
Hey Ziglets, we are back. I hope everyone had a great Thanksgiving! Hopefully everyone is out of their turkey coma and ready for some technology because today we have some ISE ISE Baby?!?! We have a new ZBISE Blog post for you, ZBISE04. This one is going to show you how to add your newly provisioned and minted ISE Cluster into Active directory. Lets do it!
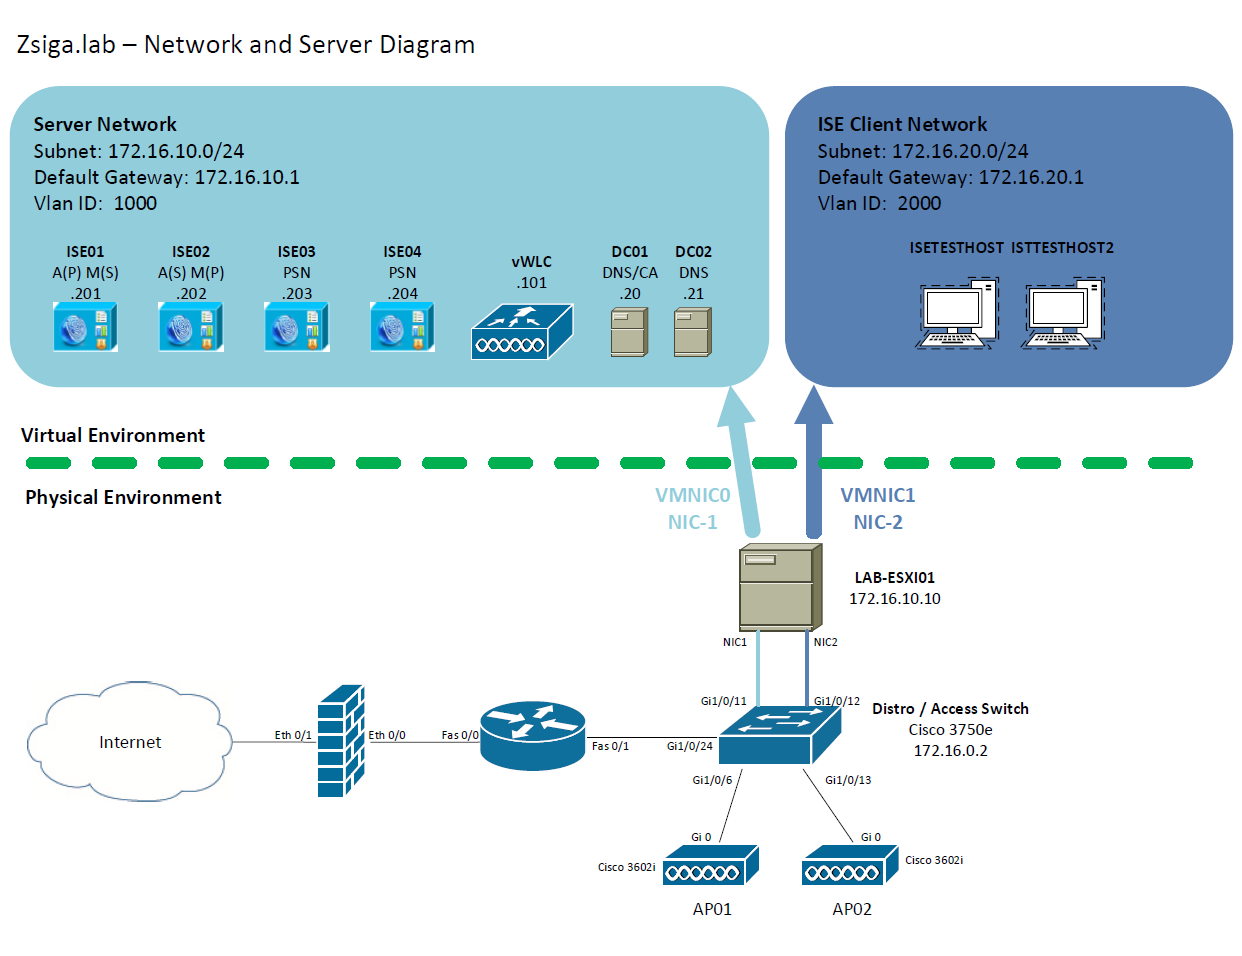
Network and Server Diagram:
Here is our reference diagram that we will be using throughout this blog series.
Related Posts:
If you haven’t seen these posts yet, you should check them out
- ZBISE01 – Basic Cisco ISE 2.3 VM Installation
- ZBISE02 – Building a Cisco ISE 2.3 Distributed Cluster
- ZBISE03 – Overview of our Cisco ISE 2.3 Use Cases for the ZBISE Blog Series
The Steps!!
1. Adding the ISE Cluster to Active Directory
Launch and Log into your Primary ISE Admin Node. If you have been following my recommendations from the beginning of this series, you should be able to browse to your “ise” alias like mine: https://ise.zsiga.lab
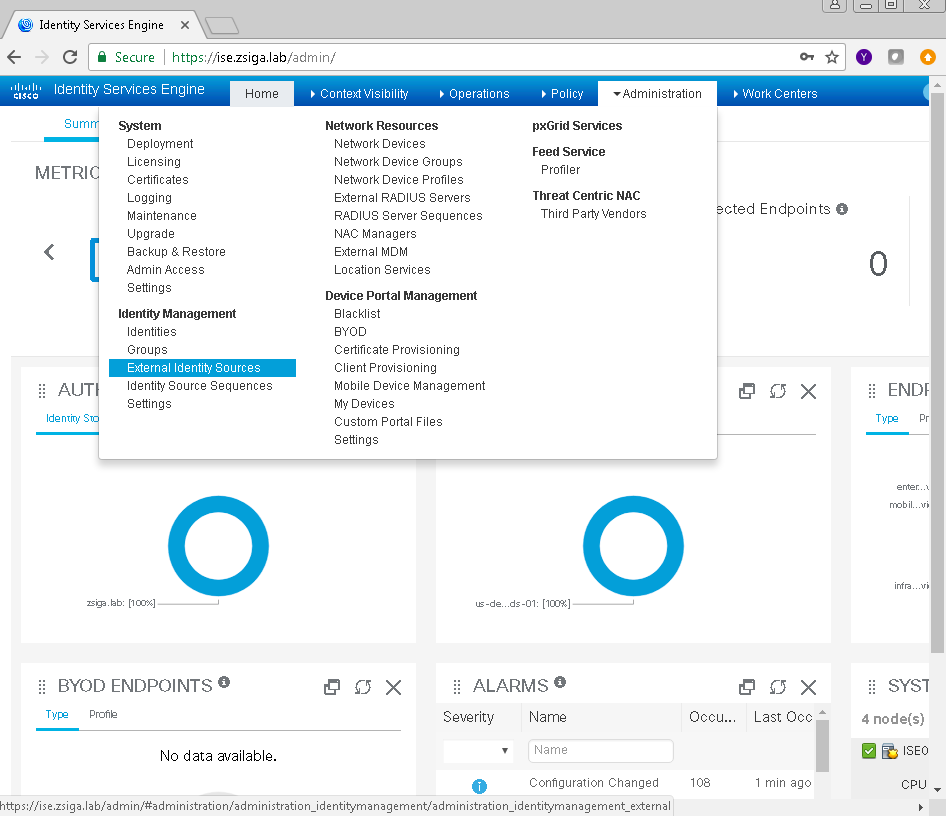
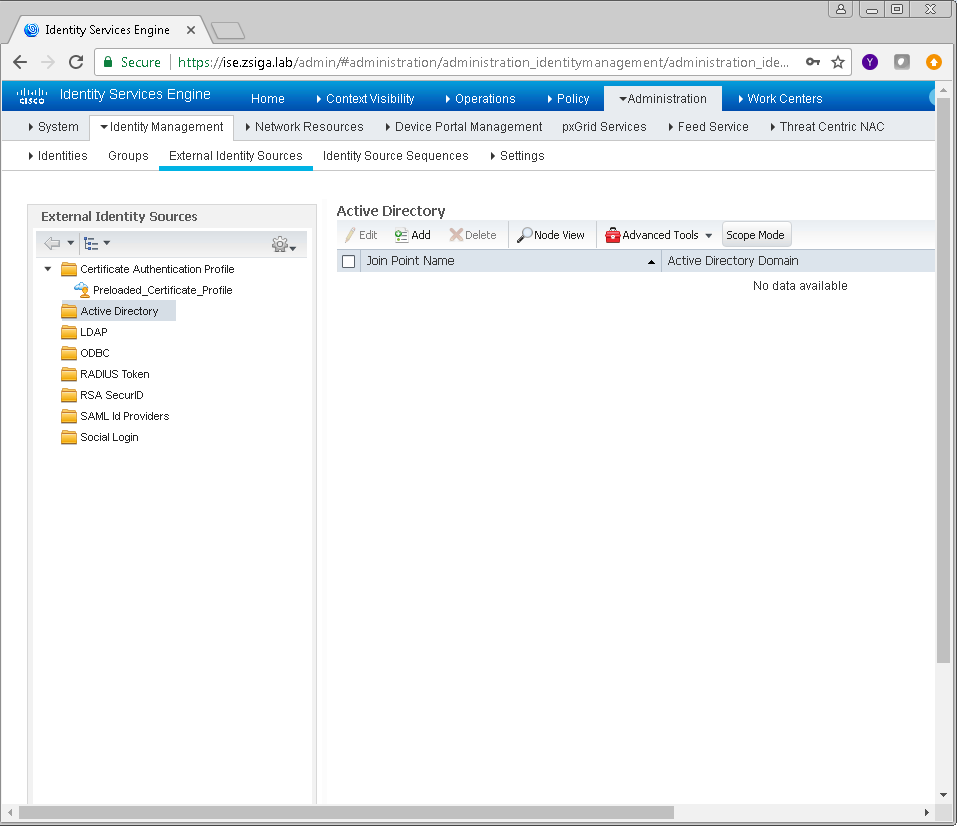
Once logged into your primary admin node, we need to navigate too Administration -> Identity Management -> External Identity Sources.
Now that we are on the External Identity Sources page, lets select the Active Directory Folder in the left pane. With the Active Directory Folder selected, if you look to the right you should see a menu item called “Scope Mode”. I personally like to enable Scope Mode because it adds some functionality when there are multiple Join Points, or multiple Active Directory environments. Lets click on Scope Mode now.
A popup menu arrives on screen, giving you a brief overview of what Active Directory Scope Mode is, once you have read through it click Scope Mode.

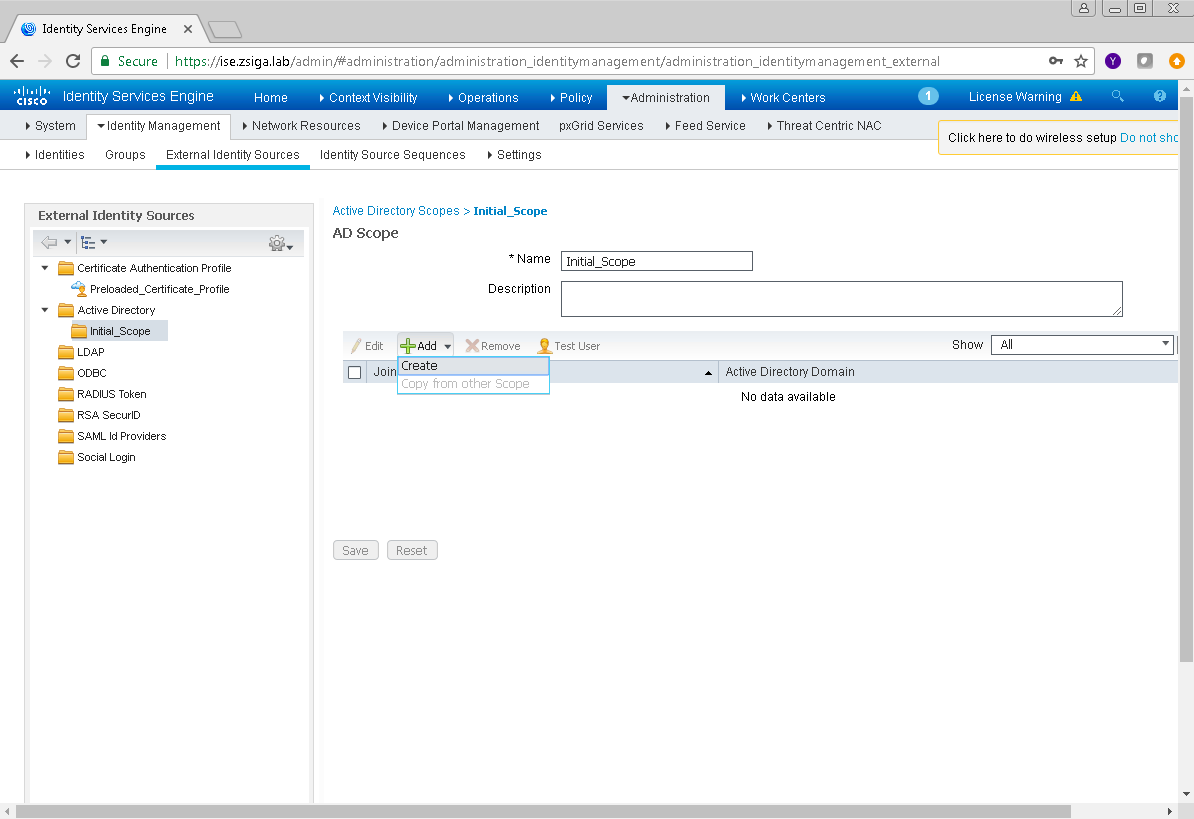
Because we enabled Scope Mode, there will be a new folder under Active Directory called Initial_Scope. You can change this name if you would like to something more meaningful. I honestly very rarely change this, and don’t have a good reason why or why not.
Once your Initial_Scope folder is selected, we want to click the Add button and then the Create option in that drop down menu.
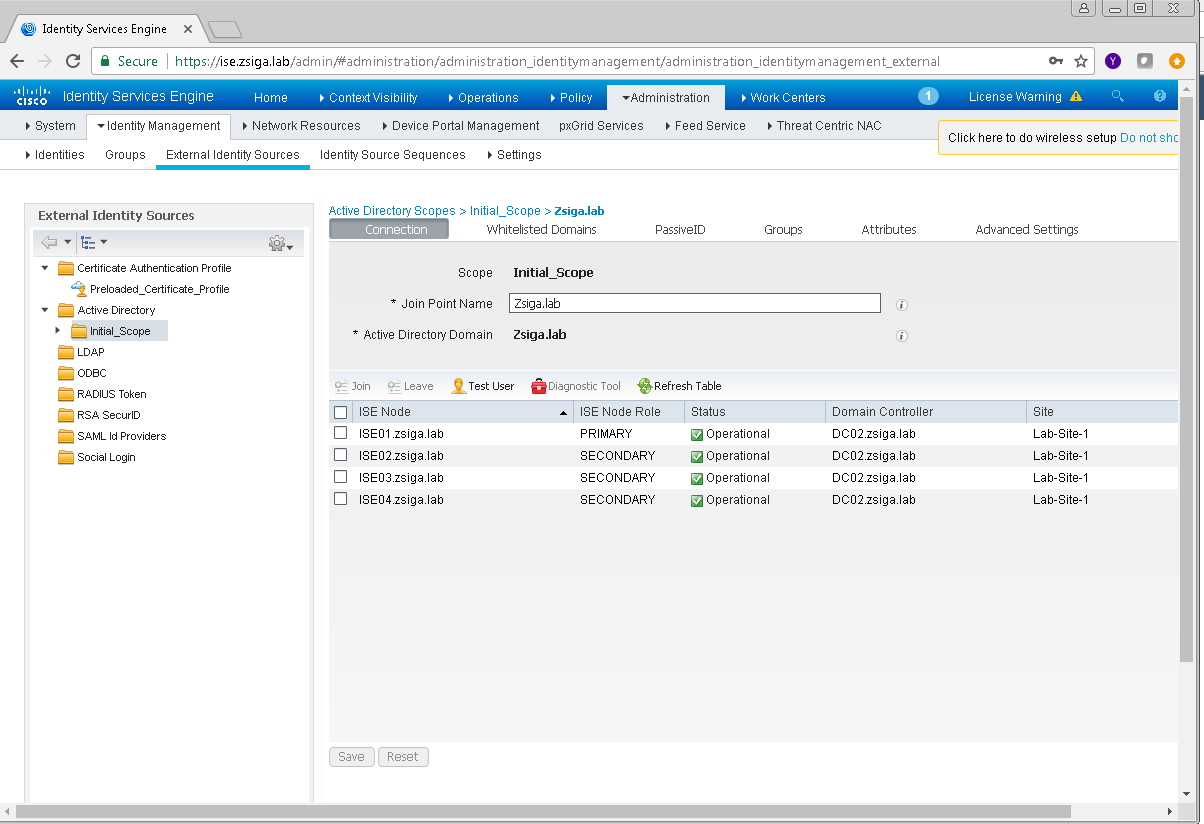
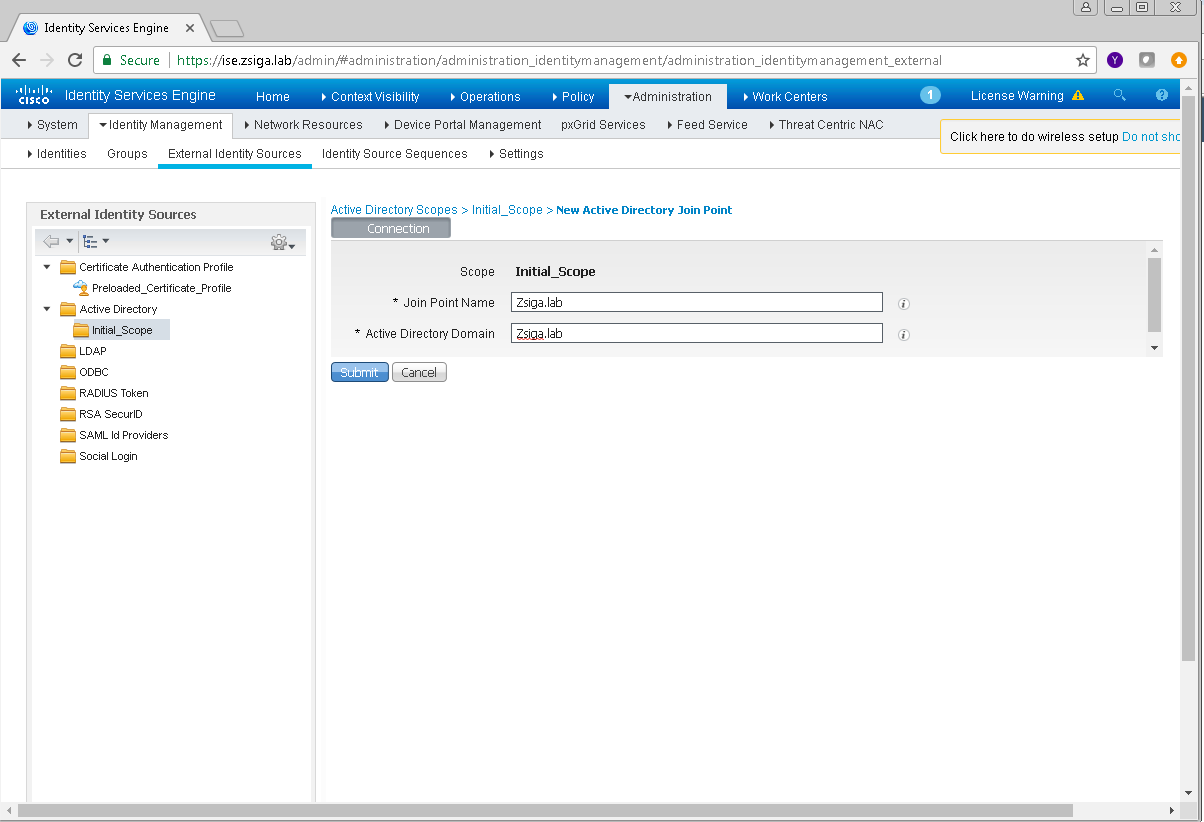
The next screen that displays is where we are going to enter our Active Directory Domain Specific information. We are also going to give our Active Directory Domain a Join Point Name which is an internal pointer within ISE that will reference this Domain.
You will see in my screenshot below that I’m very original with my Join Point Name of Zsiga.lab which is the same as my actual Active Directory Domain Name.
Once you have your information entered, click the Submit button to continue.
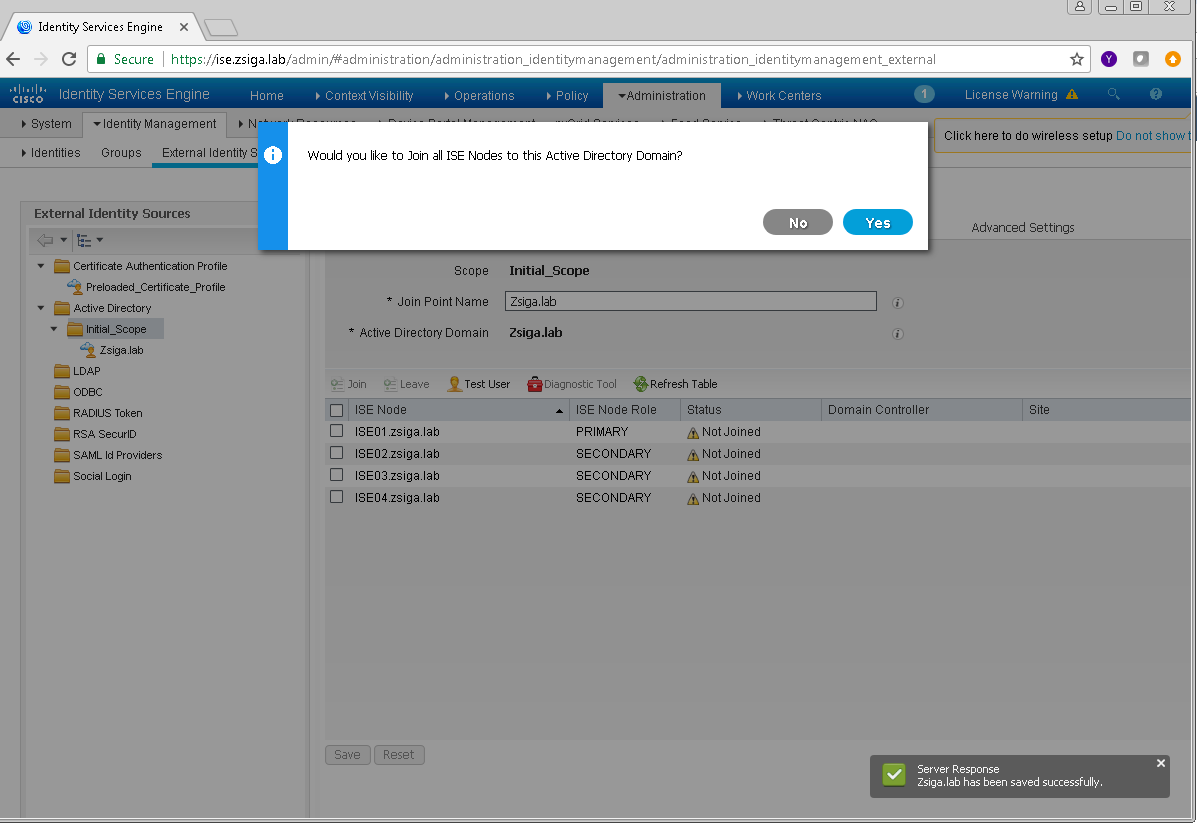
Yay!! Another popup window. For this popup window, our ISE Cluster is asking if we want to add all of our ISE Nodes into this Active Directory Domain, which for this deployment we do.
Click yes to continue.
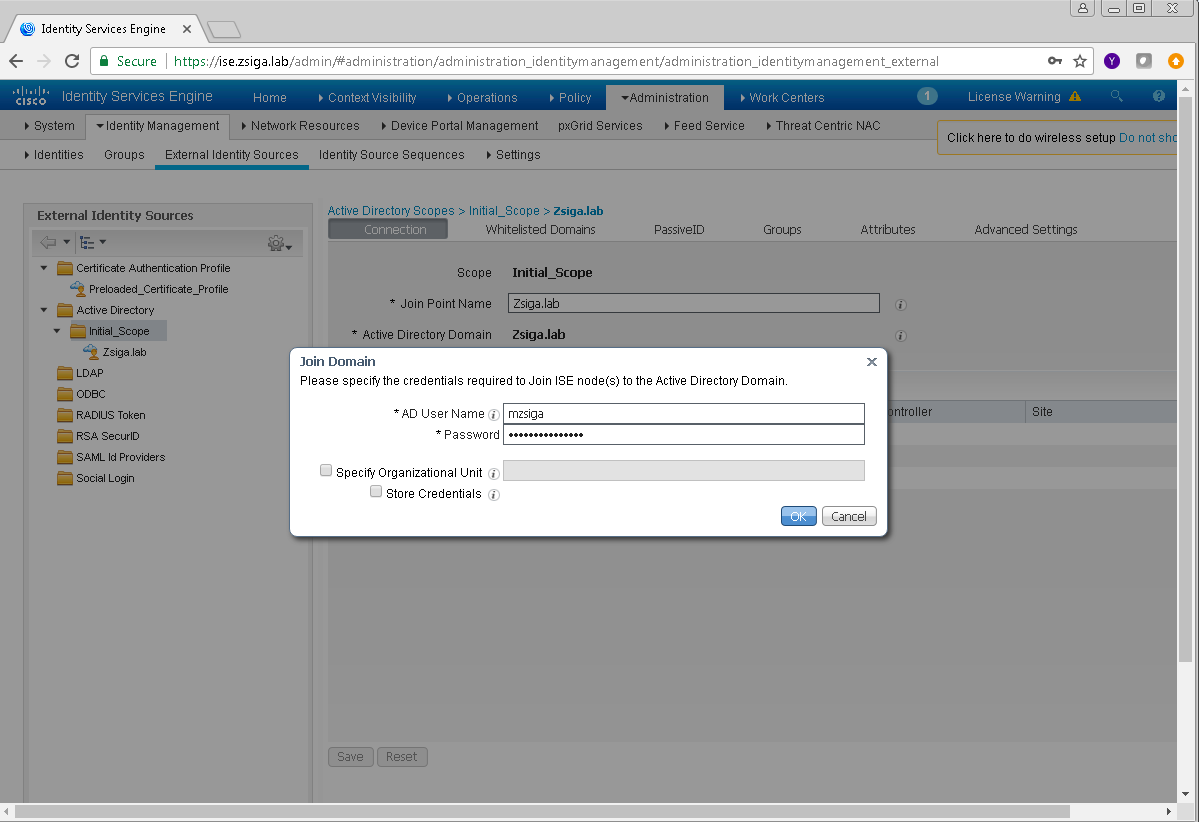
Wait a second, did we just get another popup?!?!?! Yep, this one is asking us for valid domain credentials to add the ISE Cluster Nodes into this specific Active Directory Domain.
Just to note, this is not a Service account like some of the legacy domain applications had in the past cough***EXCHANGE***COUGH.
This account just needs to be able to add the ISE Nodes as computer accounts in Active Directory. I’ve had deployments where I’ve been delegated the necessary permissions to add Computers to the Domain, I’ve been delegated the ability to manage the computer accounts that were already created, and where I’ve had full Domain Admin Access. Each option has worked, as long as the ISE Nodes are actually added to the domain, we are good to go.
With your credentials entered, click OK to proceed!
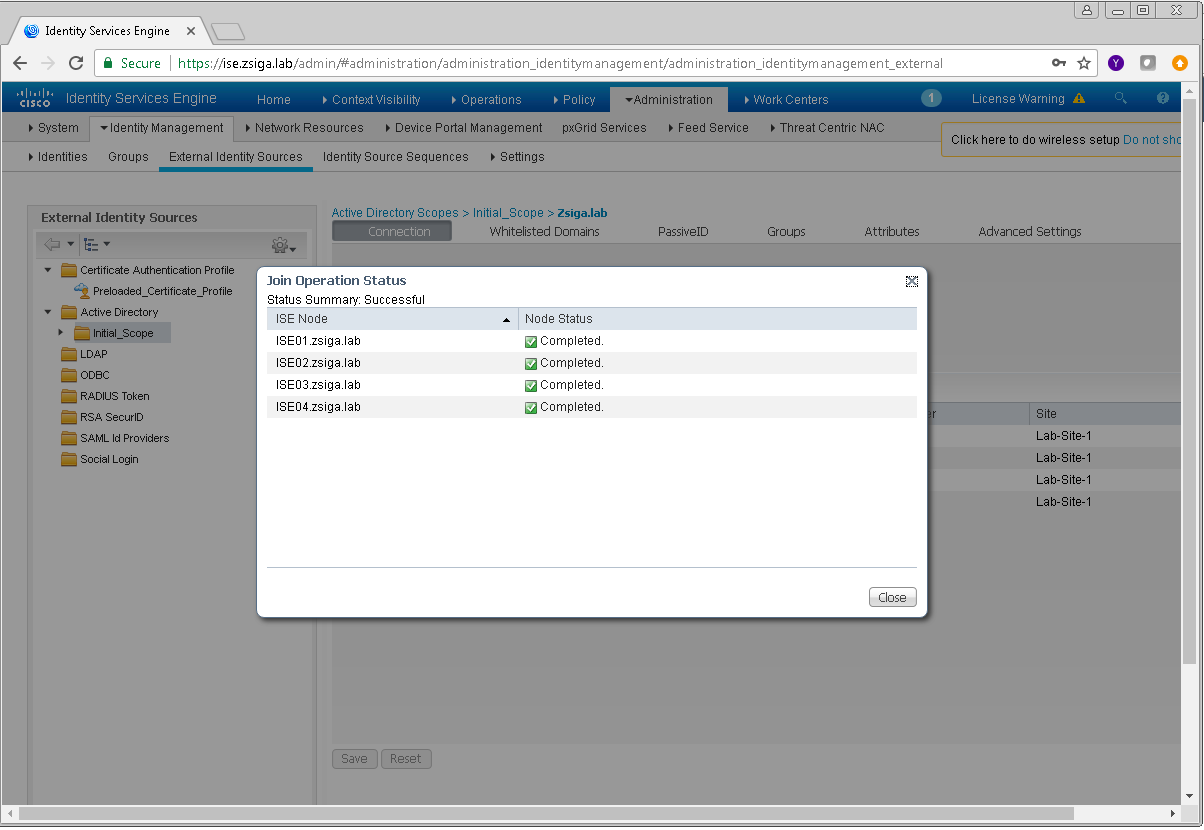
And…you guest it, we get one more popup menu! Its our last one for this process. This popup menu will show you the status of each ISE Node in the cluster and if it was successfully added to the Domain in question.
Go a head and click Close to get back to the Intial_Scope area where you are going to see a lot more information like which Domain Controller each ISE Node is connected too and which Active Directory Site the ISE Nodes are in.
And thats how we add our ISE Cluster to Active Directory.
If you have an issue with adding your ISE Cluster to Active Directory, the first item I would check is your time!! This is 99% of the time the issue. Your Domain Controller’s time and the ISE Cluster’s time is more than 5 minutes apart. When this happens you will receive a failed message instead of a Completed (Successful) Message. Time is a very critical component in an ISE deployment so its always best to use a proper NTP Server.
2. Pulling in Active Directory Groups into ISE
Now there isn’t really much we can do with just our ISE nodes added to Active Directory, so we should pull in a number of Domain Specific Groups to be used in our Policy Sets in the future!
Lets make sure we are in the same location still. You should be under Administration -> Identity Management -> External Identity Sources -> Active Directory -> Initial_Scope
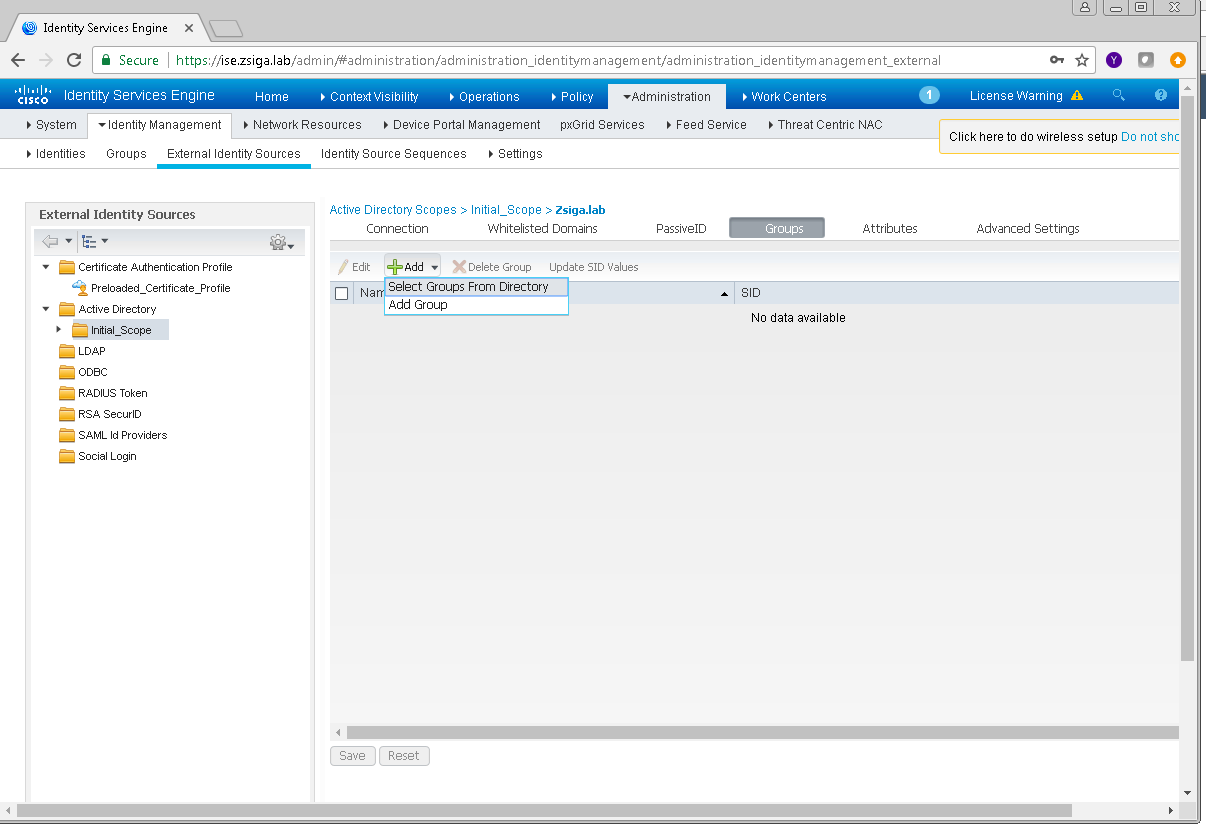
You should be seeing a similar screen like the one below. In this window on the right side of the screen, we want to click the Groups Menu.
Once on the Groups menu, we want to select Add -> Select Groups From Directory
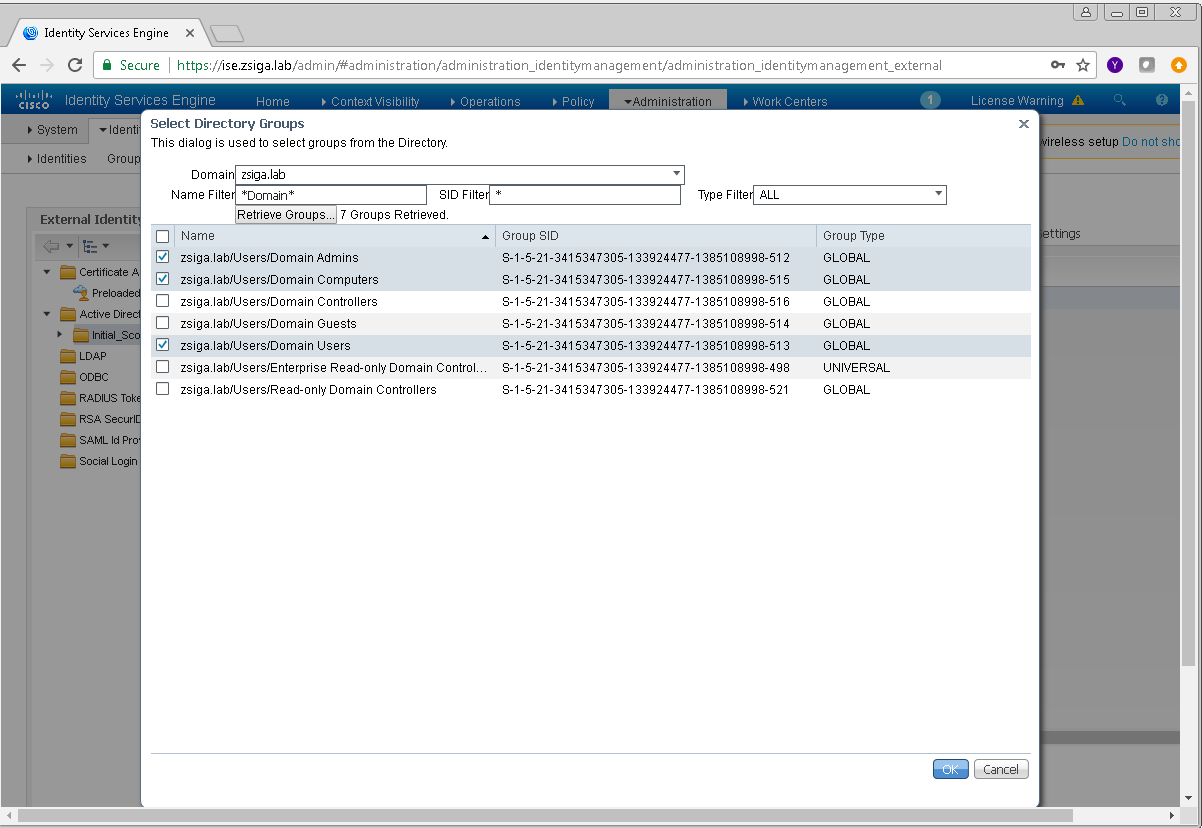
On this next window, there is a handy filter at the top that we can use to query the domain with. In my example, I put *Domain* in my Name Filter filed because I wanted to add a few groups that have “Domain” in the name.
Once your query comes back, you will get a list of groups but none of them will be selected by default. For this deployment, we are going to select Domain Admins, Domain Computers, and Domain Users. Once you are ok with the selected groups, click OK.
Now you can save these groups or complete another query for more specific groups. I’m going to do the latter option because there are more groups that I plan to utilize in this deployment.
In this query, I filtered by *IS* because I was looking for my ISE specific groups that I had created. We are going to add ISE Admins, ISE Helpdesk, IS_Administrators, and IS_Guest Sponsor. Once again, when satisfied click OK.
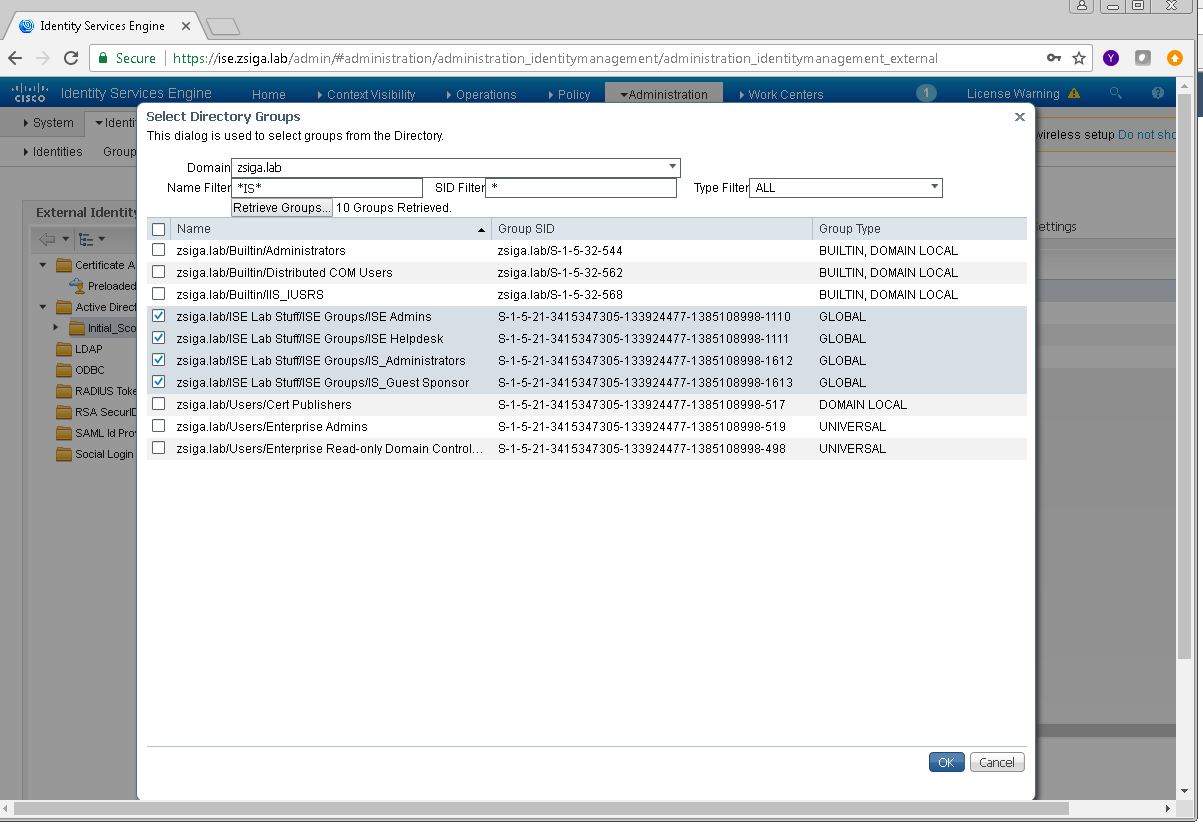
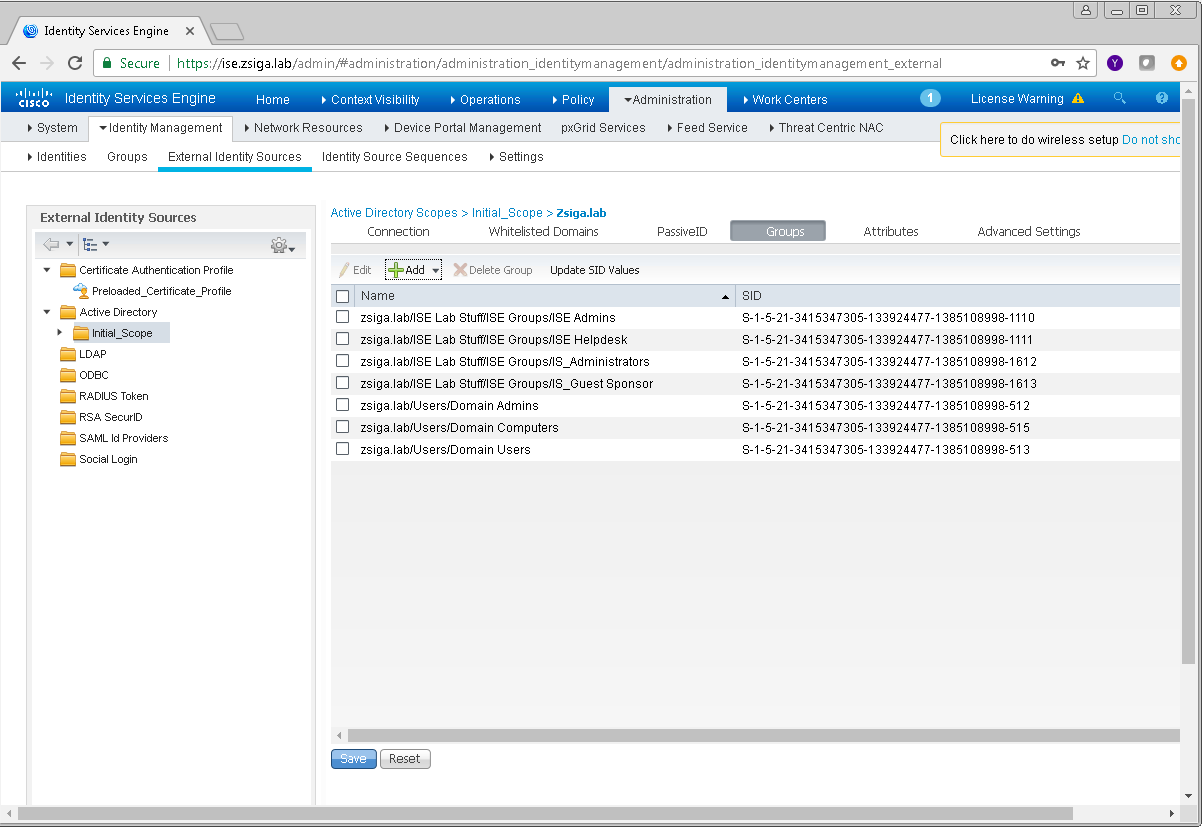
The following screen is going to show a summary of what groups are going to be added, they are not added yet! These groups are not added into ISE until you Click save here. Go a head and click Save!
Previous versions of ISE didn’t have a validation step here so if you browsed away from this page without saving, you lost all of the groups.
Thats It! We now have our ISE Cluster added into Active Directory and we have pulled in a number of Active Directory Groups to use in our ISE Deployment. We will be using these all soon enough! Until Next time, keep it Nerdy!! Yep I am corny and I’m a Nerd!
Related Resources:
Ask questions and give feedback
- You can leave a comment on the blog!
- You can leave a voicemail at (617) 913-4103
- You can email us at Feedback@zigbits.tech
Engage with Zigbits further:
- Subscribe to the podcast on an iPhone or on an Android
- Follow Zigbits on Twitter!
- Follow Zigbits on LinkedIn!
Engage with me further:
Transparency:
This post may contain affiliate links to products or services were I may receive a level of compensation from your actions by following those links. This is seamless to you and does not add any additional cost to the products or services in question. In addition, I do not let any affiliate relationship cloud my judgement or my recommendation of a product or service. My recommendations will always be above reproach. This is my commitment to you Ziglets!