

Hey Friends, Nerds, and Geeks! In Today’s Cisco ISE 2.3 Blog Series installment we are going to implement three of our Use Cases. Yes, I know it has been a long time in coming!! The Use Cases we are going to be implementing today are our Wired PEAP specific Use Cases of Domain PC, Domain User, and Domain Privilege User. Strap in and buckle up as this is going to be a long and informative installment with over 80 screenshots!
No Screenshots were harmed in the making of today’s Post! 🙂
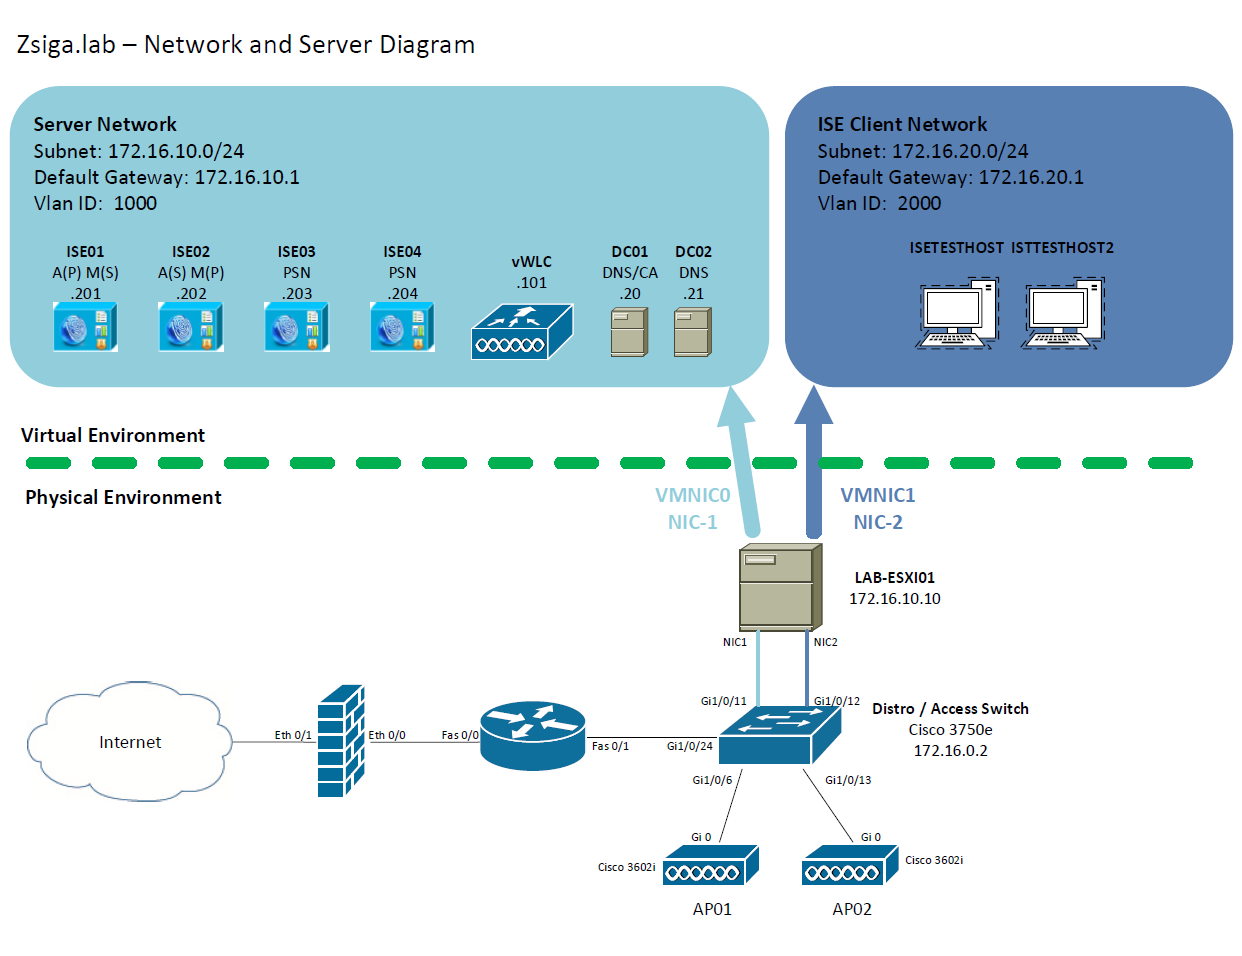
Network and Server Diagram:
Here is our reference diagram that we will be using throughout this blog series.
Related Posts:
If you haven’t seen these posts yet, you should check them out
- ZBISE01 – Basic Cisco ISE 2.3 VM Installation
- ZBISE02 – Building a Cisco ISE 2.3 Distributed Cluster
- ZBISE03 – Overview of our Cisco ISE 2.3 Use Cases for the ZBISE Blog Series
- ZBISE04 – Cisco ISE 2.3 Adding the ISE Cluster to Active Directory
- ZBISE05 – Virtual Wireless LAN Controller (vWLC) Install
- ZBISE06 – Cisco ISE 2.3 Adding Network Access Devices (NADs) – Cisco Switch
- ZBISE07 – Cisco ISE 2.3 Adding Network Access Devices (NADs) – Cisco vWLC
- ZBISE08 – Cisco ISE 2.3 Wired Authorization Profiles
Wired Use Cases
Here is our Wired Use Cases table for reference as we go through today’s installment of creating our PEAP specific Use Cases of Domain PC, Domain User, and Domain Privileged User.

The Steps!!
In Today’s post there are a number of different steps that we will be completing. Here is a quick high level summary of what we are going to do:
2. Create a Policy Set Called WIRED
3. Create An Authentication Policy for our WIRED Policy Set
4. Create An Authorization Policy for our WIRED Policy Set
5. Enable DOT1X with PEAP Auth on our Test VM
6. Enable our Wired Switchport for ISE Auth
7. Validation and Testing of our Use Cases Configured
1. Create a Custom Allowed Protocols Services Object
To get started, launch your supported browser of choice, browse to your ISE Cluster primary admin node. If you have been following along from the start, you should be able to go to https://ISE.FQDN. For example in our deployment, I went to https://ISE.ZSIGA.LAB
Once at the login screen, use the appropriate credentials to login.
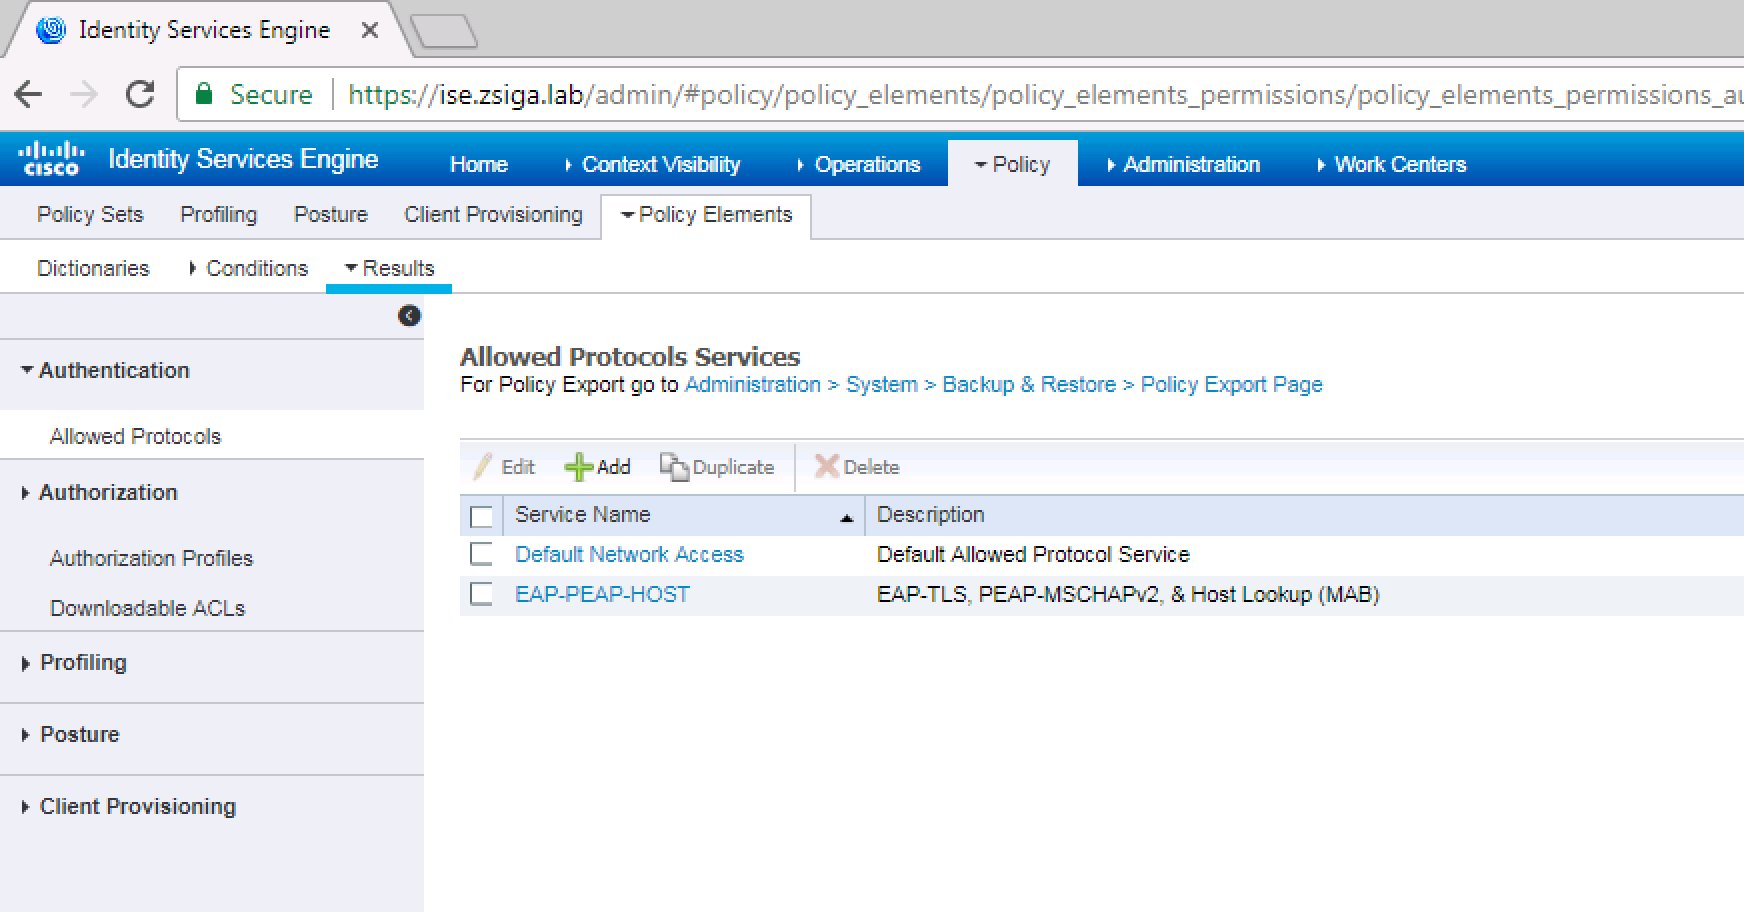
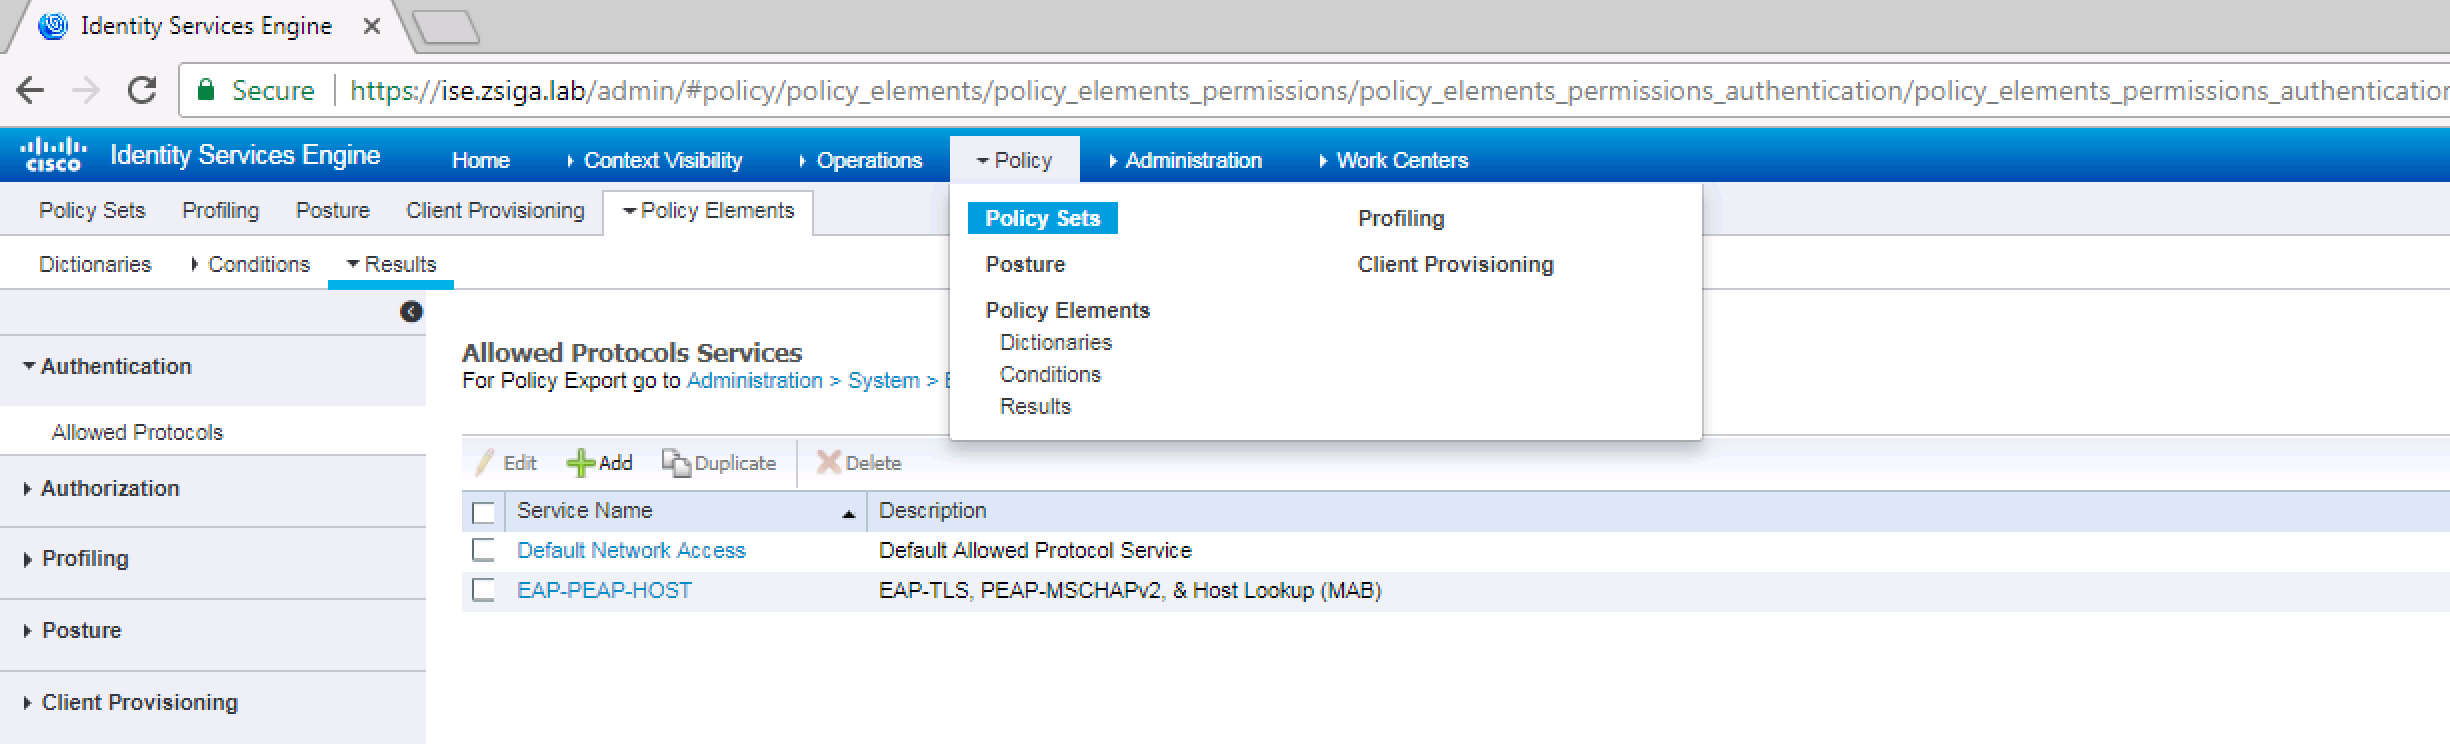
We are going to navigate too Policy -> Policy Elements -> Results.
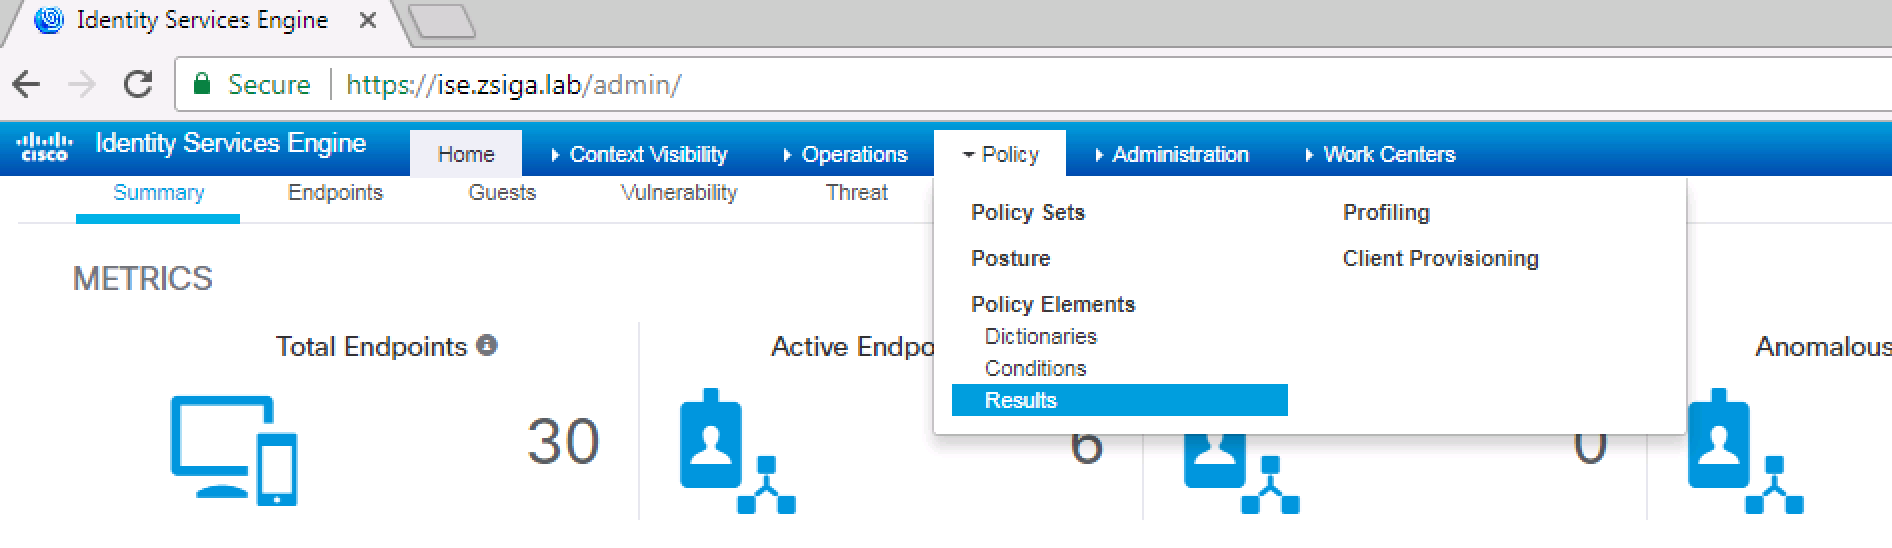
Once this screen loads, you should already be at the Allowed Protocols Services screen, if not on the left side of the screen select the Allowed Protocols Sub Menu option under the Authentication Menu.
On the Allowed Protocols Services screen, click the Add button as shown in the below screenshot!

For most of the Use Cases we will be implementing in our Lab Deployment, we are only going to use a few of the Authentication Protocols. We are going to use PEAP-MSCHAPv2, EAP-TLS, and MAC Authentication Bypass (MAB). For our Allowed Protocols you will see that these are reflected accordingly, with one difference, Allowed Host Lookup. This is actually MAB. Below are a few screenshots showing how our Allowed Protocols object is configured, including an intuitive description!! 🙂
Once you are satisfied with your configuration, click the Submit button to create this object.
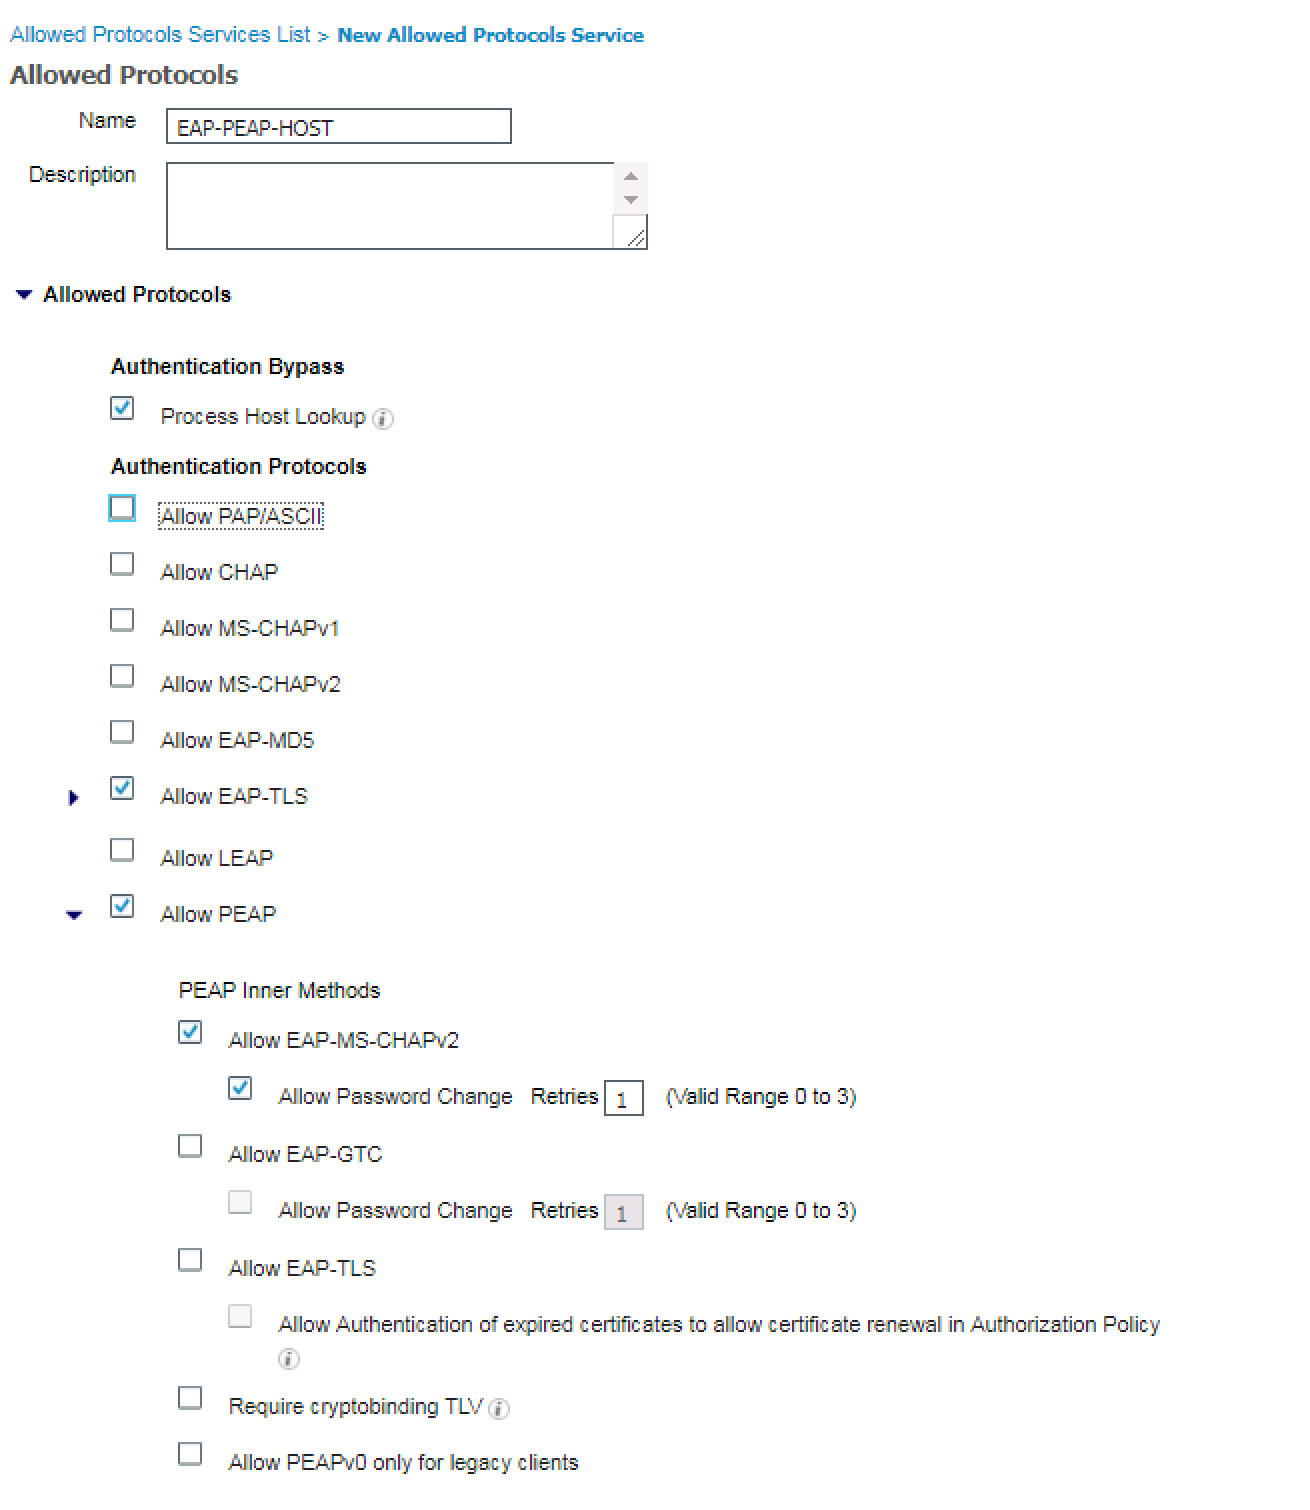
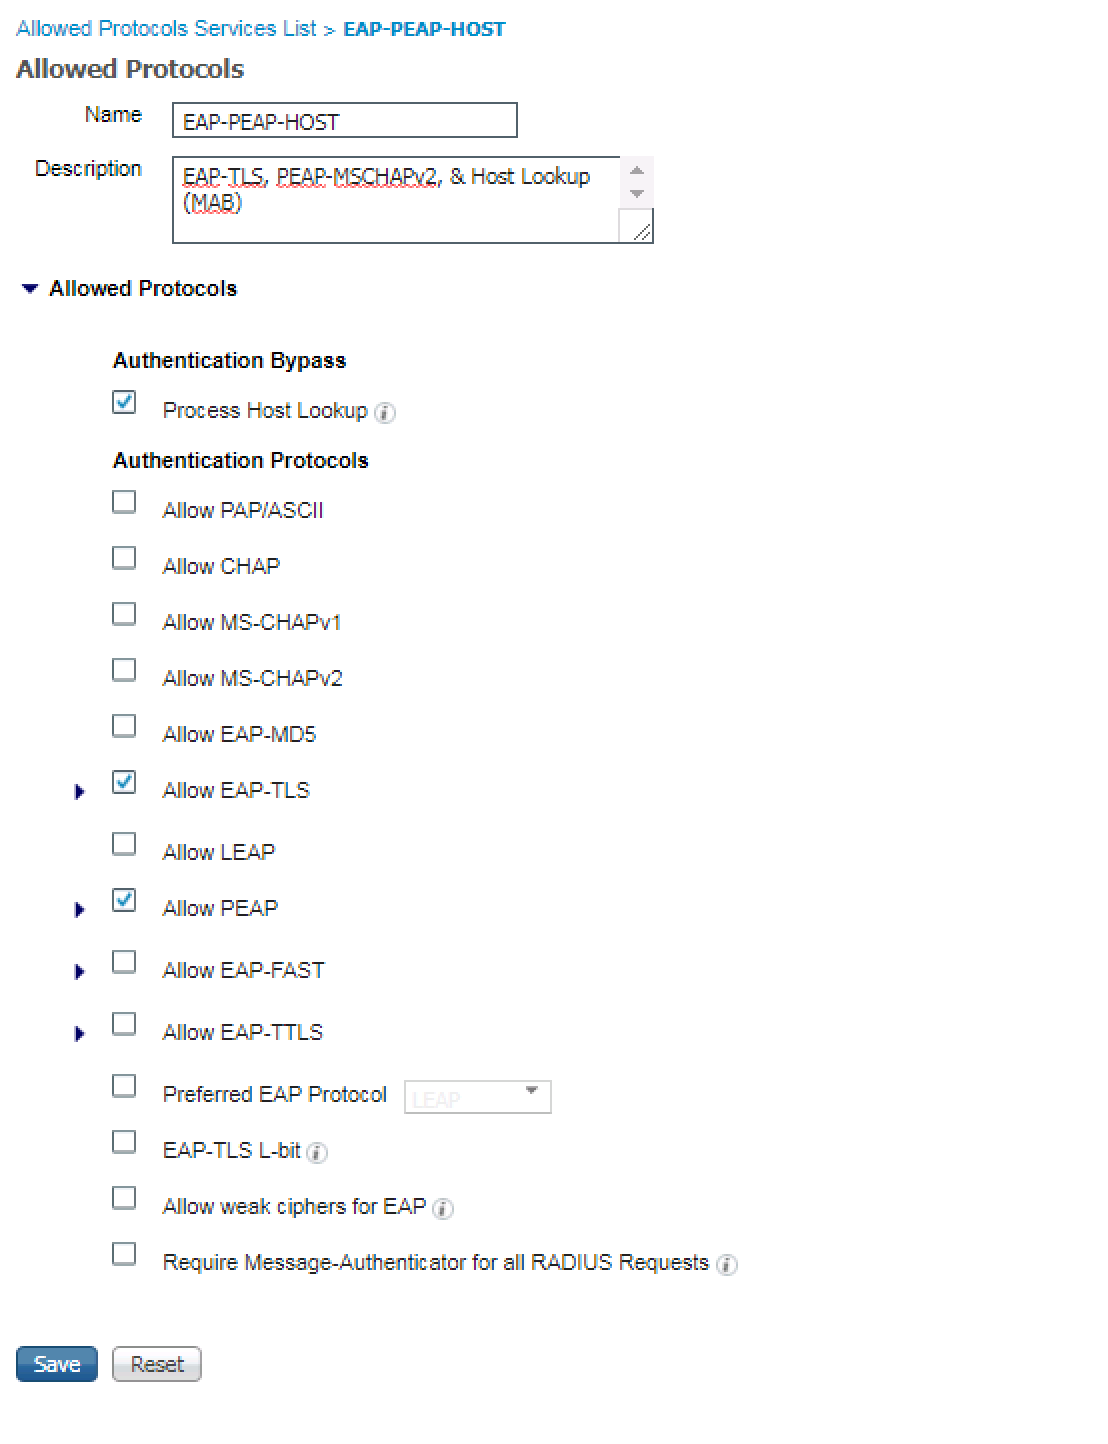
You will now be brought back to the previous screen that shows all Allowed Protocols Services Objects. You should see your new one you just created. For our Lab I named ours EAP-PEAP-HOST.
That’s it for this step, now onto our Policy Set!! 🙂
2. Create A Policy Set Called WIRED
Our second task for today’s installment is to create our WIRED Policy Set that we will be using a lot. To do this, navigate to Policy -> Policy Sets.
When you arrive to the Policy Sets screen, you will see the Default Policy set. I traditionally do not like to modify the defaults so if I need to reference them or use them in the future I can. Think of Policy Sets as a way to organize your different Authentication and Authorization Policies. For example, our deployment is going to have two Policy Sets: A WIRED Policy Set and a WLAN Policy Set. This should be pretty initiative, all Wired related Access will be in our WIRED Policy Set and all Wireless related Access will be in our WLAN Policy Set. If we were to add another connection type, such as VPN, we could create another Policy Set called VPN. The Policy Set List is very similar to an Access Control List (ACL) in that the top level row is going to be checked first, then reach row after that until there is a match, if no match then it will use the Default Policy Set.
To create a new Policy Set, click the + icon on the left of the screen near where it says Policy Sets. This window is a “live” window, and when you click the + icon it will add a new row to the top of the policy lists where you can fill in the information you want for your policy set. You will see in the screenshot below that we gave our new Policy Set the name of WIRED and we selected our EAP-PEAP-HOST Allowed Protocols Object we created in Step 1 above.
![]()
There is one item we haven’t addressed yet for our new Policy Set and that is the Conditions. In the Row of our WIRED policy set and under the Conditions Column you will see another + sign but this one is bigger. Go a head and click on it to set some conditions around what we want to use this WIRED Policy Set for.
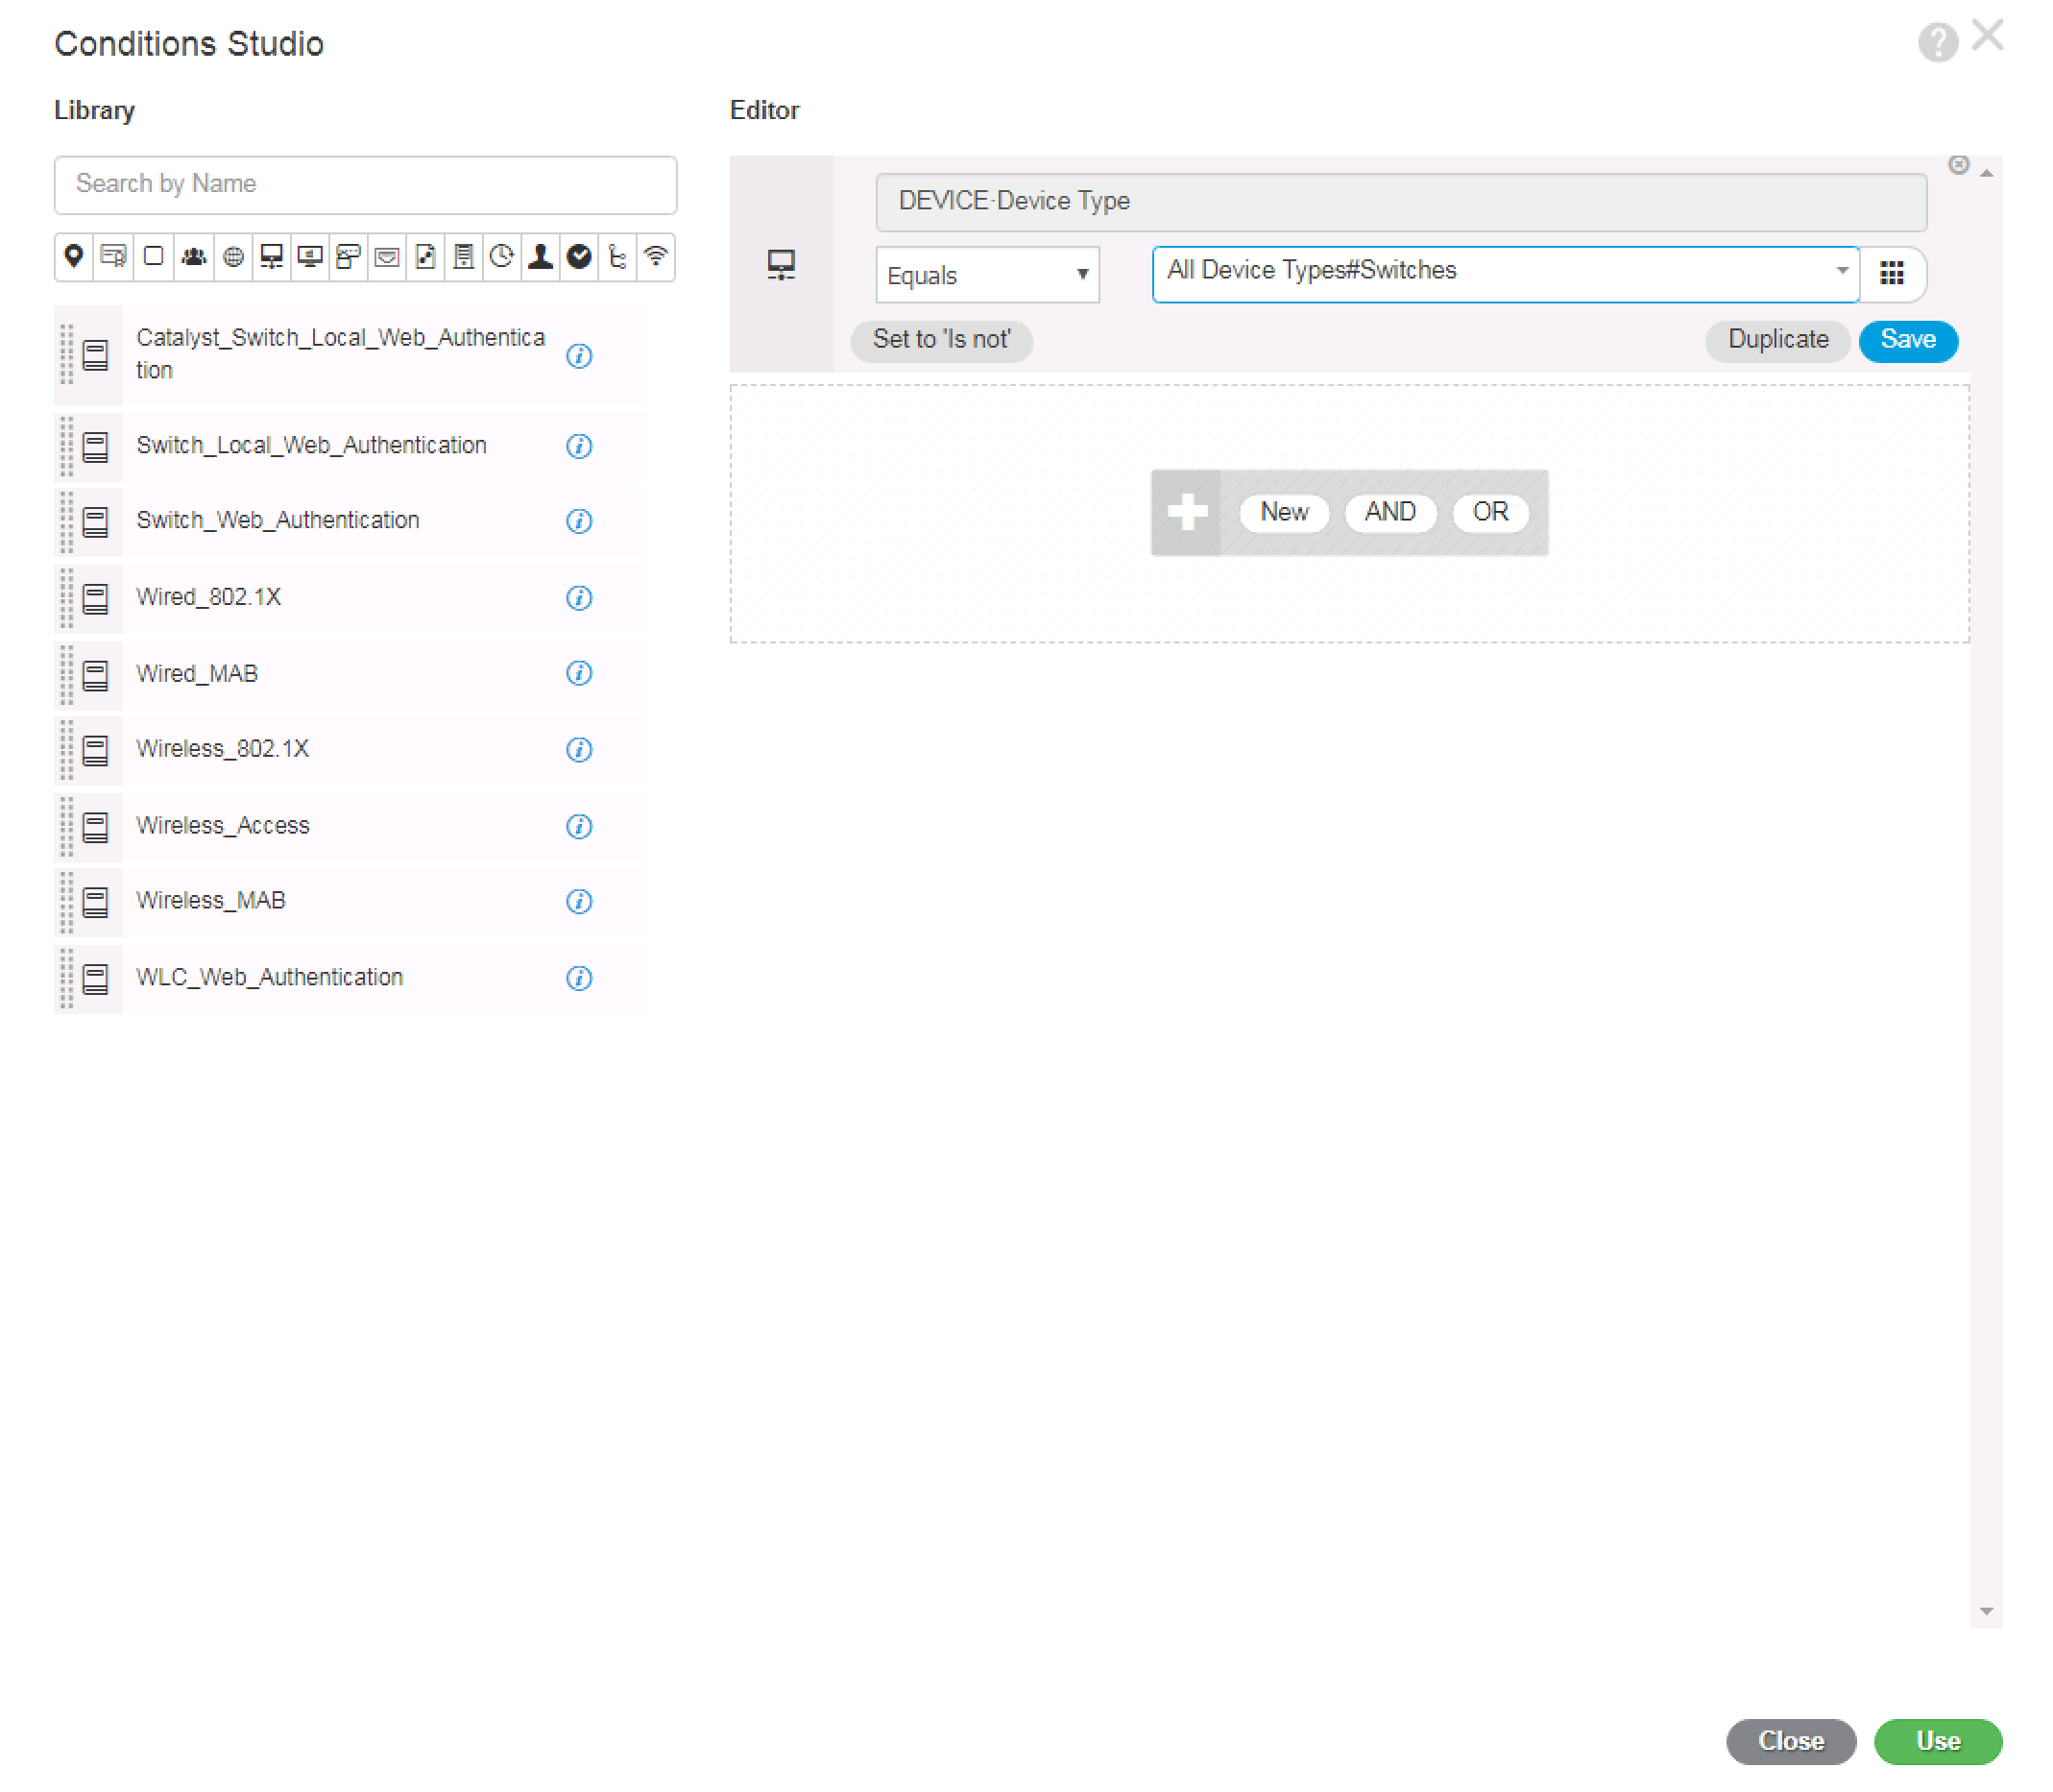
When you click that second + sign, a new window will appear that didn’t exist in previous versions of ISE. This window is called the Conditions Studio, and there is a lot you can do in here. If its your first time accessing the Conditions Studio, you might get the “tutorial” overlay on screen which is pretty helpful for you to get a quick understanding of what to do here.
For this specific item, we are going to click on the right pane, where it says “Click to add an attribute”. When you click on it, a dropdown and filter menu appears. Here you can filter different type of attributes and you can put in information in the Attribute Field to find a specific one you know by name. I did the latter in this example because I was looking for the Device Type Attribute under the category of Device.
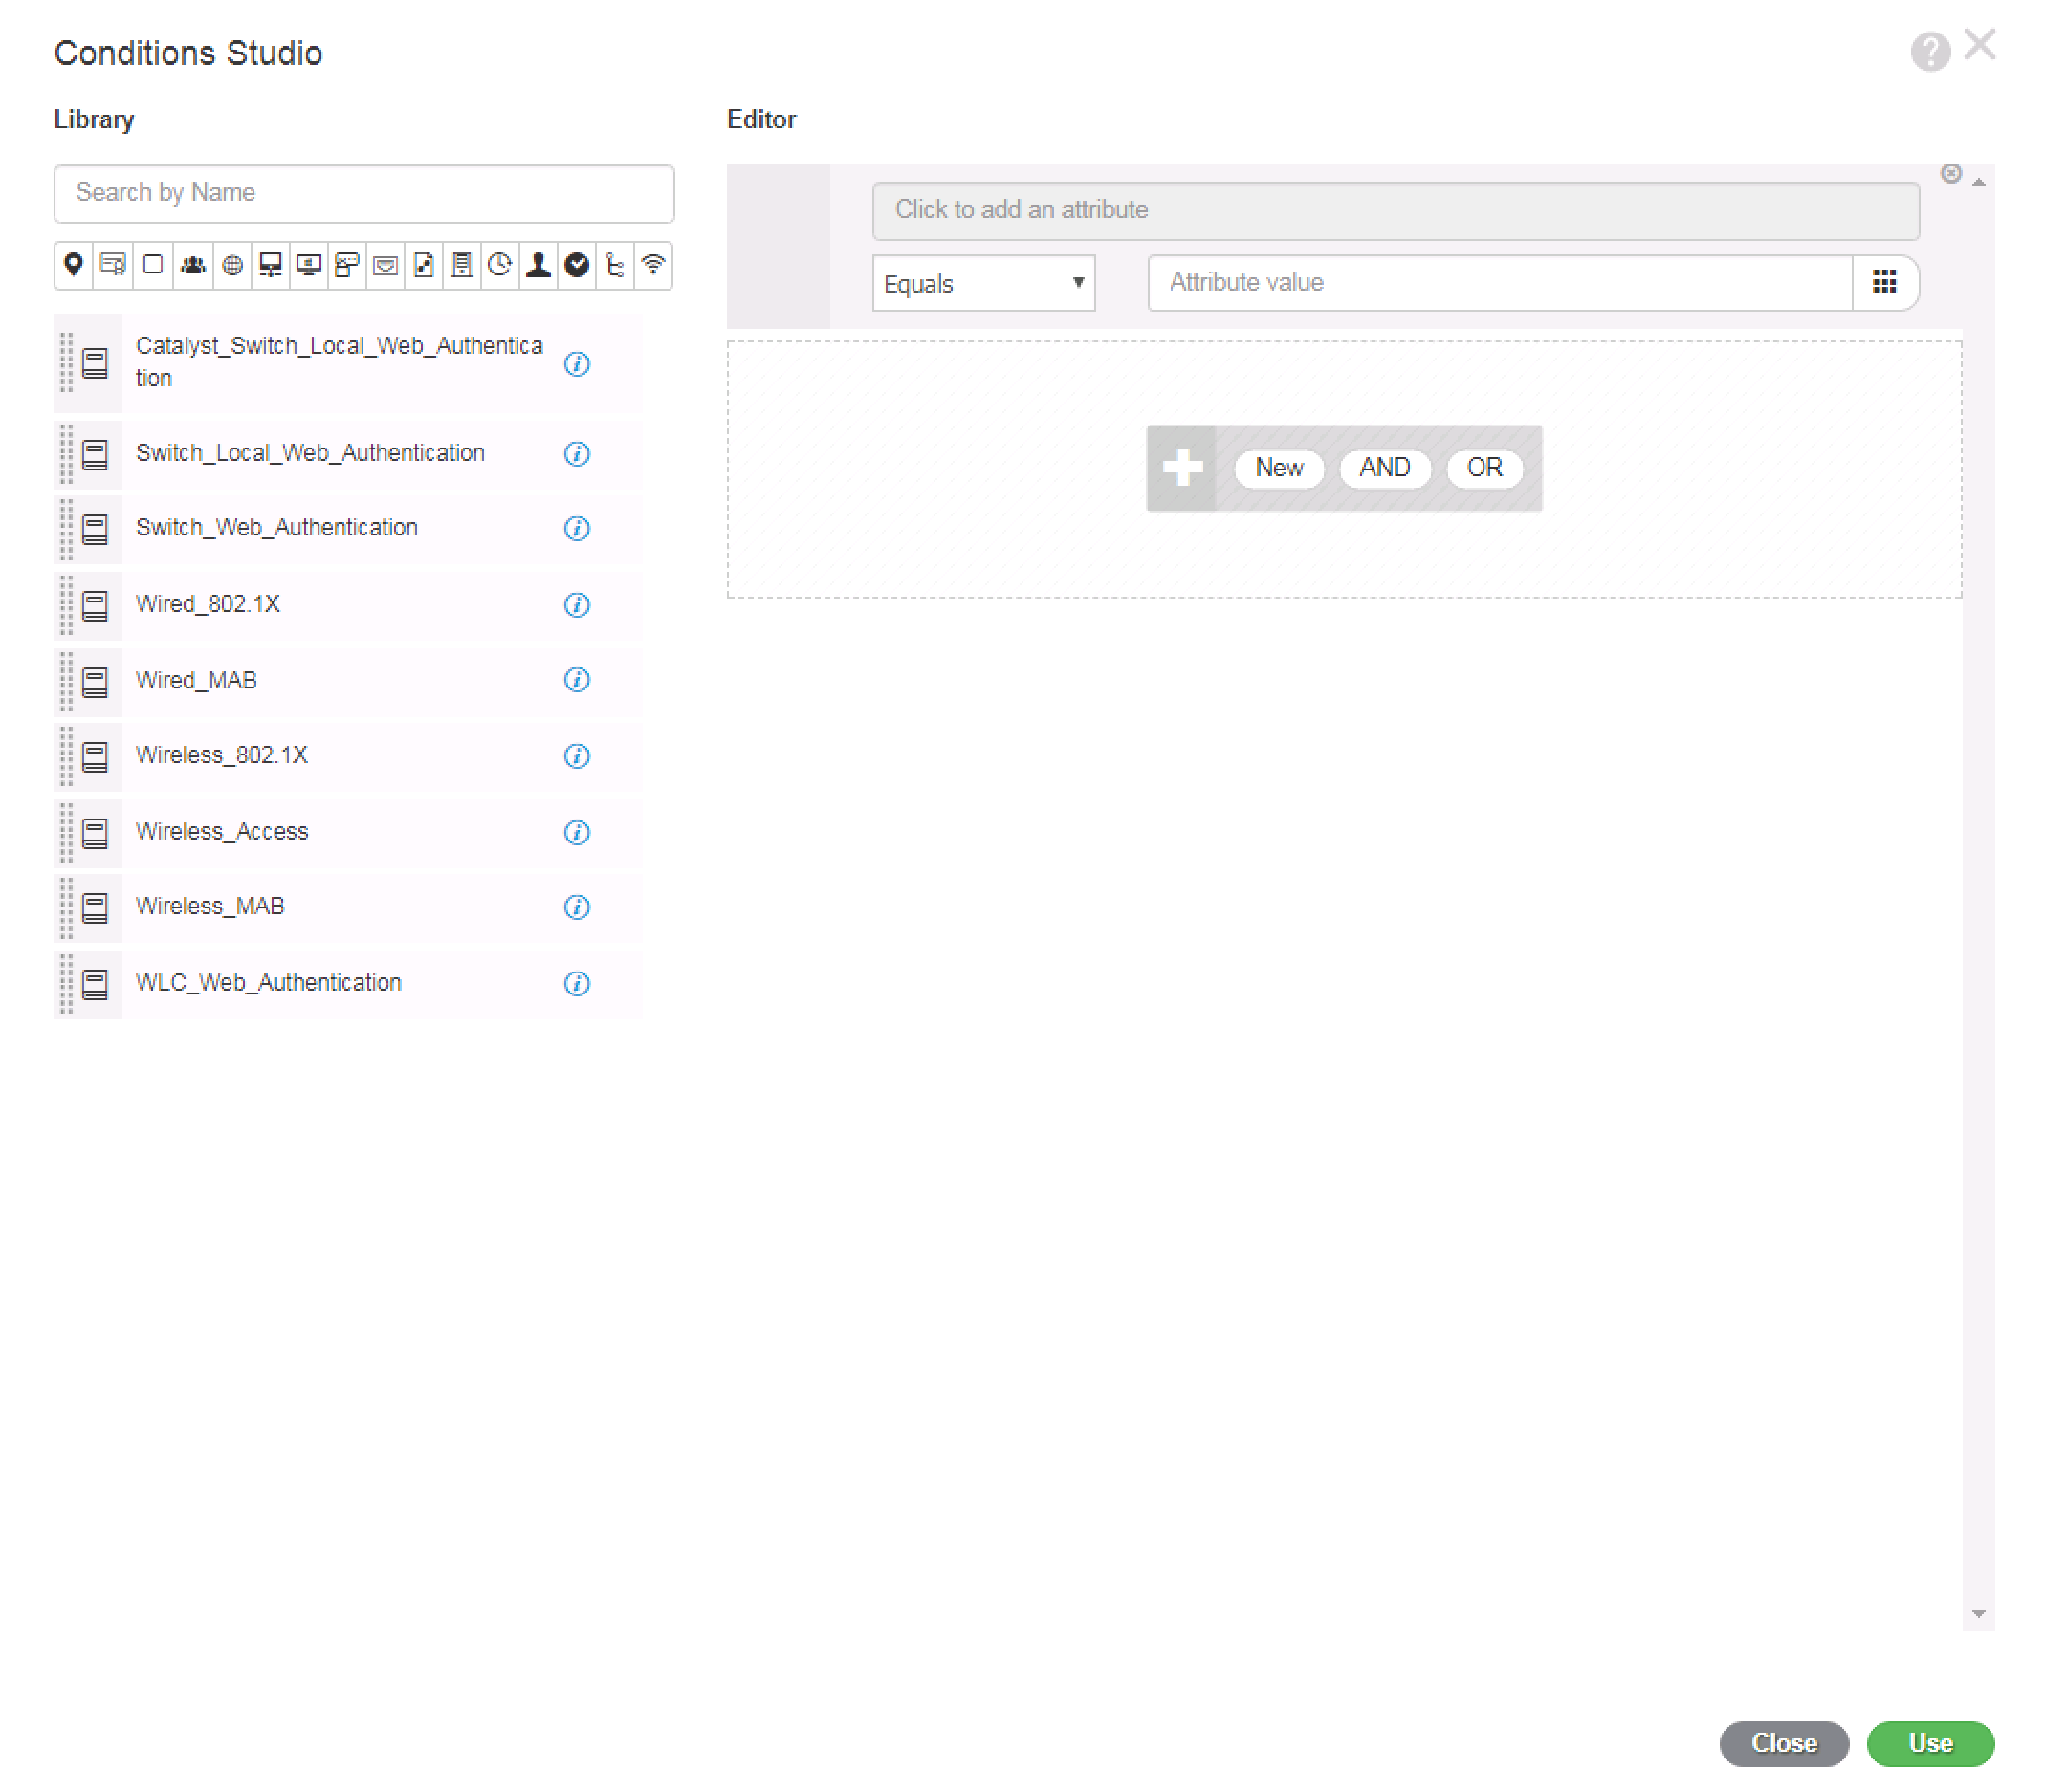
Once you have Device, Device Type selected as the Attribute it will be displayed in the top field. The next two fields are for our matching criteria. The first field is a dropdown menu that lists the different matching operators like Equal, Contains, Not Equal, Matches, In, Starts With, etc… The second field is what we are matching too. In this case we are going to match the Device Type of Switches because we only want to catch our Wired Use cases in this Policy Set.
Note: You really can do pretty much anything you want from a conditions and logic perspective. I just personally like to differentiate between the way users connect to the network. You could put all of your Use Cases in the same Policy Set if you wanted, which was how ISE Defaulted too in previous versions.
At this point, you should have something along the lines of the screenshot below. If what you have is good to go, then click the Green Use button on the bottom right of the window to insert this condition into your Policy Set.
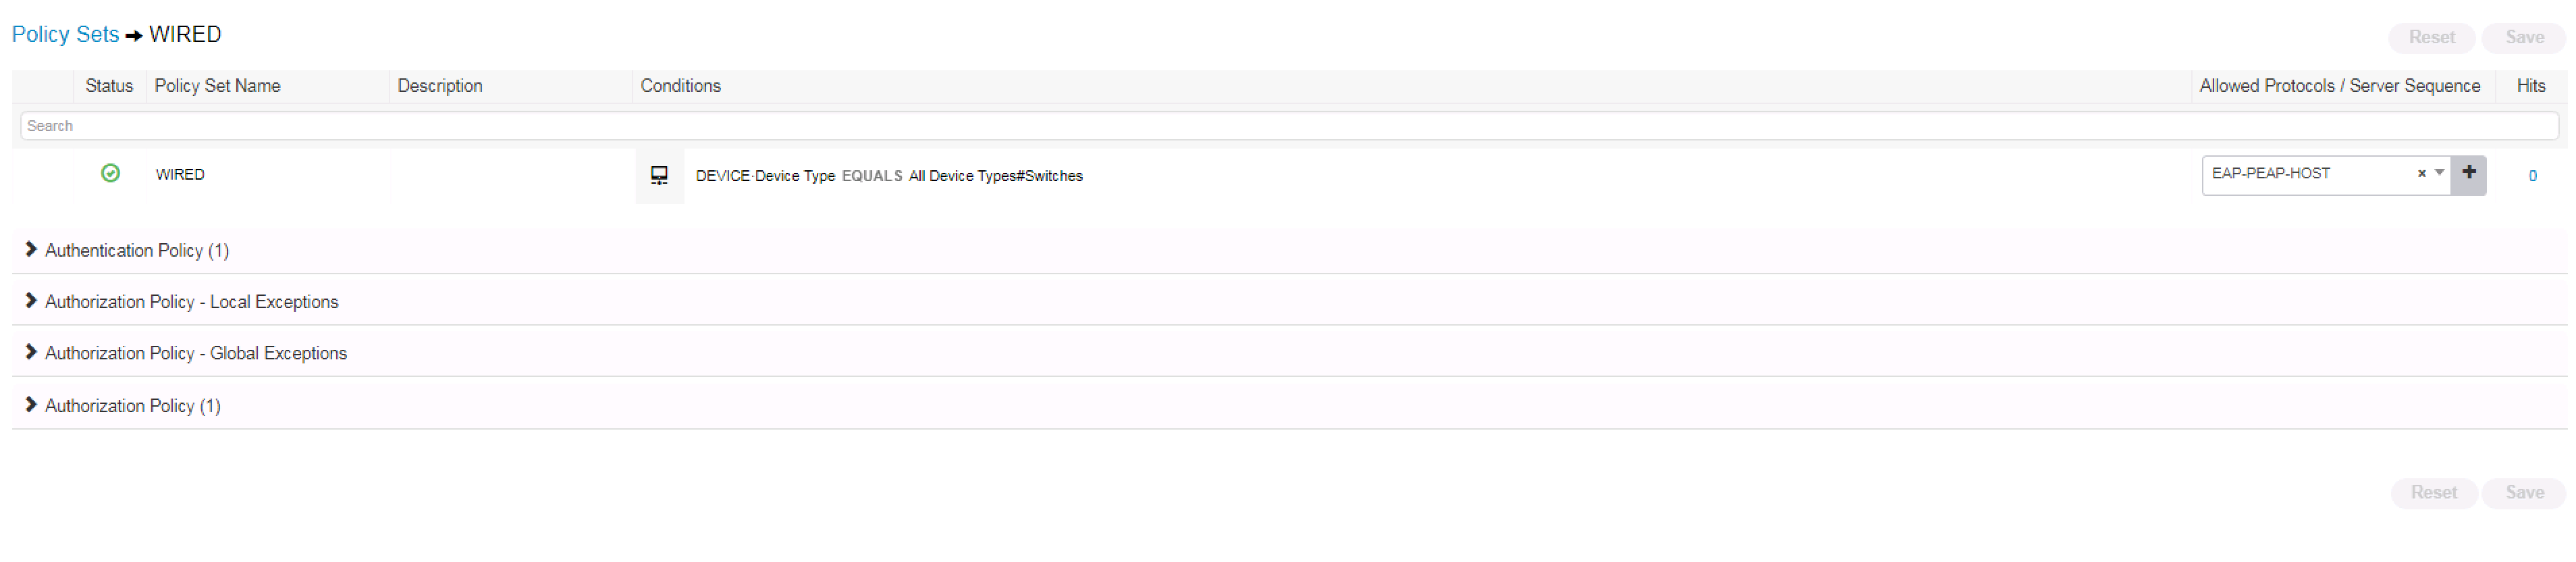
After adding the condition to your Policy Set, you will see the below output. Nothing is saved at this point so lets go a head and click the save button to make sure our changes are kept.
![]()
Thats it for creating a Policy Set. In Summary, we just created our WIRED Policy Set, we added the Device Type must Equal Switches as a condition to this policy set, and we selected our EAP-PEAP-HOST Allowed Protocols Object for what we want to allow for Authentication for our Policy Set!
Good on you!! We are making Progress!
3. Create An Authentication Policy for our WIRED Policy Set
With our WIRED Policy Set created, our first task should be to configure the Authentication Policy. To View the specific Authentication and Authorization Policies for our WIRED Policy Set on the right side of our Policy Set, you will see a View Column that has a > in it. Click on this > to view the details of a Policy Set.
The screenshot below shows where the > is in relation to the Allowed Protocols Column.
After selecting the View button for your WIRED Policy Set, you will see something very similar if not the same to the below screenshot. We are first going to focus on the Authentication Policy at the top, so go a head and expand it by click its name, Authentication Policy.
When you expand the Authentication Policy, you will see a Default entry that has no conditions and is currently configured for the predefined All_User_ID_Stores Identity Source Sequence. We are going to leave the Default entry alone and add a new entry above it. To do this there is a + button right above the Default entry, click it and now you will be given a new row that you can configure. In our Lab you will see I named this new entry / row WIRED DOT1X. The screenshot below shows where we are up to this point.
![]()
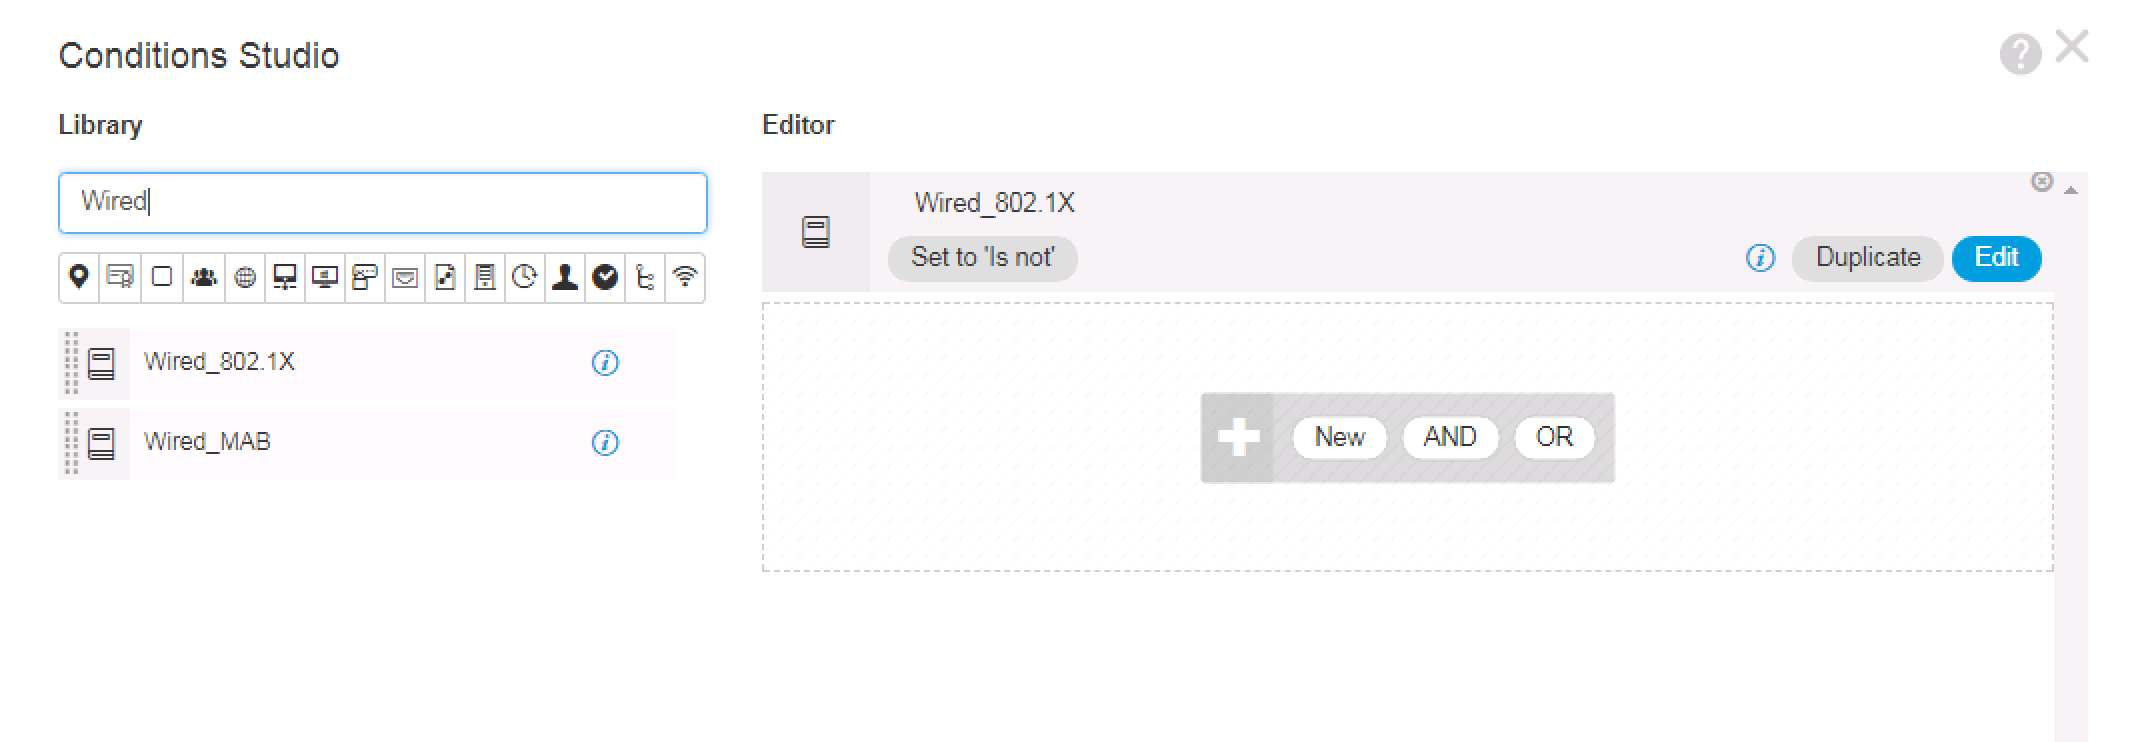
Next, we want to add a condition to this Authentication Rule, so you will need to Click the + button that is in the same row as your newly added WIRED DOT1X rule. When you do this, the Conditions Studio Window will be displayed as shown below. Here on the left side of the screen, you will see that I am filtering the Library of conditions by the term “Wired”. I’m doing this because I am looking for Wired_802.1X as I only want to match this specific Authentication type in this rule.
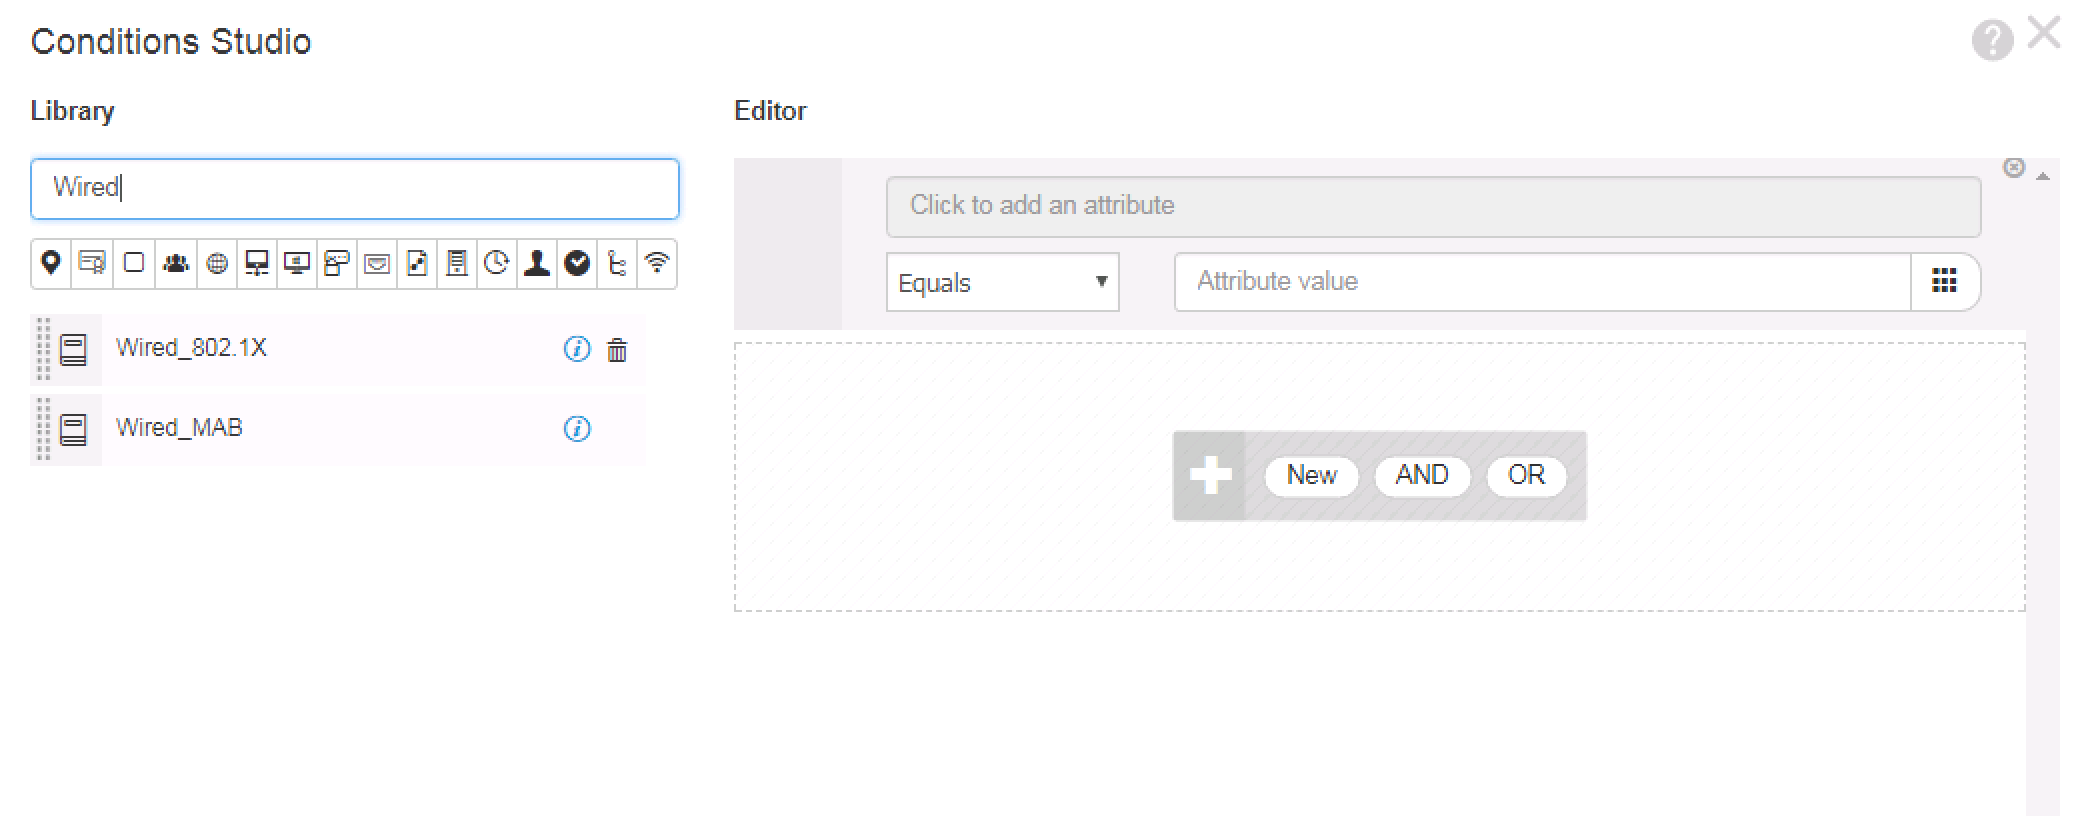
Once you see Wired_802.1X on the left side of the screen, you can drag it to the right side to add it to the condition as show below. This is all we need for this condition, so go ahead and click the green Use Button at the bottom right of the window to add this condition to our Authentication Policy.
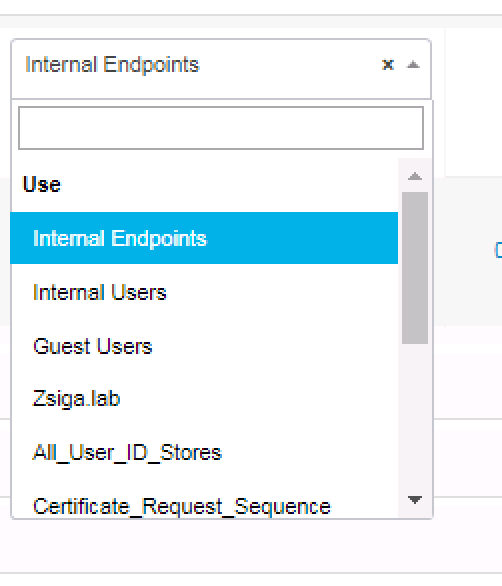
Now that we have a condition added to our Authentication Rule, we need to select which Identity Store to use for the authentication. By Default ISE selects the Internal Users Identity Store, but we want to change this to use our Active Directory Domain Zsiga.Lab Identity Store.
Note: Later on we will get into how to select multiple Identity Stores by using an Identity Source Sequence but for now we only need to select the one.
Below is a screenshot showing how we can select the different Identity Stores we can use.
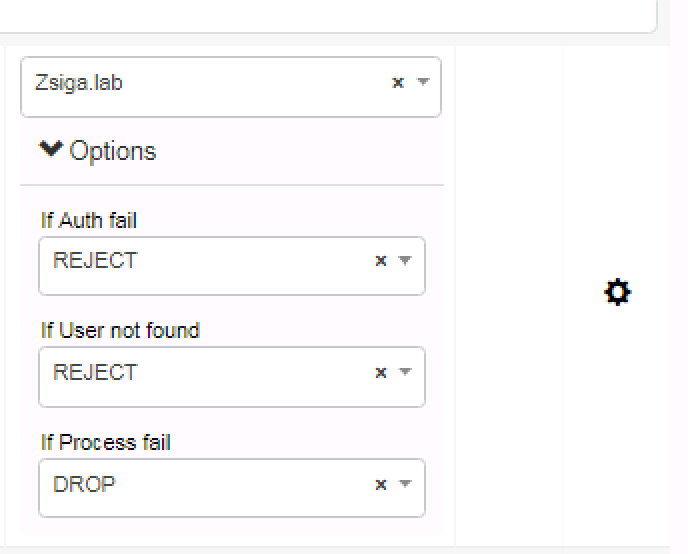
Once you have your Active Directory Domain Selected as your Identity Store, I would like to point out the Options button underneath the Identity Store Dropdown. When you select the Options button, you will see what is shown in the below screenshot. For this specific Authentication Rule, we are not changing any of the defaults. Just know that these options are there if you ever need to change them.
That’s it for our Authentication policy. Its pretty straight forward because we are only going through our PEAP use cases. In future installments we will be adding EAP-TLS and MAB authentication rules but for now we are ready to move into our Authorization Policy Configuration.
4. Create An Authorization Policy for our WIRED Policy Set
4.1 Domain PC Use Case:
Still on the Policy Set Window for our WIRED Policy Set, expand the Authorization Policy. It will be the last Policy of the Four in the WIRED Policy Set.
You should be getting used to seeing Default Elements within ISE, and as expect there is a Default Authorization Rule here that has no Conditions and has a DenyAccess Result / Permissions. This is like your Deny IP Any Any in an ACL. Once again, we are not going to modify this entry, but we are going to create our own entries above this Default Rule. Click the + button to start the process of creating a new Authorization Rule in this Policy.
![]()
You will now have a new rule to configure above the Default Policy, you will see below that we named our rule WIRED Domain PC and we already selected our WIRED-DOMAIN-PC Authorization policy (Permissions) that we created in ZBISE08 – Cisco ISE 2.3 Wired Authorization Profiles. Now we just need to add a condition to this Use Case of ours by selecting the + in our WIRED Domain PC Authorization Rule.
![]()
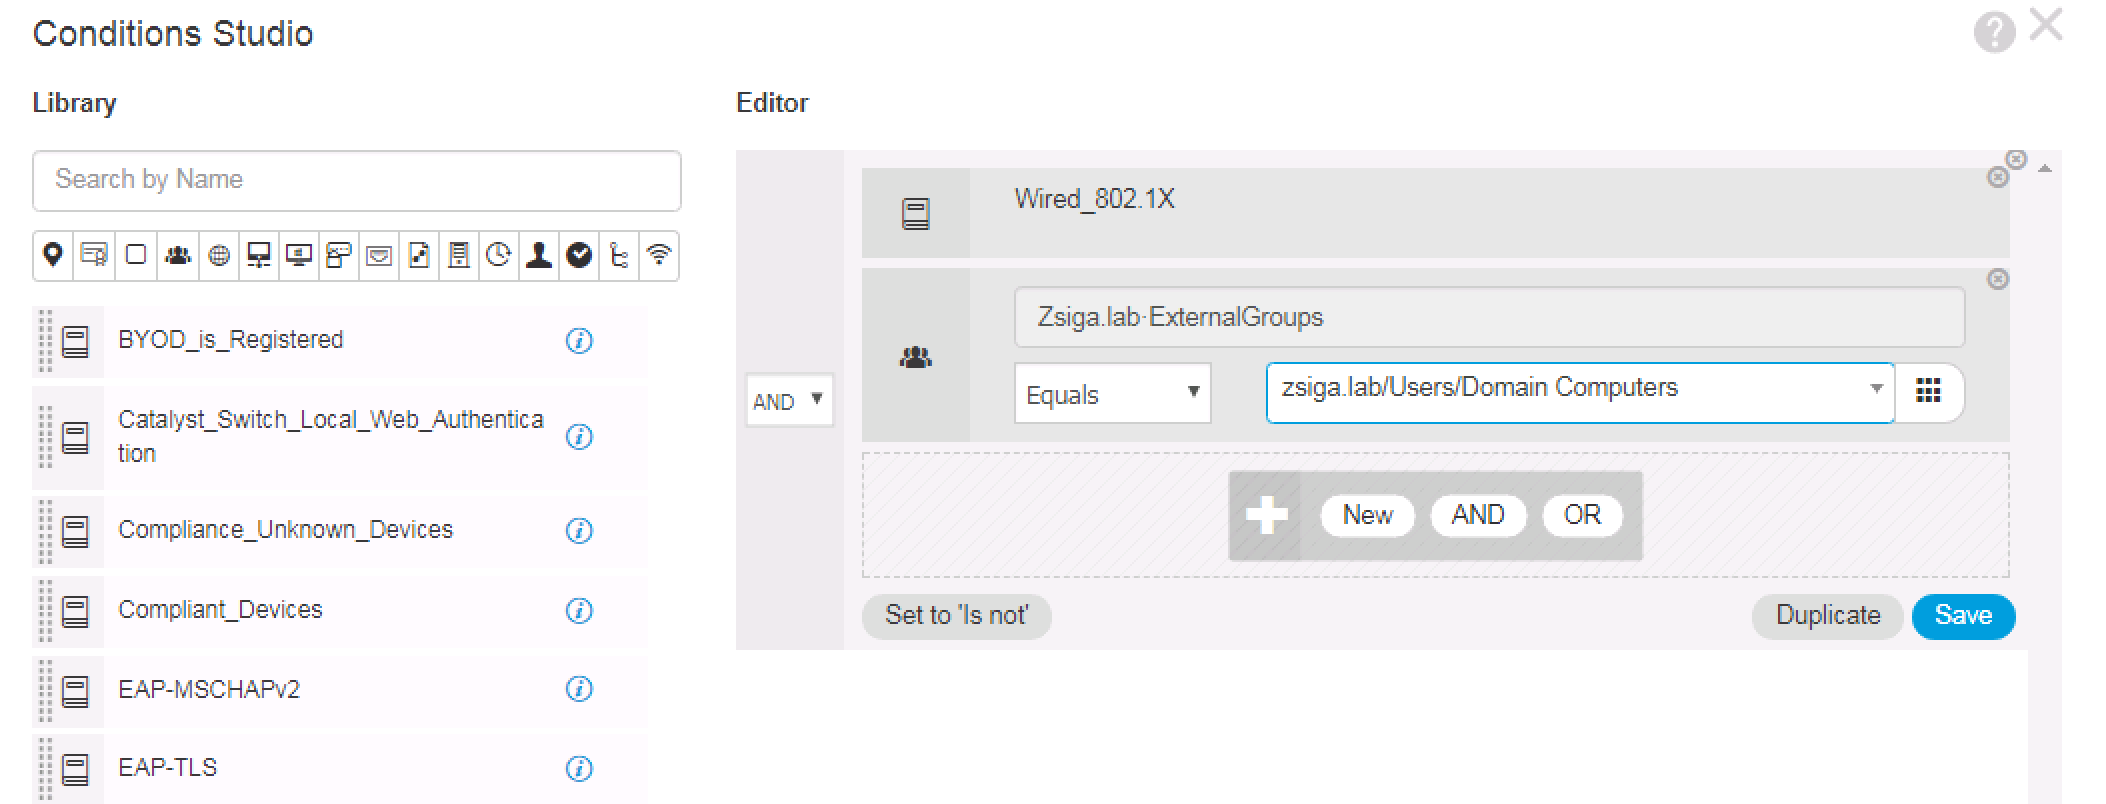
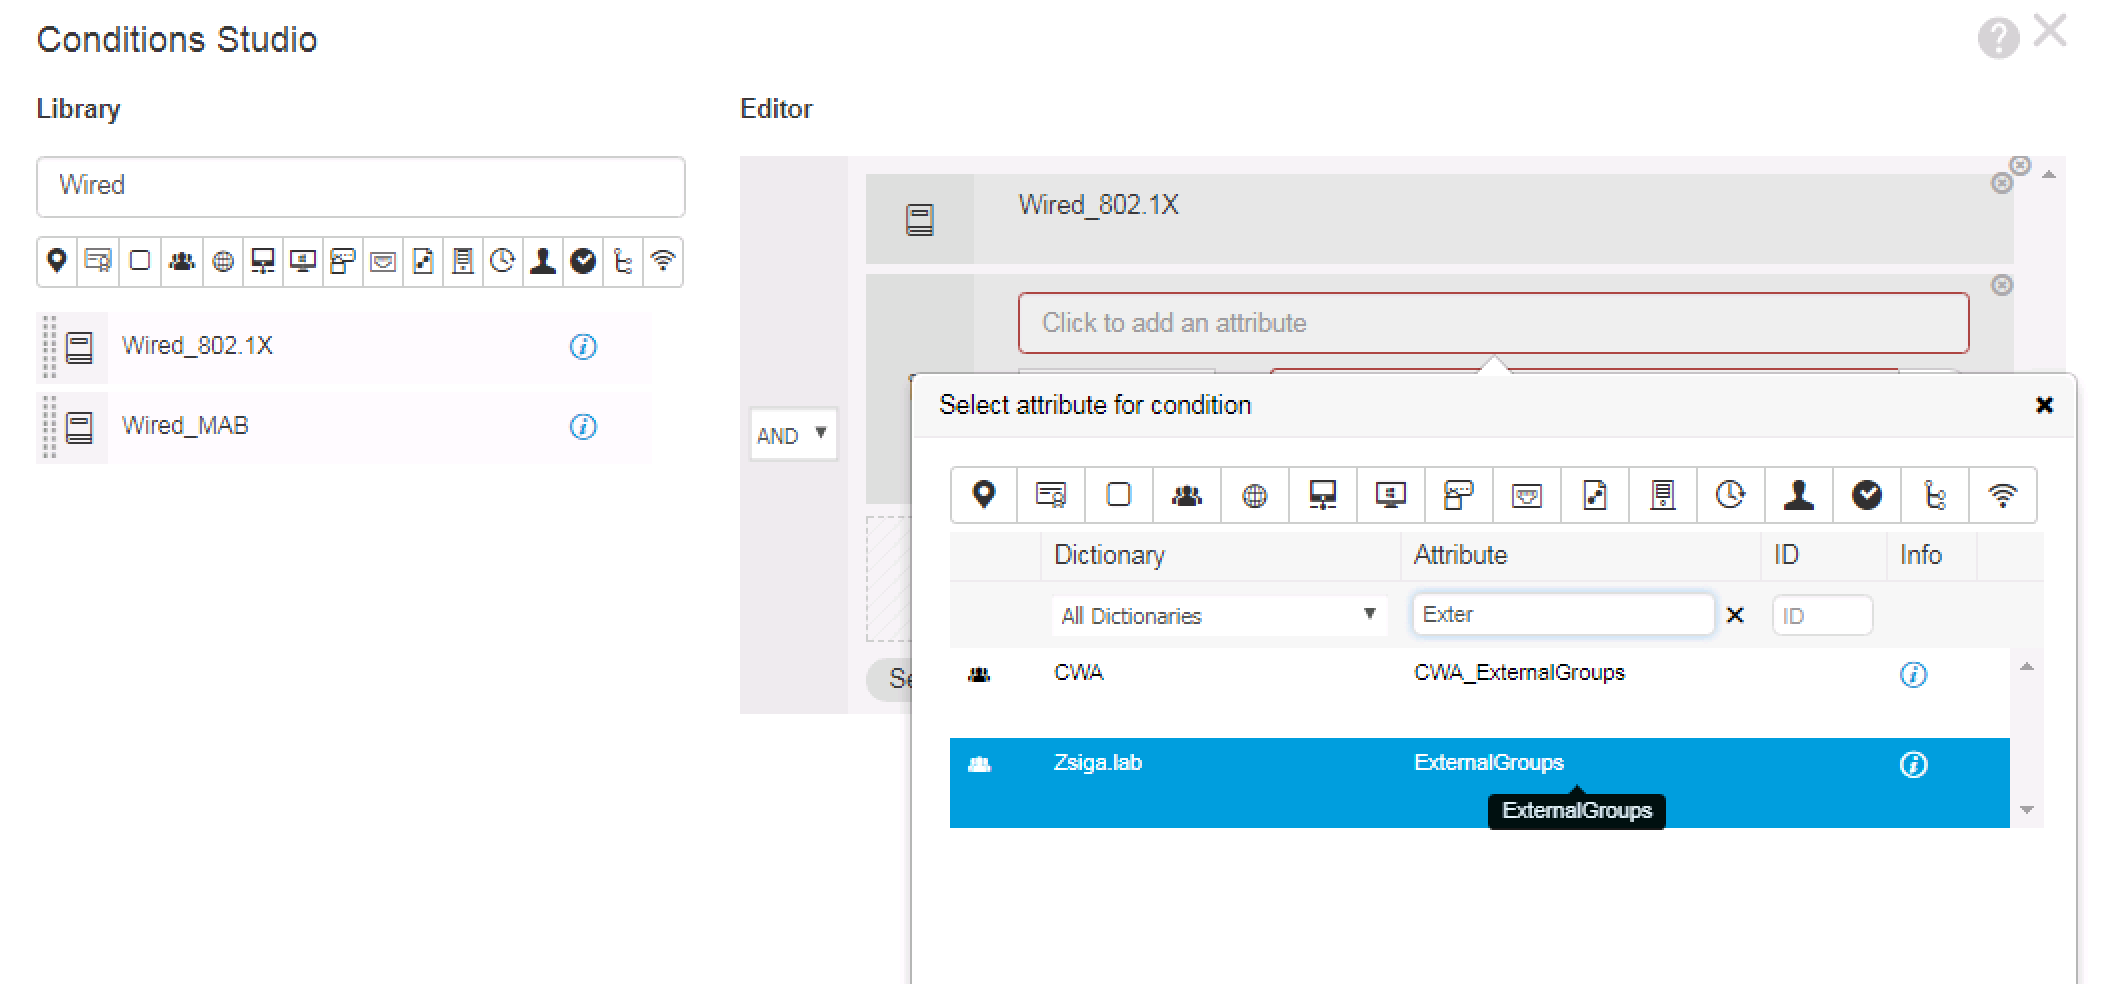
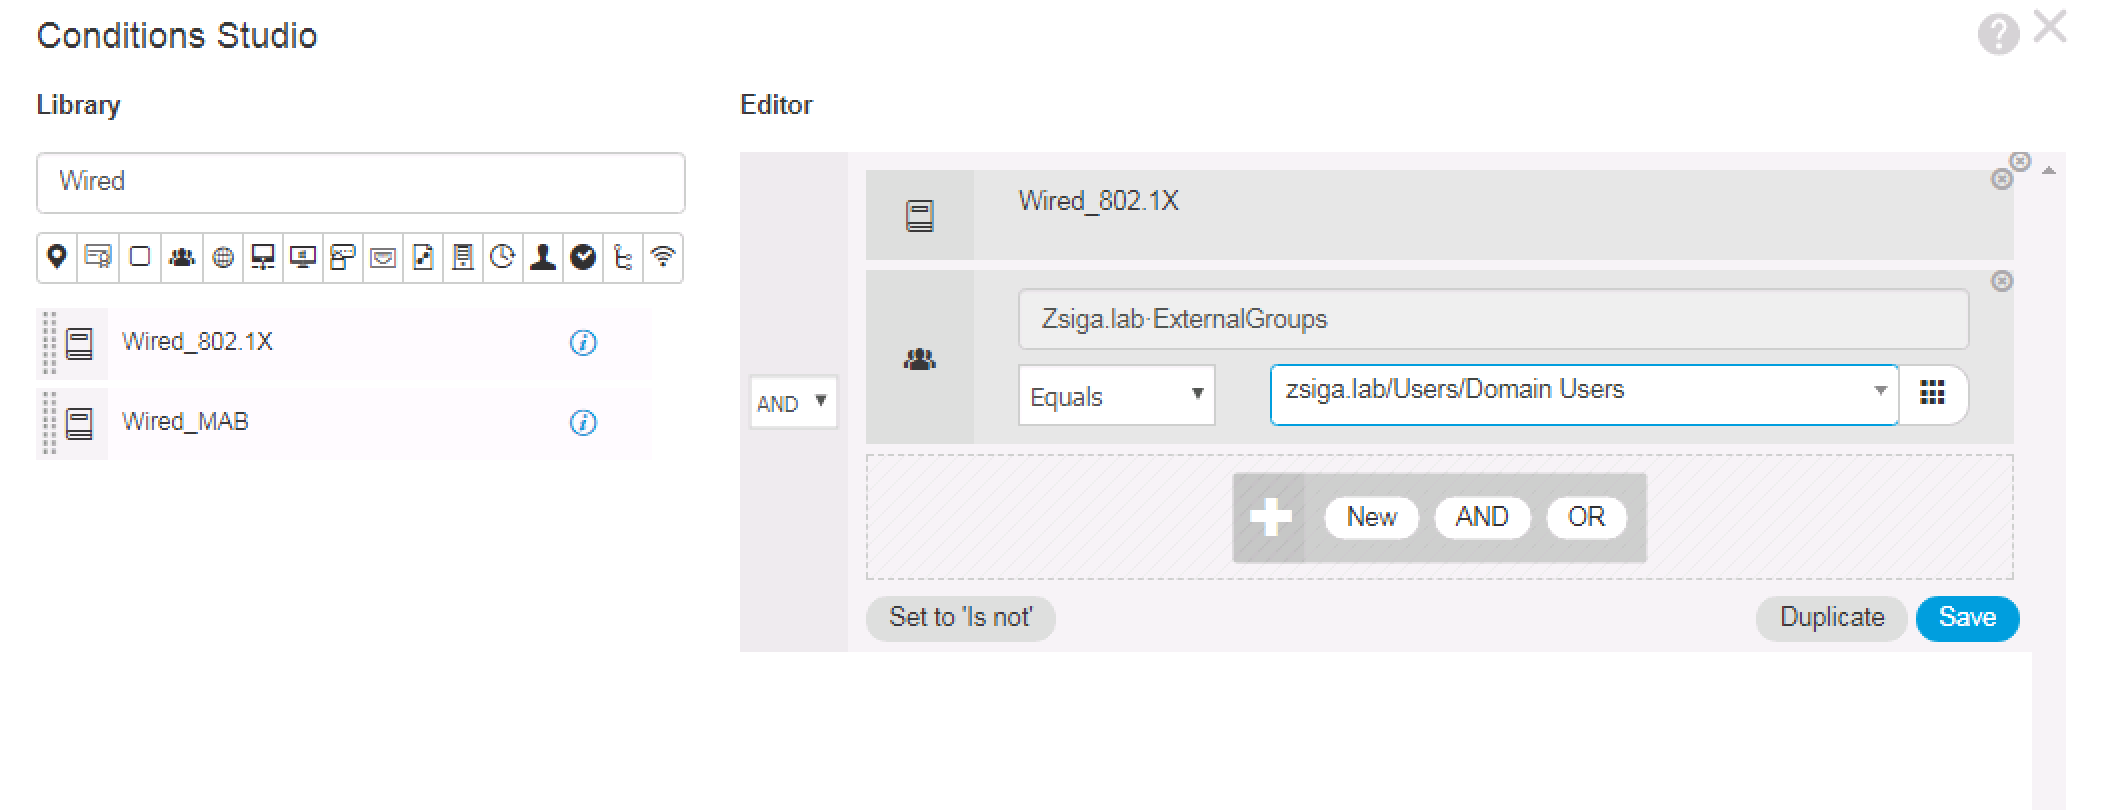
For this rule’s condition we want to make sure the client device was Authenticated via Wired_802.1X and is part of the Zsiga.lab Active Directory Domain Computers Group.
Note: We could be very specific here on what the Authentication Tunnel is, for example we could specific PEAP or EAP if we wanted, but to make this simple we are just using WIRED_802.1X and are relying on our Test Machine’s Supplicant to determine its Authentication Type. When we do our EAP-TLS Installment we will show how this can be done.
Below is a couple of great screenshots showing you how this Logic Condition is forming. For you Computer Science folks out there, this will come pretty easy to you as these Logic Conditions are very similar programing logic statements. We added the Wired_802.1X Library Condition and we added our Active Directory Domain Zsiga.Lab:ExternalGroups with our condition checking to see if it matches our Domain Computers Group that will pulled into ISE in ZBISE04 – Cisco ISE 2.3 Adding the ISE Cluster to Active Directory. Hopefully you can start to see how all of these different installments are starting to come together now!! 🙂

Once you have the condition configured they way you would like it, click the green Use button in the bottom right of the window to add it to your Policy Rule.
Once your Condition has been added to the rule, you will be brought back to your Authentication Policy view. Your new rule will be on screen, it should loo pretty close to what the screenshot below shows.
![]()
Thats it for our first Use Case of Domain PC. You can save your Authorization Policy if you would like now or wait until we have added all three of our Use Cases in your Authorization Policy.
4.2 Domain User Use Case:
Our Next Use Case that we are going to add is our Zsiga.Lab Domain User via PEAP Authentication. A lot of these steps are going to start to be similar, so it wont take you long to pick them up.
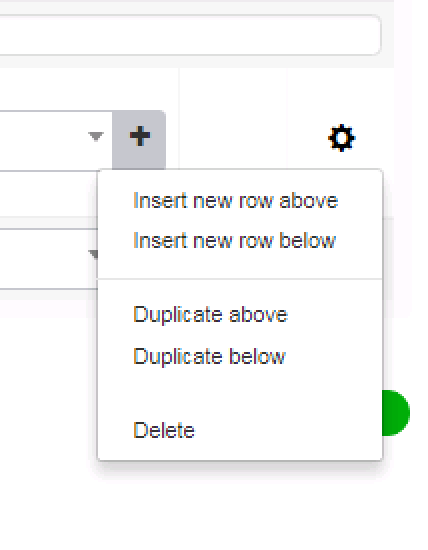
To begin, there is a Gear Button on the right side of each rule, click on the Gear that is in the same row as your WIRED Domain PC to bring up a context menu. In this menu, select Insert new row above.
Just like with our Domain PC Use Case above, we now have a new Authorization Rule that we can configure. You will see that we named this rule WIRED Domain User and selected our preconfigured Authorization Policy of WIRED-DOMAIN-USER that we created in ZBISE08! All we have left to do now is add our Condition, which will be familiar to our Domain PC Use Case’s Condition.
![]()
In the Conditions Studio we are going to select Wired_802.1X and Zsiga.lab:ExternalGroups again but this time we are going to match our Domain Users group instead of our Domain Computers group.
Once the Condition has been configured appropriately, Click the Use button to continue.
Now when brought back to your Authorization Policy Window, you will see three rules here. They should look very similar to the below screenshot.
![]()
Thats it for our second Use Case of Domain User. Now lets jump right into our third and get this moving along!! 😉
4.3 Domain Privileged User Use Case:
With the previous two Use Cases, we showed you how to add new Policy Rules, but for this Use Case we are going to duplicate a rule. This is a very handy option when you have similar rules, it saves time and is less error prone.
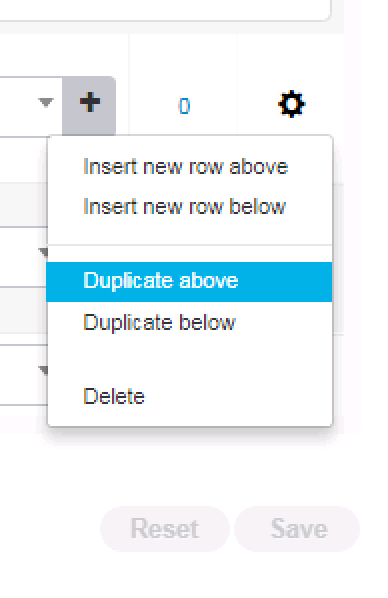
To the right of the WIRED Domain User Authorization rule you just created, click the Gear button to launch the context menu you see in the below screenshot, select the Duplicate Above option.
Now you will see a new rule that has the same configurations as the WIRED Domain User rule, but with Copy in the name. Lets change the Name to WIRED Domain Priv User, the Authorization Profile to WIRED-PRIV-USER, and then the condition to Domain Admins. What you have your environment should look like the below screenshots when completed.
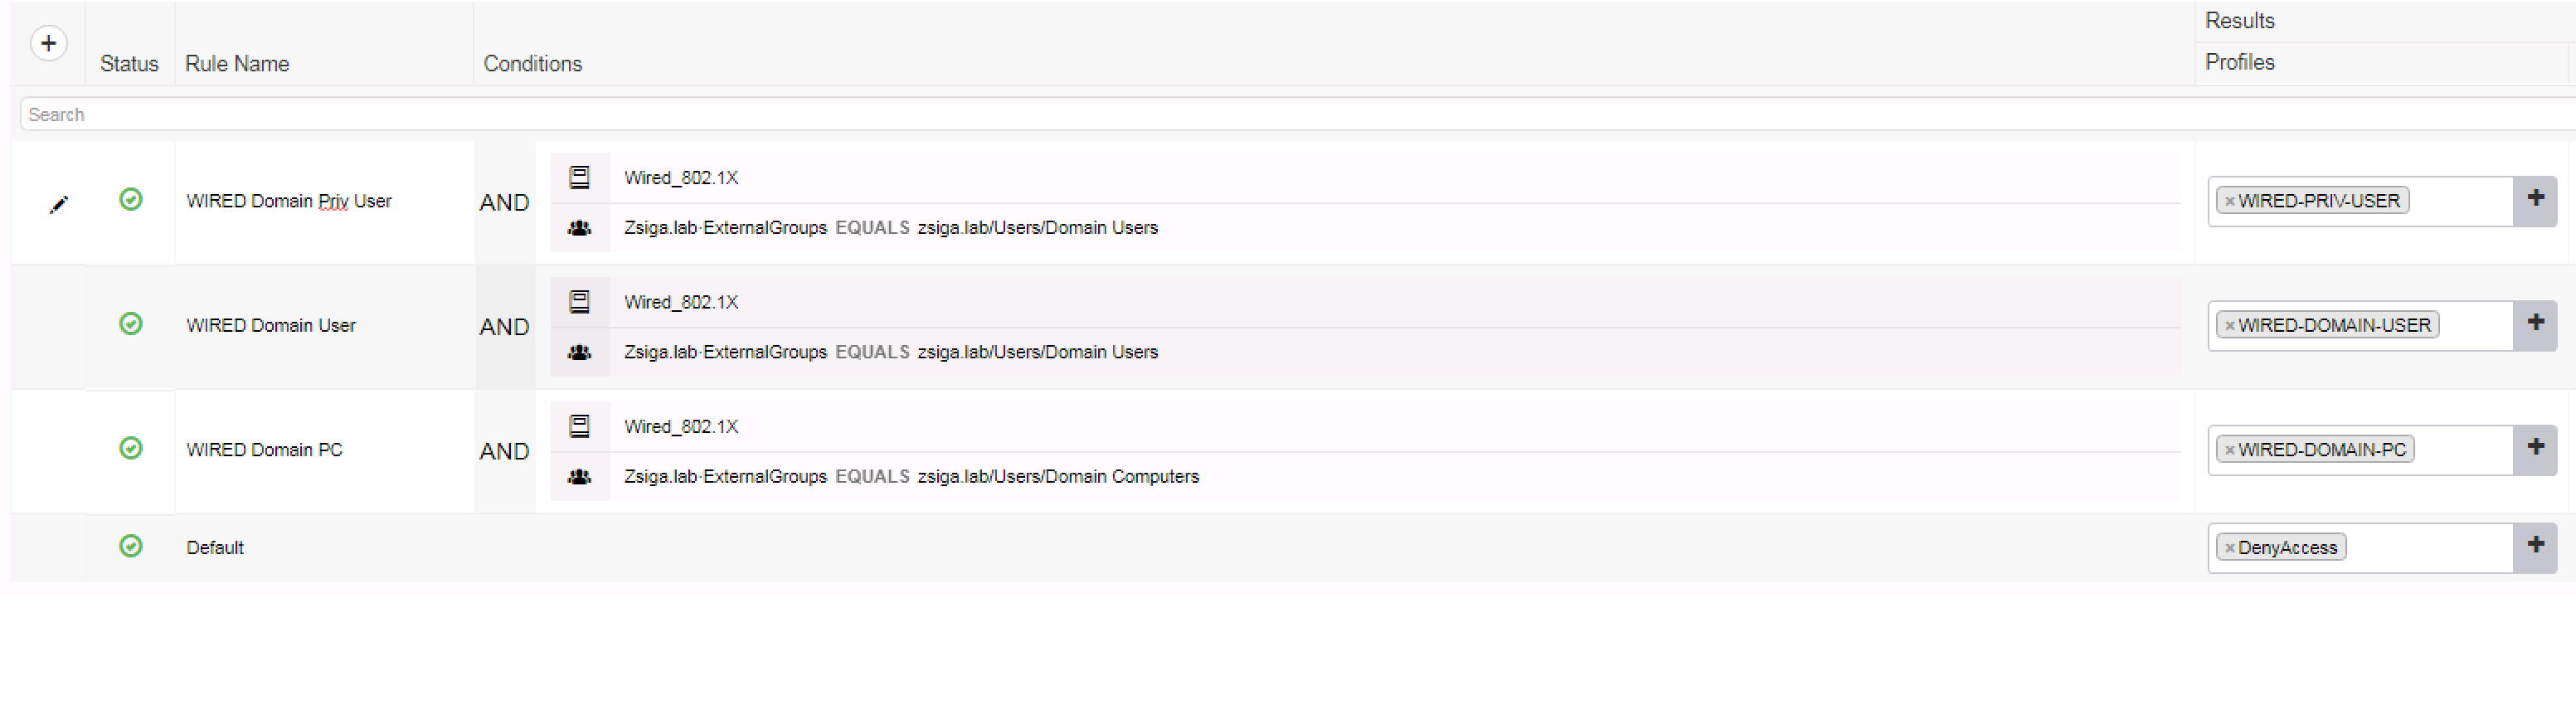

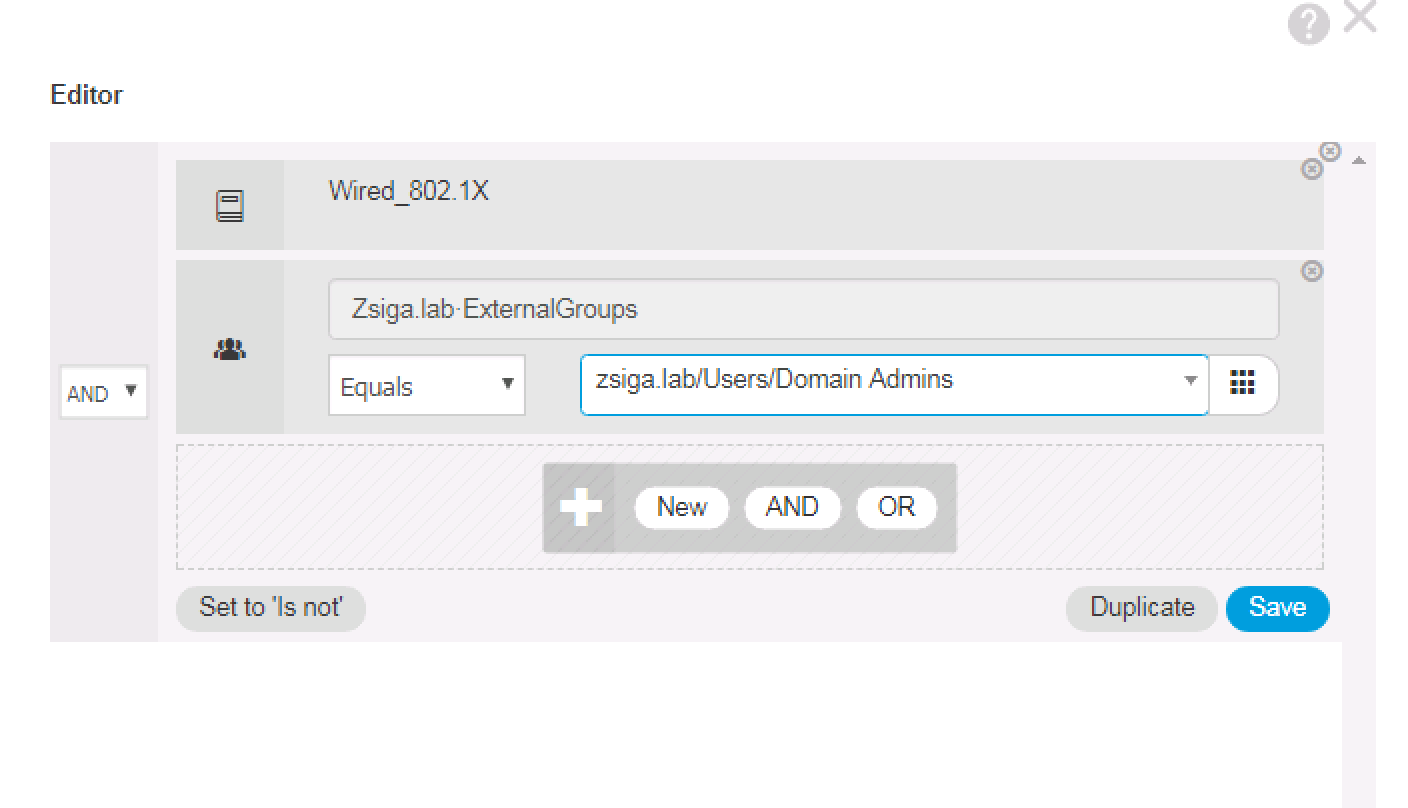
Once you have completed modifying the last Authorization Policy Rule, you can click the Save button in the bottom right of the screen.
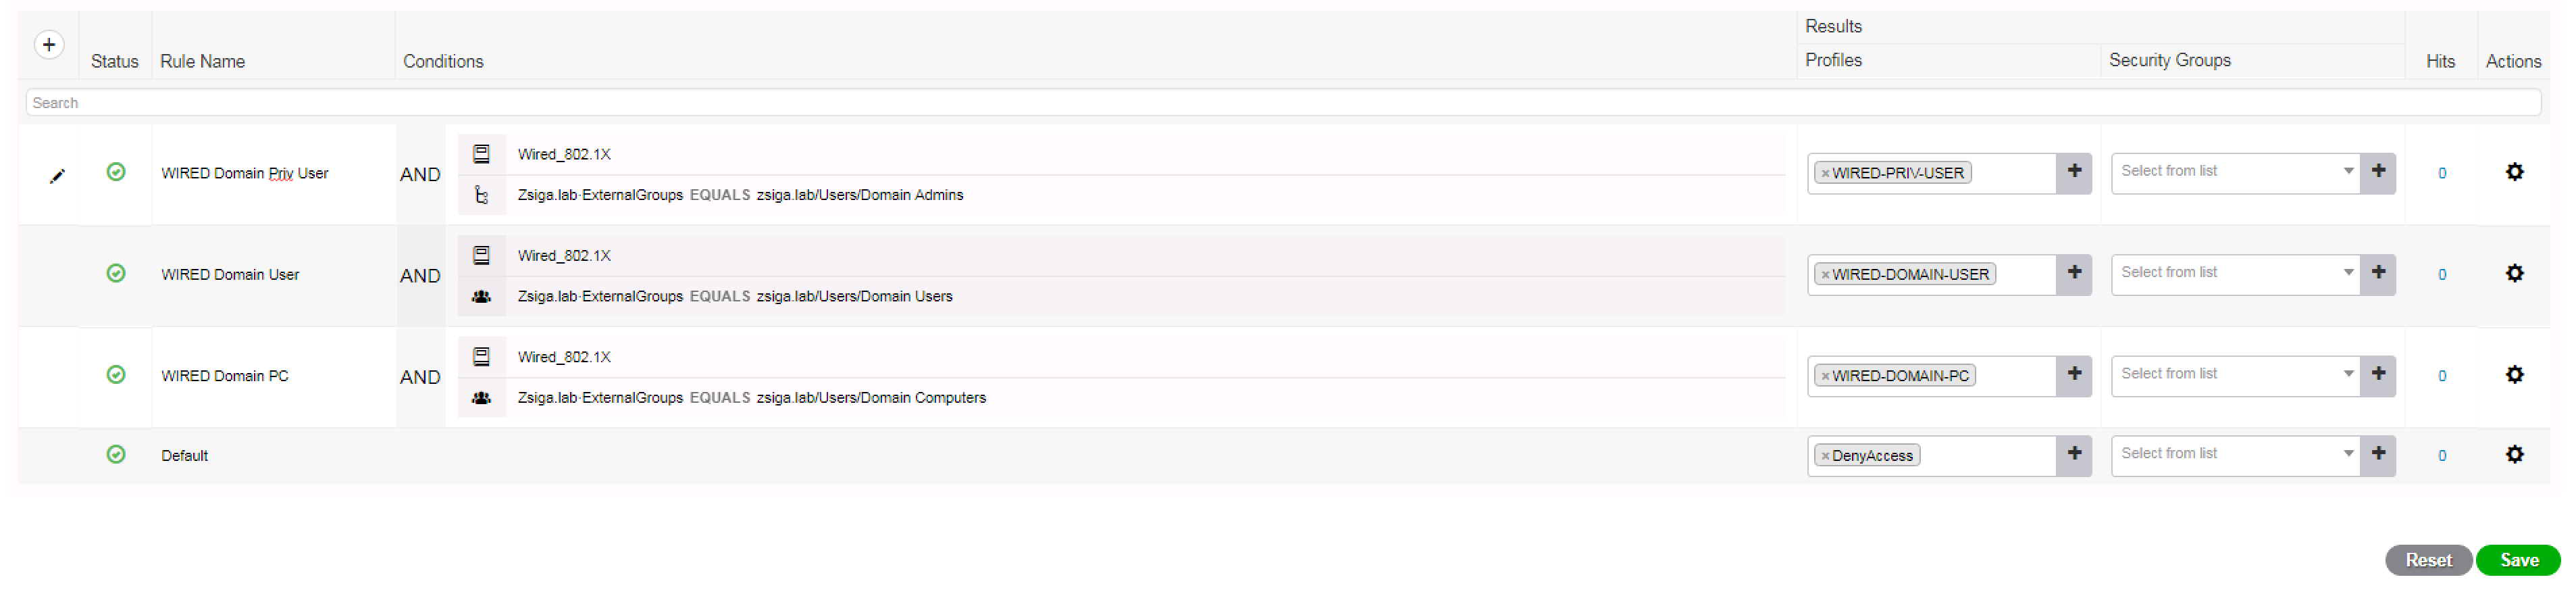
Thats it for our PEAP Use Cases in our ISE Configuration. We could make this a little more complex and specific but for now I think this is good to go.
Lets go check our Test VM and our Switchport to see where they stand in this entire process!
5. Enable DOT1X with PEAP Auth on our Test VM
For this entire Lab our Test VM is configured for a separate vSwitch that has a dedicated NIC connected to our 3750e Switch on Port Gi1/0/12. You can reference the Lab Diagram below if needed.
Note: All of the settings that we are going to manually configure in Step 5, can and should be pushed via a Group Policy Object or GPO. For initial deployment of ISE and to complete Validation and testing of your Use Cases what we do in this lab is perfectly fine, but once these steps are completed, it is highly recommended to push these settings to your organization via GPO.
5.1 Check current DOT1X Settings
Before we can authenticate anything, we should check to see how our Test VM is configured. I’m going to log into our VMware vSphere Client, then launch the console session to our lab’s ISE Test VM.
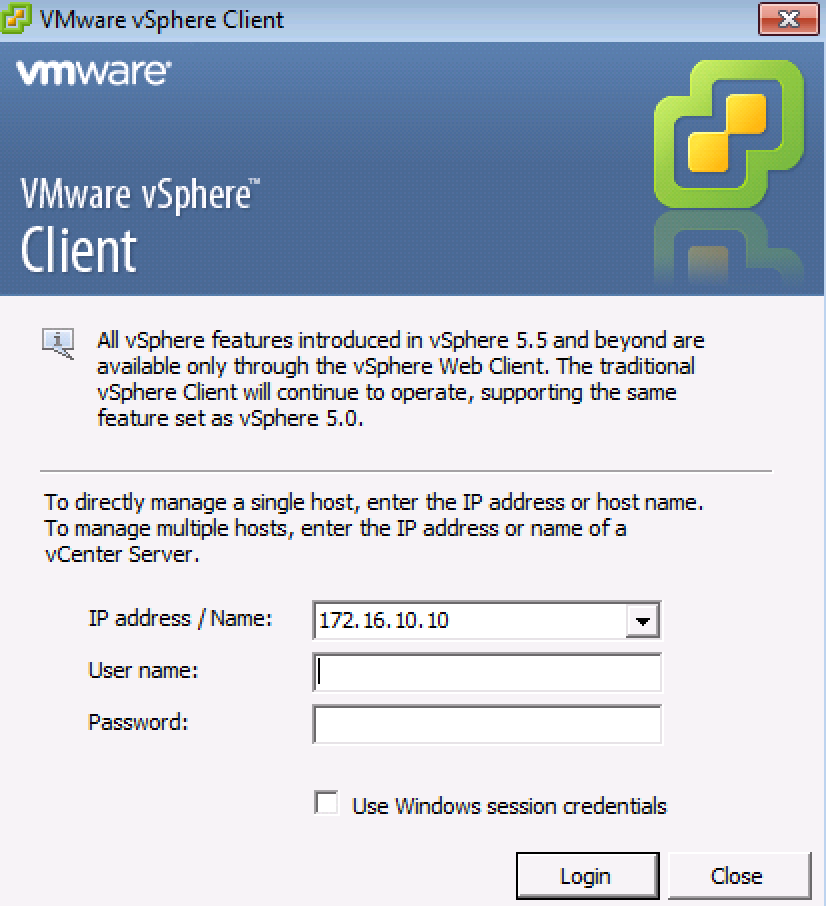
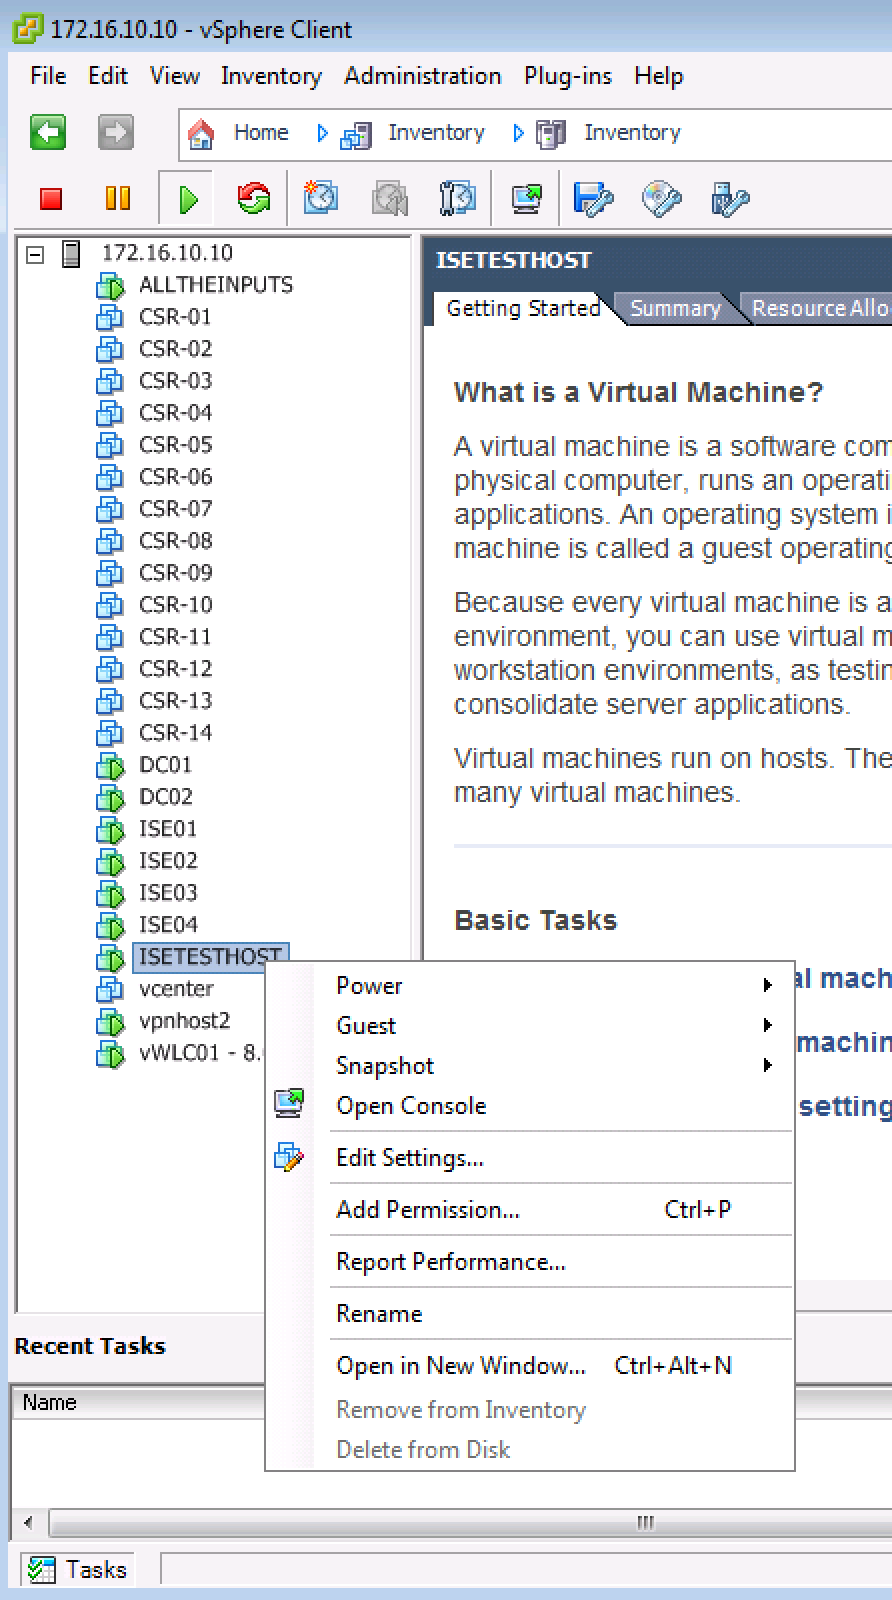
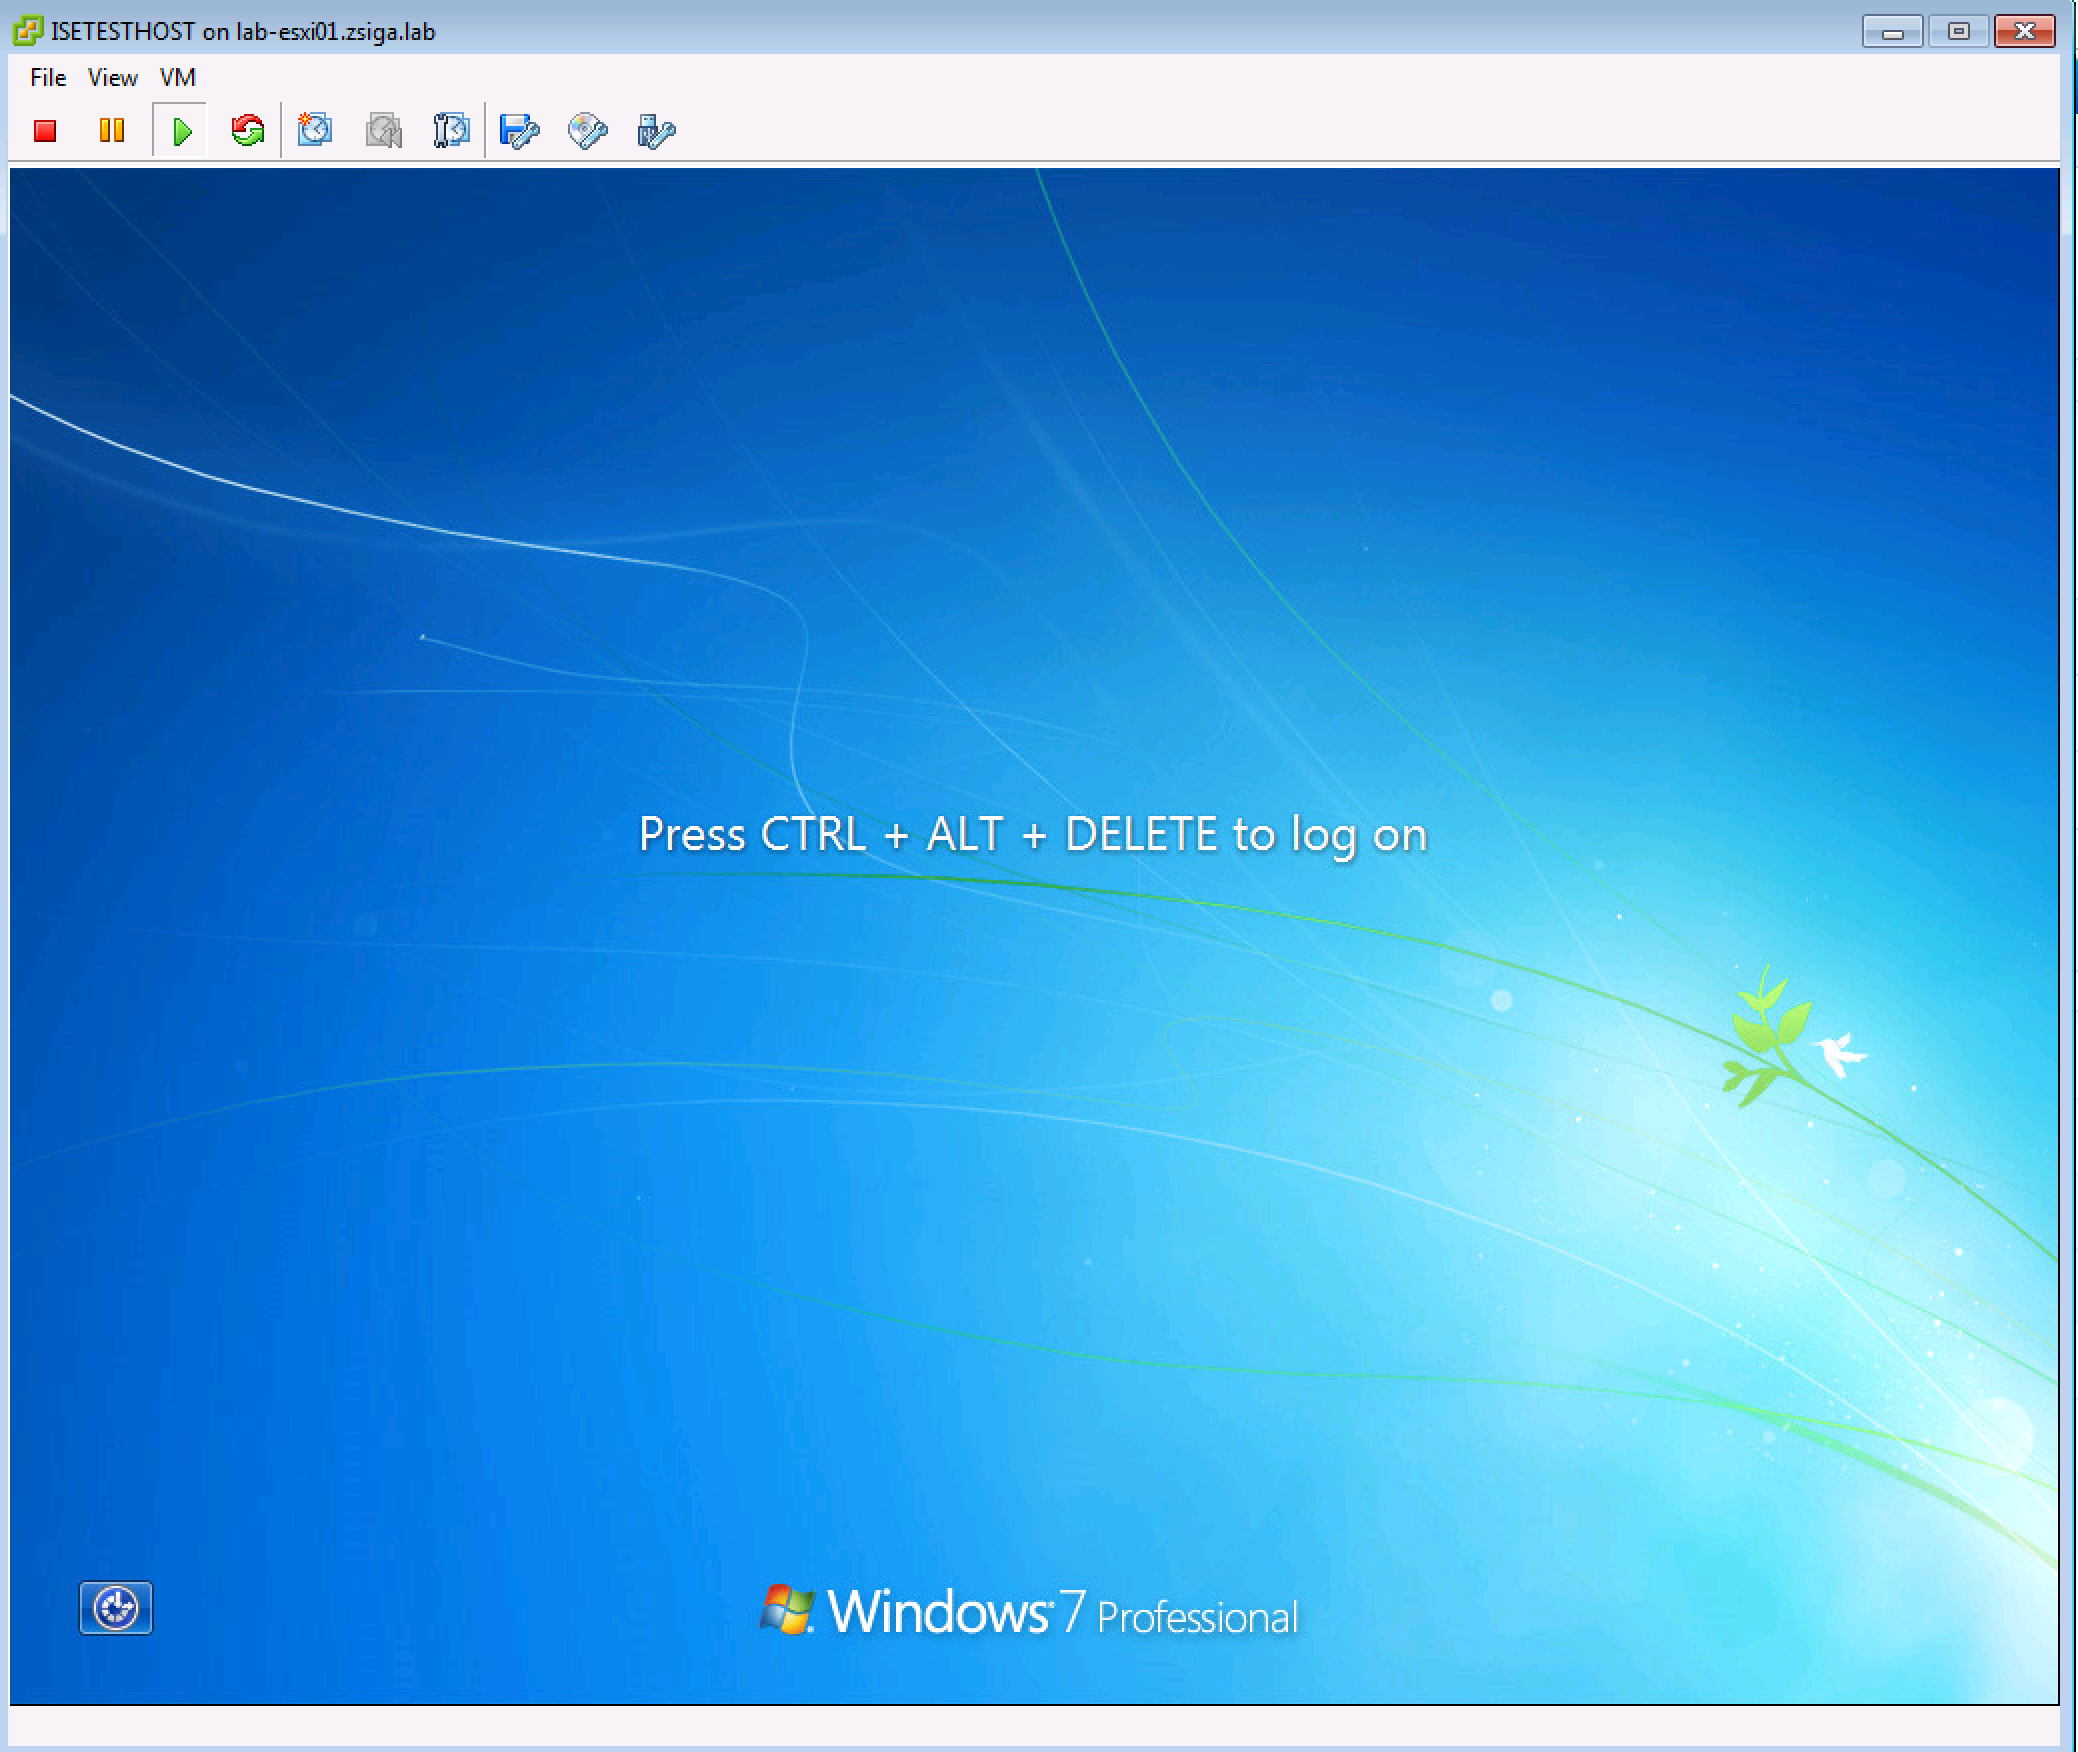
Now that I have a console connection to our Lab’s Test VM, I’m going to login with Admin Credentials, in this case I am using a Domain Admin account in my lab.
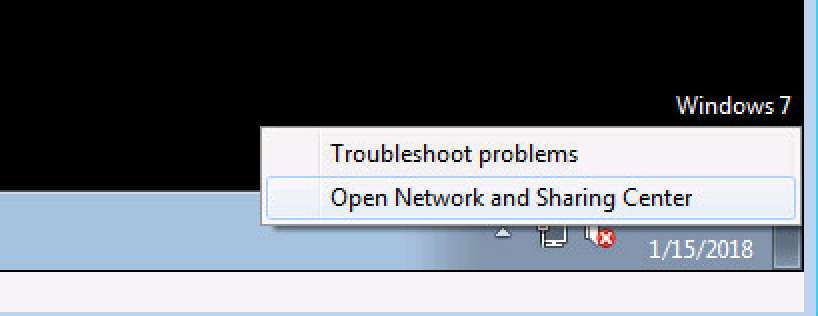
Once logged in, lets go and check our Network Interface Card (NIC) Settings. To do this I usually right click on my NIC in the system tray and select Open Network and Sharing Center. This maybe a little different in your lab environment depending on the Operating System your Test VM has installed. In our Lab I am still using Windows 7.
The Network and Sharing Center should be open now, we want to select the Change adapter settings on the left side of the screen.
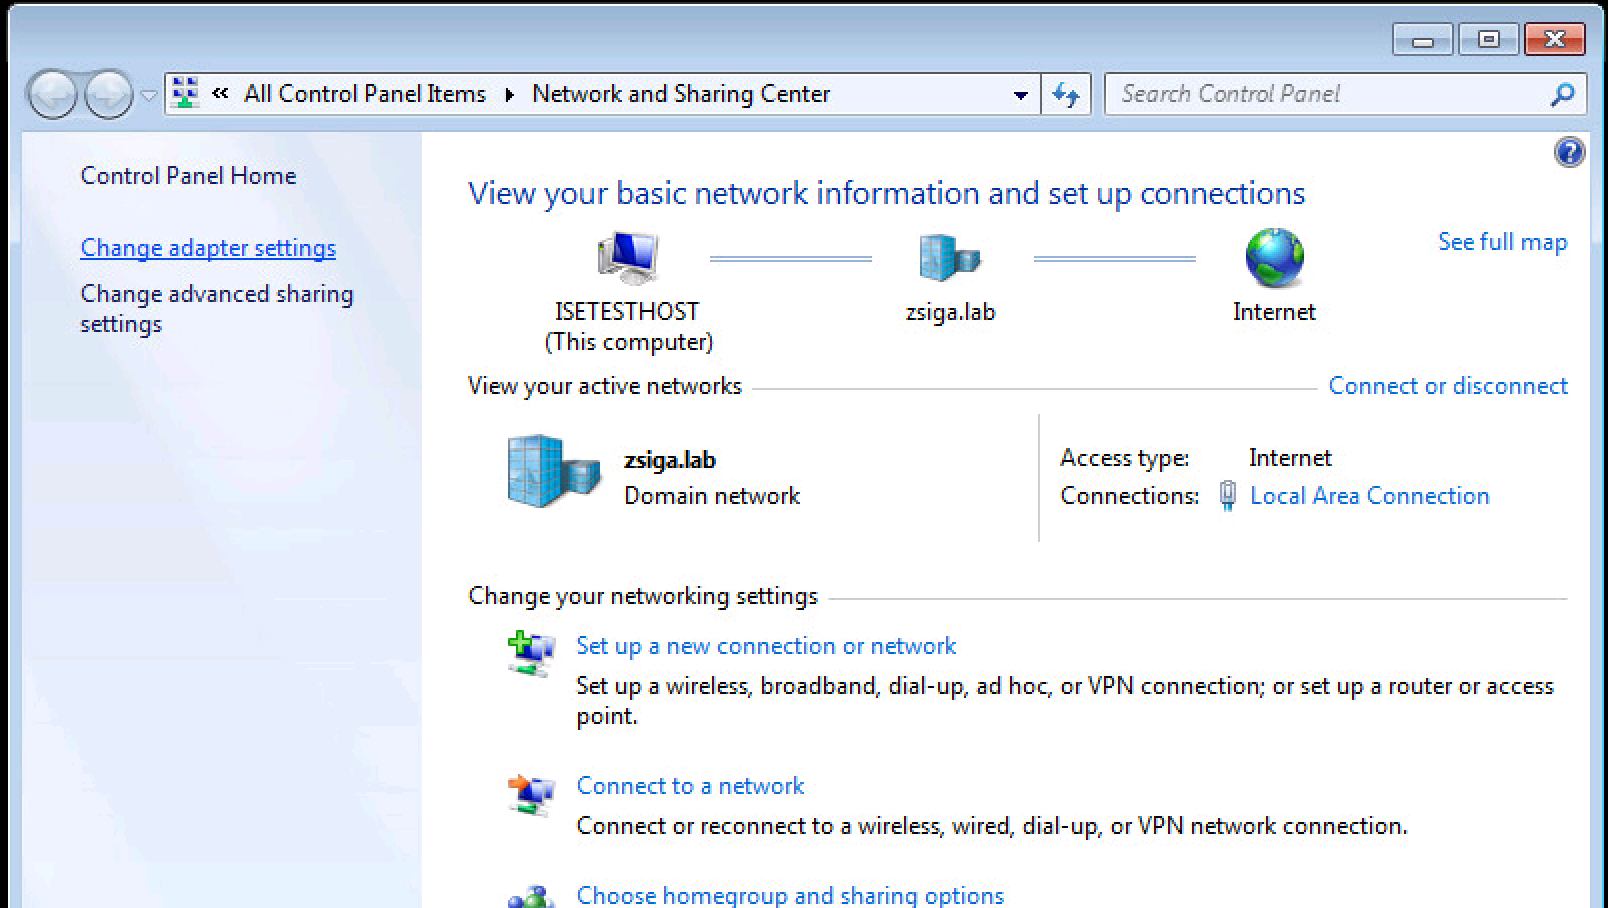
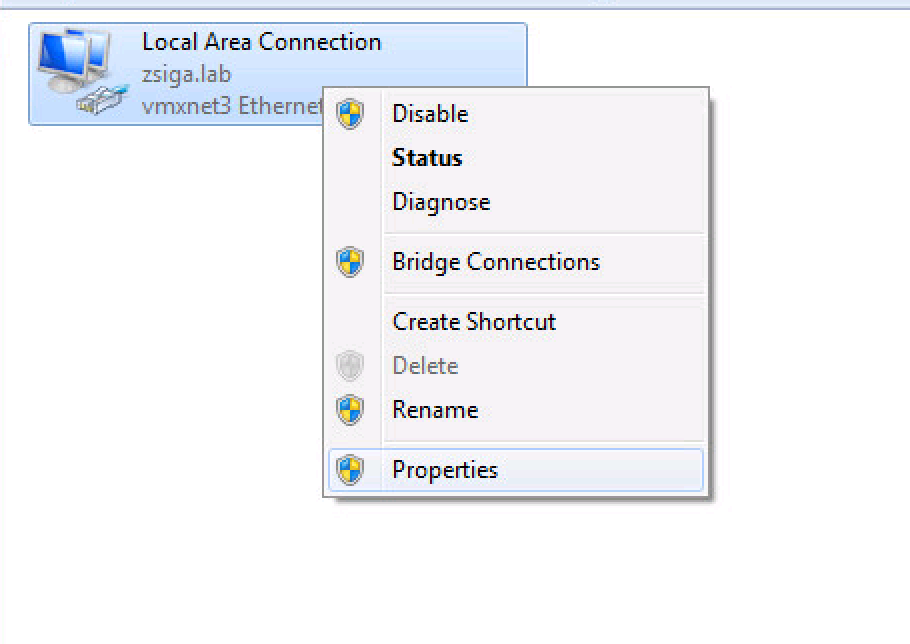
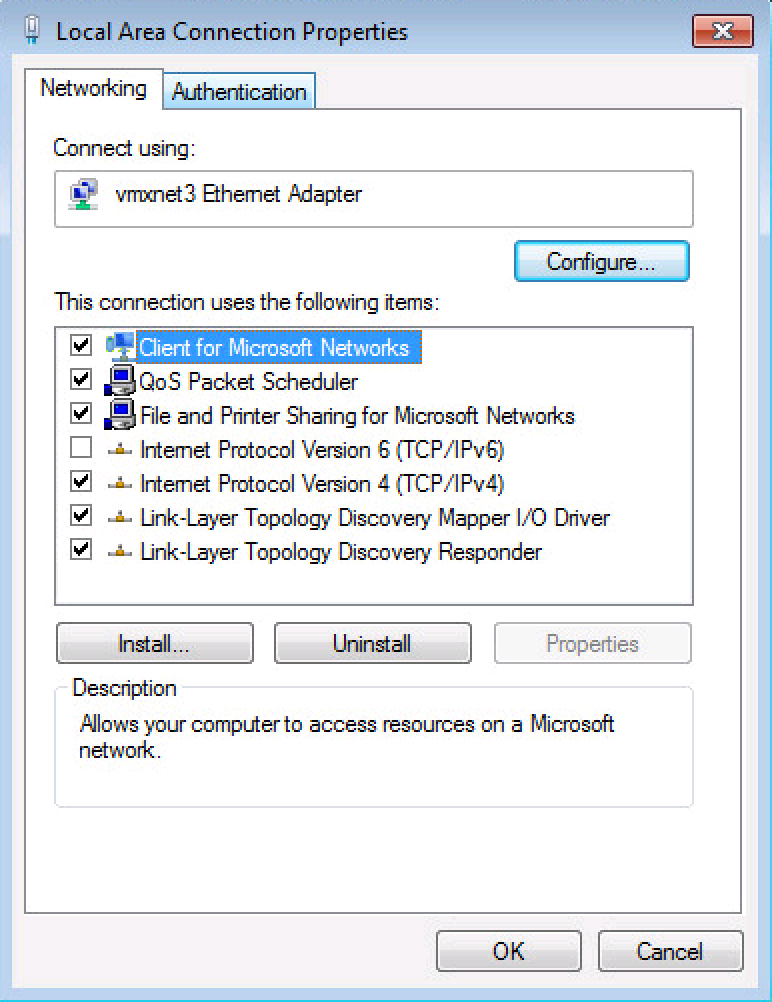
Now you should be in the Network Connections “Folder” and you should see all of your Computer’s Network Connections. In our case, we only have one NIC. Right click the corresponding NIC that is part of your lab and select Properties.
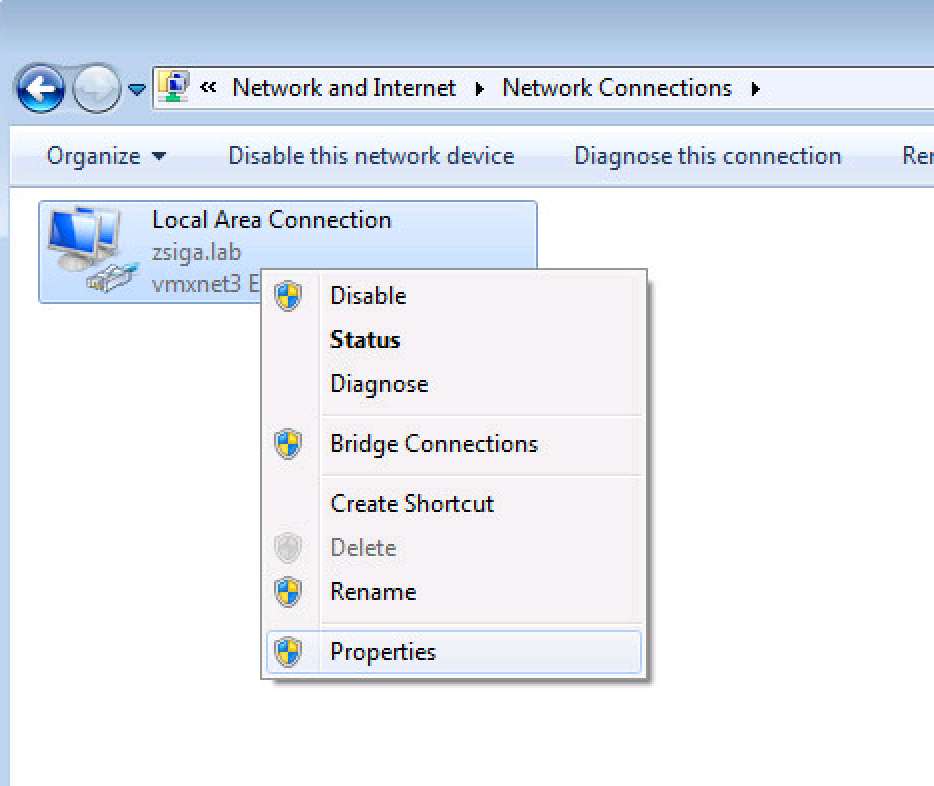
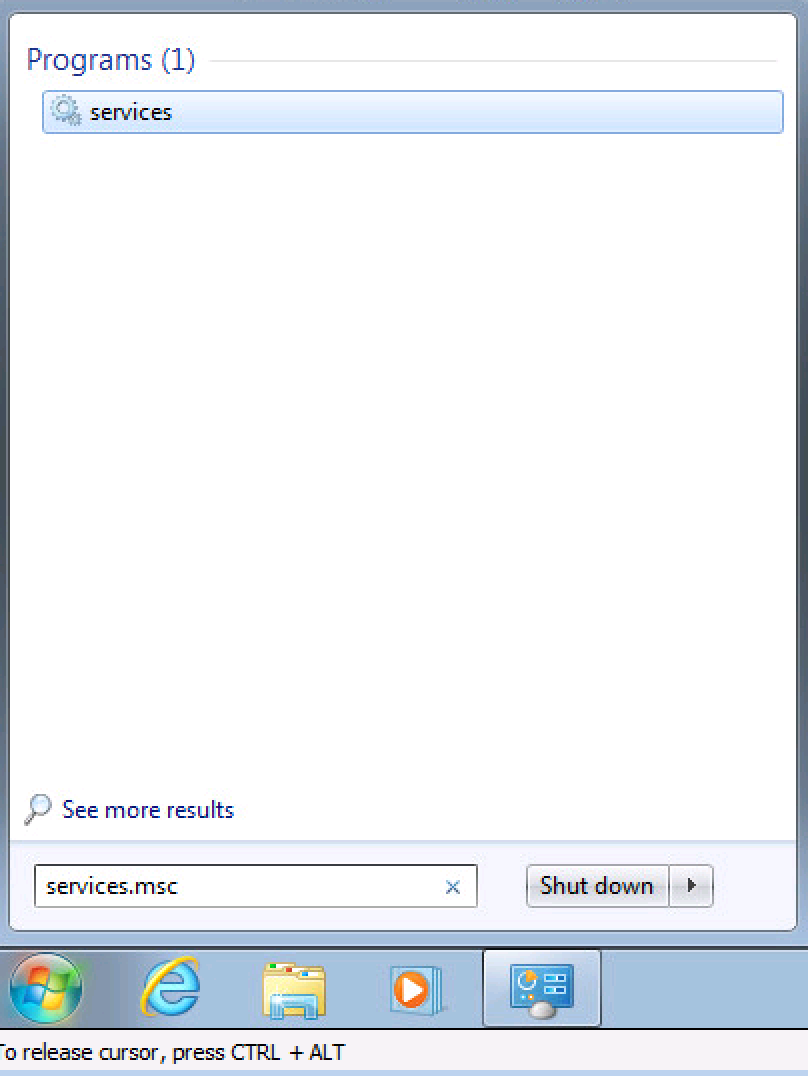
This is where we want to be. If you do not see an Authentication tab then the Wired Auto Config Service isn’t started, lets go start that now. If you do see an Authentication tab then you can Skip step 5.2 and go directly to Step 5.3
5.2 Start Wired Auto Config Service
As the rest of these steps, this is just the way I like to do these tasks. Click your Start menu and do a search for services.msc. Once it comes up in the search go a head and select it to launch the Services Console.
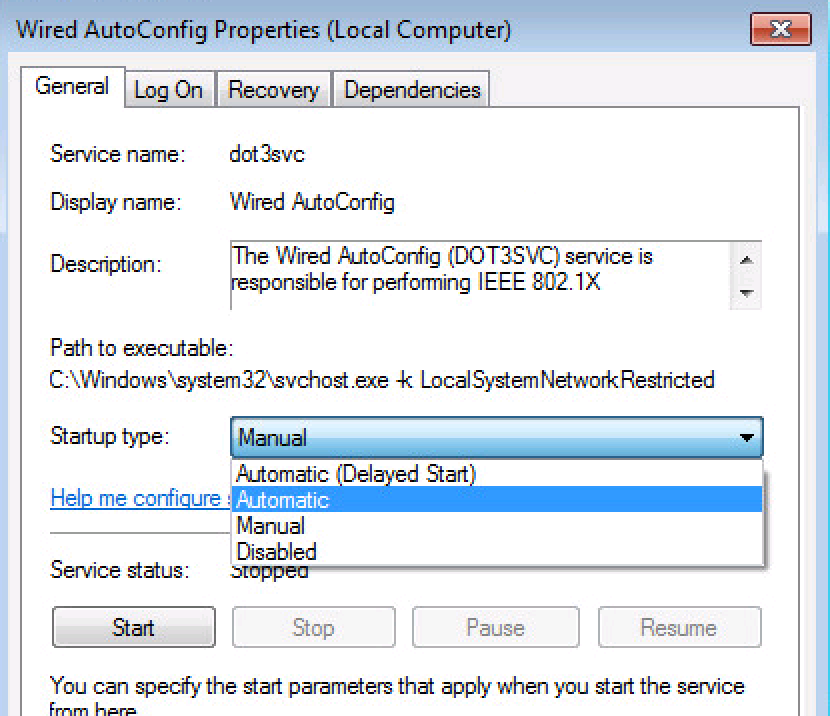
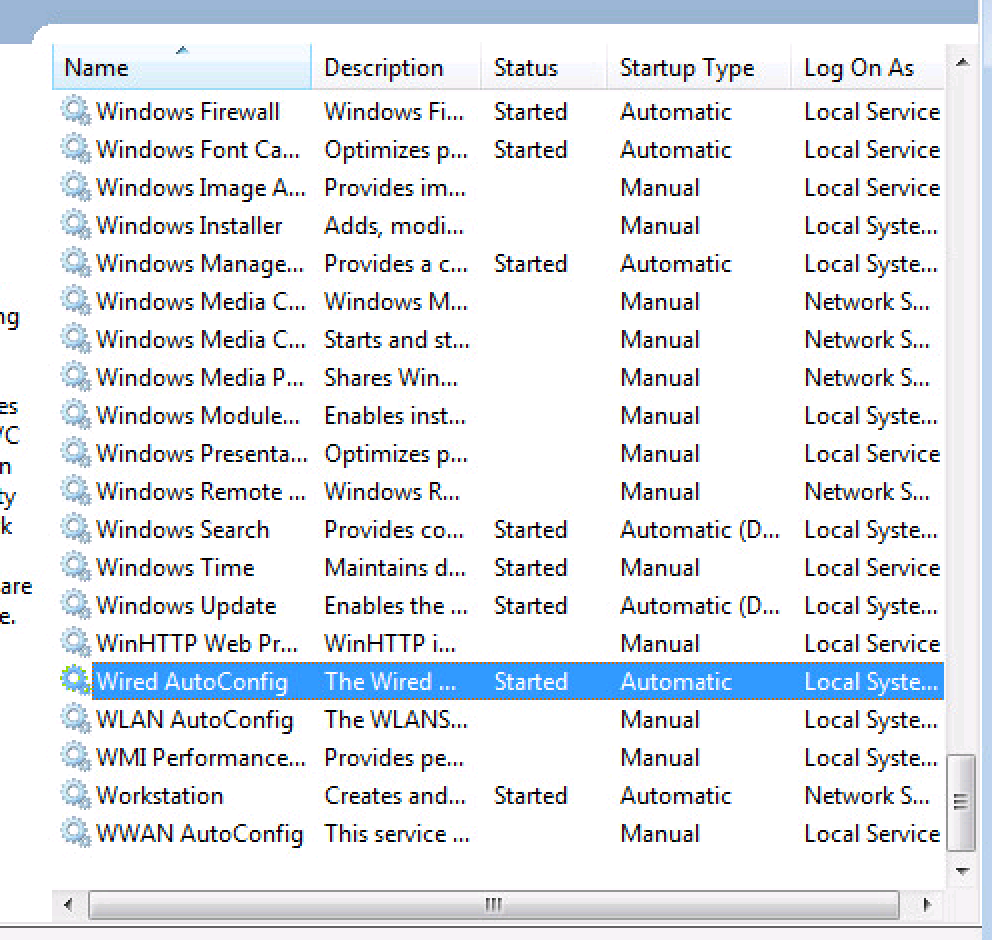
With the Services Console open, traverse near the bottom and find the Wired AutoConfig Service. Double click on it to launch the properties page.
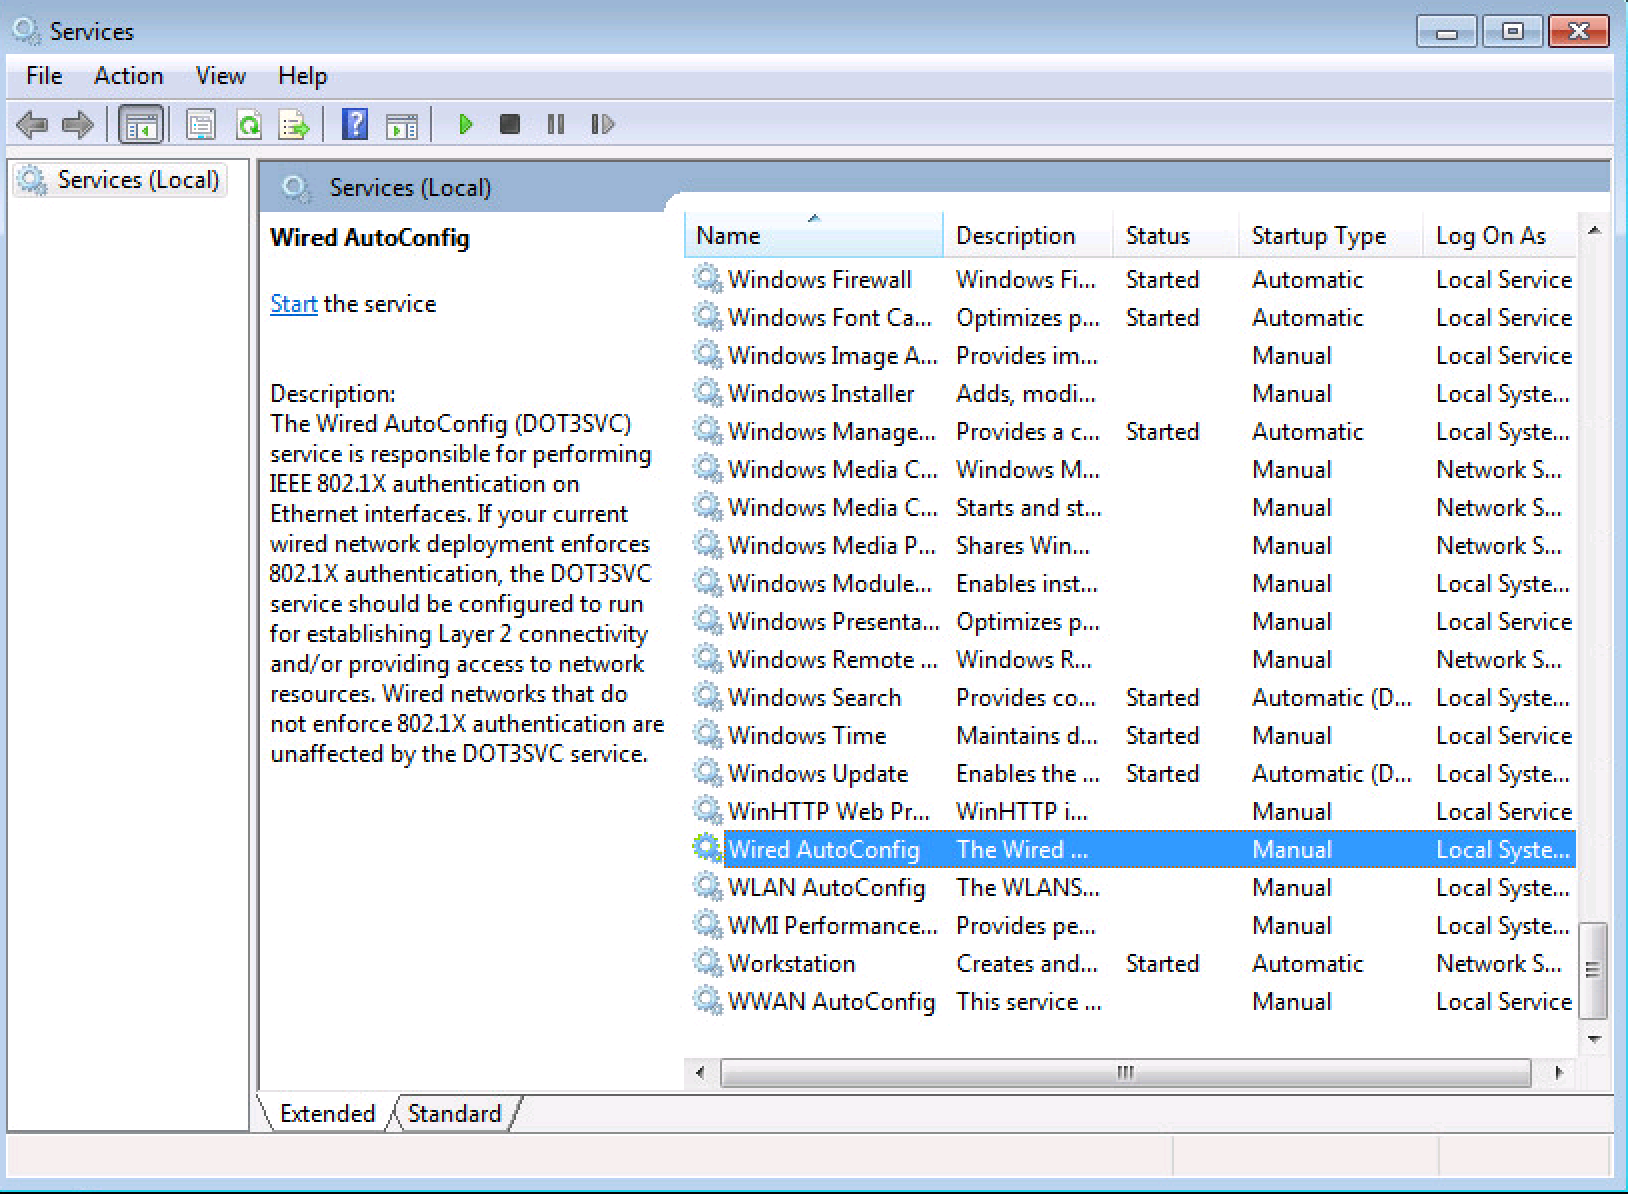
We will want to make sure this service is set to start automatically and then we will want to start it, as shown in the next two screenshots.
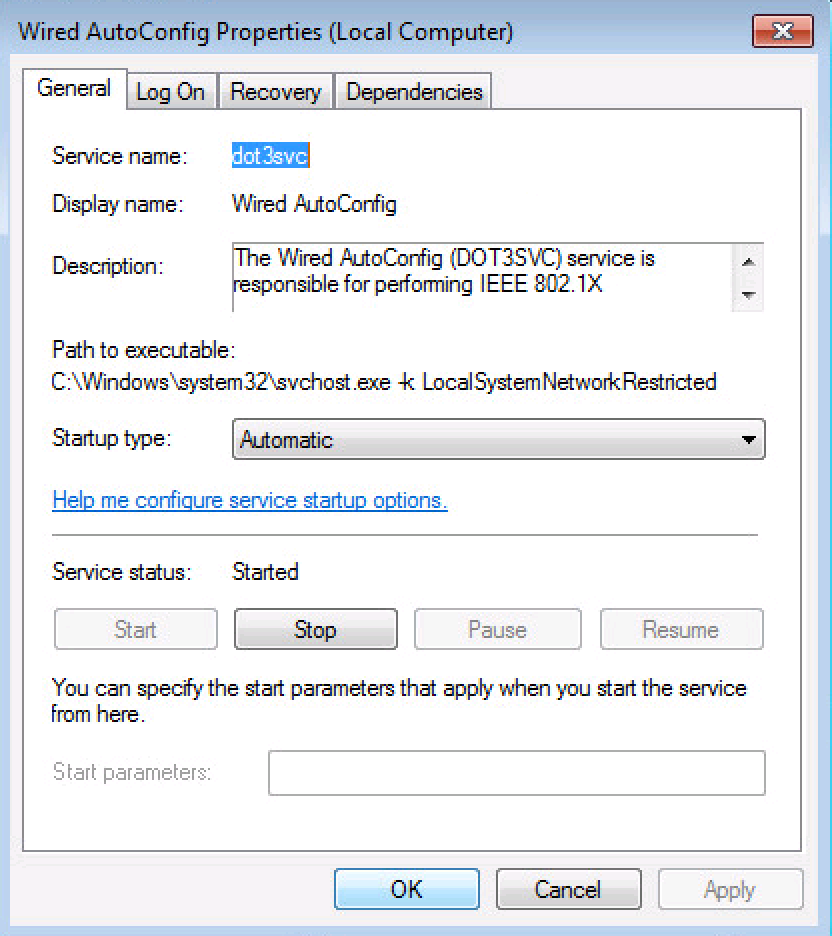
Once you have configured the Wired AutoConfig Service, check the Services Console to make sure it is started and set to Automatic. You can close the Services Console now.
5.3 Configure NIC for 802.1X with PEAP Auth
Alright now with the Wired AutoConfig Service Started, lets head back to our Network Interface Cards (NIC) property page.
I still had a few of the different windows opened so I just right clicked and selected Properties again, like the screenshot below.
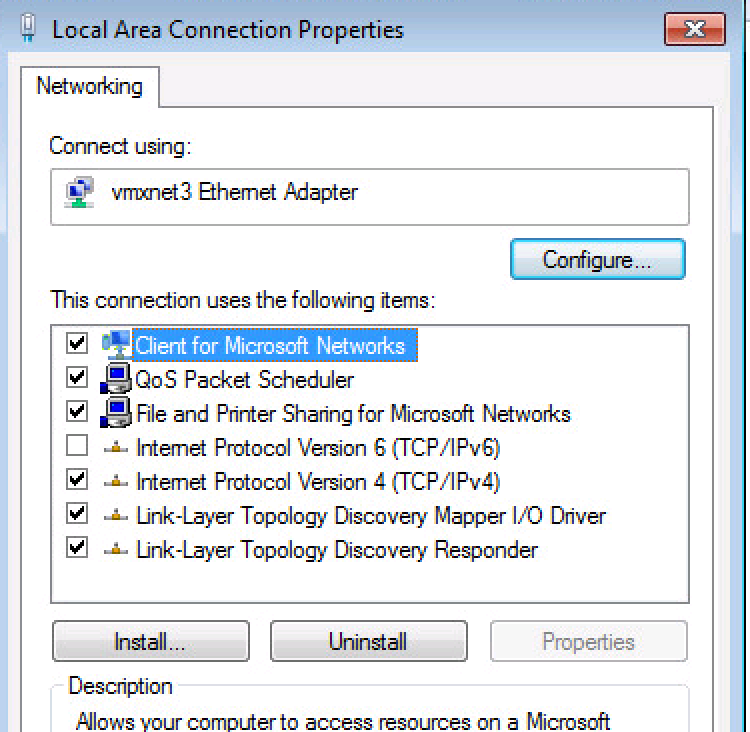
Now we have an Authentication Tab!! Select it so we enable our 802.1X PEAP Settings.
First lets enable 802.1X by selecting the Checkbox for it.
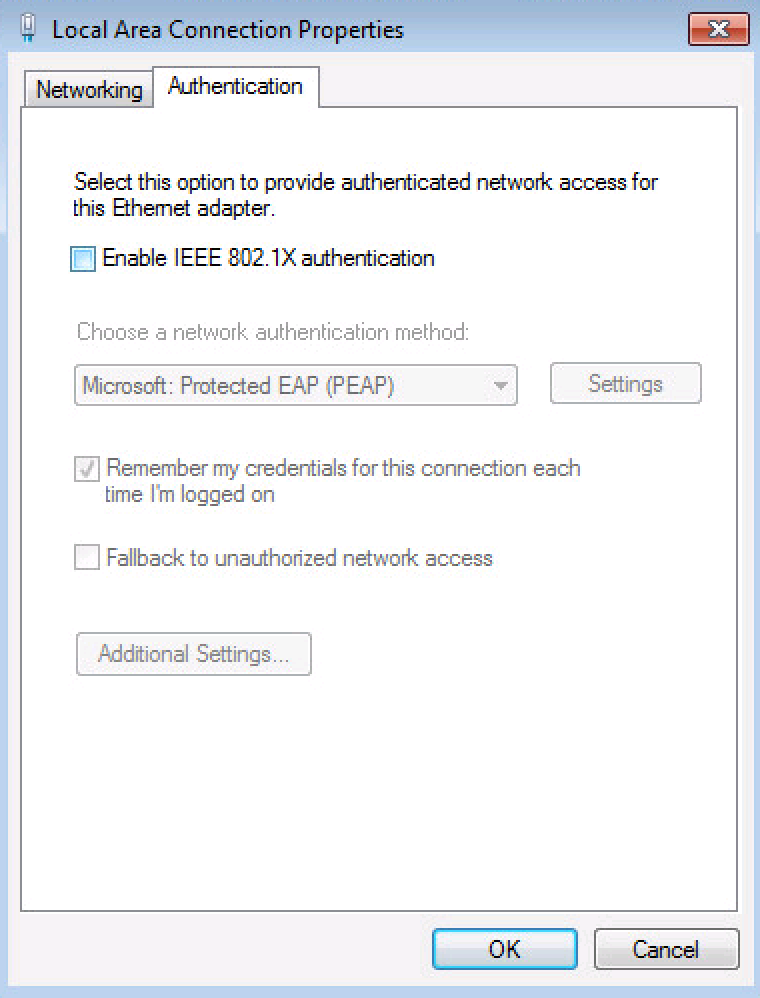
PEAP should be select as the Authentication Method by default so that can be left alone. Go ahead and click the Settings button.

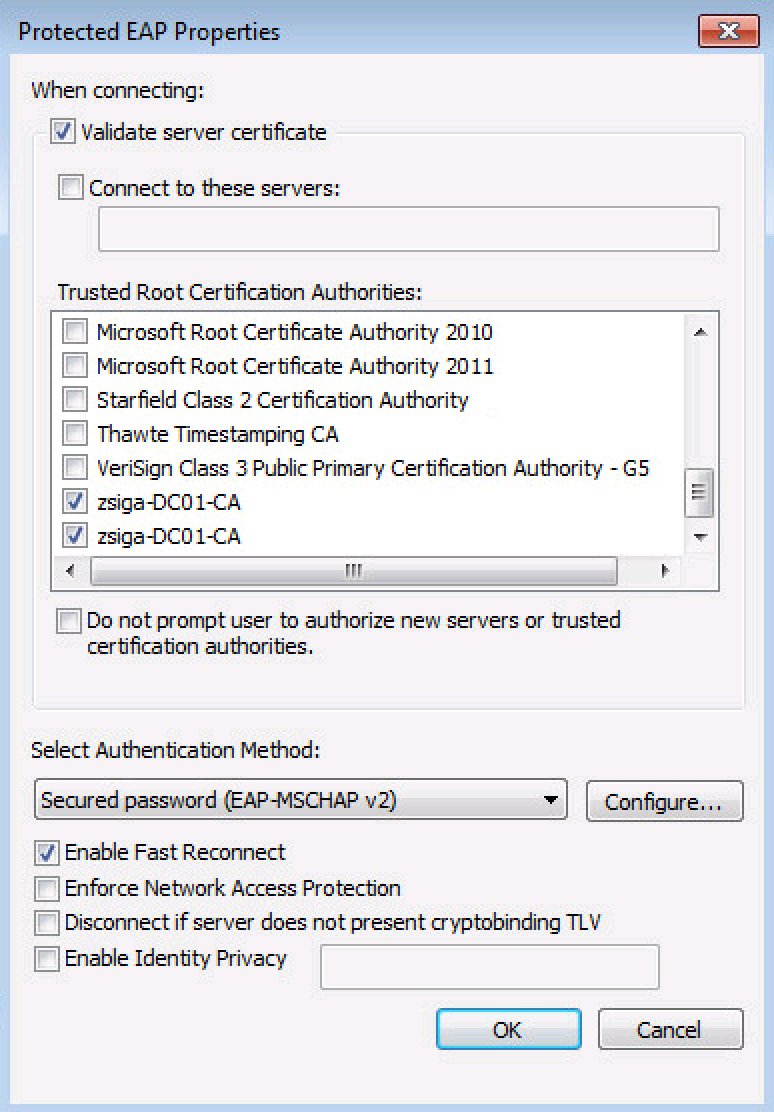
On the next window, we will want to make sure your Domain Certificate Authority Root Certificates are installed and selected in the Trusted Root Certification Authorities box. I have two installed and showing up in the list. If you do not see yours in the list, don’t forgot to scroll through, they might be further down like mine were. Everything else is fine here, go a head and click OK.
Now Click the Additional Settings… button.
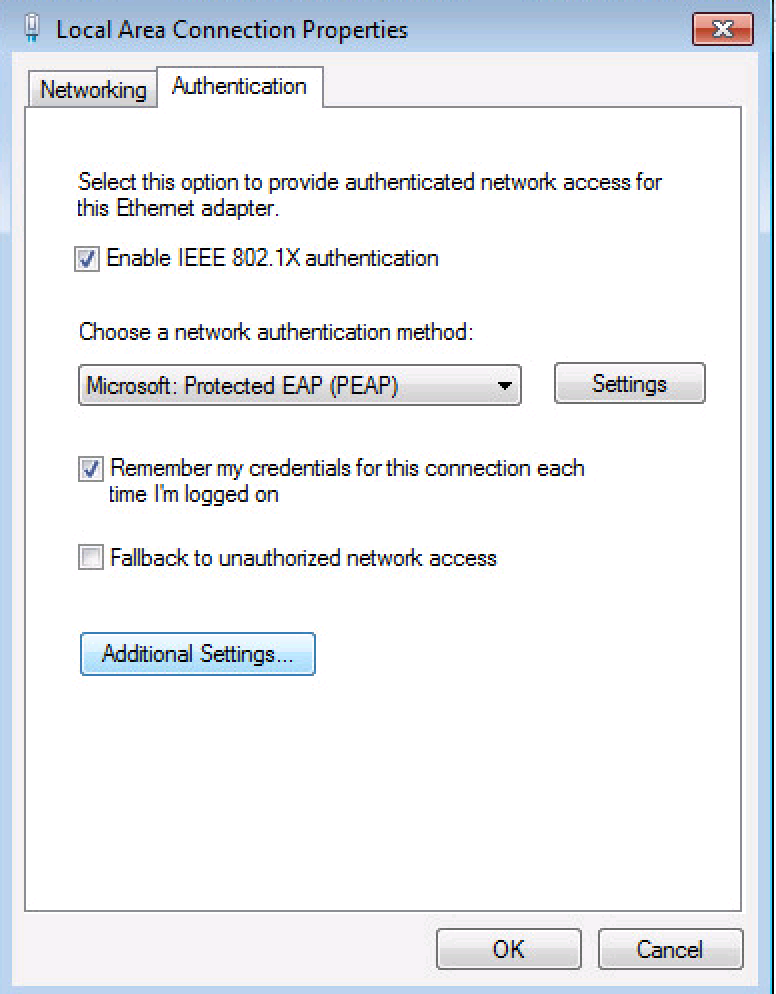
On this Advanced Settings Window, make sure the Specify authentication mode checkbox is checked and the option User or computer authentication is selected in the dropdown box. This is shown in the below screenshot! Click ok twice to finish configuring the NIC’s Authentication Settings.
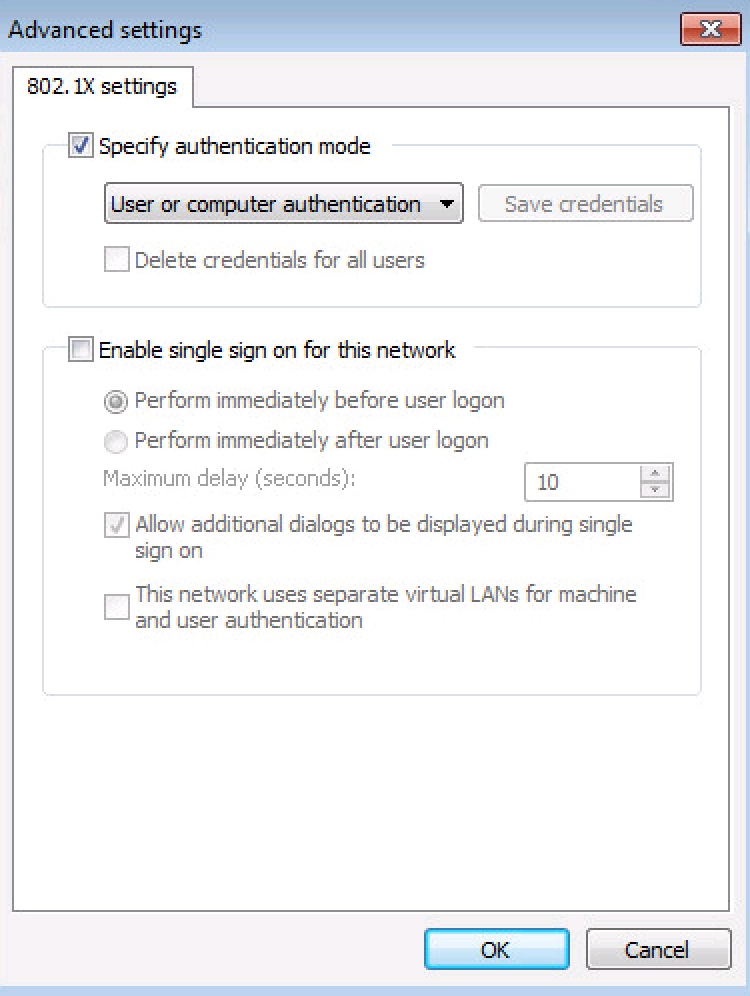
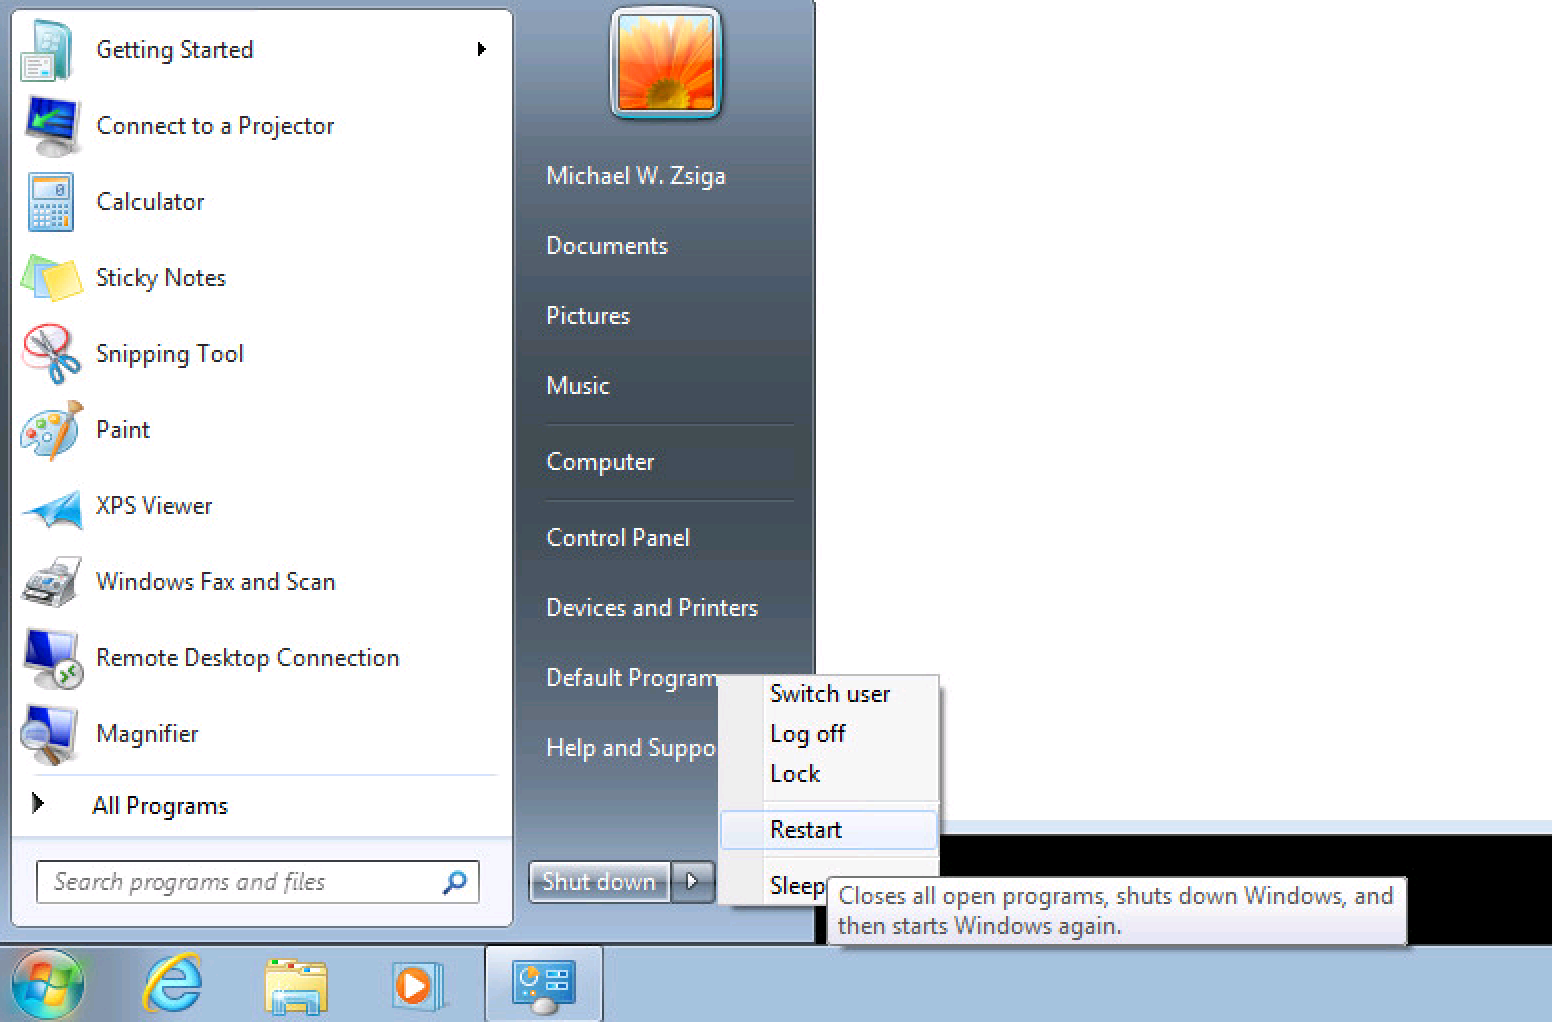
Now go ahead and reboot / restart your Test Host.
Your Test host is now configured for 802.1X authentication, specifically PEAP-MSCHAPv2. Lets go ISE our switchport now!
6. Enable our Wired Switchport for ISE Auth
Alright, we are so close, we can almost taste it!! I know I know, I am a corny nutball.
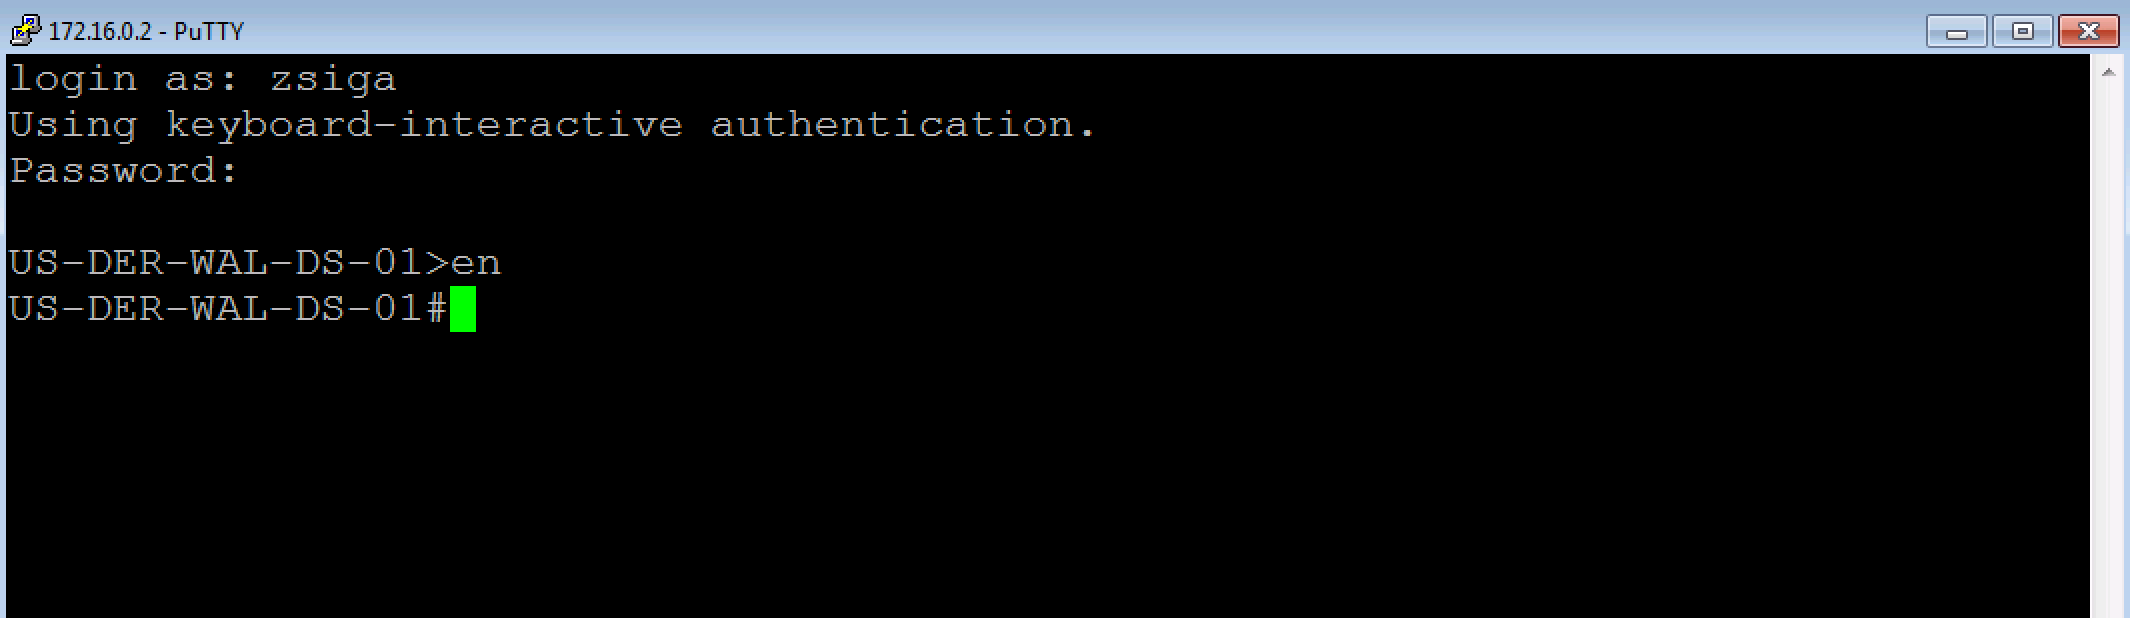
Lets get into out 3750e switch and check our Gi1/0/1 port configuration. I like Putty so I will use that. Our 3750e switch’s IP Address is 172.16.0.2. As shown below we SSHed into it with our local admin credentials.

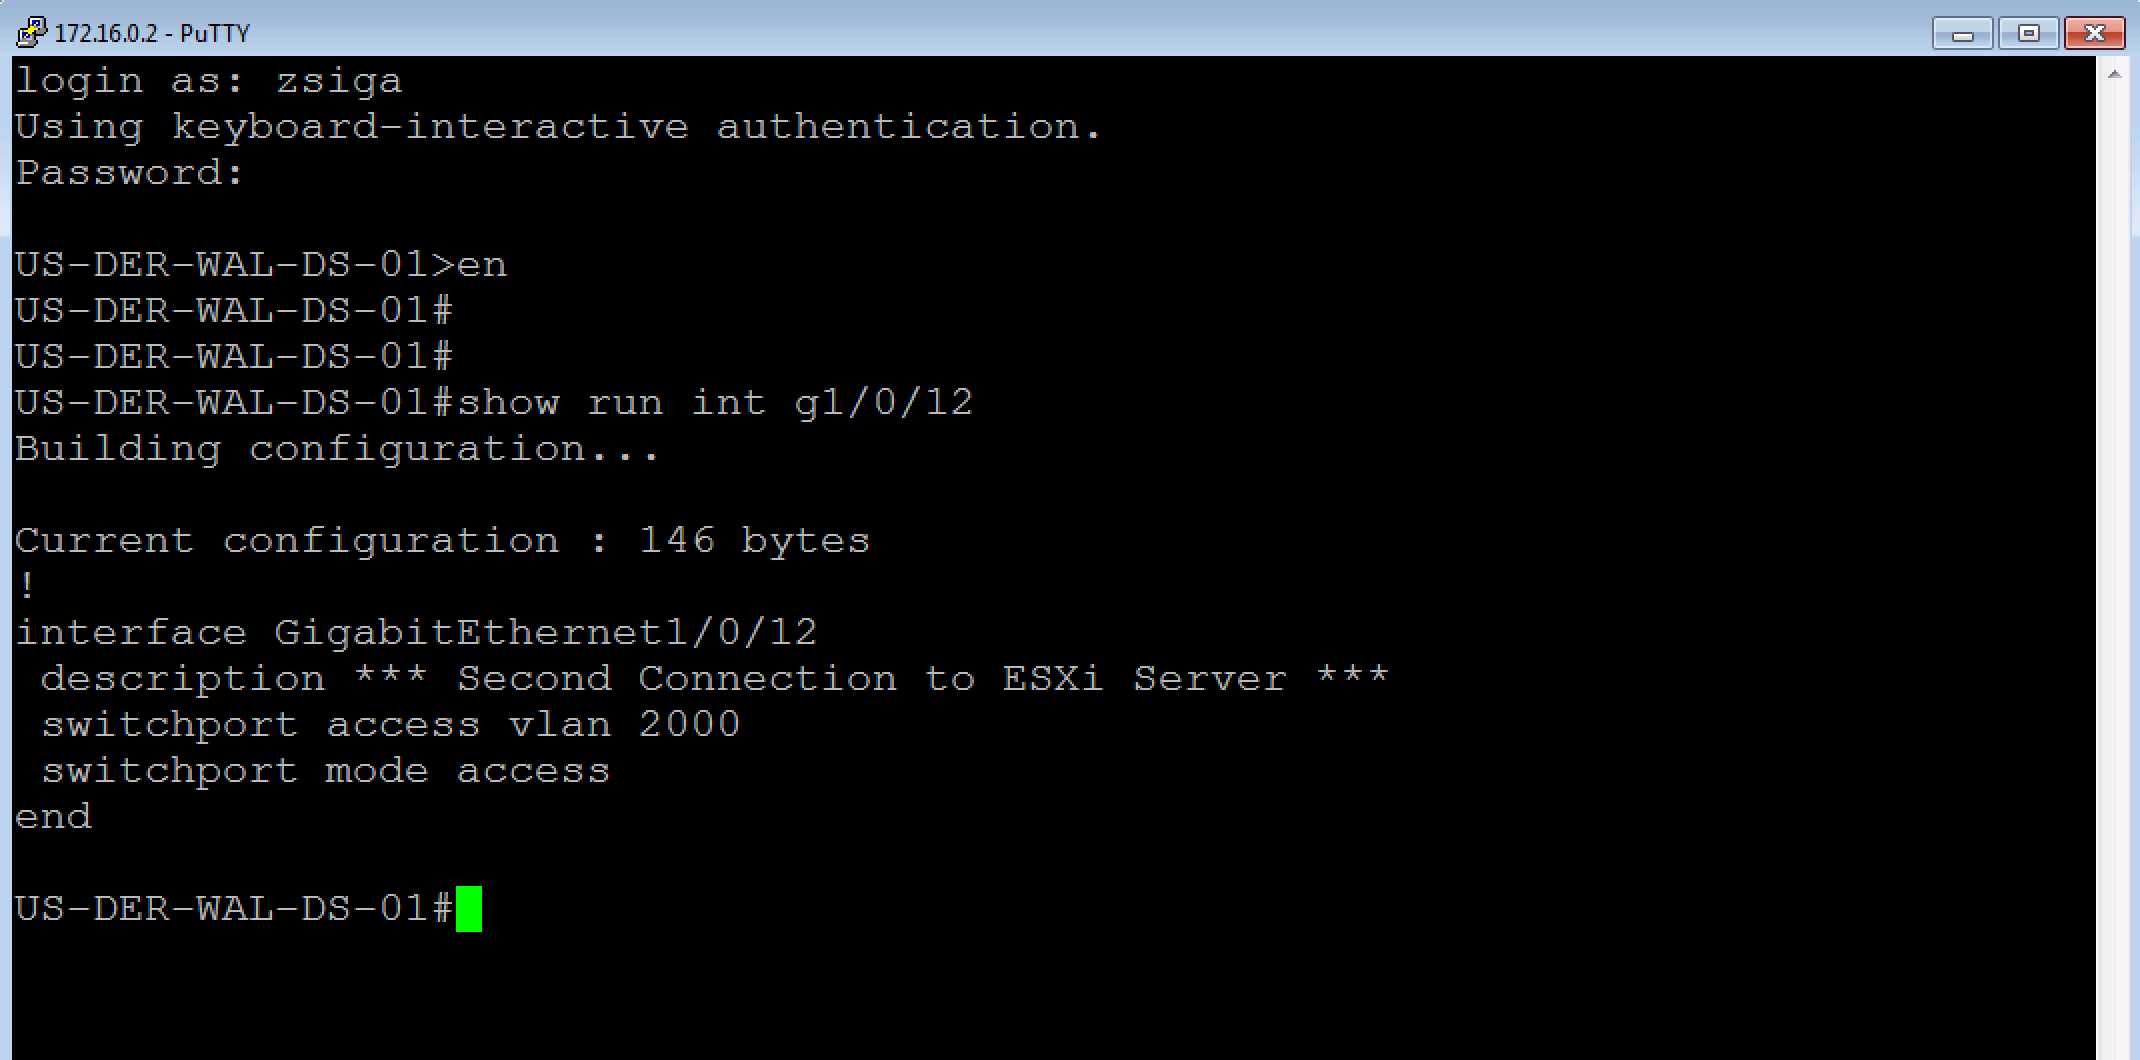
Now lets see what our Gi1/0/12 is configured for? Go a head and issue the ‘show run int g1/0/12’ command. Looks like our port is just configured as an access port only, no authentication settings have been applied to the port. In essence, this port has not been ISED yet. Lets remedy that!
If you have been following along, we went over the specific switchport configuration that we would be applying to a port to ISE it in ZBISE06 – Cisco ISE 2.3 Adding Network Access Devices (NADs) – Cisco Switch. Here is what we applied for an easy copy / paste if desired.
switchport access vlan 2000
switchport mode access
authentication event fail action next-method
authentication event server dead action authorize vlan 2000
authentication event server dead action authorize voice
authentication event server alive action reinitialize
authentication host-mode multi-auth
authentication open
authentication order mab dot1x
authentication priority dot1x mab
authentication port-control auto
authentication periodic
authentication timer reauthenticate server
authentication timer inactivity server
authentication violation restrict
mab
dot1x pae authenticator
dot1x timeout tx-period 10
spanning-tree portfast
The below two screenshots show us applying this configuration and then validating with a show command that it was actually applied to the interface.
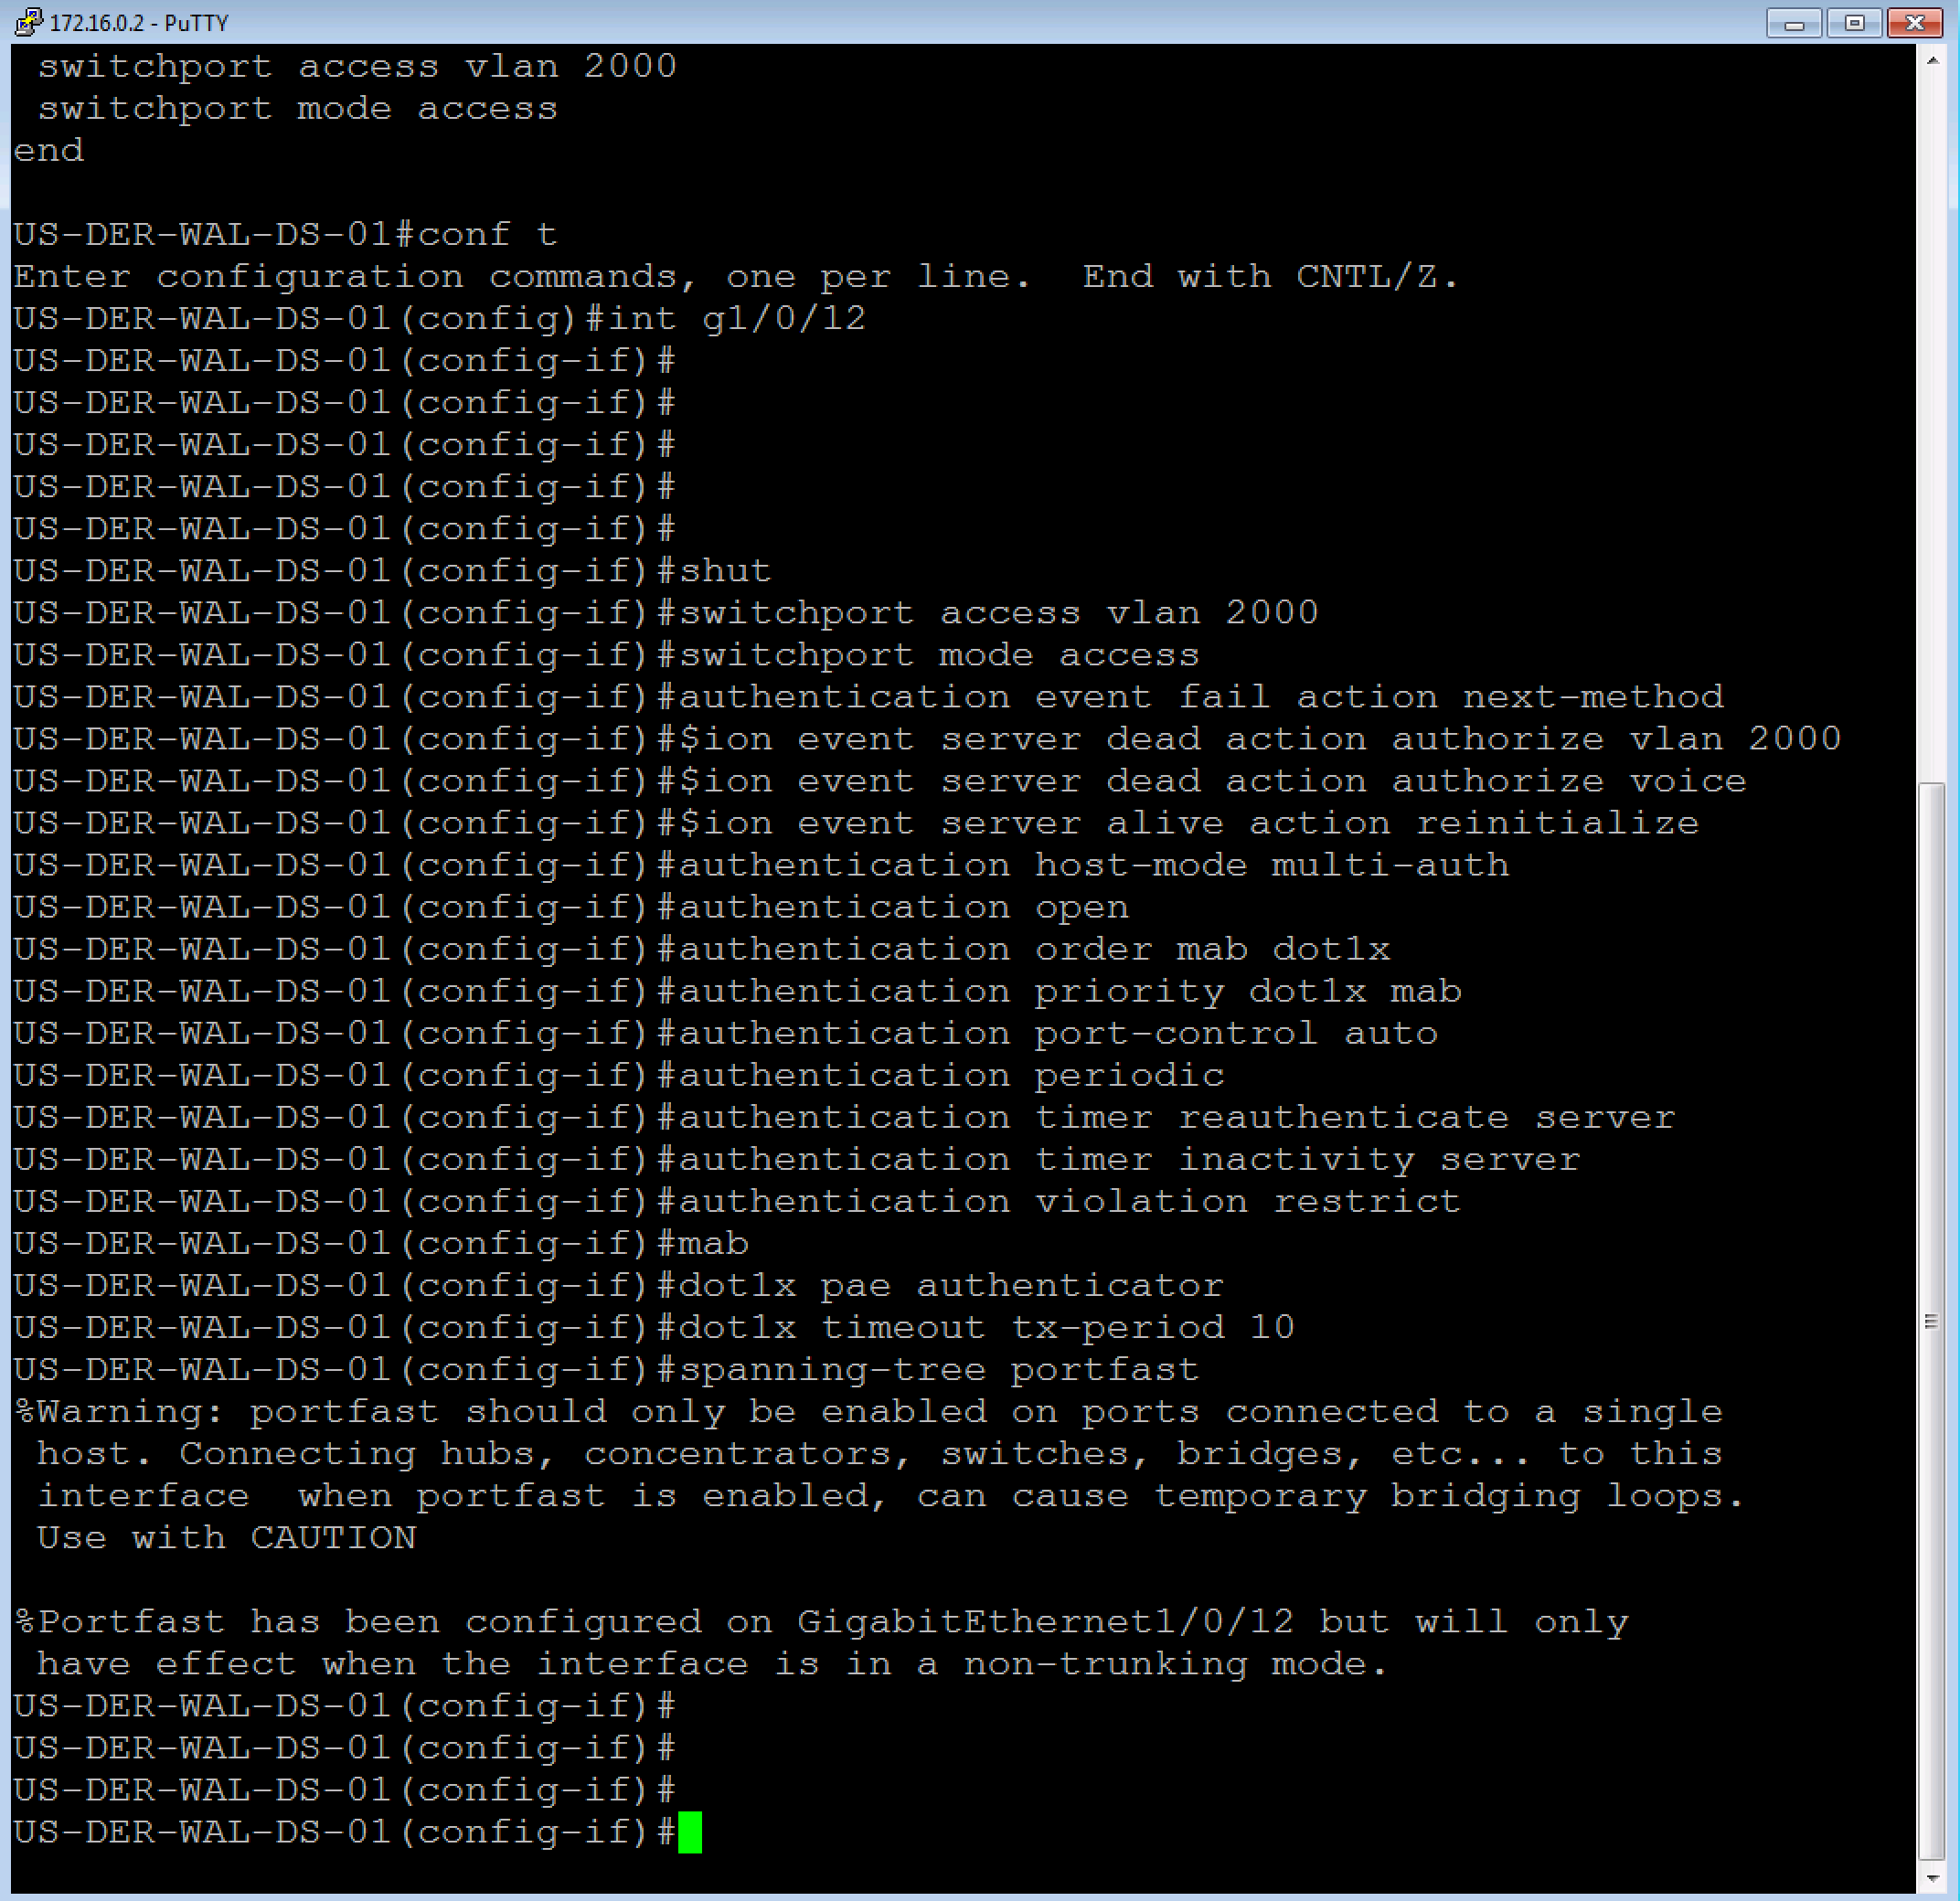
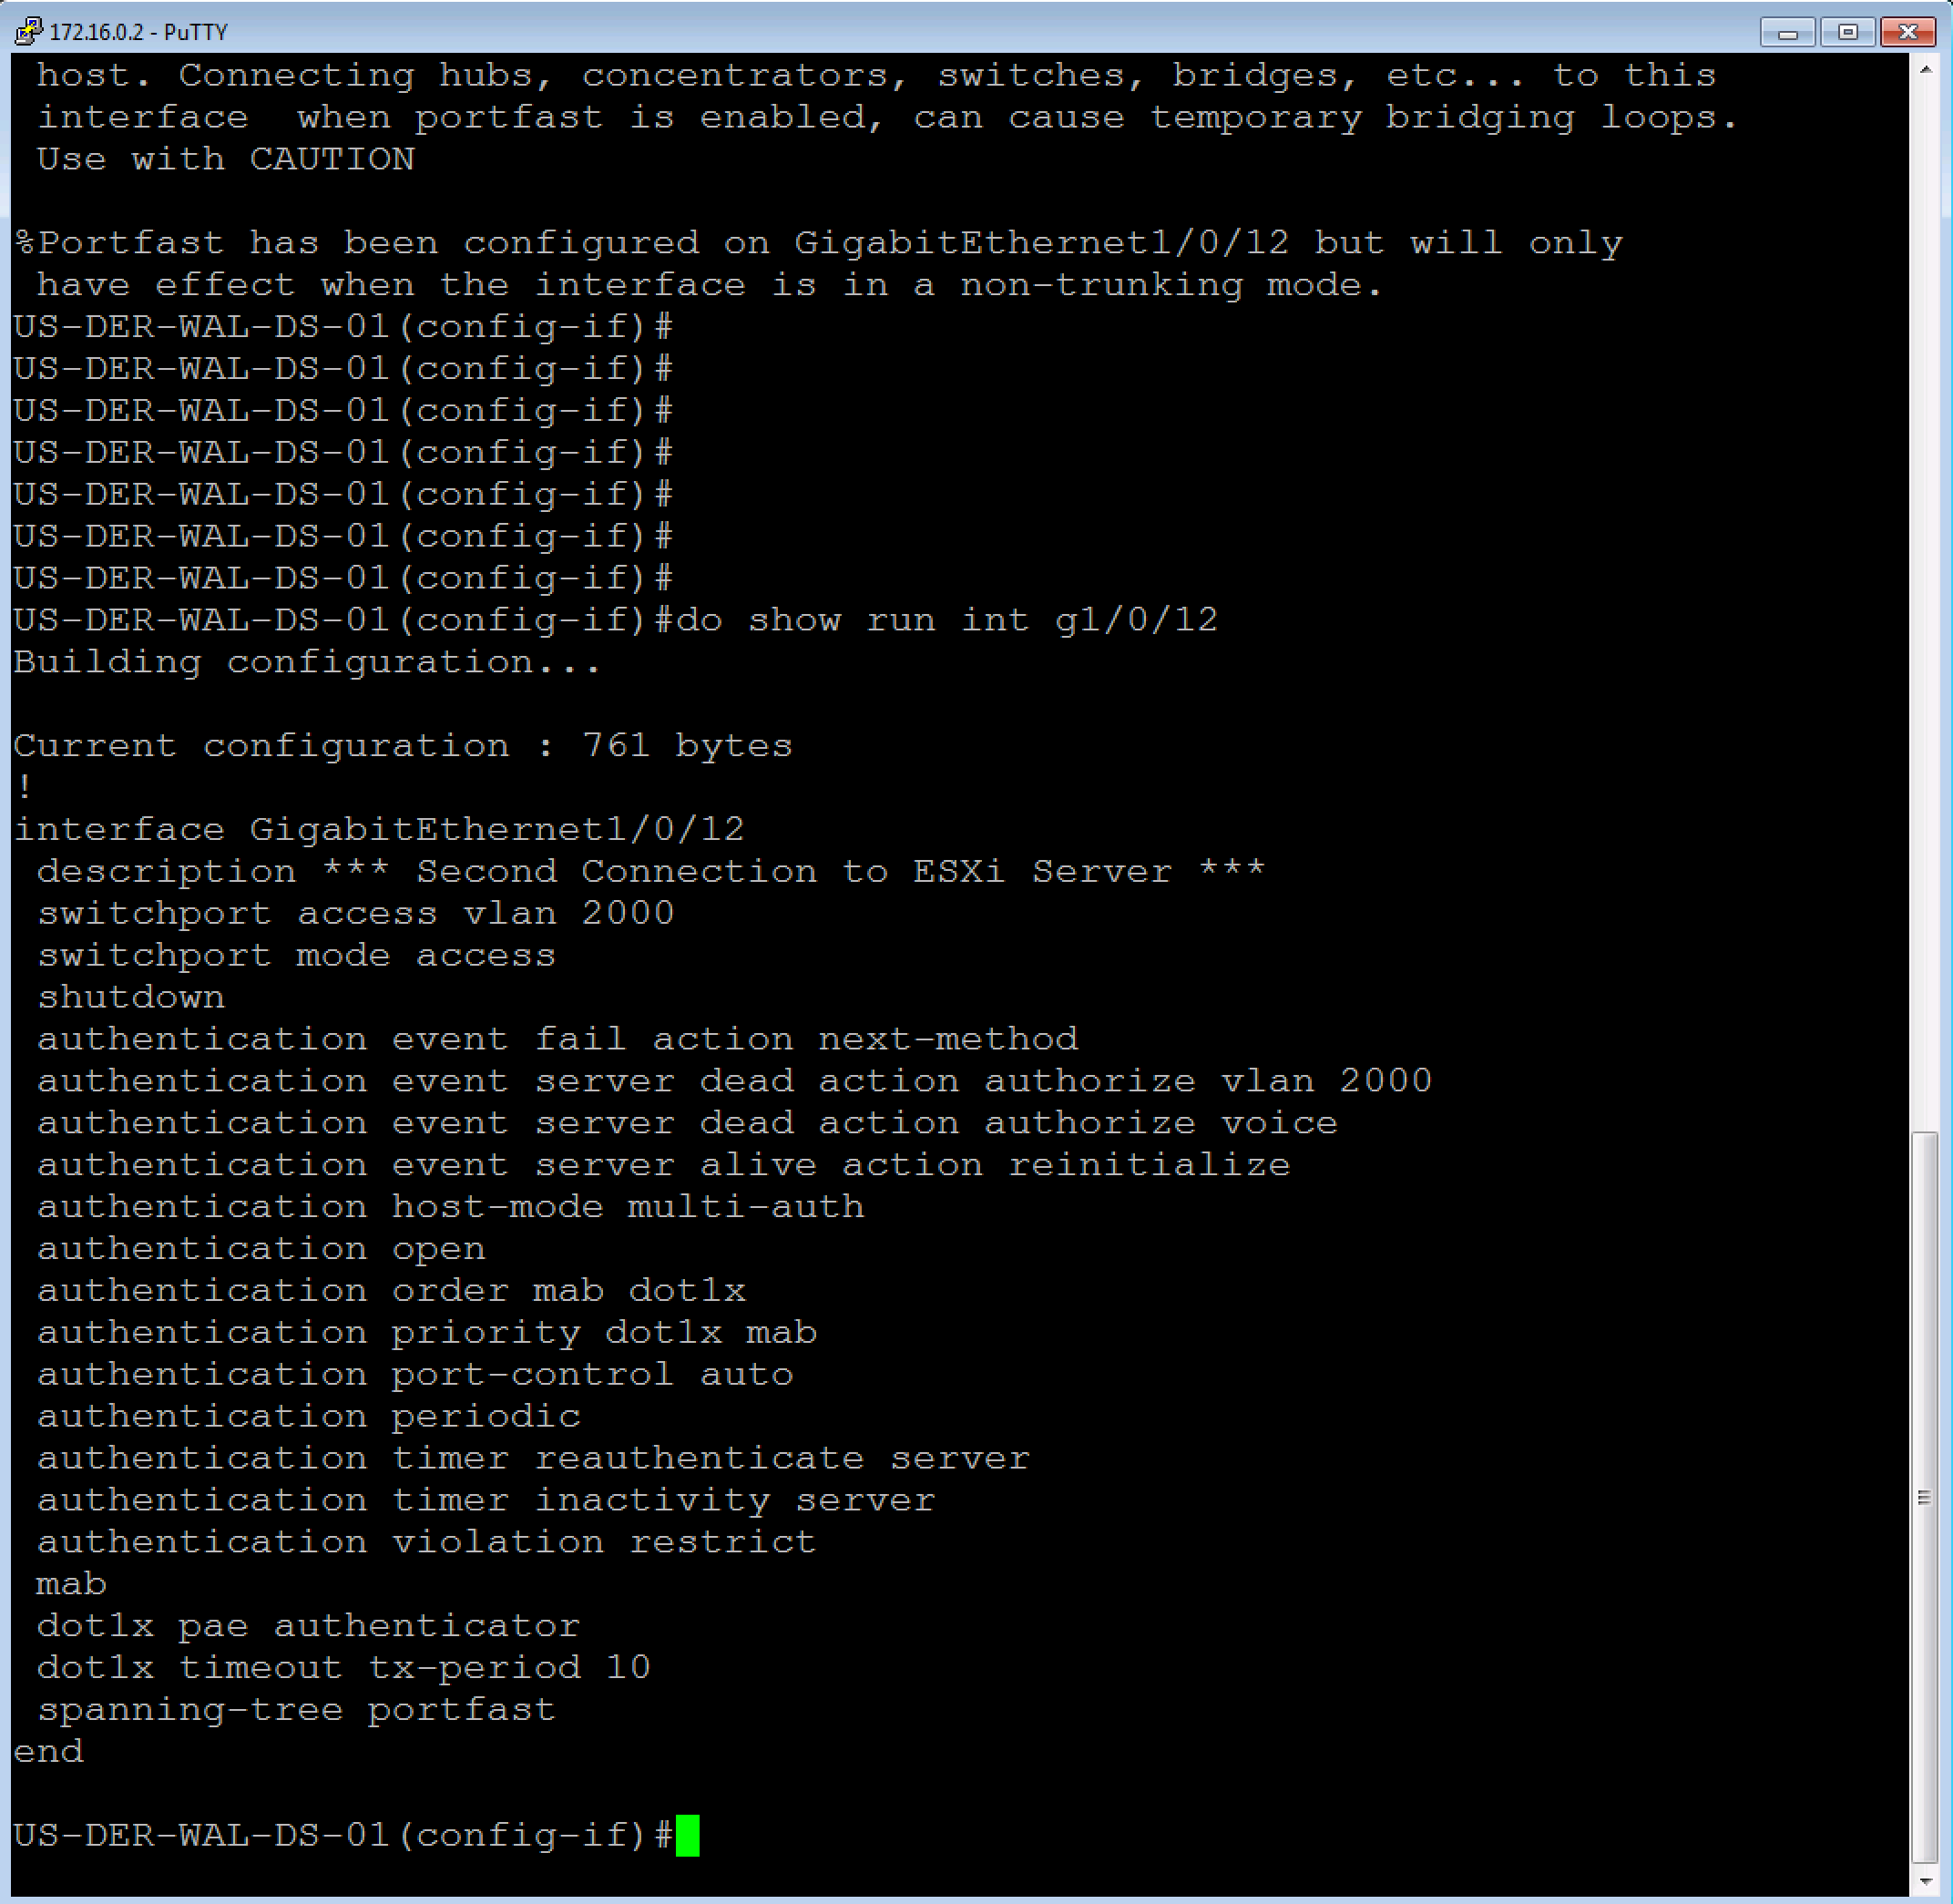
And we just ISED Port Gi1/0/12!! Now all we have left to do is our validation and testing of these three use cases!! I can totally see the light now :), can you?!?!?!?!
7. Validation and Testing of our Use Cases Configured
To start off our Validation and Testing portion of this installment, make sure you are logged into ISE and on the Operations -> Radis -> Live Logs page, and that you are logged into your network switch, in our case its our 3750e.
7.1 Domain PC
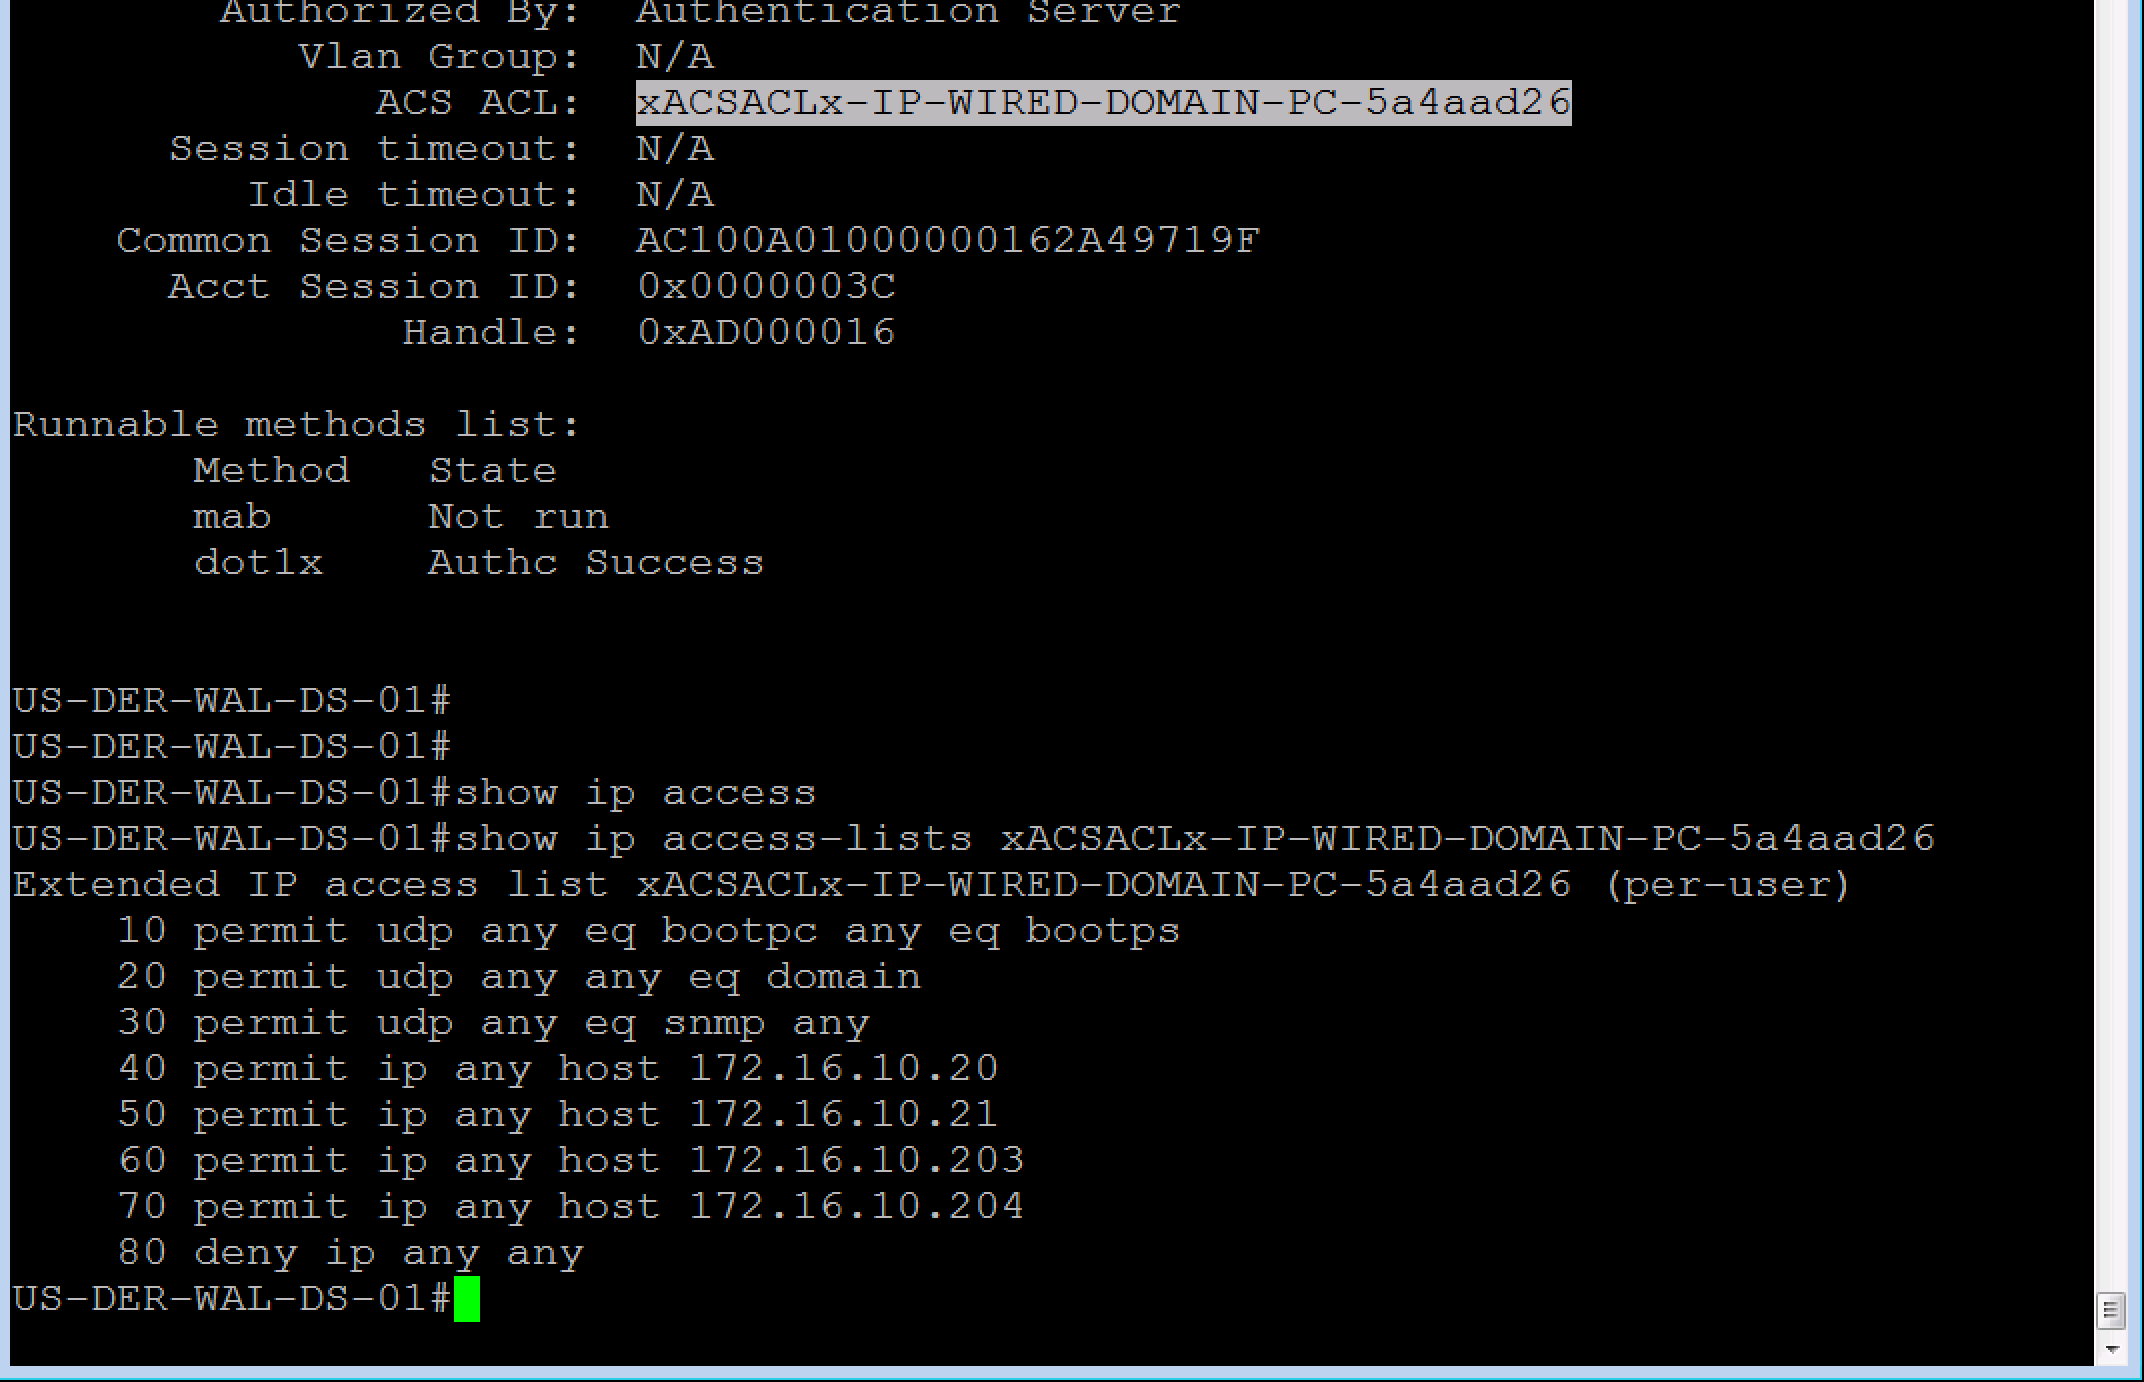
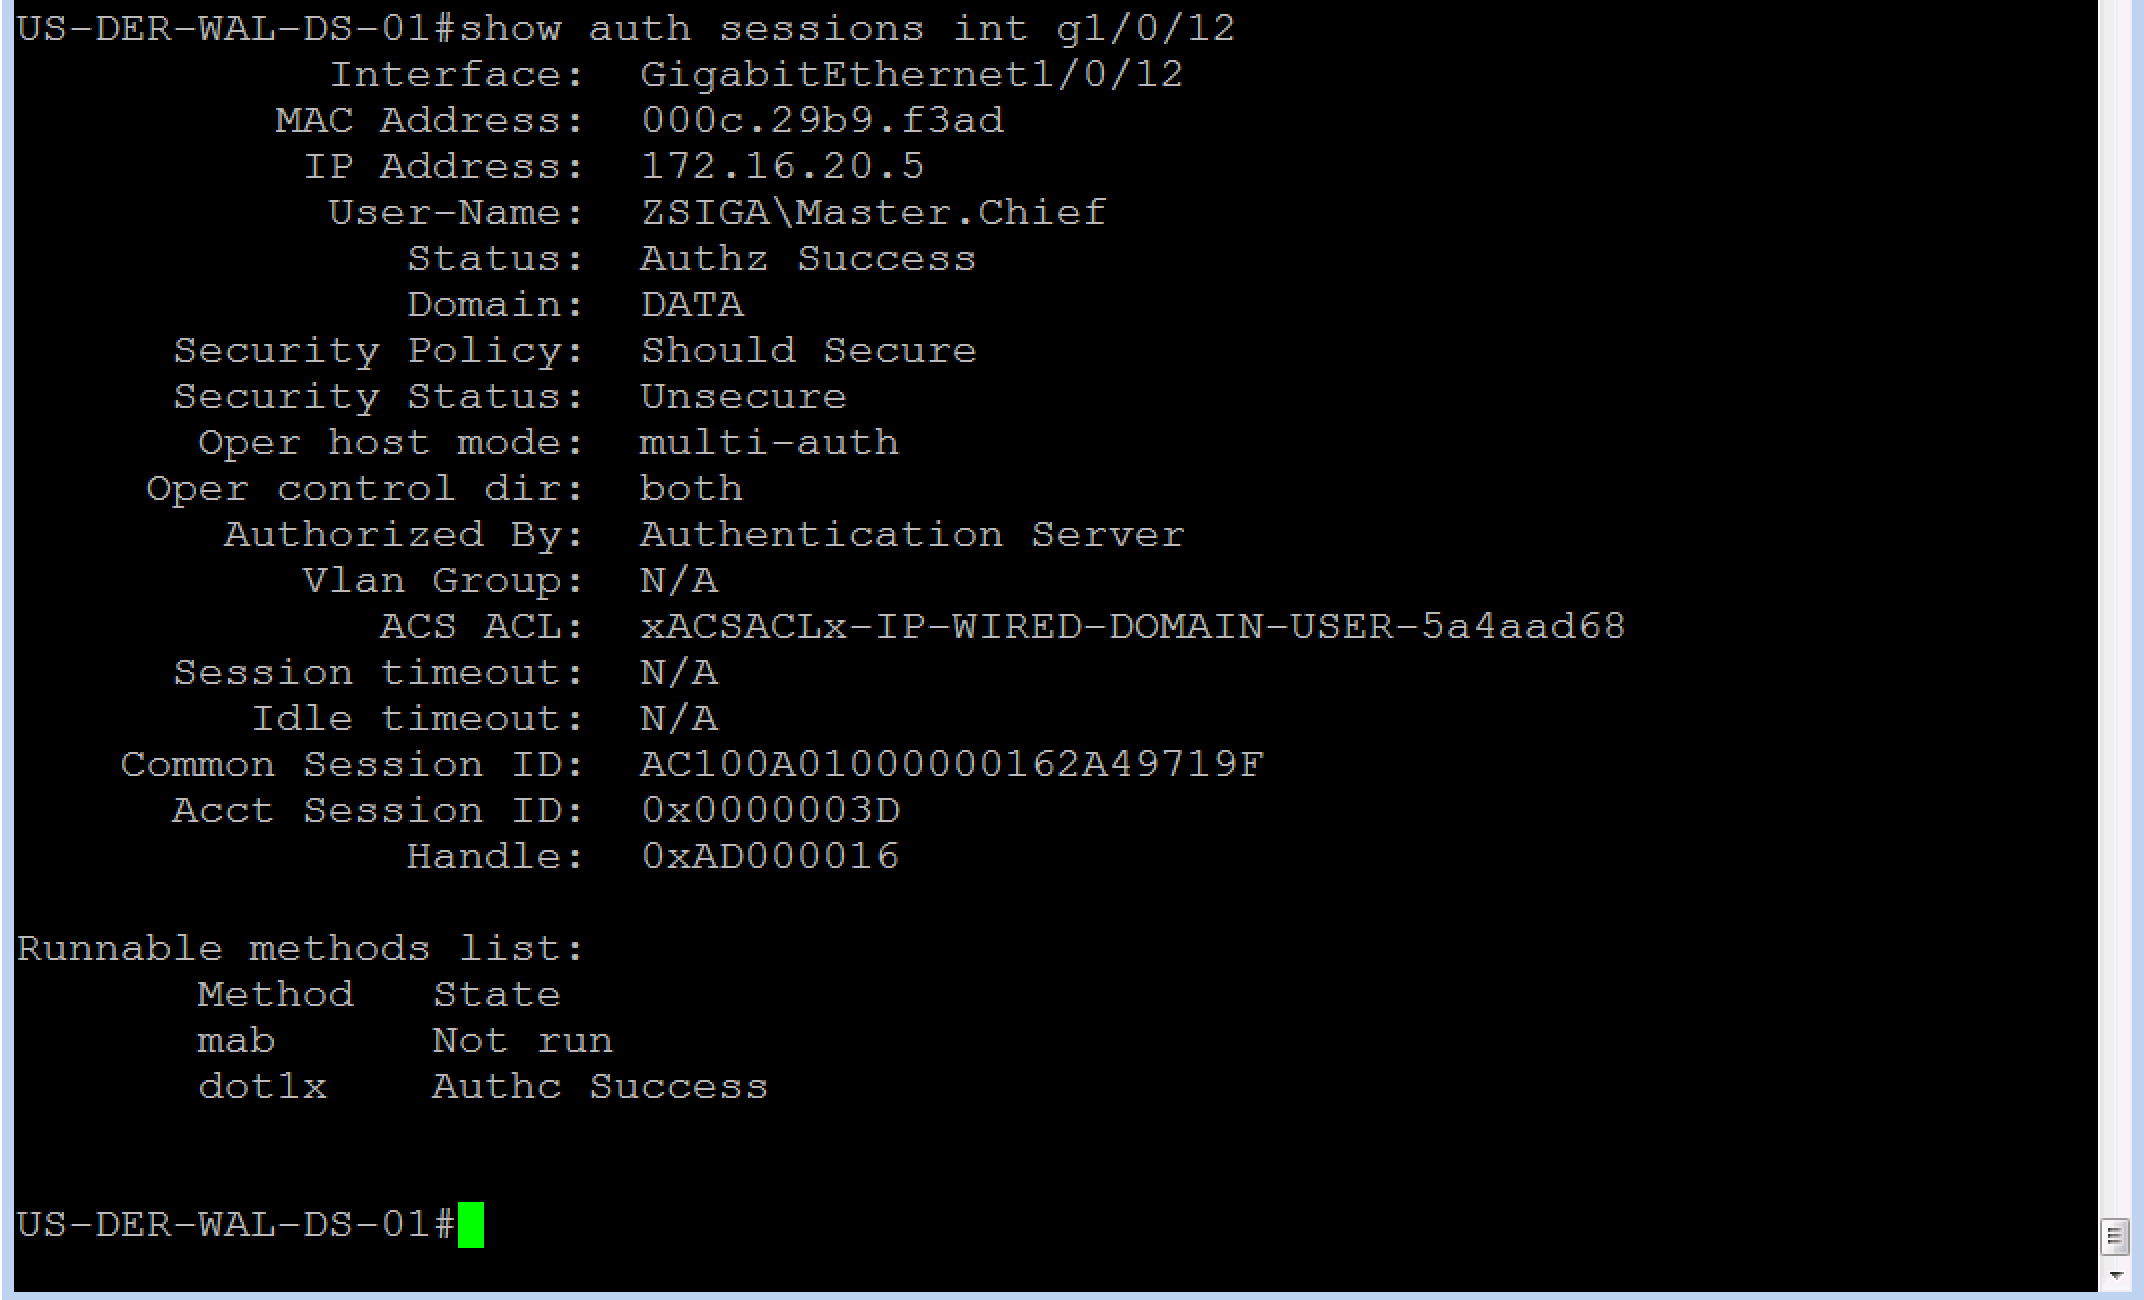
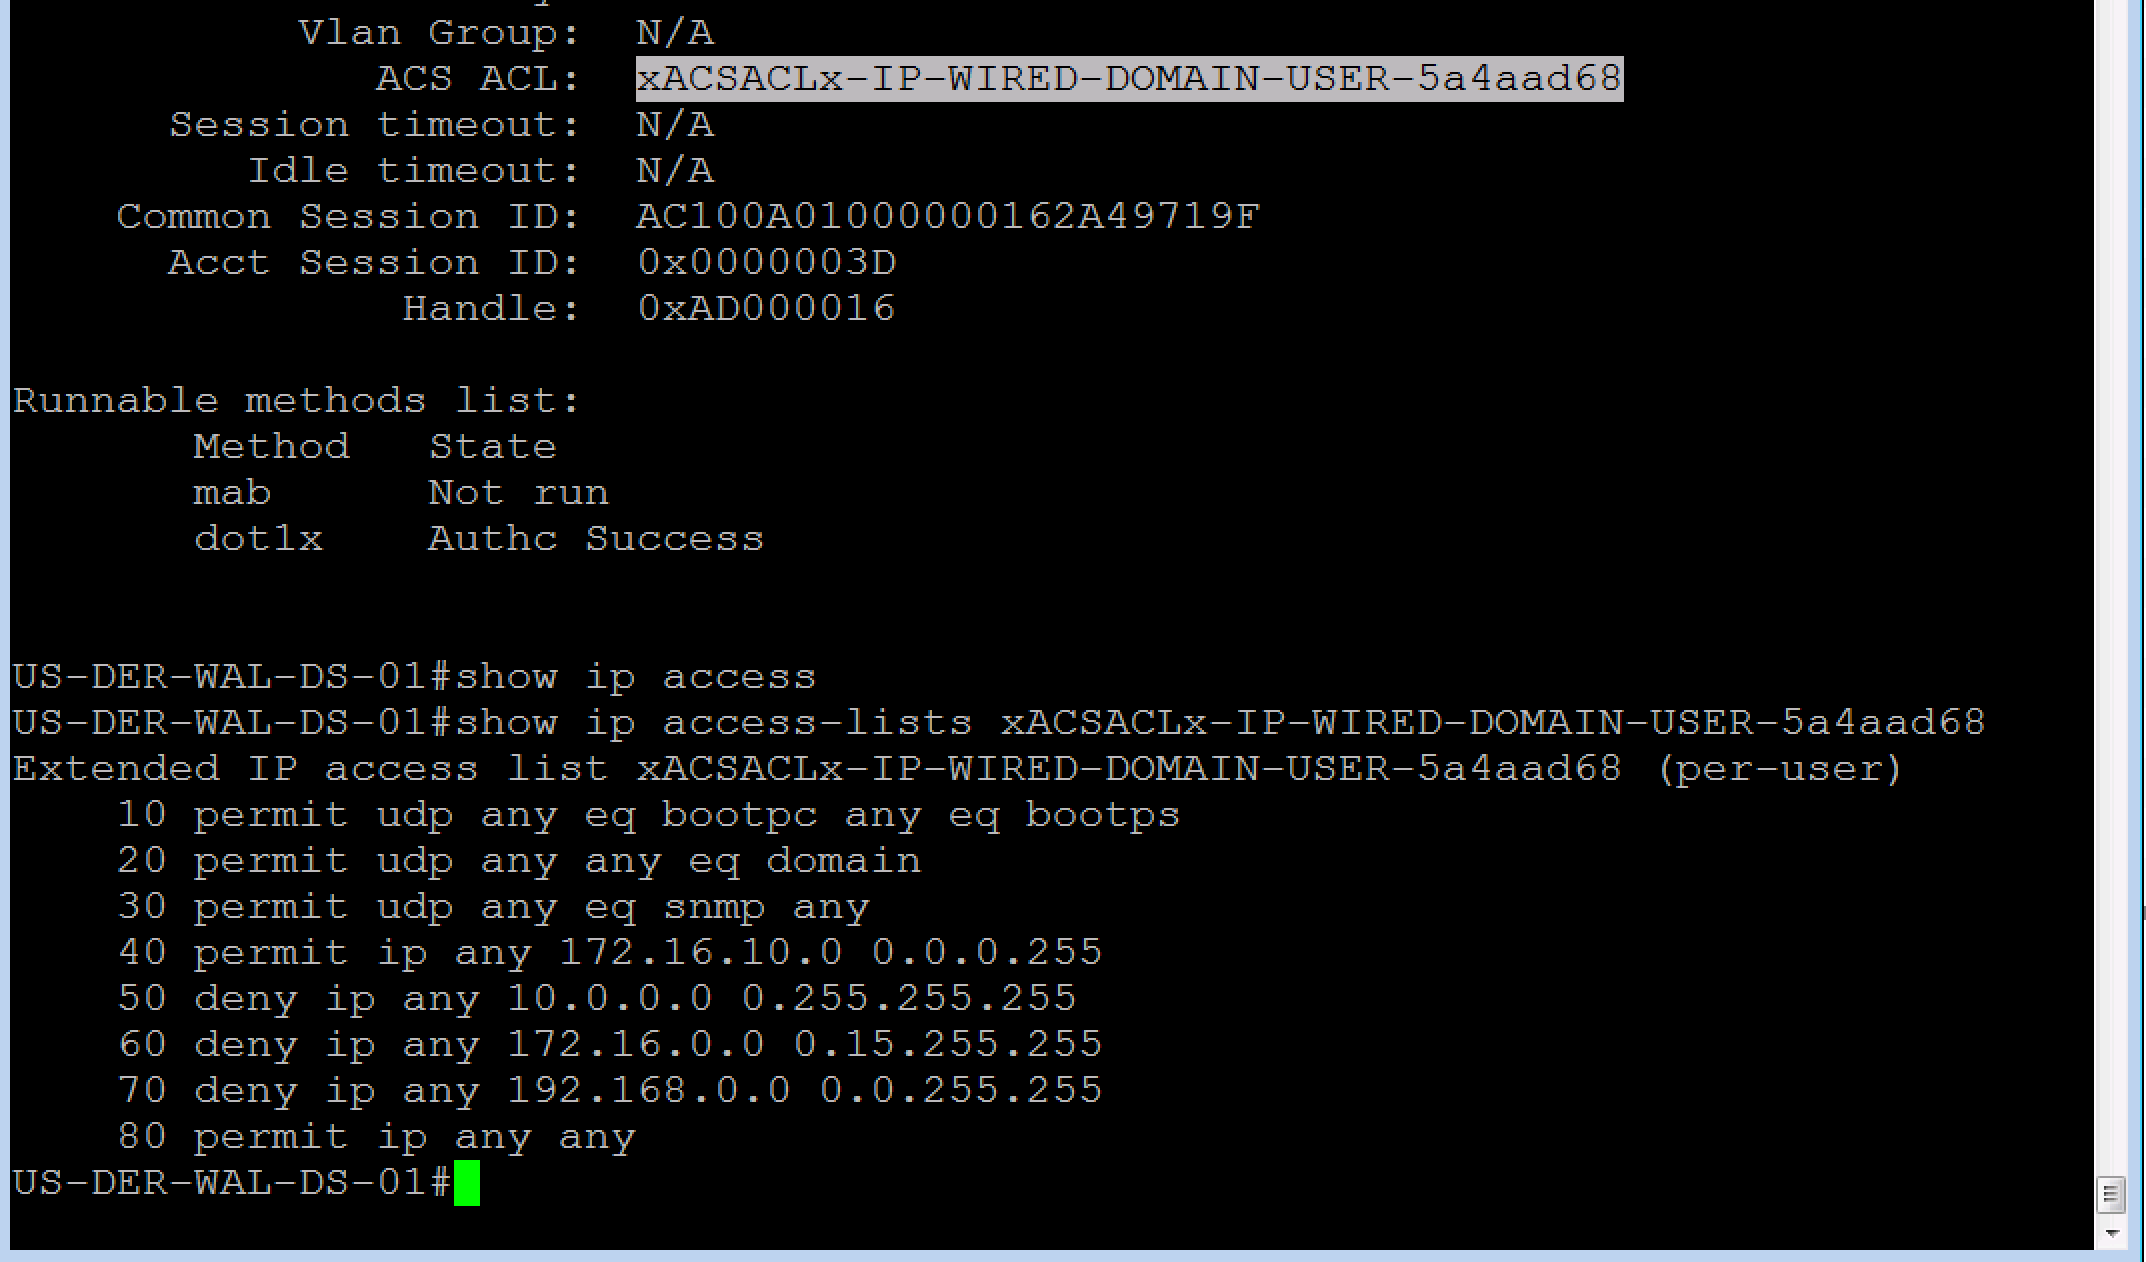
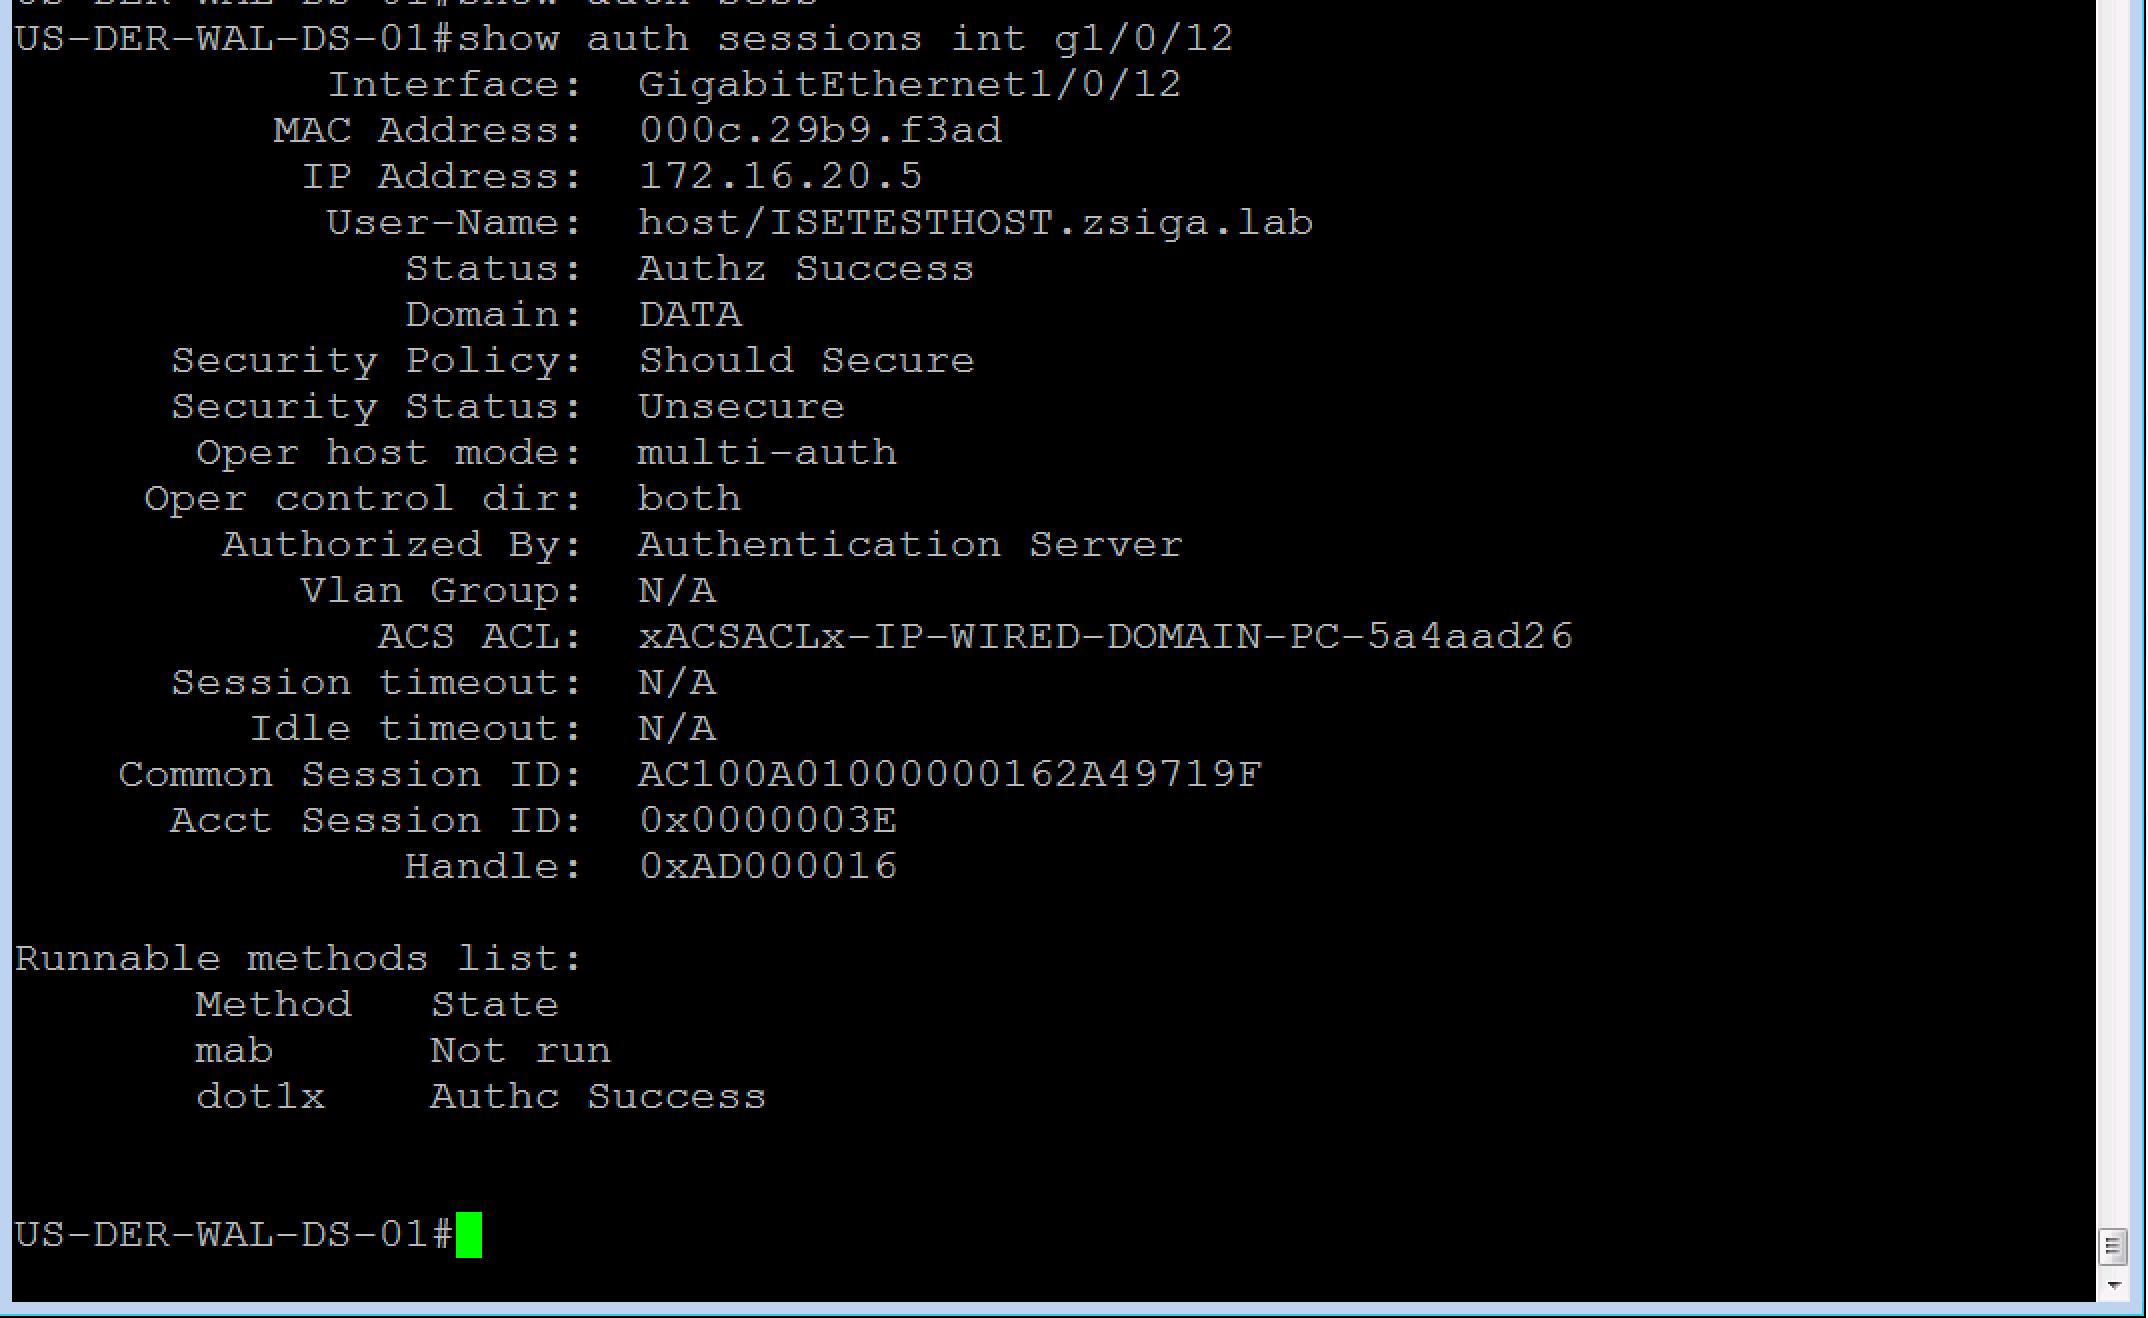
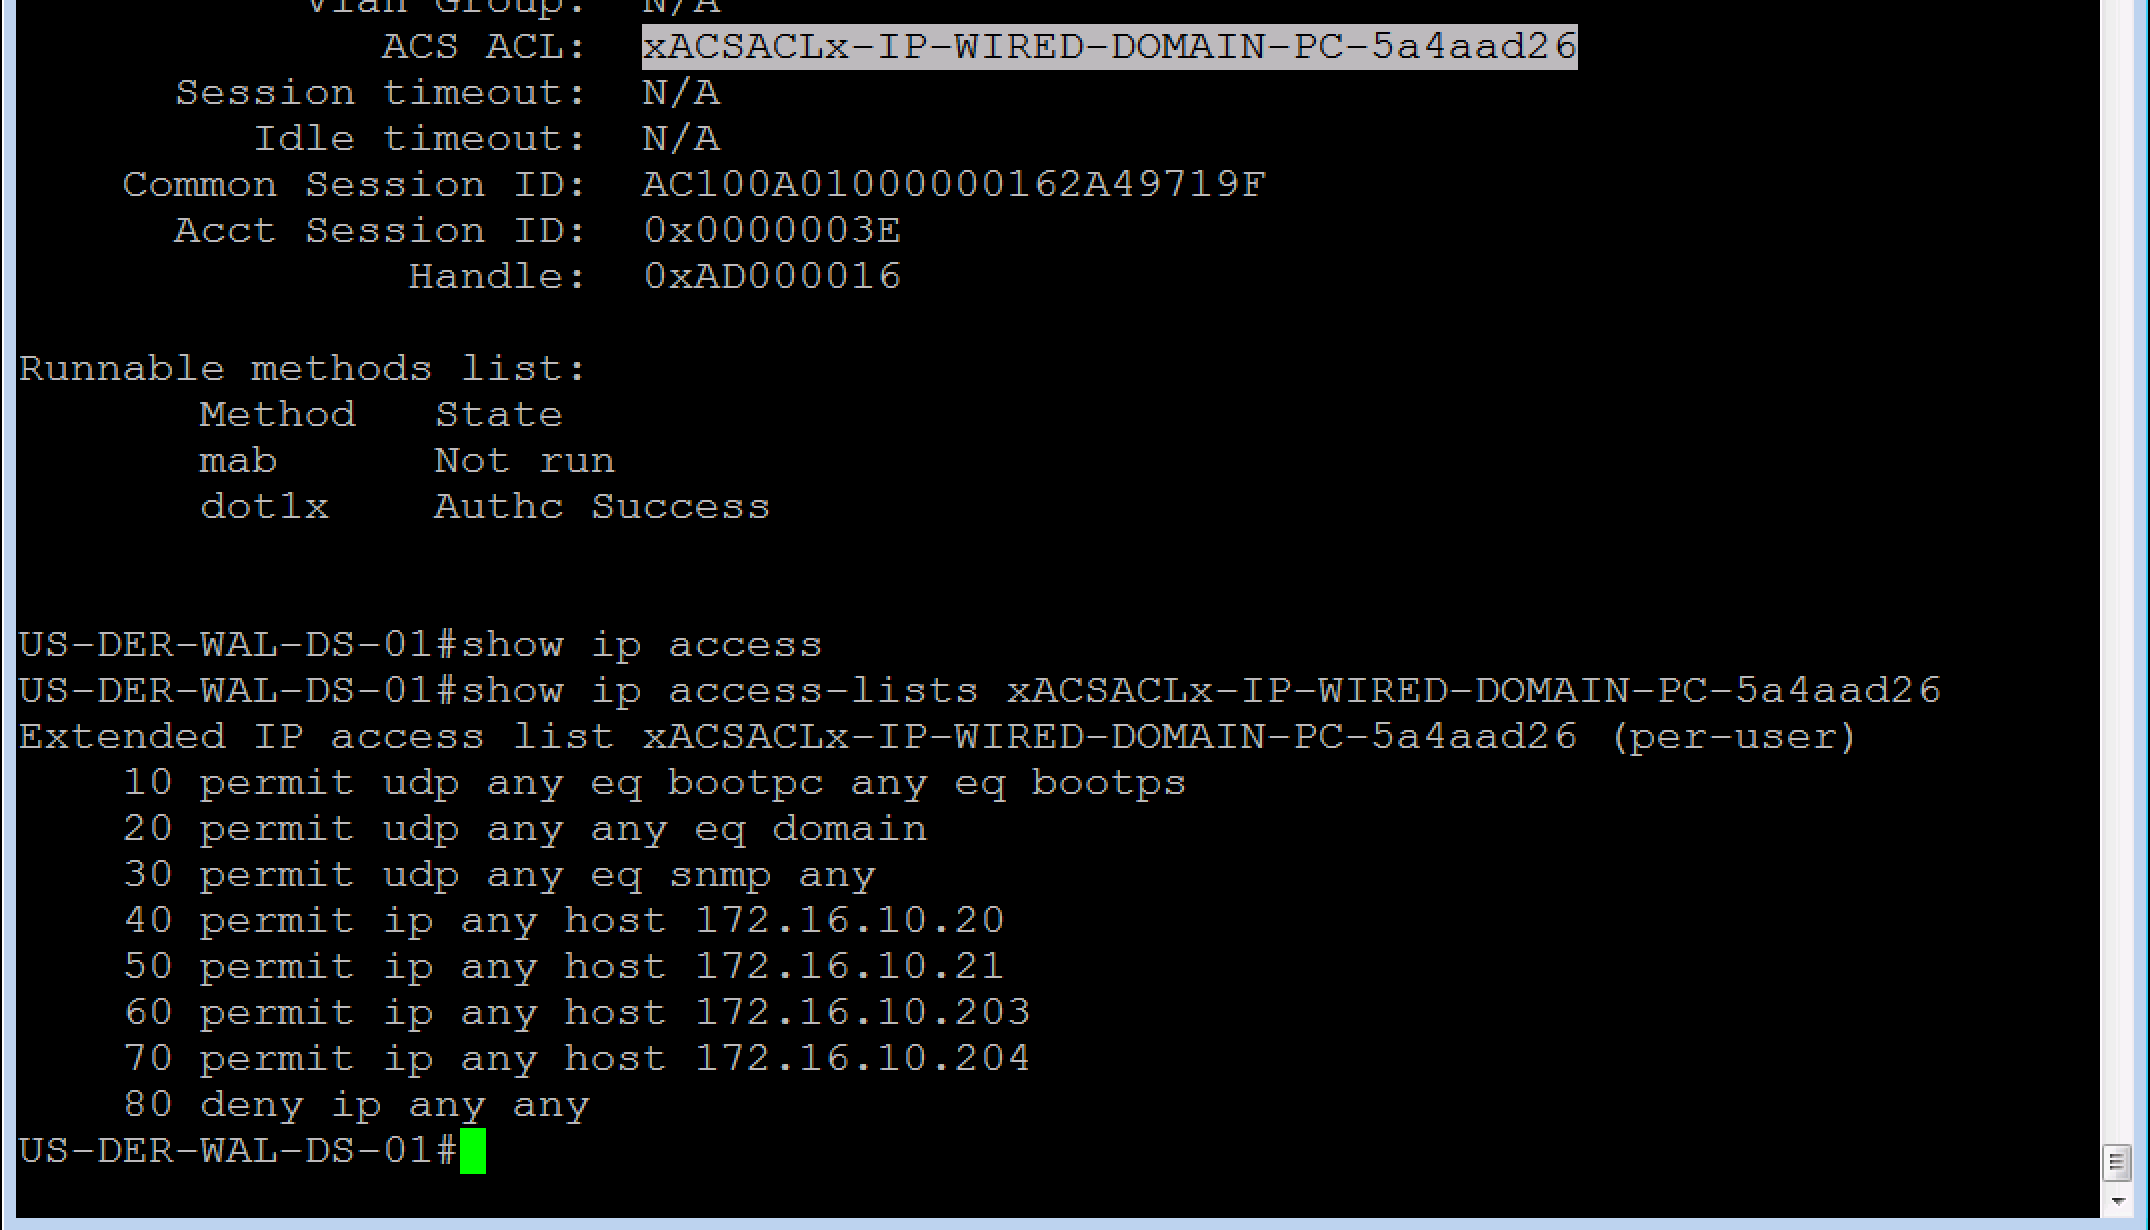
Our very first step here is to no shut our G1/0/12 as we left it in the shut state after ISEing the port. Then we will issue this command “show auth sessions int g1/0/12” . This command is going to be your best friend!! You will see in the screenshot below that we no shut our port and then ran the Auth Sessions command. The show auth sessions command is going to give back ton of information and we are not going to go over each item. The main items that we care about is if the session was authenticated and authorized. You will see at the bottom of the output that dot1x has a Authc Success which shows that Authentication is good to go. If you look further above you will also see that the Status is Authz Success which validates that the Authorization was successful, whatever it was.
Now that we know the session was both Authenticated and Authorized, we need to do some due diligence to verify the session has the correct policy. In the Show Auth session output, you should see an ACS ACL that should have the proper downloadable ACL that we configured and assigned to this use case. In our screenshot below, this dACL is named xACSACLx-IP-WIRED-DOMAIN-PC-5a4aad26. From the name we can quickly see that it should be the right dACL for this use case but lets verify what was downloaded to make sure.

If you copy the dACL name, easier than typing it all out, and the append it to the show ip access-list command you will see the dACL configuration that was downloaded from our ISE Cluster. This is shown in the output below.
Note: Something to know, if you do a show run and attempted to find these dACLs, they will not show up as they are not part of the running configuration. They are downloaded when they are needed and removed once they are no longer needed.
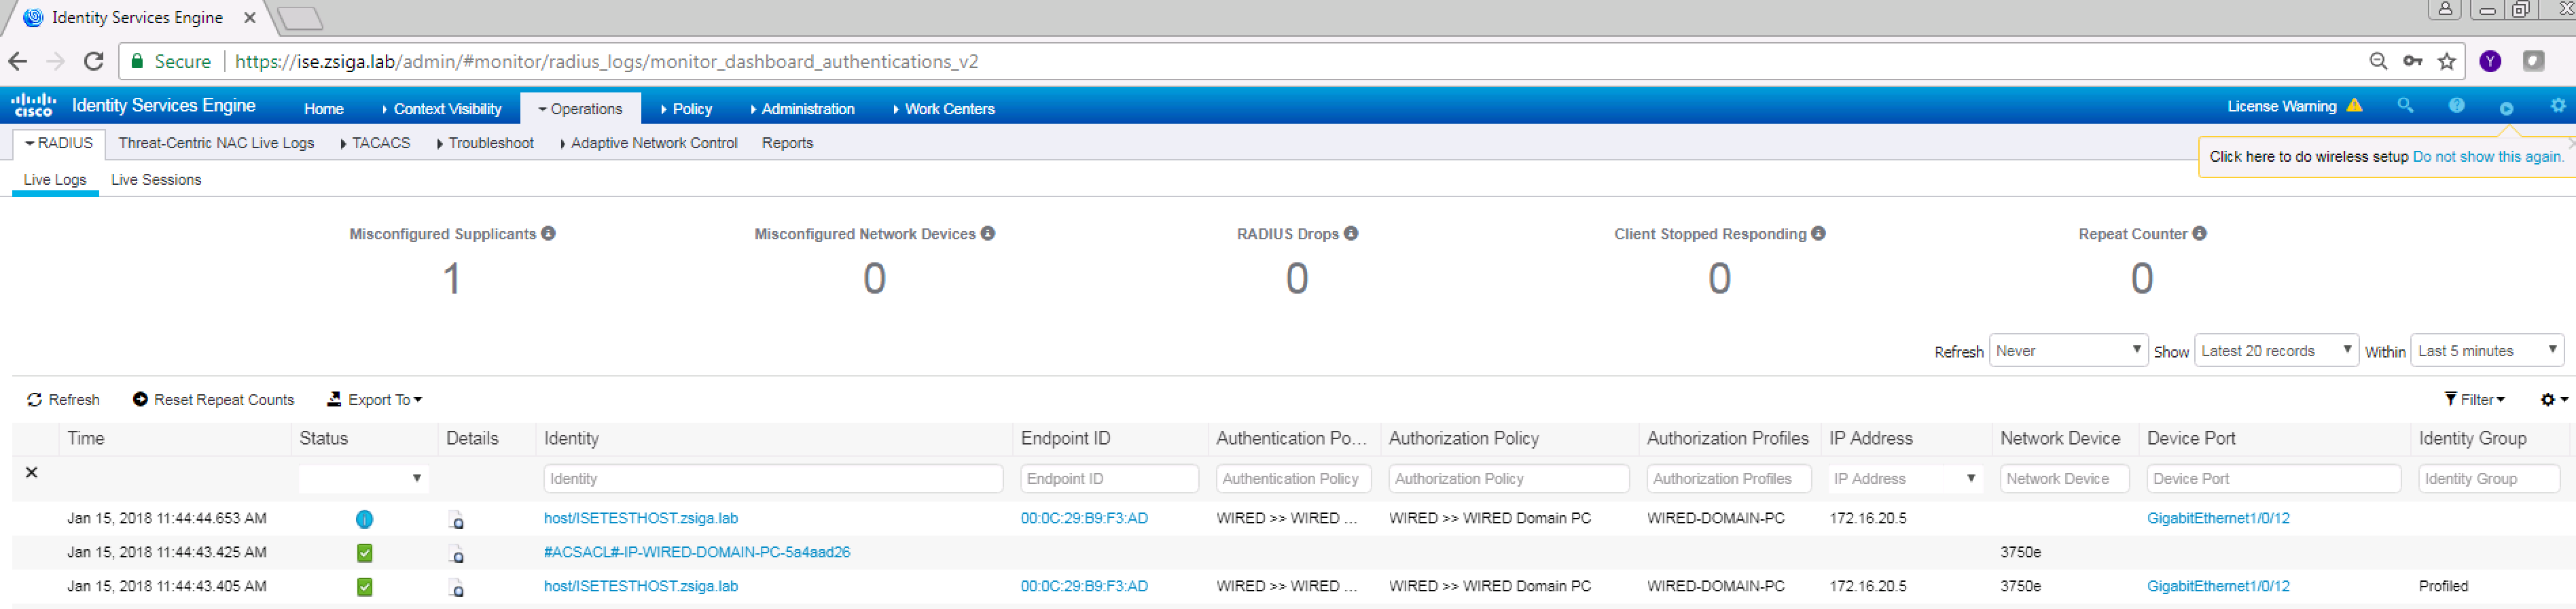
From the two commands we just issued, everything looks peachy from our switches’ perspective. Lets jump into ISE real quick to see what the logs say there.
In the Radius Live Logs screen should see a successful Authentication and Authorization entry for our Domain PC. This successful entry has the correct Authentication Policy, Authorization Policy, and Authorization Profile (Permissions) that we had planned for this Use Case. If you look closely in the below screenshot you will also see the dACL being requested / downloaded to the switch.
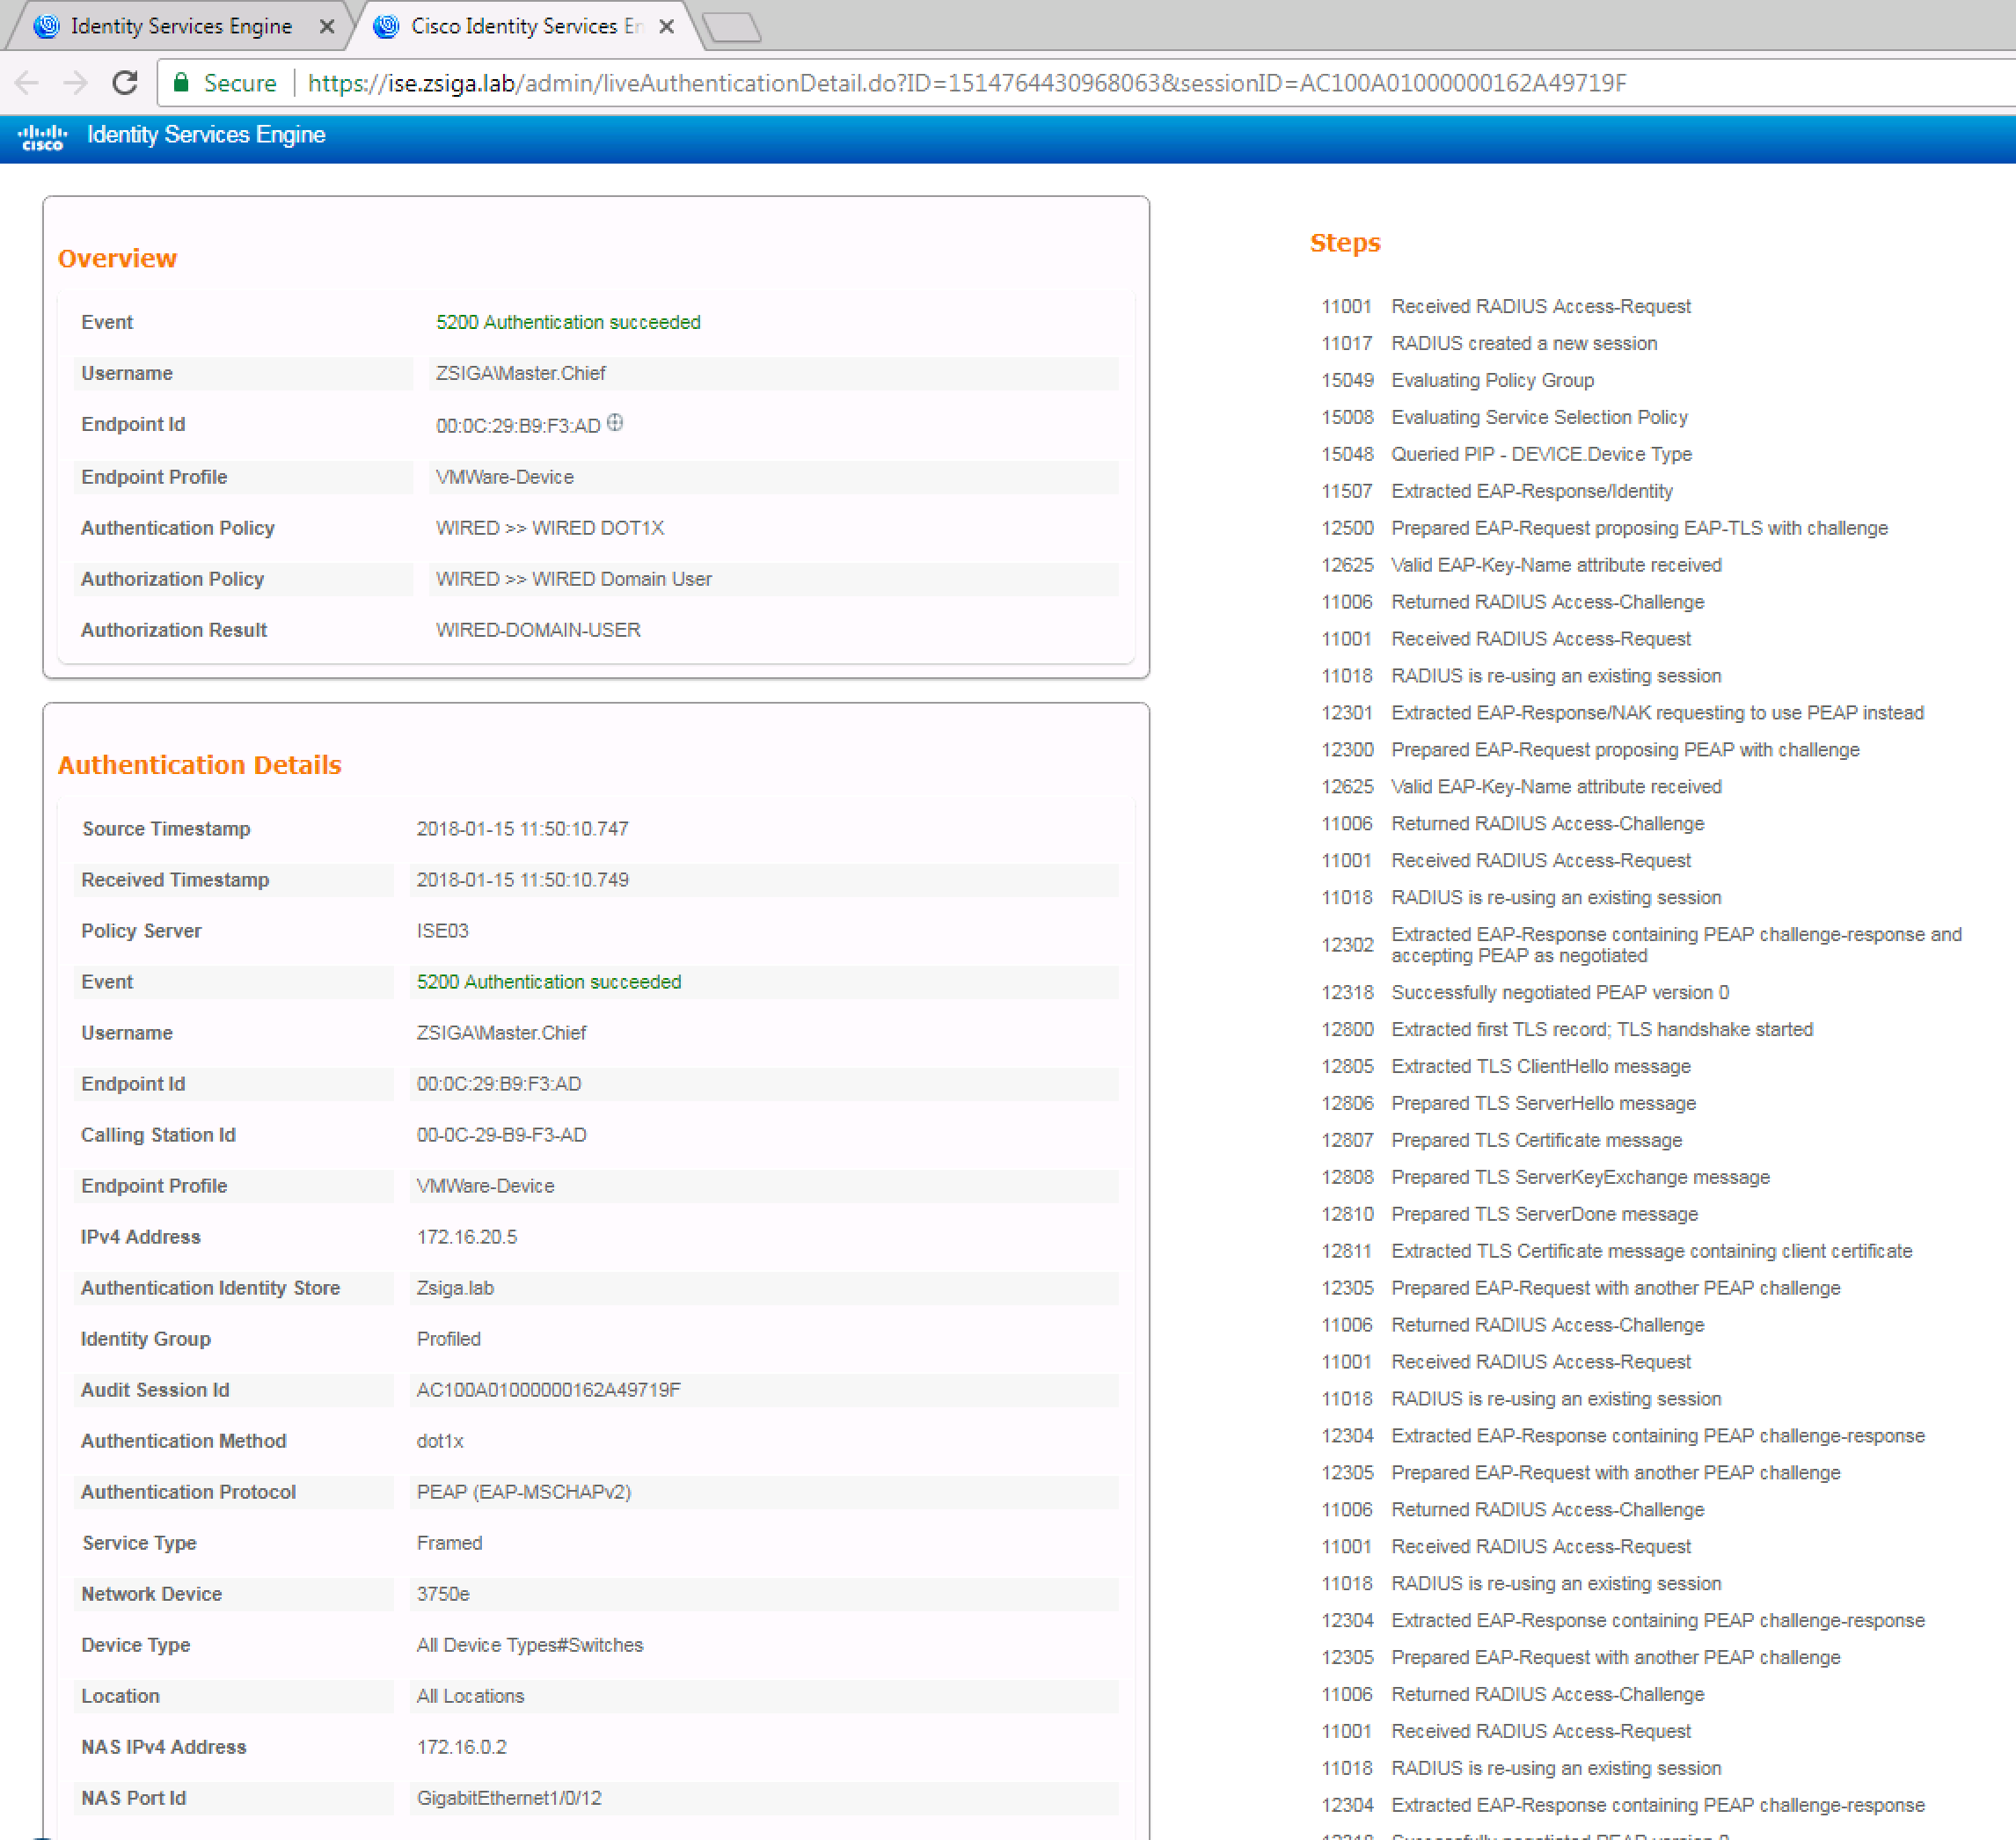
One last thing to check for this Use Case is the details of the successful session. In the Radius Live Log, there is a Details column that has a magnifying glass, click it to open another tab that shows the specific details of the session in question.
In the details window, you can find out a ton of information, more than you need most of the time, but knowing where to find what is key. Some of this information is the same info we saw on the Radius Live Log page, but a lot of it goes further into detail. The detailed information is on the left side of the window and on the right side of the window is the steps the session took. The steps are useful if you need to troubleshoot why a session isn’t be authenticated or authorized correctly.
A couple of items I would like to point out for our specific Use Case here, if you can find the Authentication Protocol line you will see that this session was authenticated via PEAP.
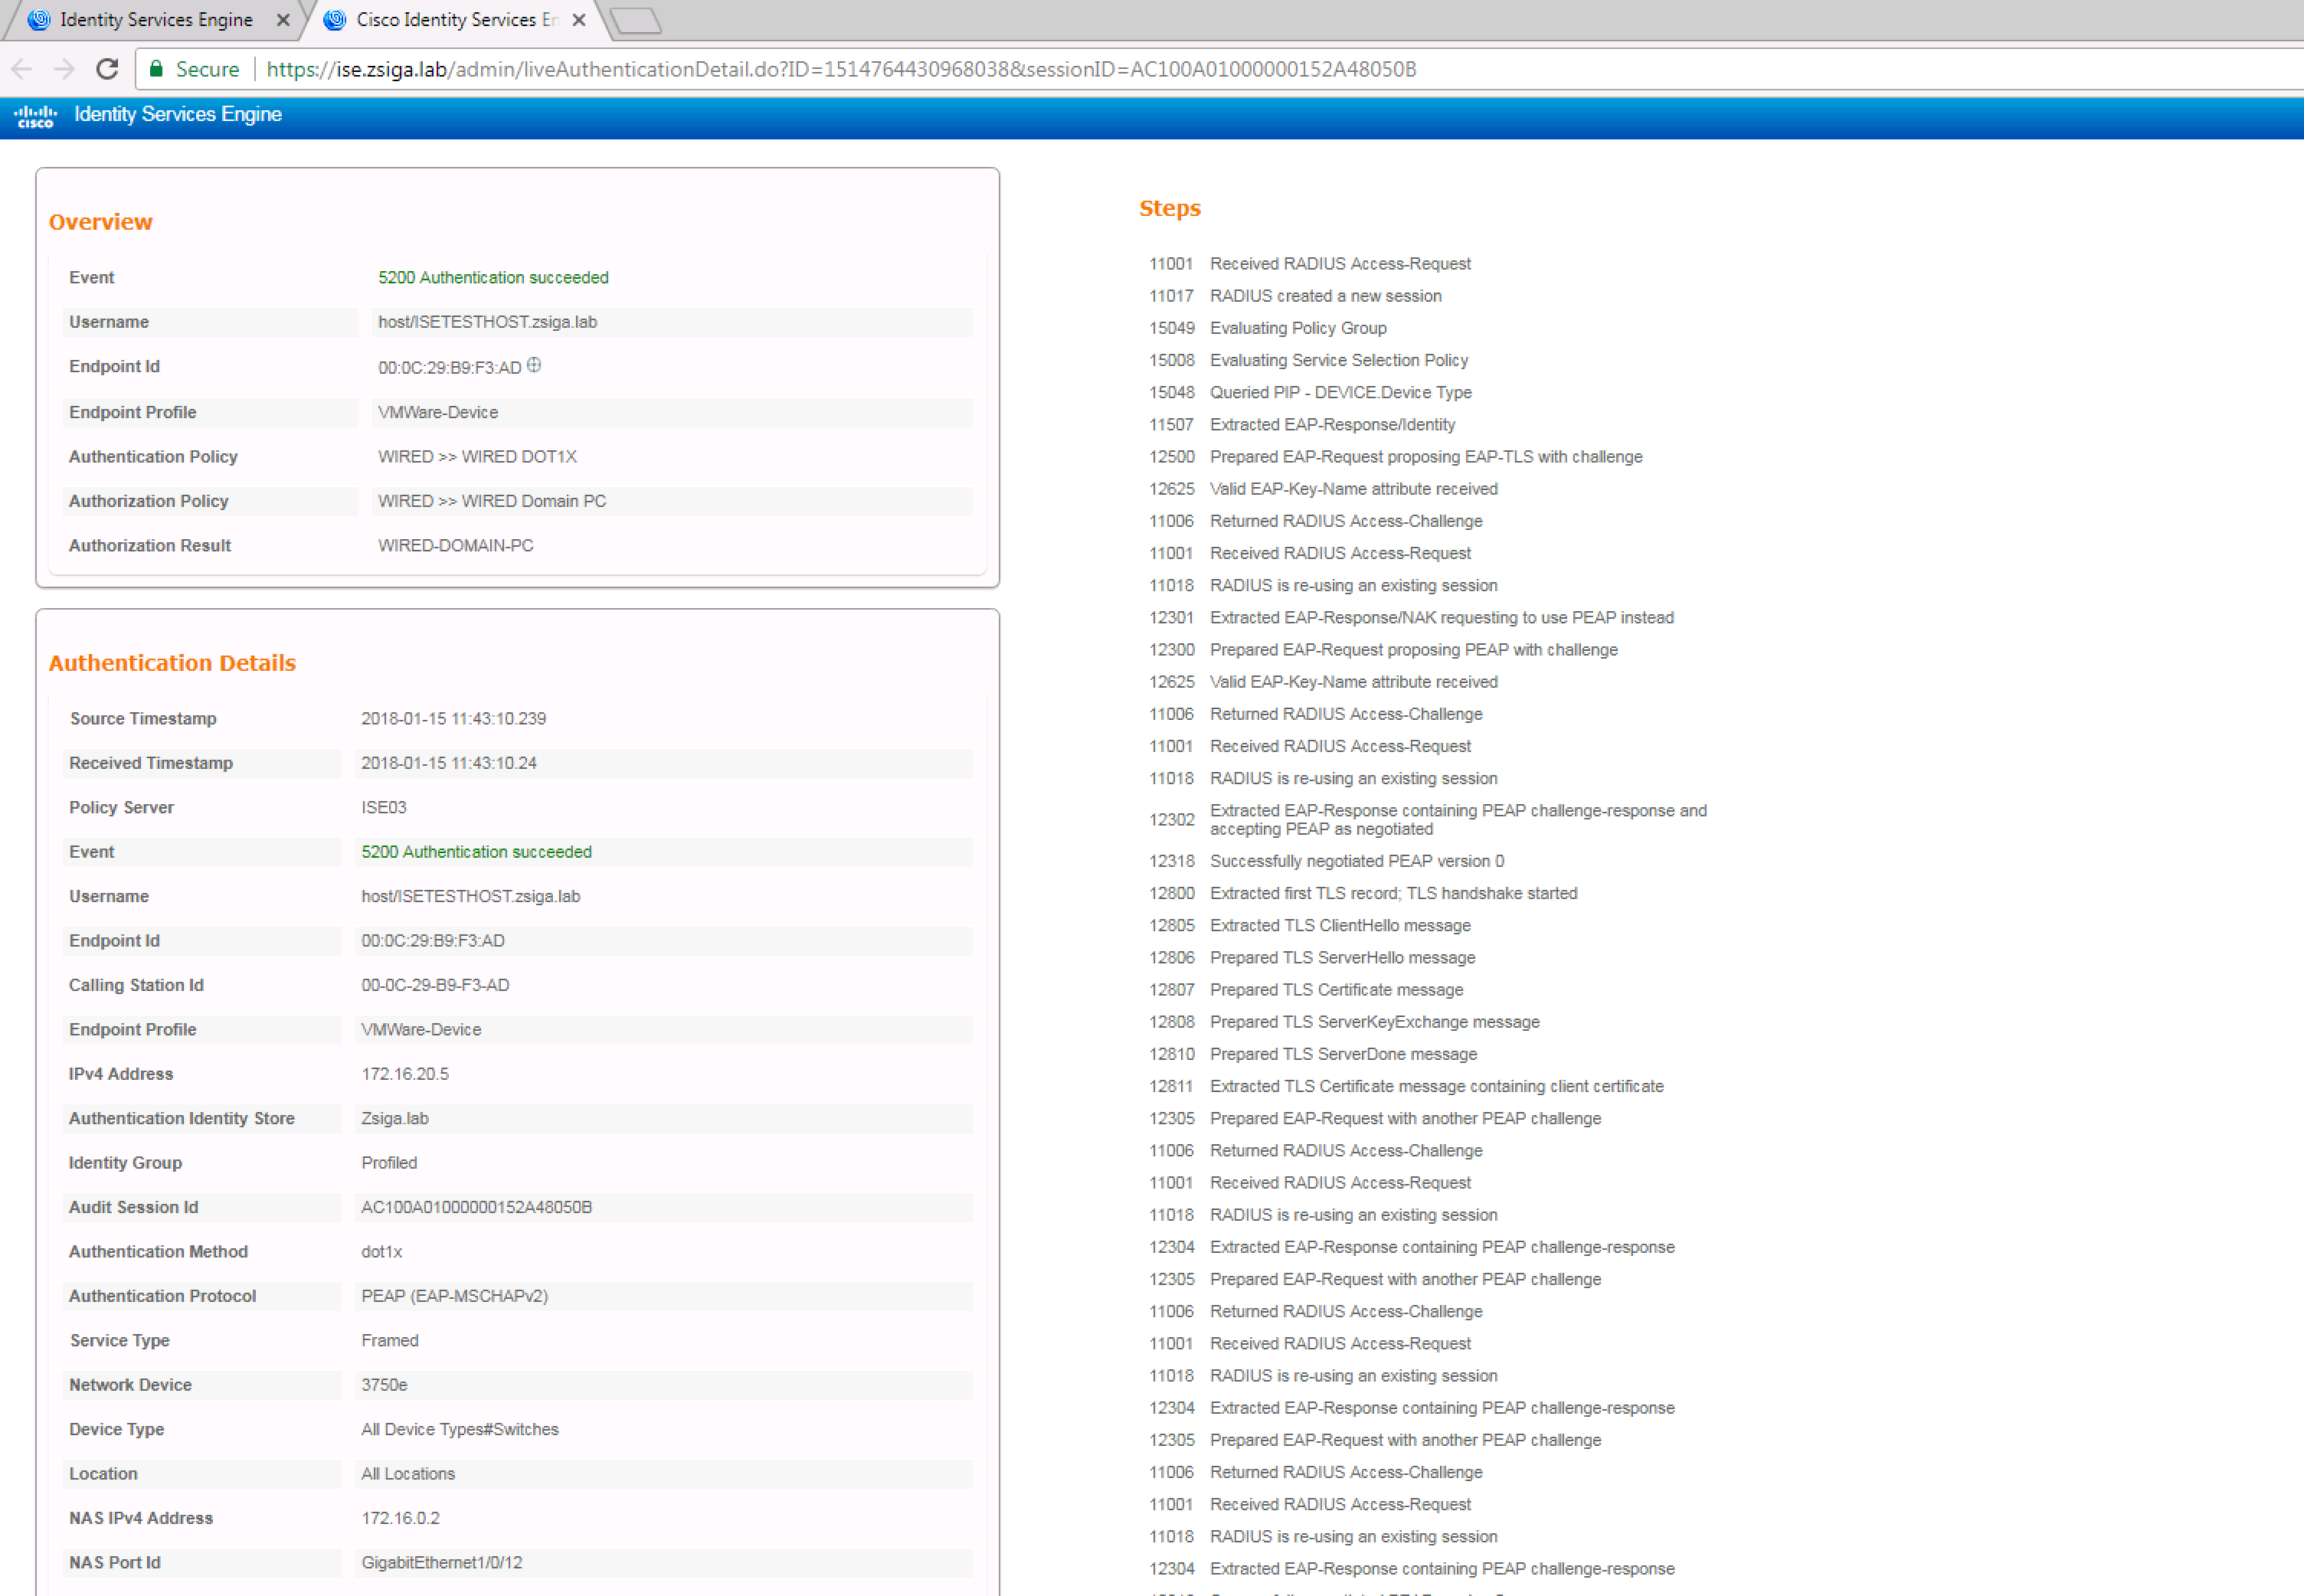
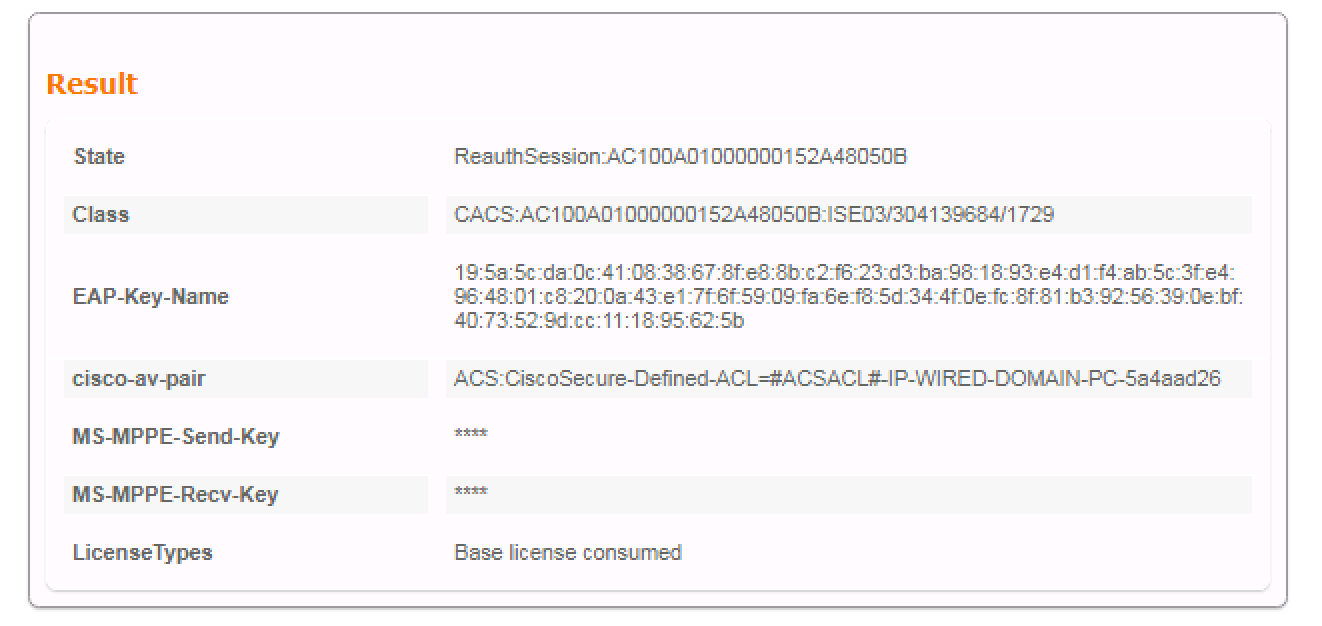
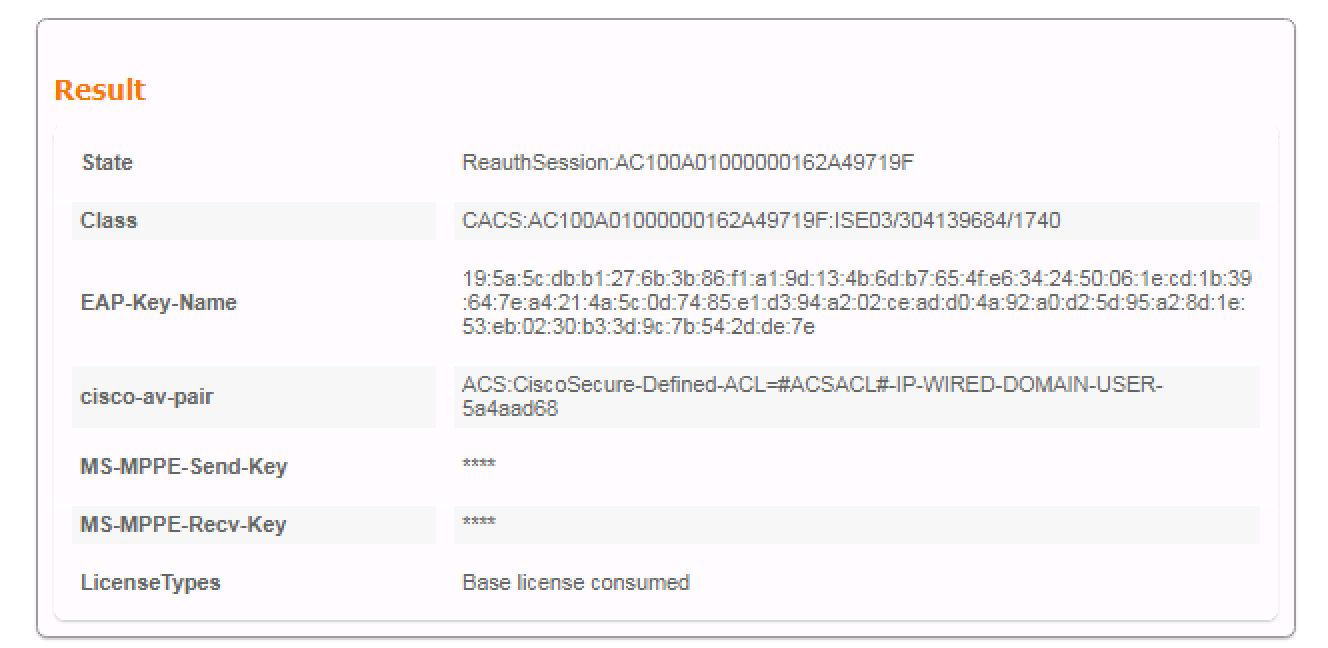
If you scroll further down on this Details page you will find the Result section. This is useful so we can validate what ISE is sending to the Network Device for this session. In this Case ISE is sending a dACL like it should.
We just authenticated our first session in our newly built ISE Cluster, how are you feeling?? Hopefully motivated! One little thing to keep in mind, we haven’t even logged into our test VM yet. This was just the computer itself being authenticated and authorized, no user interaction needed at all! Lets add our User specific Use Cases now!
7.2 Domain User
We’ve done some of these tasks above, so they will become similar pretty quick.
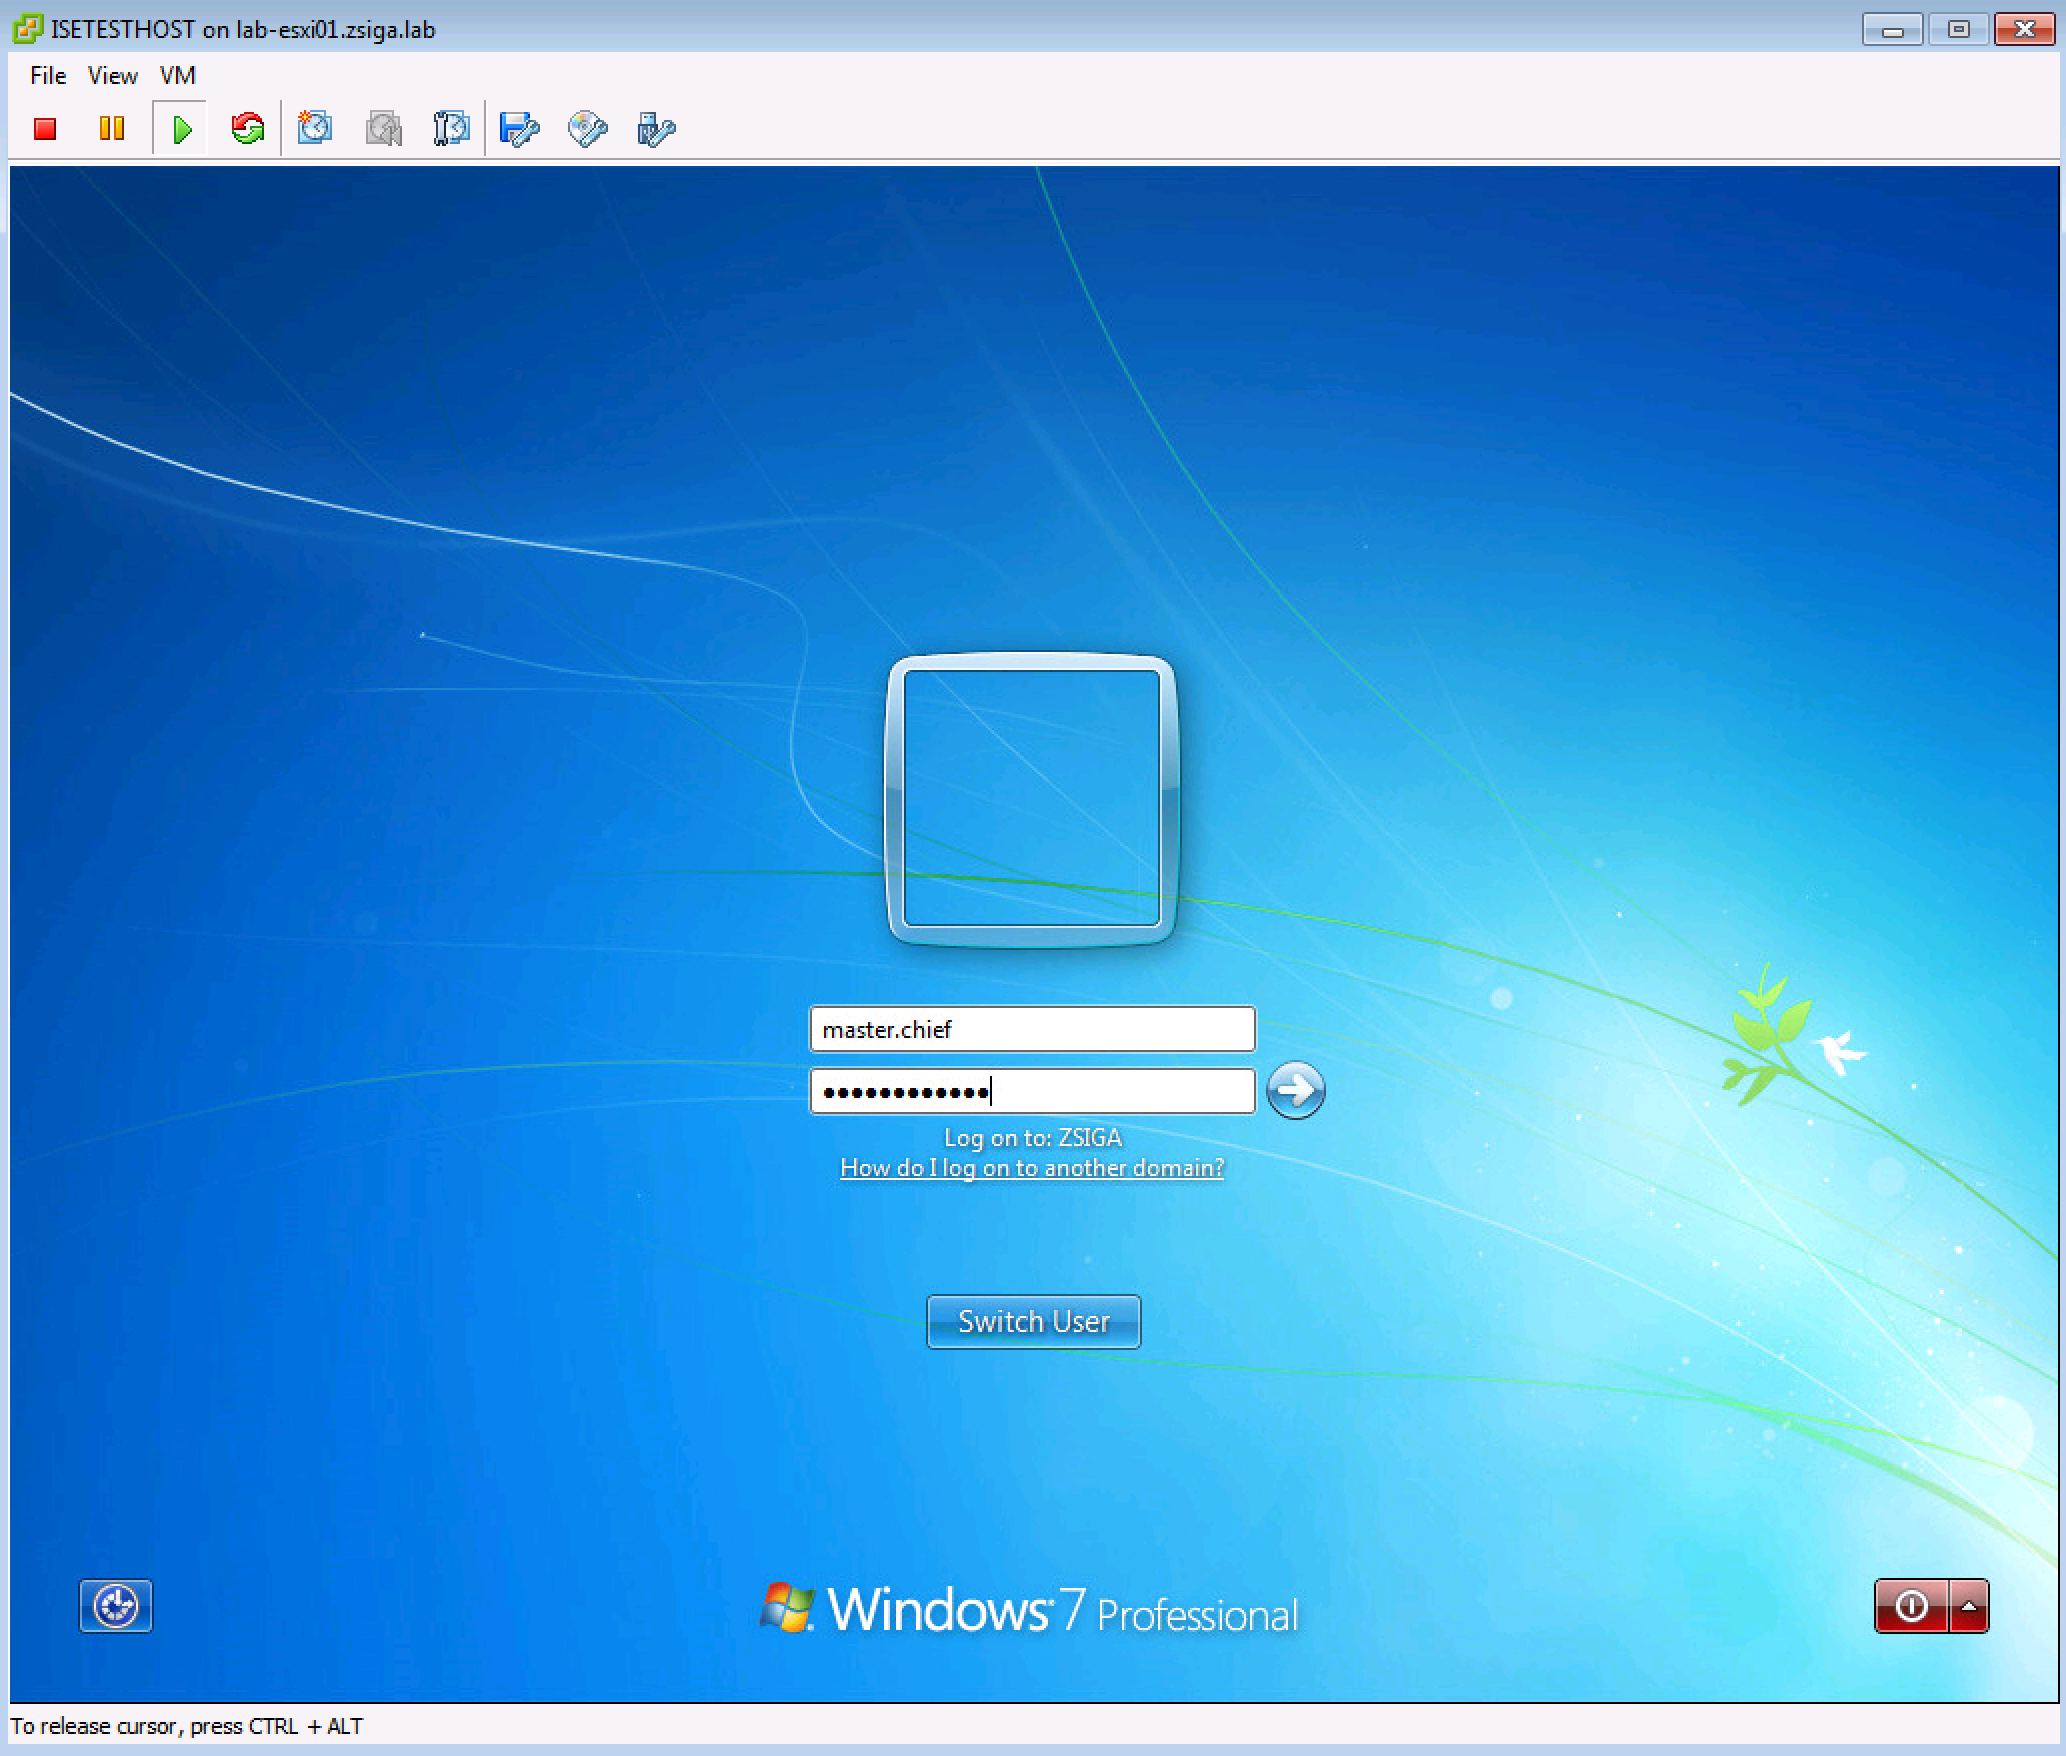
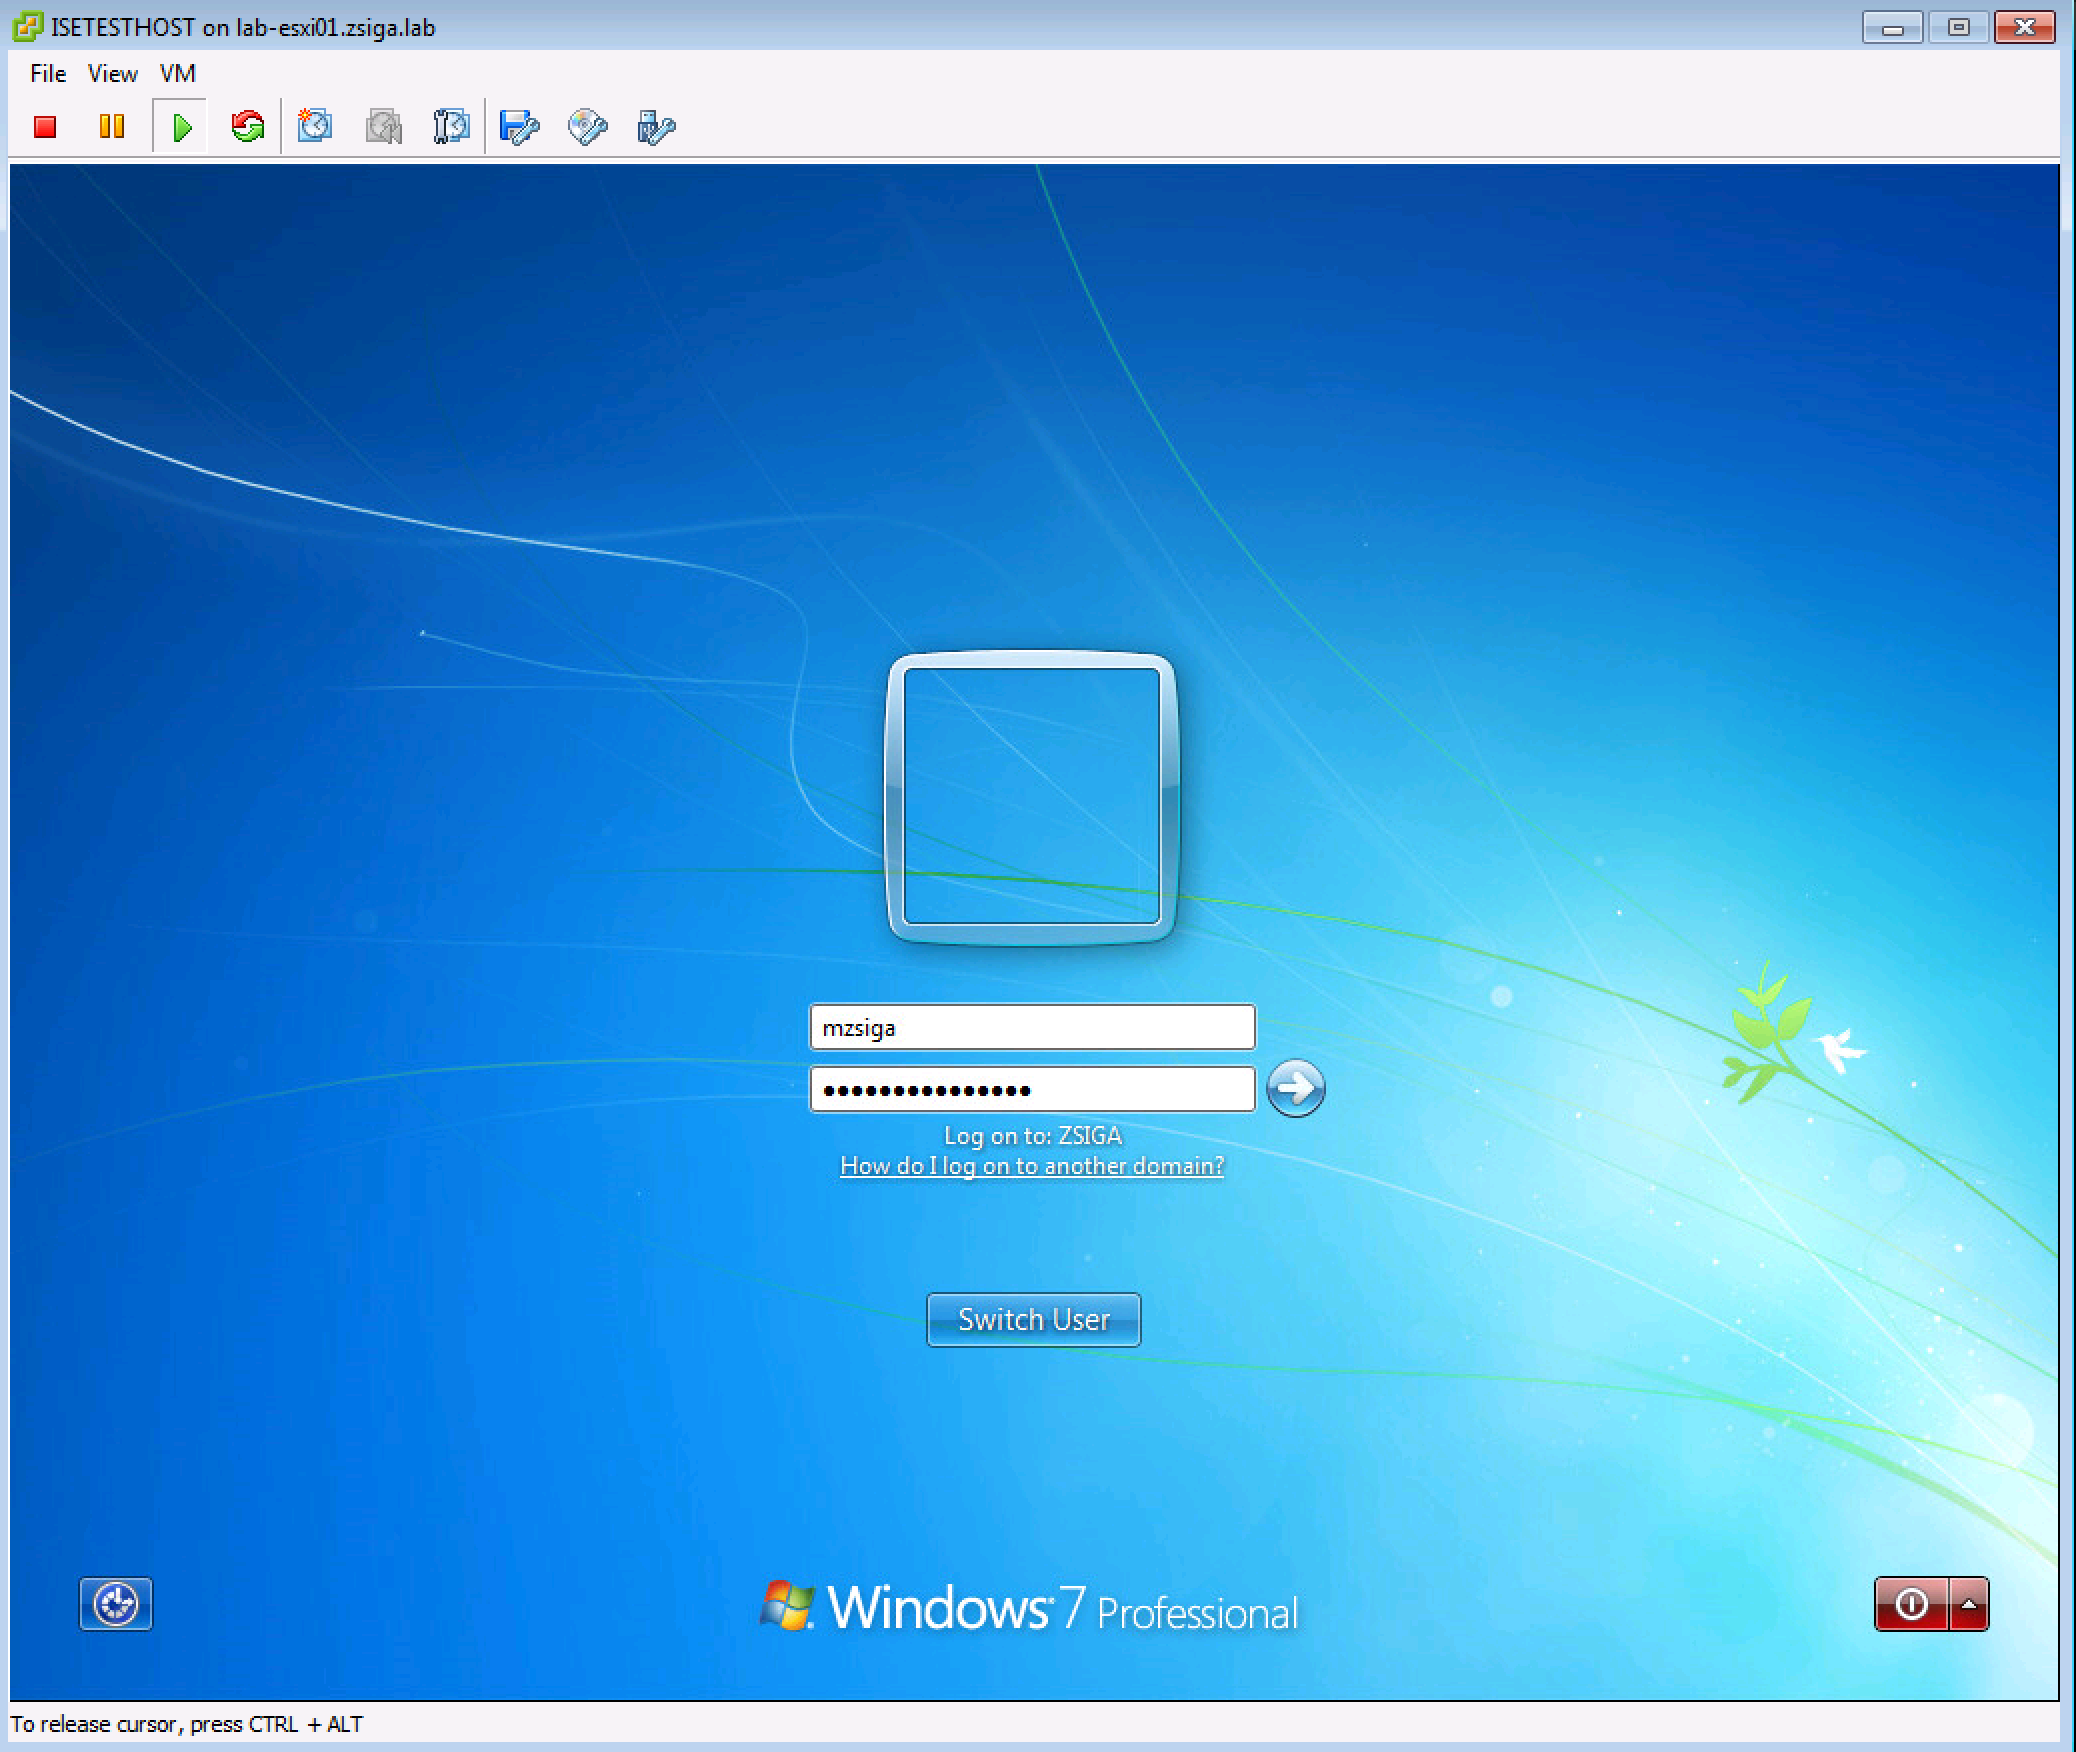
Lets get back to our console view of our Test VM and login with a Domain User account. For those of you Halo Fans out there, one of my test accounts has always been Master.Chief. This account is only in the Domain Users group so its a good test for this Use Case.
The Below screenshot shows us logging in as Master.Chief.
Once you click the login button or hit enter, find your SSH / Telnet window to your switch and lets issue the “show auth sessions” command again to see whats changed on our switchport.
In the previous Use Case our User-Name was host/ISETESTHOST.zsiga.lab but now its ZSIGA\Master.Chief. This shows the different authentication / authorization sessions going on. You can also see like the last Use Case that we have both a Successful Authentication (AuthC) and Authorization (AuthZ). We also have a dACL but this time its called xACSACLx-IP-WIRED-DOMAIN-USER-5a4aad68.
Lets check this dACL was downloaded properly onto the switch by issuing the show ip access-list command as shown in the below screenshot. I’m telling you, copying the name makes it a lot easier to do this 😉
As you can see from the output below, this dACL looks to be correct and as expected! Lets go check our ISE Radius Live Log to see what it says!
In the ISE Radius Live Log we see where our Computer Authenticated. We see where the switch downloaded the dACL for the Domain PC Use Case. Then we see where our Domain User Authenticated, and the switch downloaded the new dACL for the Domain User Use Case.
Note: I’ve changed the view up a bit here which you can do as well. You add/remove columns as you see fit here, but what I have in this screenshot is a pretty good list of the elements you would want to see for each session.
![]()
As in our Domain PC Use Case, lets click the Details button to dive a little deeper into the session information. Here we can see the Authentication Protocol Again, which is PEAP. We can also see the Result box (second screenshot) that shows the dACL that the switch will eventually download for this session.
We are making some huge steps of progress here. We just Authenticated a Domain PC and authorized it on our network. Then we Authenticated a Domain User and Authorized him/her on the network. We are missing something at this point that may not be obvious to all. We need to make sure that what our Domain User is allowed to do works and what our Domain User is not allowed to do doesn’t work. This is our Use Case Validation and Testing at its finest!! 🙂
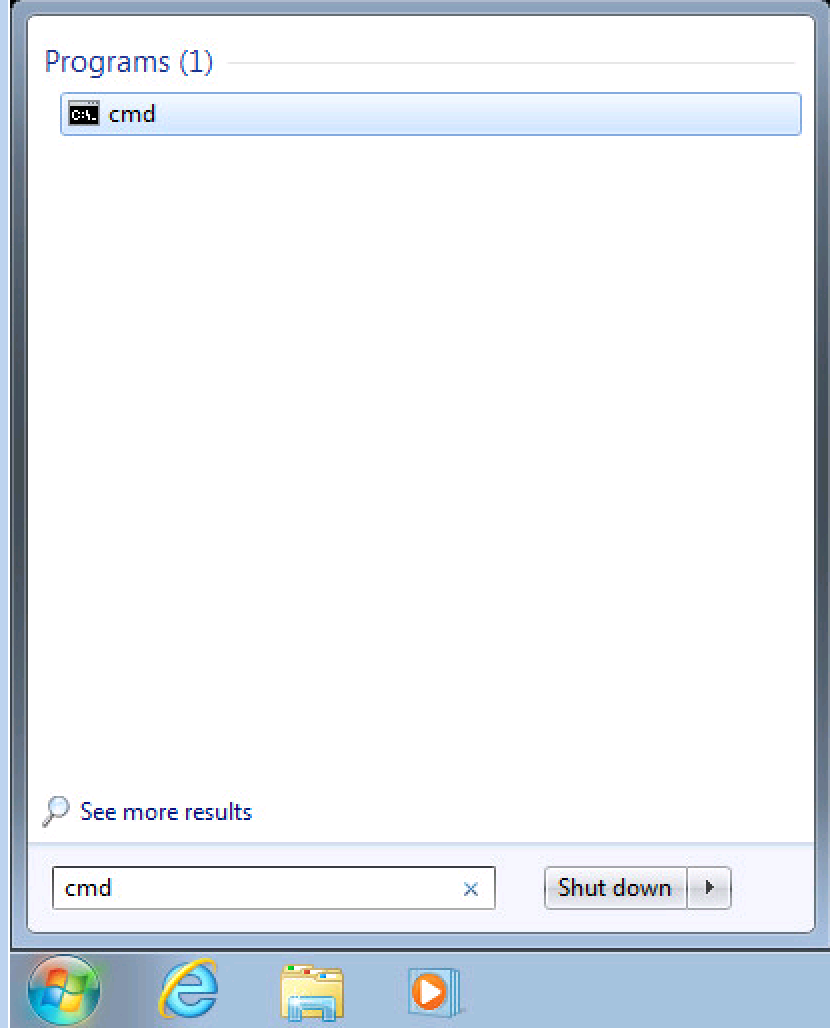
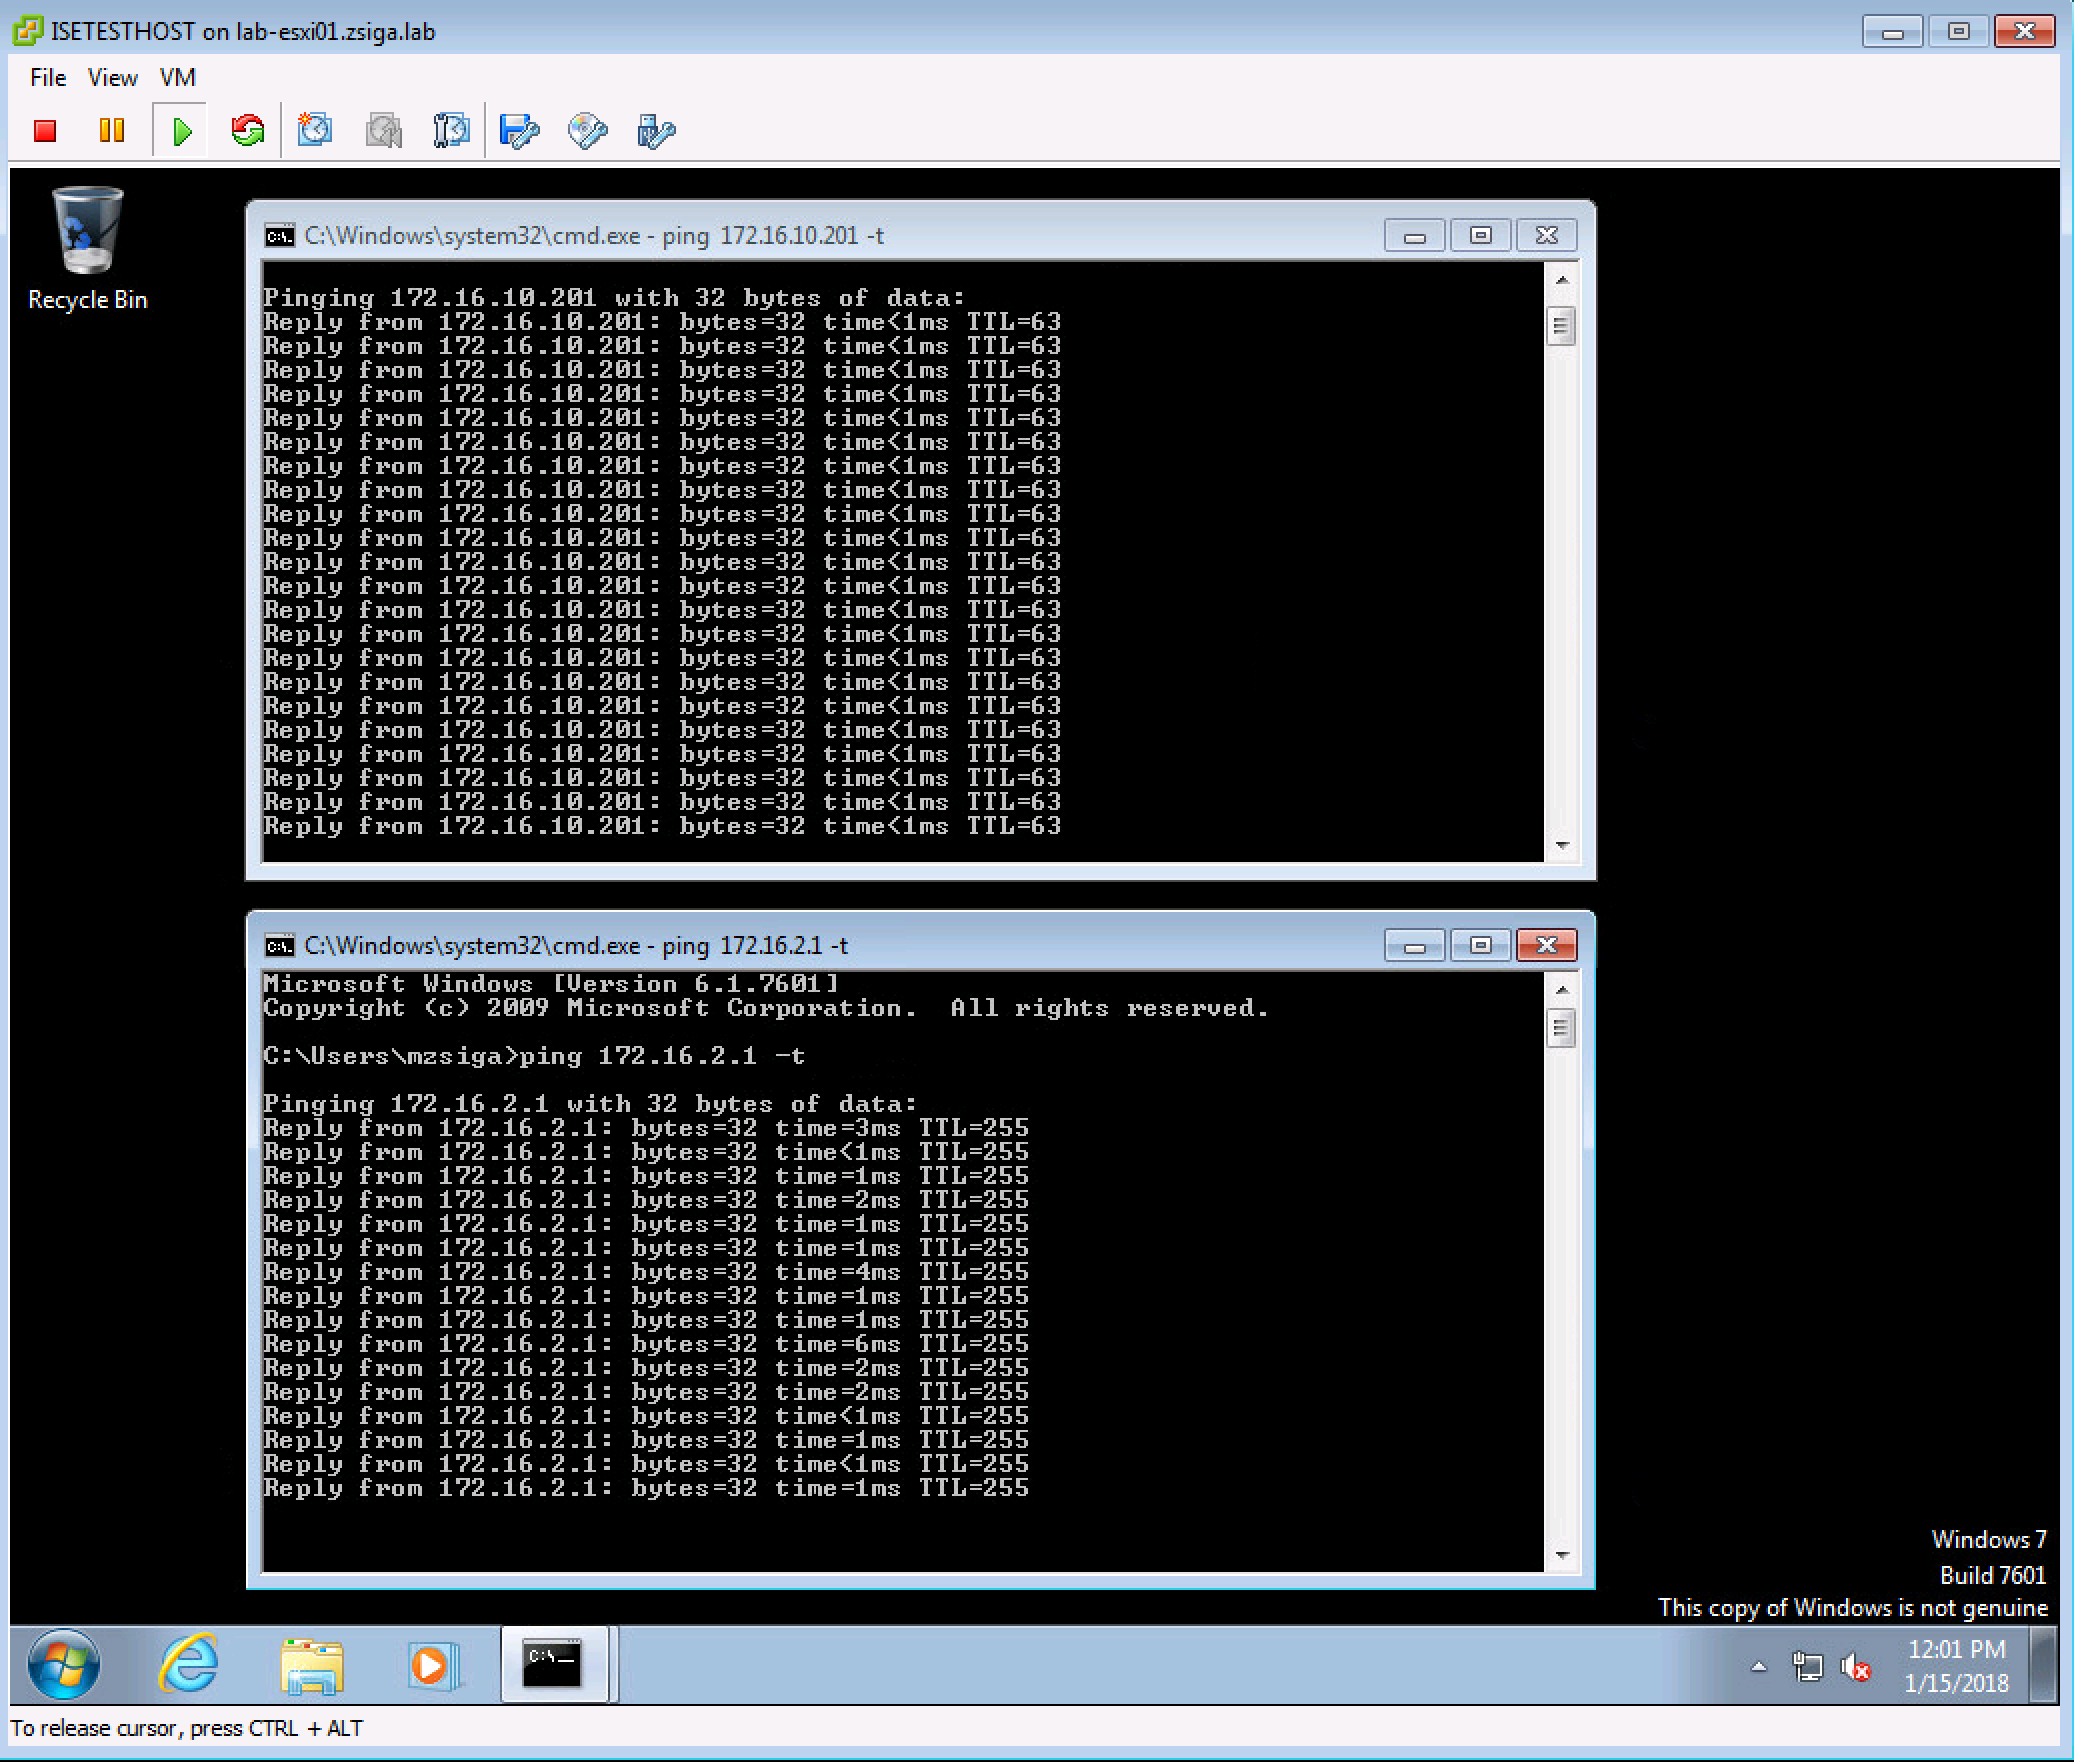
To test our Domain User’s access, lets go back to our VM and Launch a CMD window. To do this Click the start menu and search for CMD. When the Program shows up at the top of the start menu, go a head a click it to launch it. Repeat this process to open two different CMD windows.
Now with our two CMD windows open, lets have one window ping one of our ISE Nodes, 172.16.10.201, while the other window pings our Wireless Network’s (172.16.2.0/24) Default Gateway of 172.16.2.1.
If we take a look at our dACL, we should see a permit for anything in our Server subnet of 172.16.10.0/24 which is where our ISE Nodes live. Then we should see a deny for all other RFC1918 Address space to include the rest of the 172.16.0.0/12 network, which is where our Wireless Network (172.16.2.0/24) falls. This would mean that our ping to our ISE Node, 172.16.10.201, should be successful but our ping to our Wireless Network’s default Gateway, 172.16.2.1, should not be successful.
Below is a screenshot showing this expected behavior.

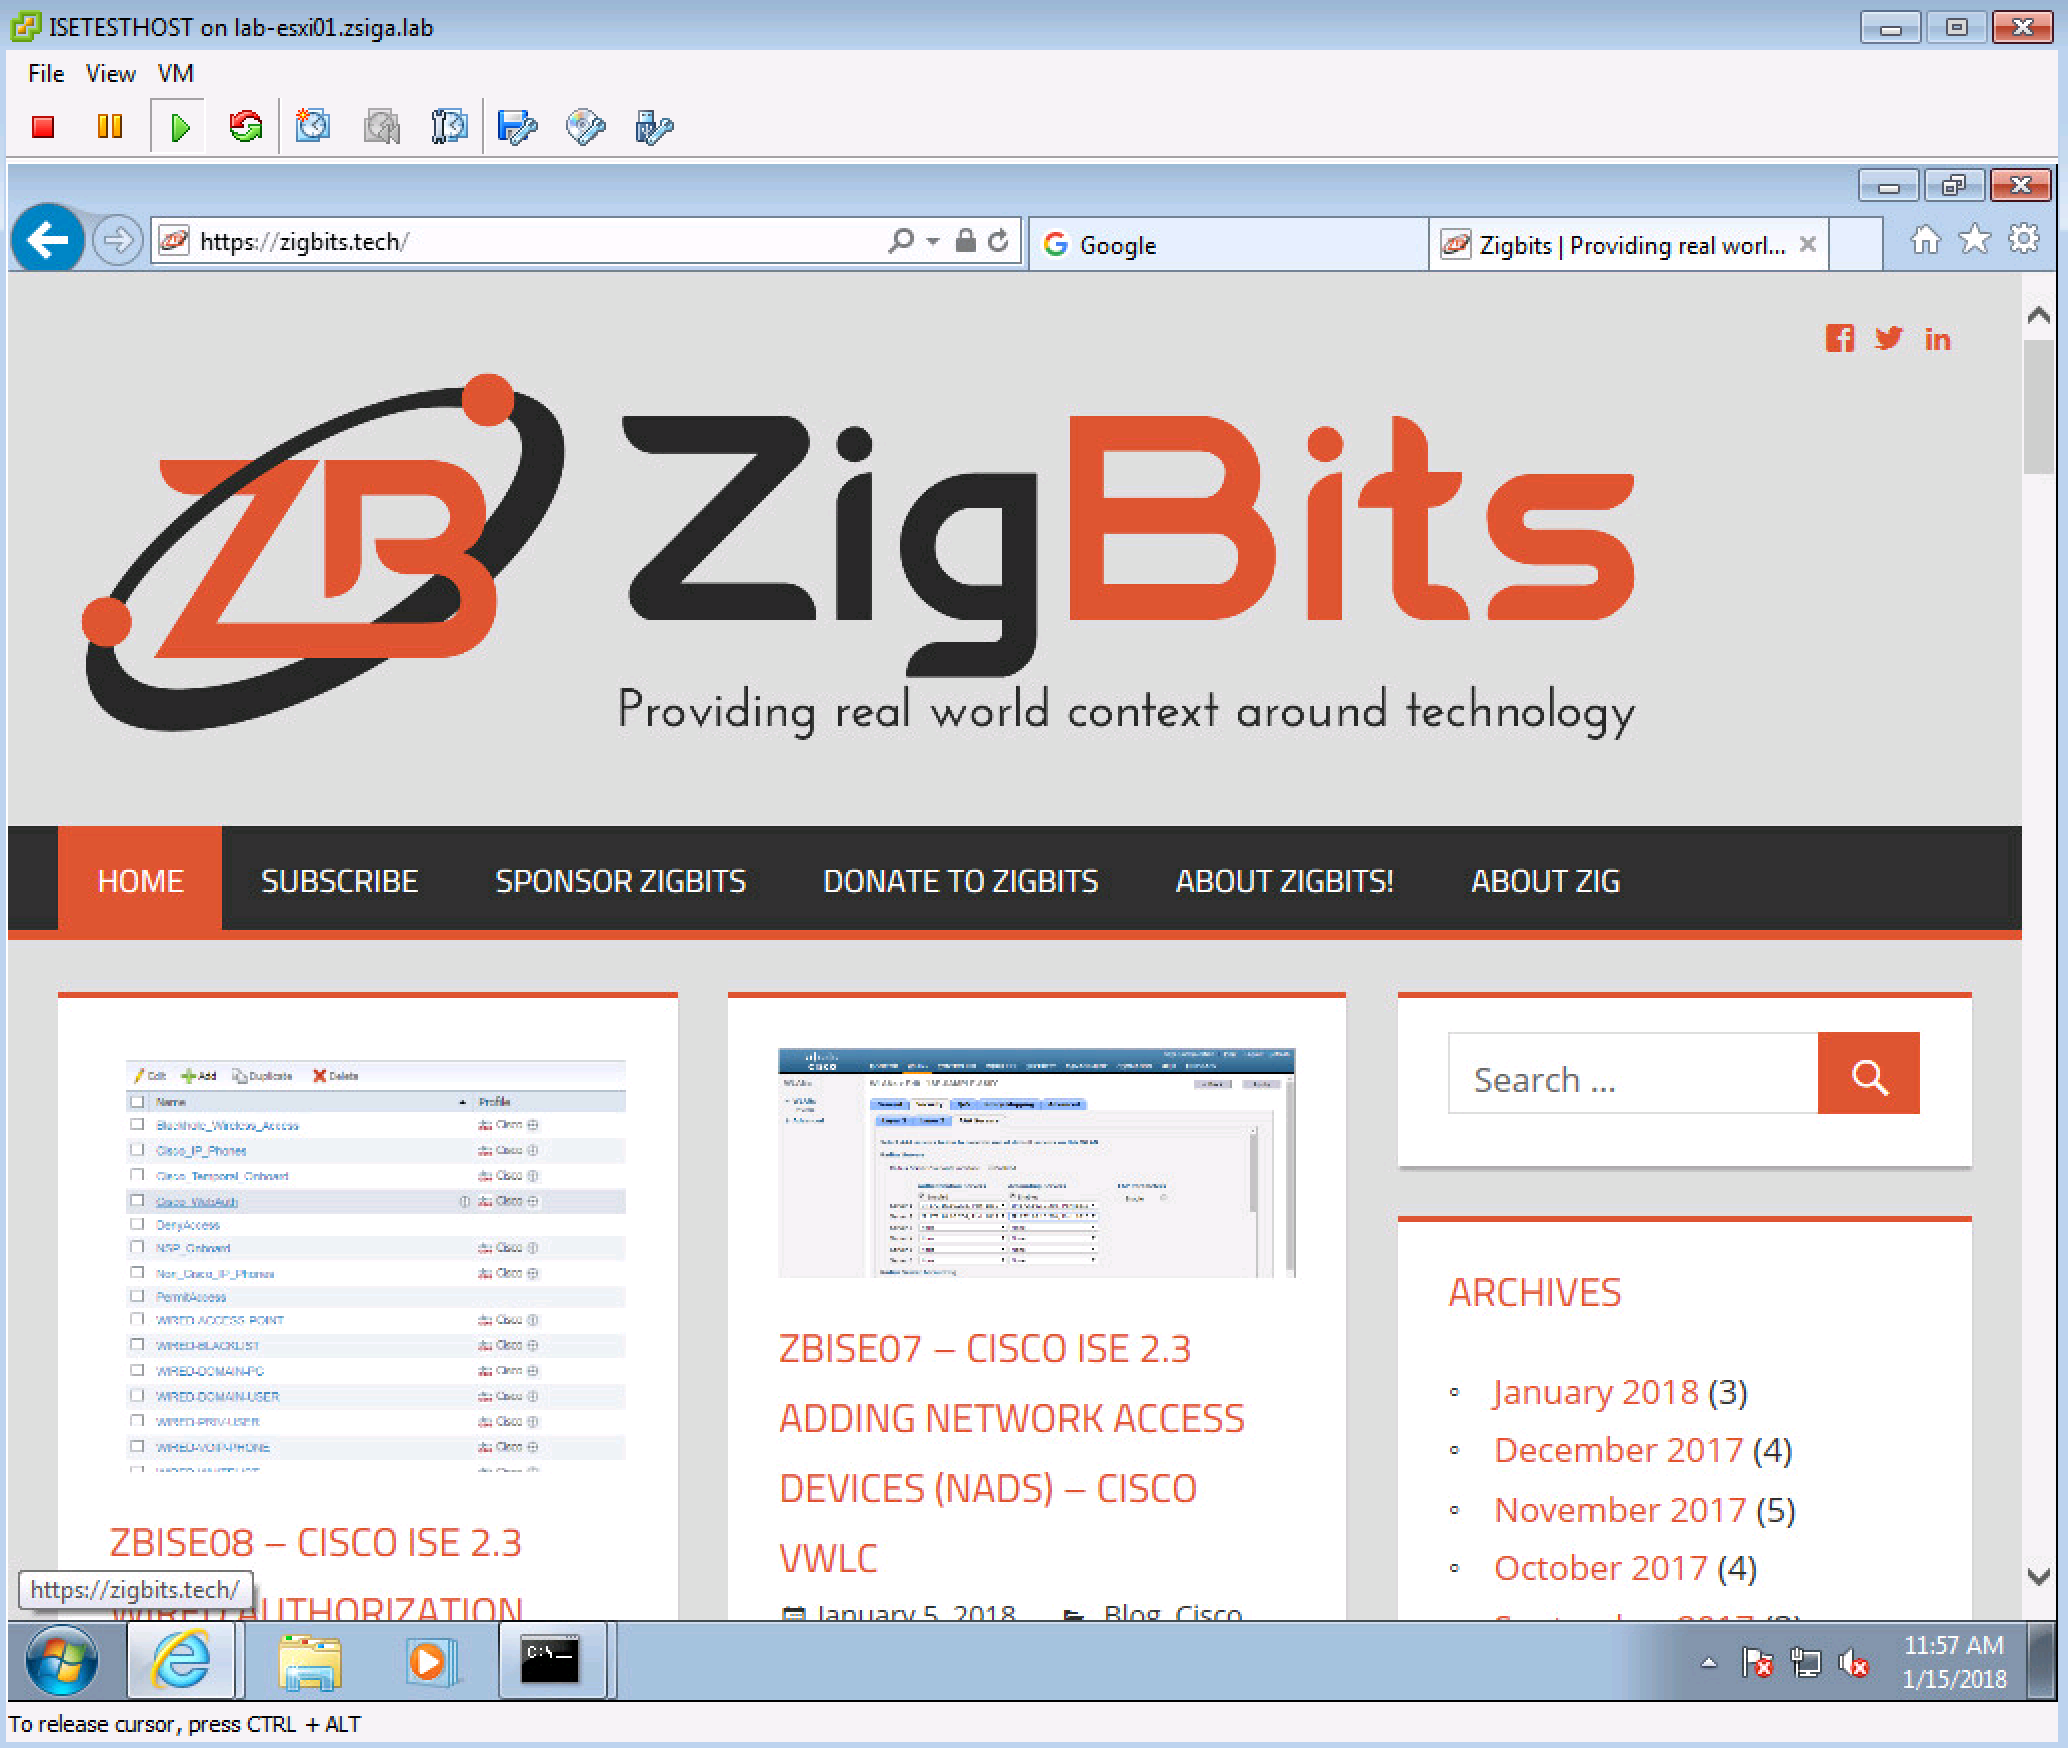
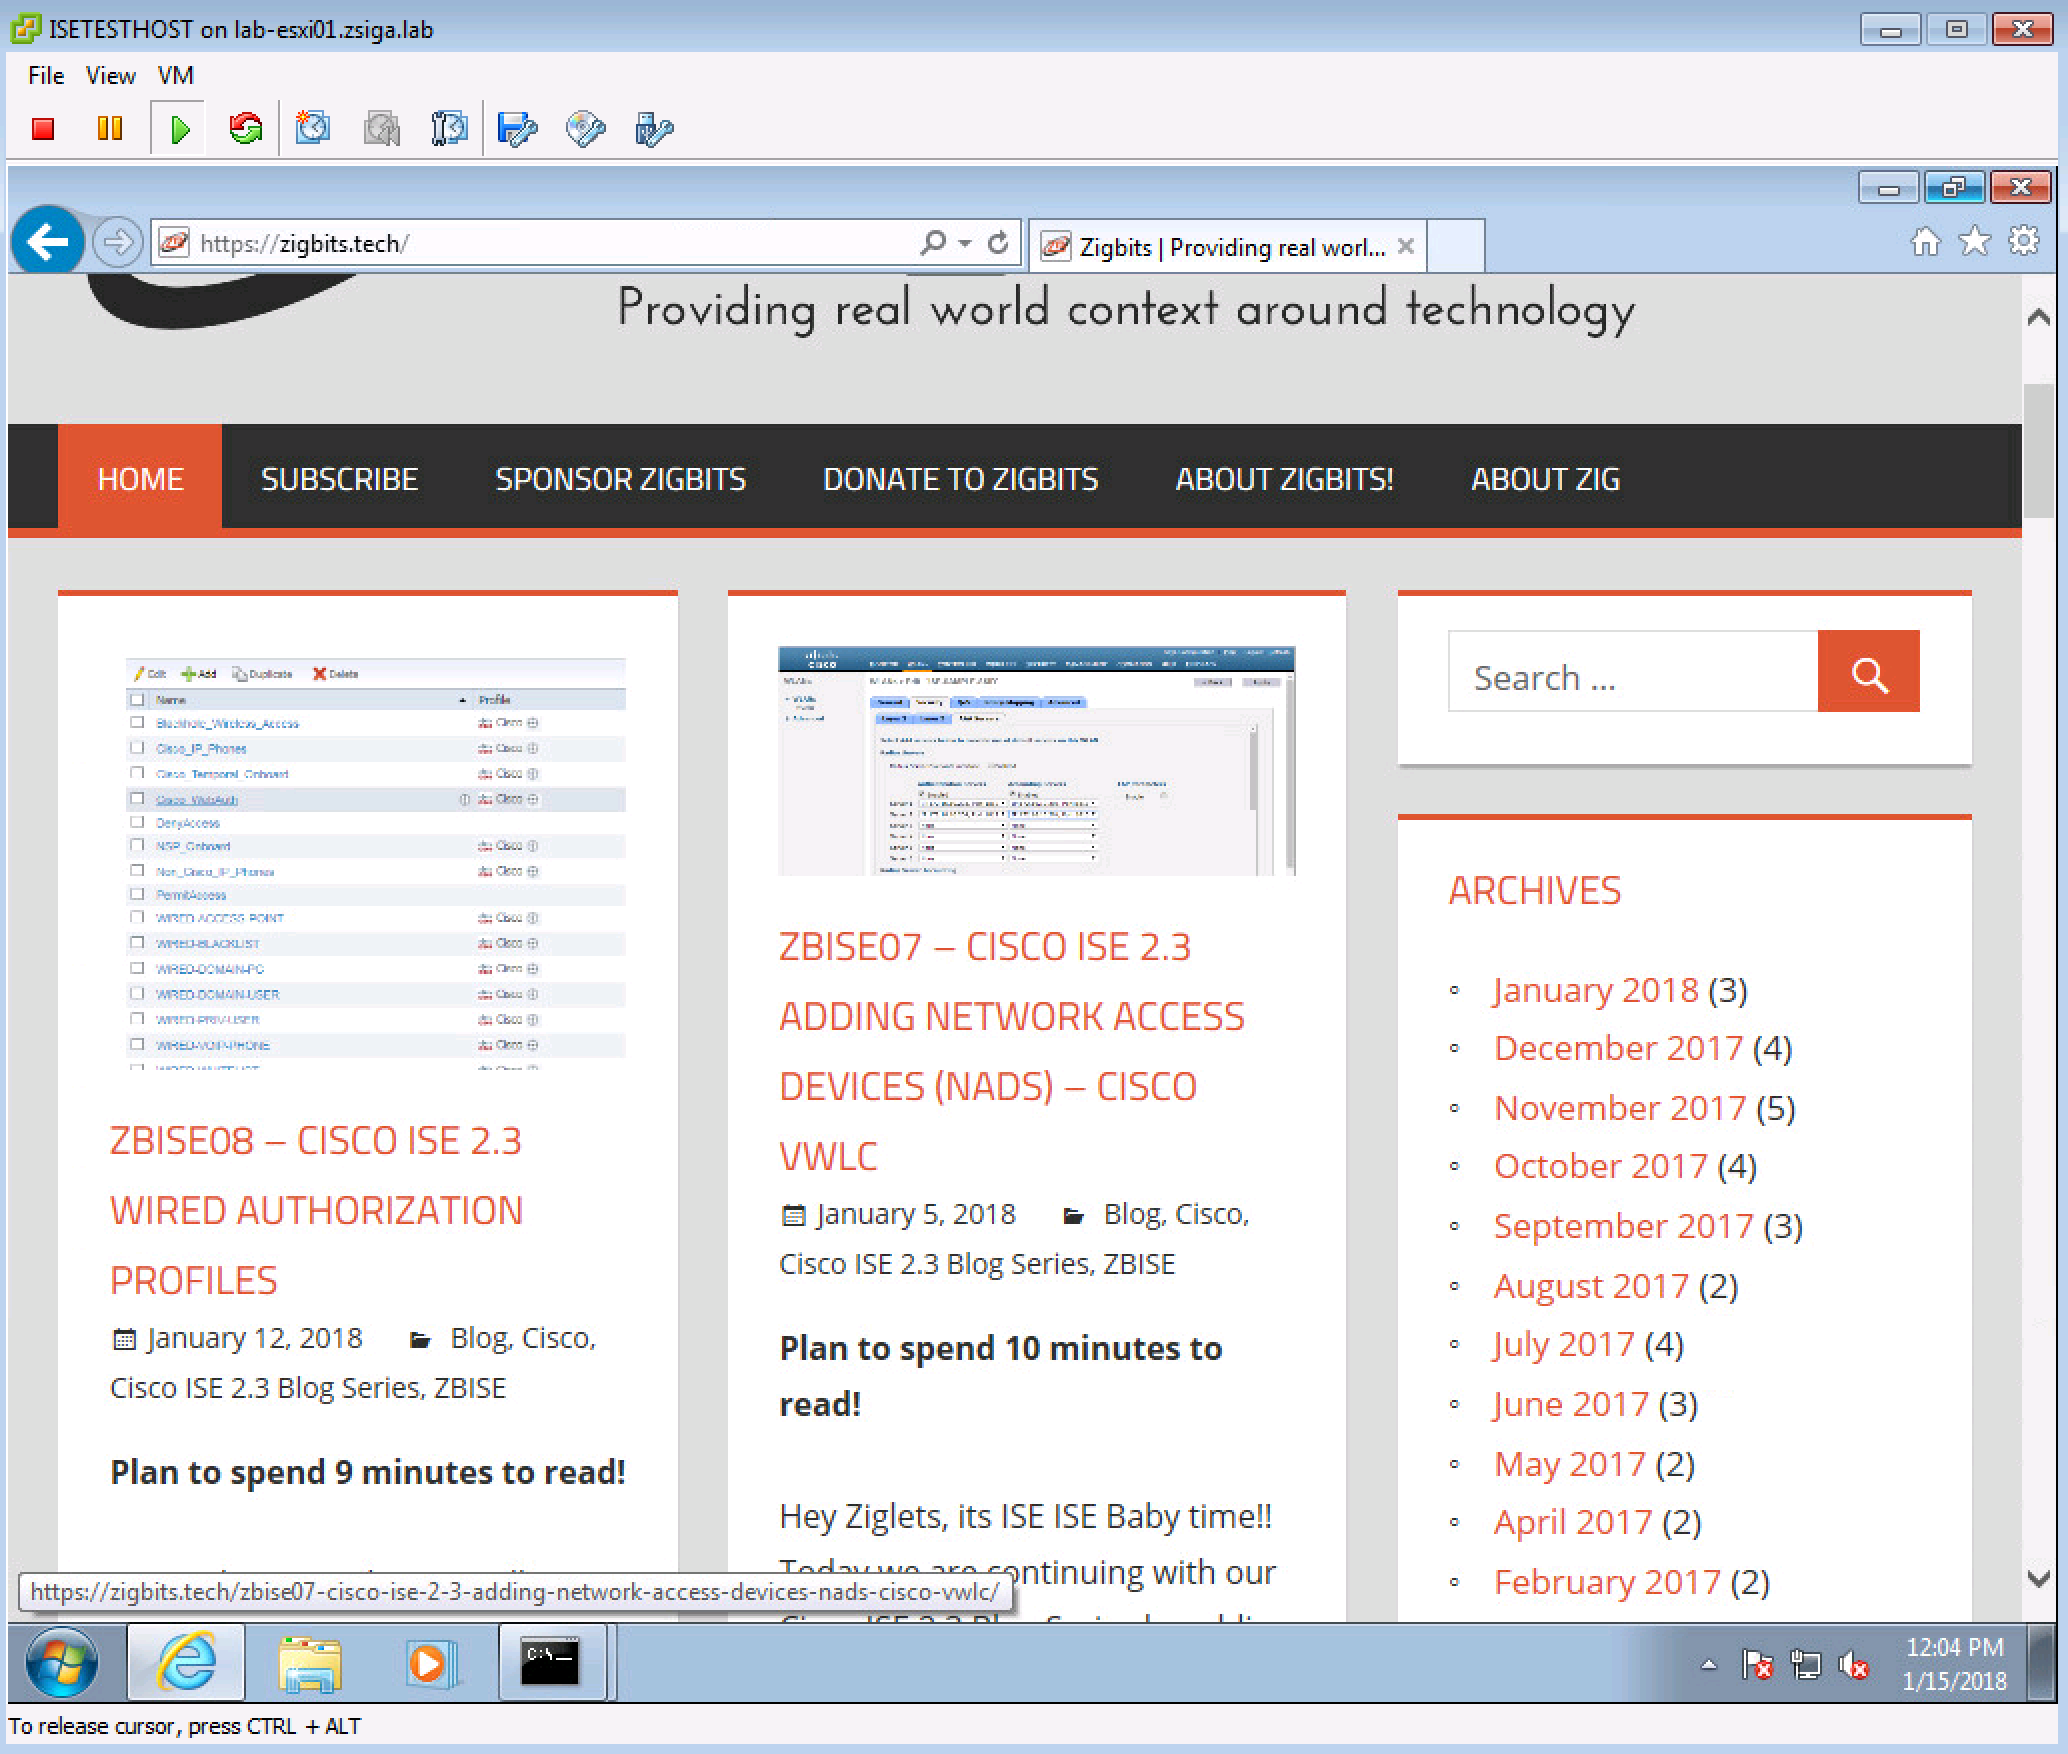
We have one more test for this Use Case, as the last line of our dACL is a Permit IP Any Any which is for internet bound traffic. Lets attempt to browse to the Zigbits.tech Home page from our test VM.
Would you look at that? It worked as expected!
Now that we have fully tested this Use Case we can move on to our final Use Case of Domain Privilege User.
7.3 Domain Priv User
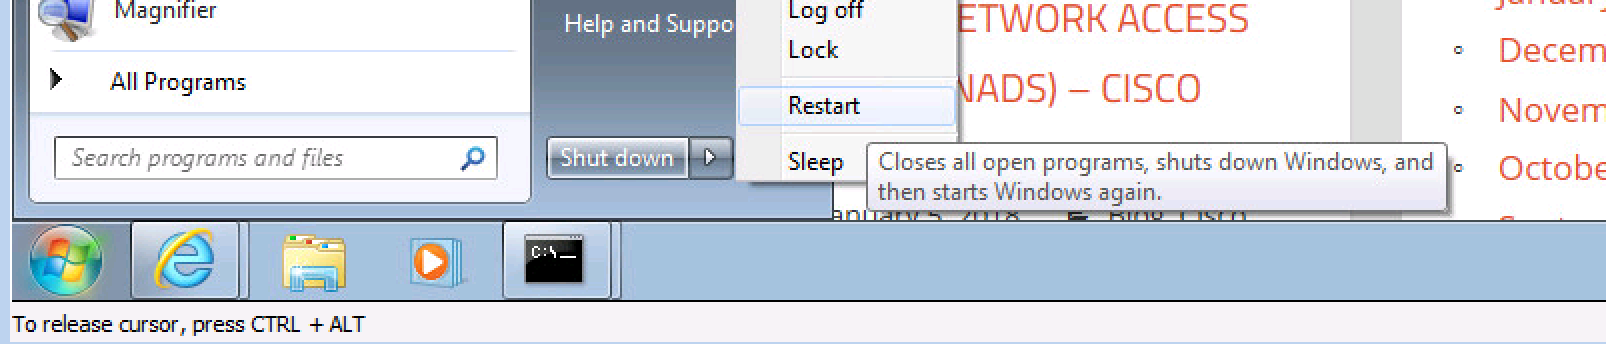
Lets Go a head and restart our Test VM as shown in the below screenshot.
As the Test VM is coming back online, we can re-validate that the Domain PC Use Case is still working and is taking effect as expected. On our Switch side we can issue our favorite command, show auth sessions, to see where the port is in the process.
As you can see from the below output, our Test VM did get our Domain PC Use Case again and received the WIRED Domain PC Policy.
Lets check this in ISE as well. If we look at the Radius Live Logs, we should see something similar to the screenshot below.
We first had our Domain PC Session, then we had our Master.Chief Session, and now we have a Domain PC Session again.
Lets head back to our Test VM and login with a Domain Admin Account this time. My mzsiga Account is a Domain Admin.
Just like the Domain User Use Case, once you’ve started the login process with your Domain Admin Account you can switch right back to your SSH/Telnet session to your Switch to see whats going on.
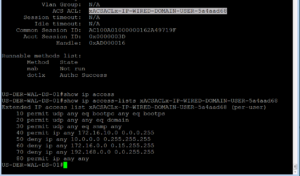
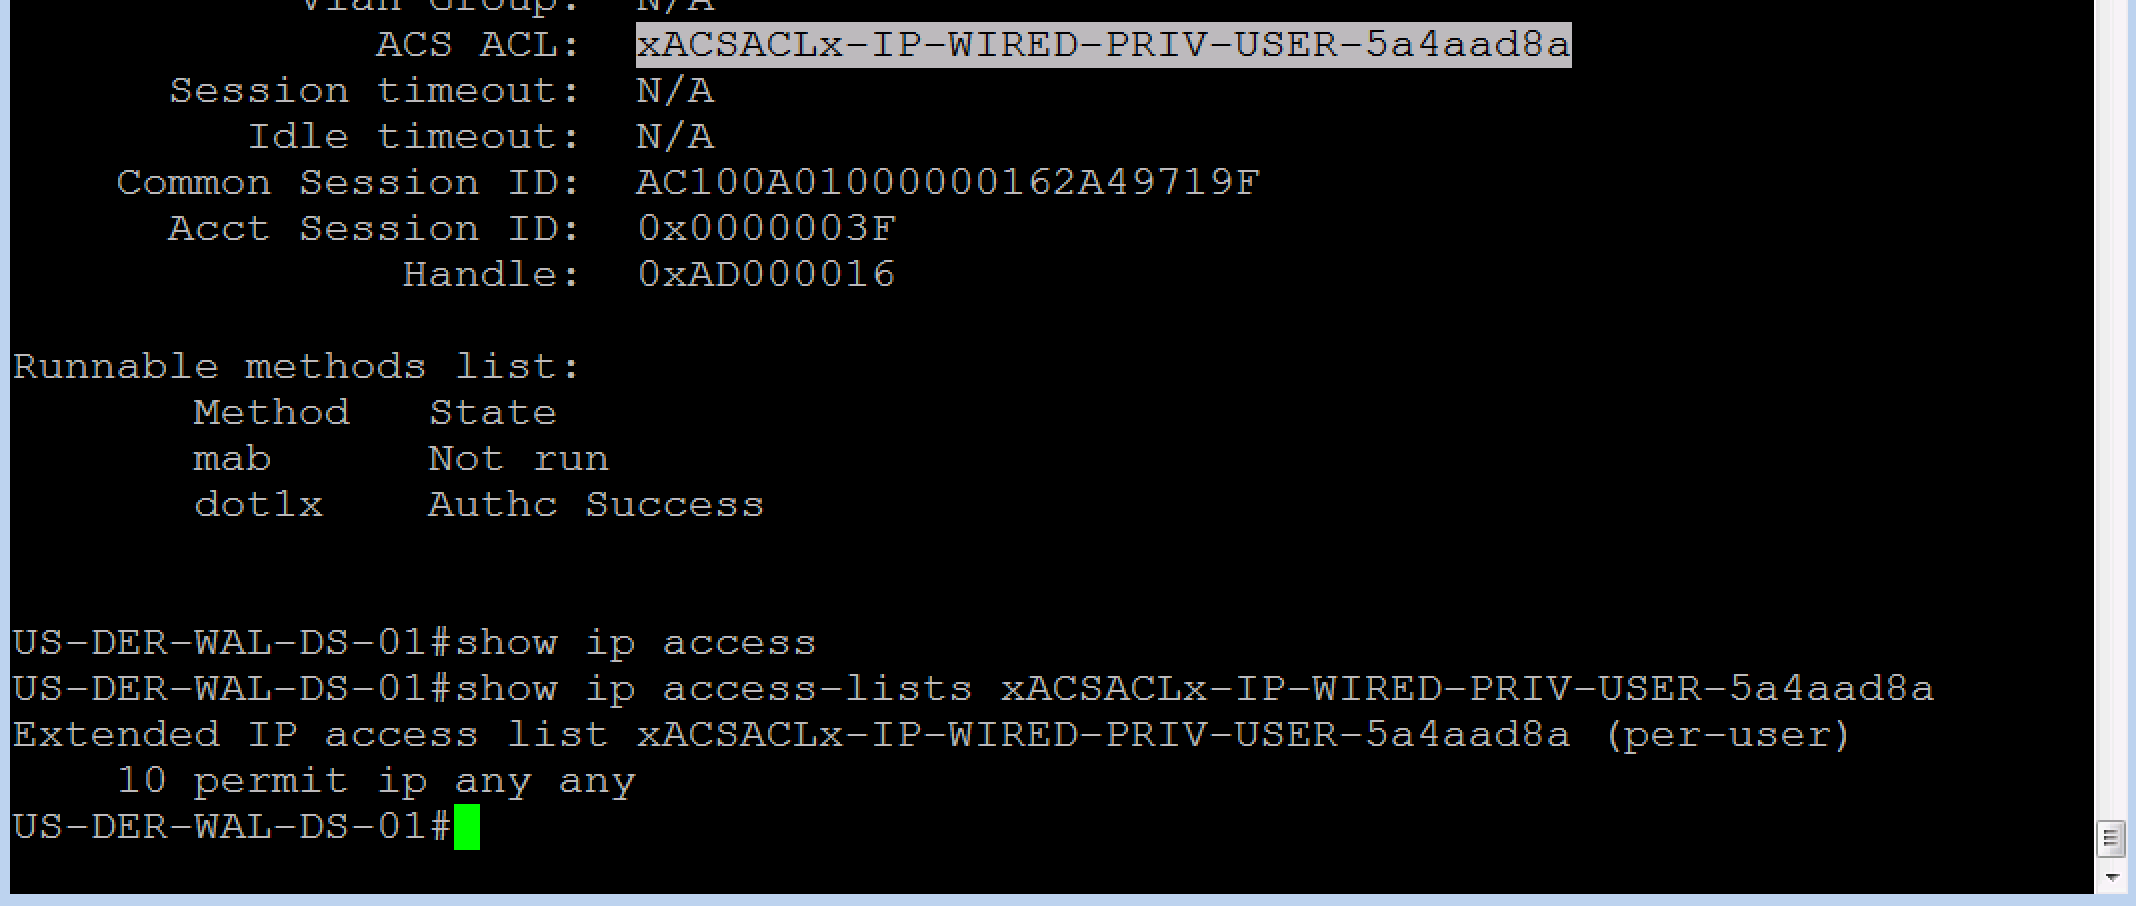
On the switch, issue the show auth session command again to see whats going on. For the Use-Name you should see our Domain Admin: ZSIGA\mzsiga as expected. You should see both a successful AuthC and AuthZ. Then comes the verification that the correct AuthZ policy was applied, which in this case a dACL called xACSACLx-IP-WIRED-PRIV-USER-5a4aad8a was applied to the session.
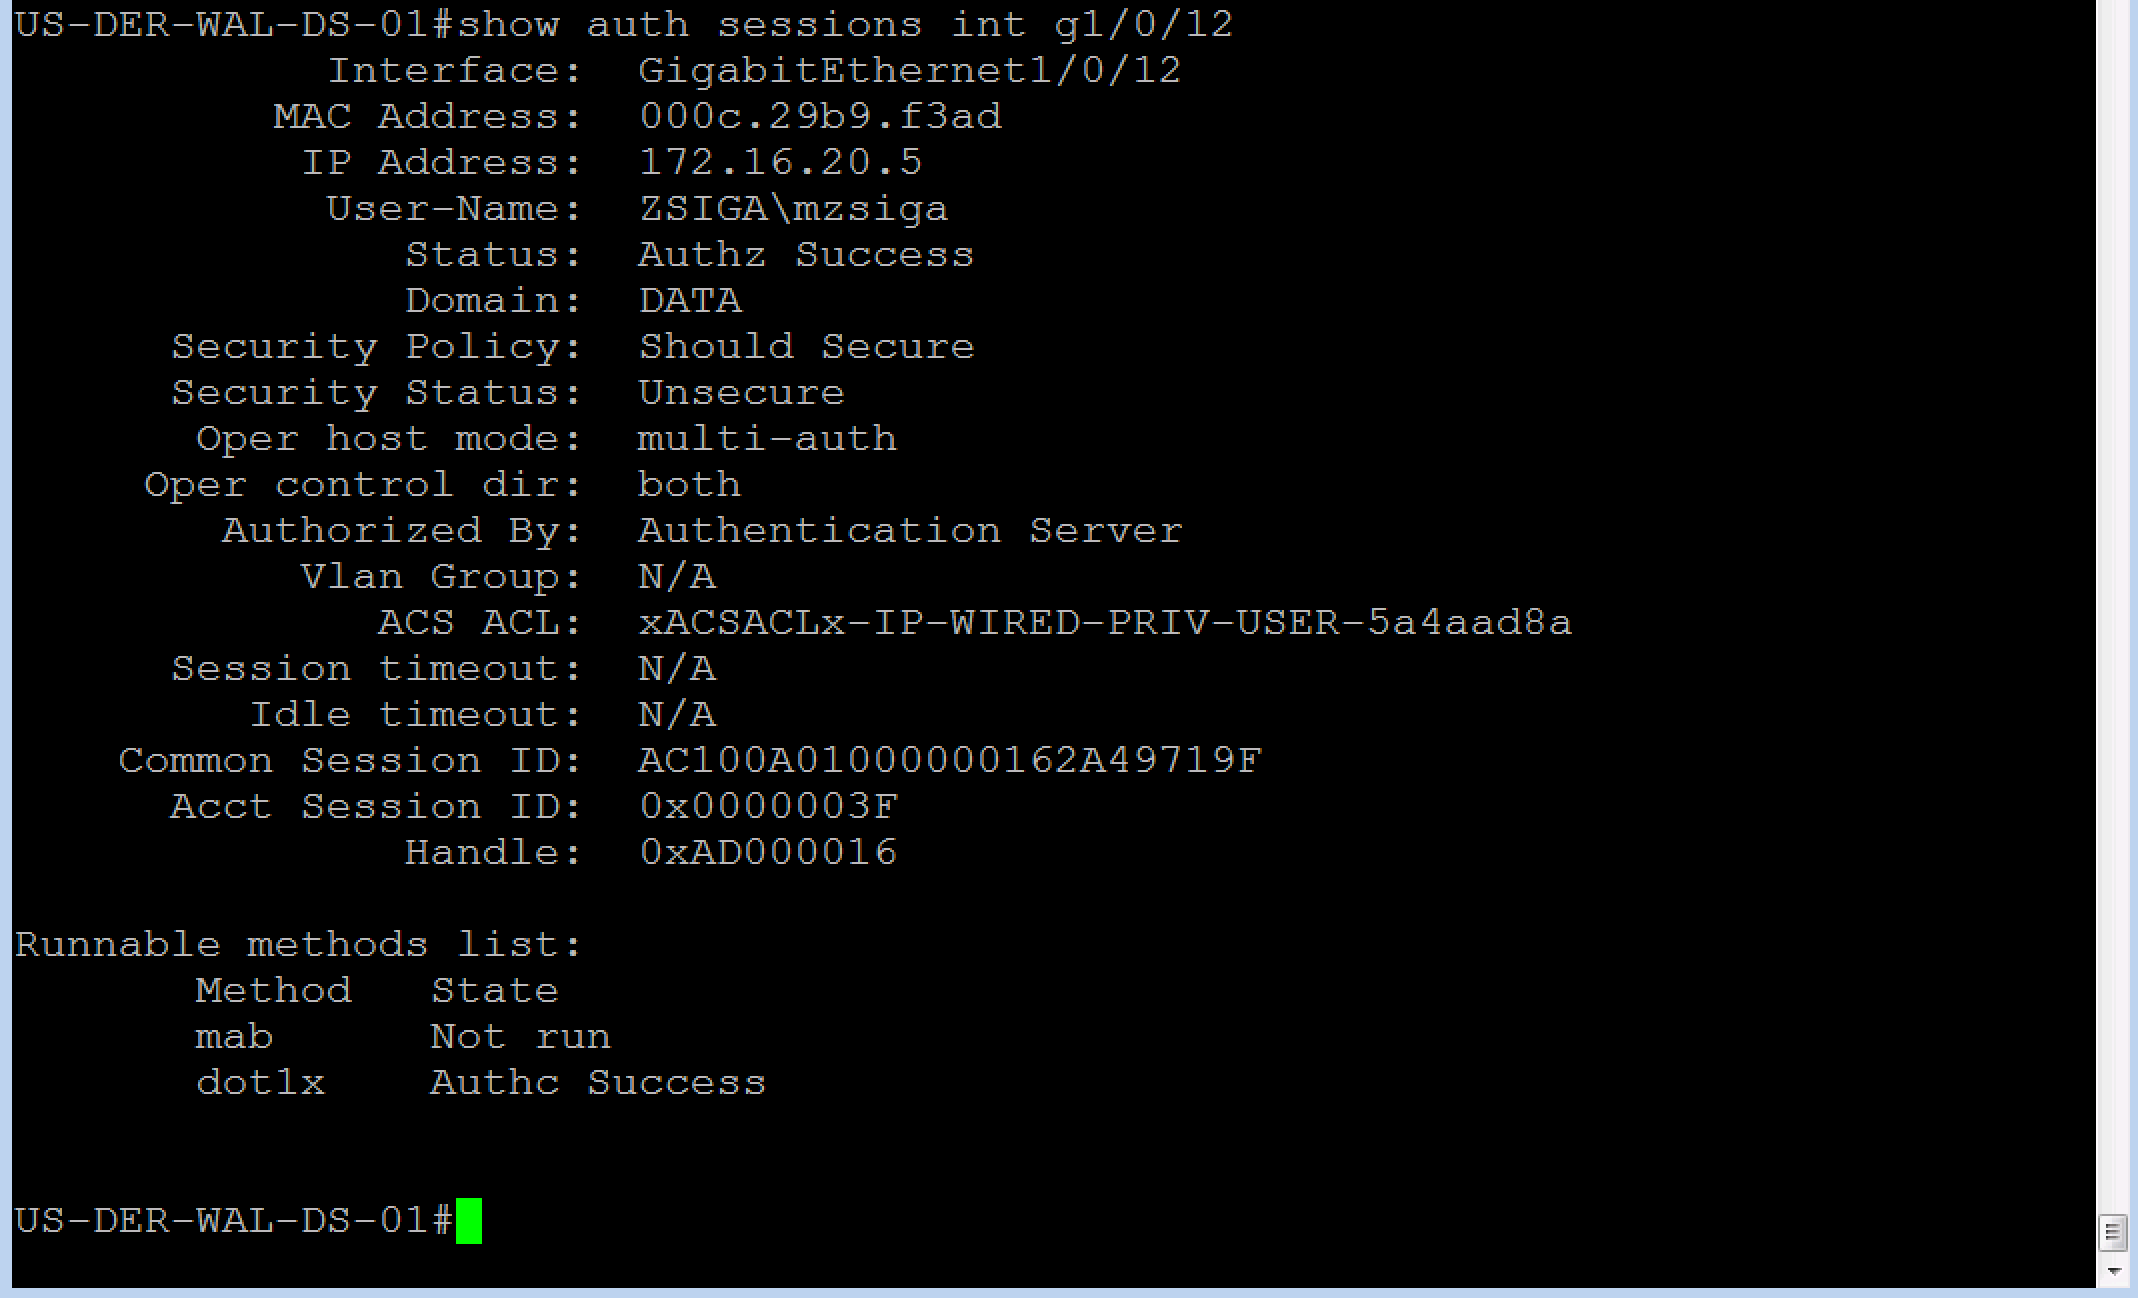
Like our other Use Cases that used a dACL, lets just verify what was downloaded is correct. As you should be able to see from your own output and from the screenshot below, our switch has a permit ip any any in this dACL. This is what we were looking for.
Now that we have verified correct authentication and authorization, lets verify our functionality like we did for our Domain User use Case.
Launch two CMD windows like before.
Use one of the CMD windows to ping our ISE node, 172.16.10.201, and the other CMD window to ping our Wireless Network’s Default Gateway, 172.16.2.1. This session should be able to ping both of these IP addresses as this session should have full access.
The below output shows that this Privileged User can ping both of these test cases.
Lets check our internet access while we are here and browse to our home page, Zigbits.tech. And just like that it worked!!
Thats it! Over 80 screenshots and we are done. We got through three of our Use Cases today which is a huge step for our Lab Deployment. We will be continuing with this level of motivation next week!!
Related Resources:
Ask questions and give feedback
- You can leave a comment on the blog!
- You can leave a voicemail at (617) 913-4103
- You can email us at Feedback@zigbits.tech
Engage with Zigbits further:
- Subscribe to the podcast on an iPhone or on an Android
- Follow Zigbits on Twitter!
- Follow Zigbits on LinkedIn!
- Follow Zigbits on Facebook!
Engage with me further:
Transparency:
This post may contain affiliate links to products or services were I may receive a level of compensation from your actions by following those links. This is seamless to you and does not add any additional cost to the products or services in question. In addition, I do not let any affiliate relationship cloud my judgement or my recommendation of a product or service. My recommendations will always be above reproach. This is my commitment to you Ziglets!