

Hey Ziglets, Here is another Zigbit for you on Cisco ISE 2.3. That’s right, Its ISE ISE Baby time again. Today we will be showing you how to build a four node Cisco ISE 2.3 Cluster. Lets get started!
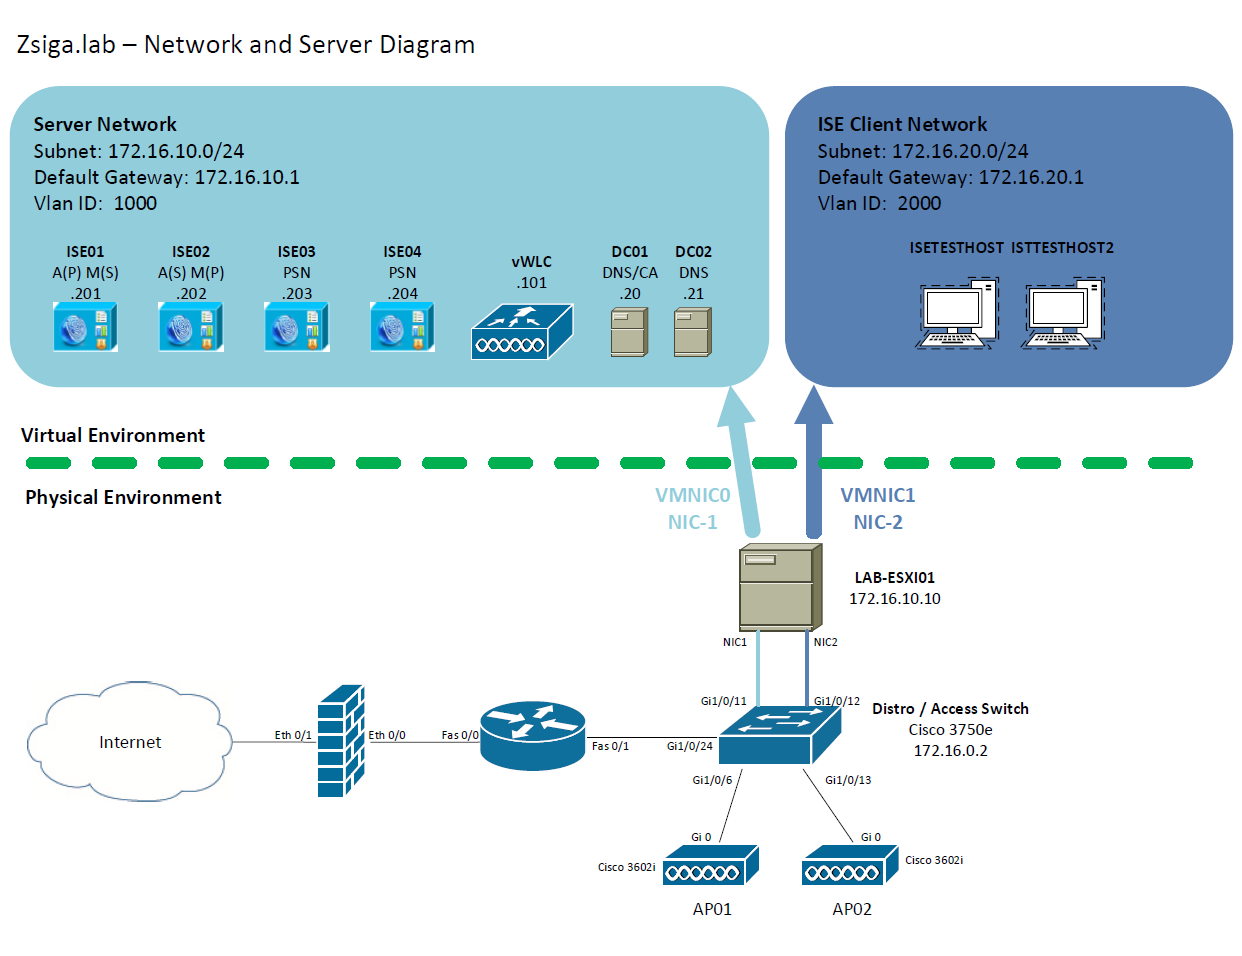
Network and Server Diagram:
Before we start into the Cluster build, below is a Network Diagram of how this lab environment is setup or will be setup once we are completed.
Related Posts:
If you haven’t seen these posts yet, you should check them out
Pre-Requisite information:
- Public Key Infrastructure (PKI) to provision Certificates
- DNS Servers for A records of the ISE Nodes
- Pre-built ISE Nodes for the cluster with all information
The Steps!!
To add the ISE Nodes into a cluster there are a couple of items we have to have. We need valid DNS entries, A records, for each ISE Node. We also need a valid Certificate from the Public Key Infrastructure (PKI) that ISE is being deployed in. We will start with the DNS entries, then do the Server Certificates, and finally create the Cisco ISE 2.3 distributed cluster.
1. Adding DNS Entries for the ISE Nodes in the ISE Distributed Cluster
To add DNS A records in our lab, we are going to connect to one of the lab domain controllers, 172.16.10.21 (DC02) via Remote Desktop Protocol (RDP).
Go a head and launch your RDP client of choice:
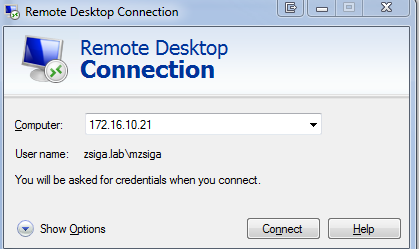
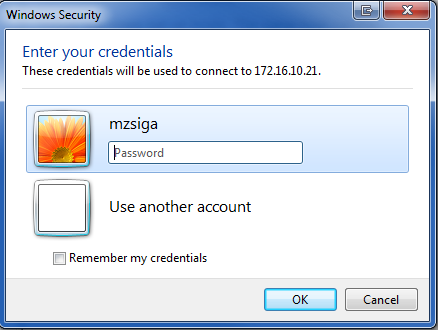
Click connect, and when prompted enter valid credentials to your domain controller. In my lab I am using an account that I have already created called “mzsiga”.
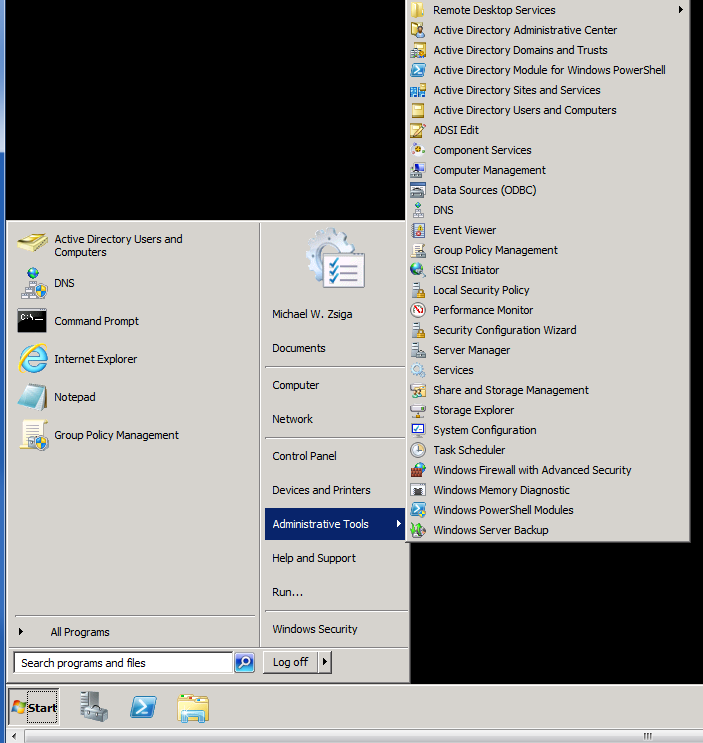
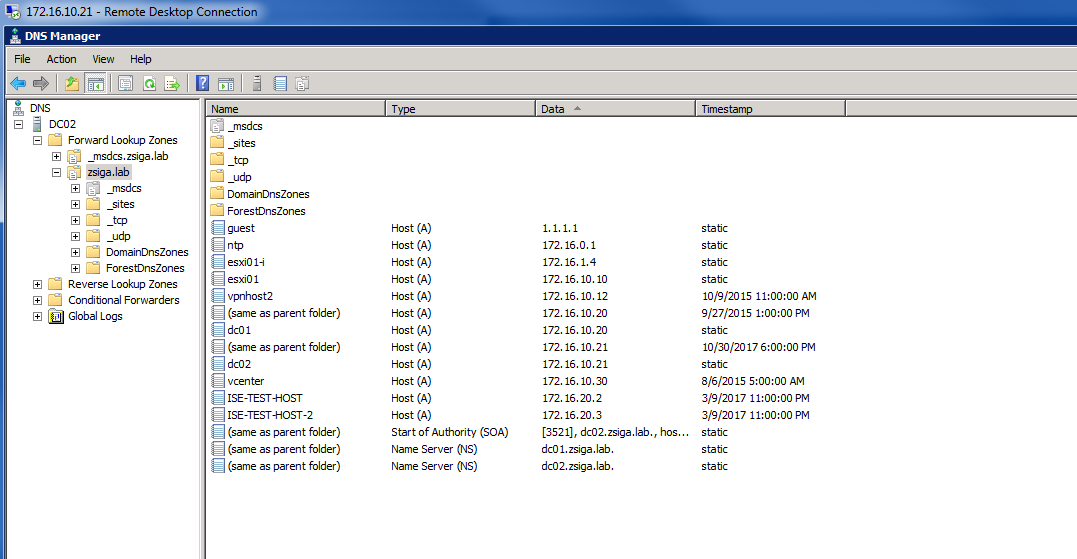
Once logged into the Domain controller, we are going to launch the DNS management console under Administrator Tools on the start menu. Below is a screenshot of how this looks on a Windows 2008 R2 Server.
Inside the DNS management console, dig down to your specific forward lookup zone, in our lab this is “zsiga.lab”. You will see all of the other DNS records that are part of the lab domain.
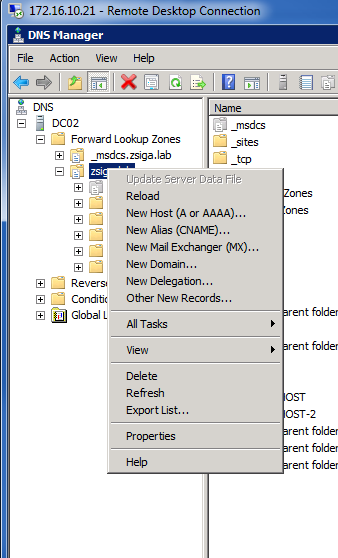
Now that we are in the DNS management console, to create a new A record, we need to right click on the Forward Lookup Zone that we want it created in and then select “New Host (A or AAAA)…”. Once again in our case, this will be “zsiga.lab”.
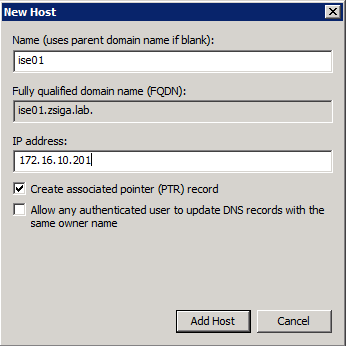
When the New Host window is on screen, we will enter in the specific values for the first ISE Node that we have in our deployment. Once done, click Add Host.
A successful window will display saying that it created the host record. Repeat this step for each ISE Node in your deployment.

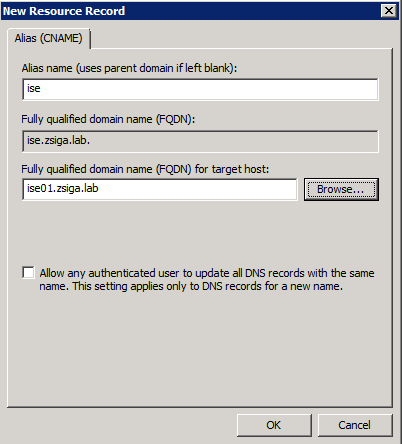
At this time, I also like to create an Alias (CNAME) record in DNS for “ise” pointing to the Primary admin node in the cluster. This allows a quick and simple url to be entered to log into the ISE GUI of the cluster. You do not need to complete this task if you do not want to use “ise” as a alias in your deployment.
Right click on your Forward Lookup Zone again, in our case its “Zsiga.Lab”, then select “New Alias (CNAME)…”.
On the configuration window that loads, enter “ise” as the alias name and then browse your DNS and select your primary admin node. In our deployment here, the primary admin node is ise01.zsiga.lab.
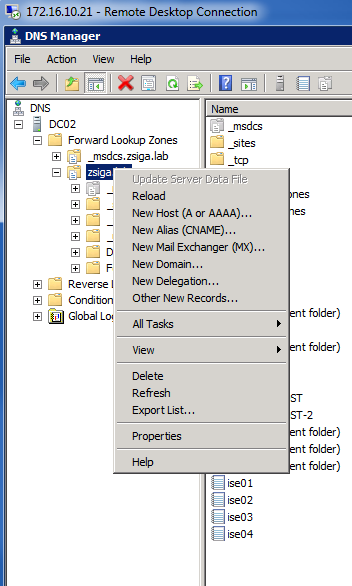
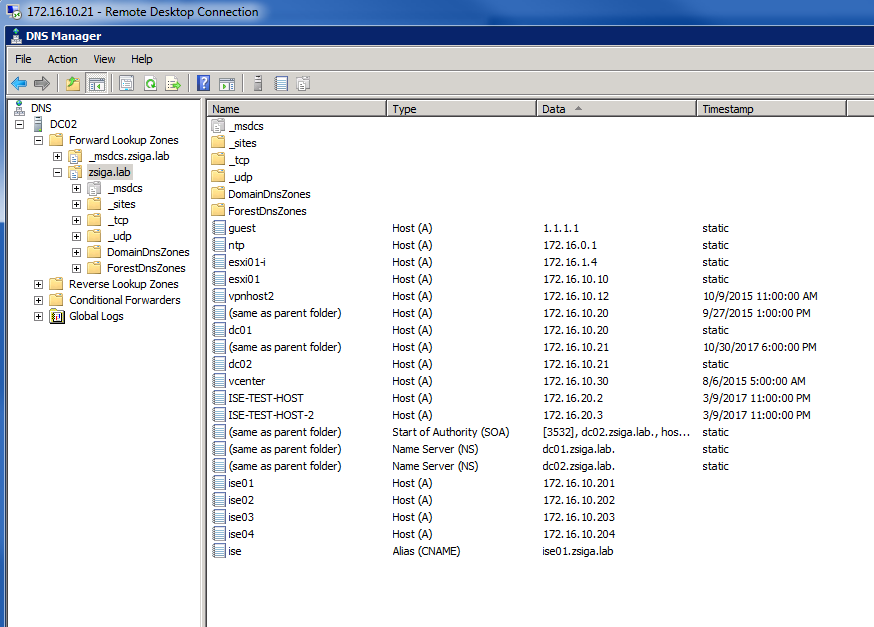
Once all done with creating records in DNS, you should see something similar to the below screenshot.
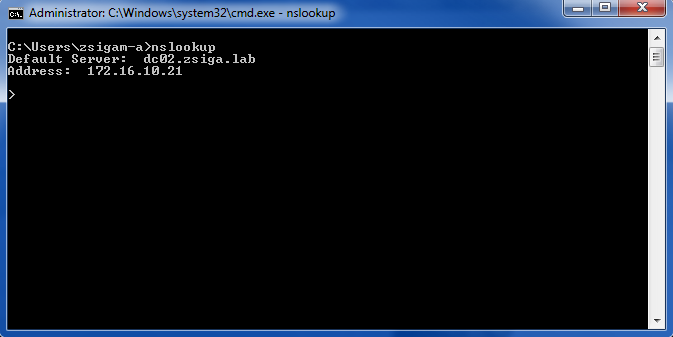
After creating all of these DNS records, I always like to validate that they are functioning properly within the environment I am working in. To do this, we are going to launch a CMD window, and then utilize nslookup to see what our two domain controllers are reporting for each DNS record we created.
Below is a screenshot showing how to launch nslookup within a CMD window.
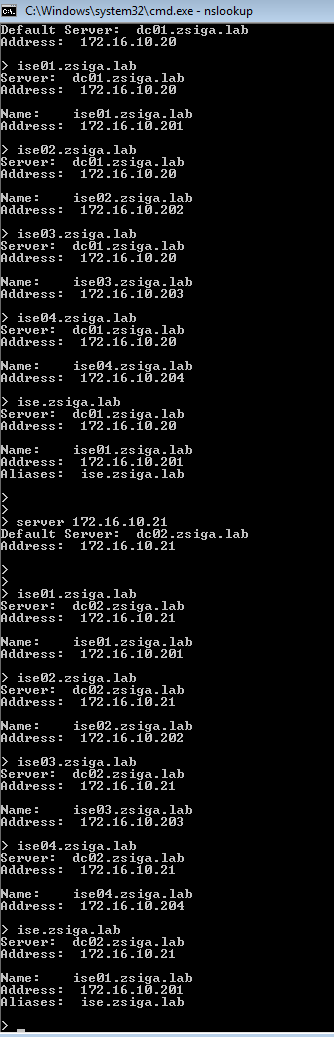
The below screenshot shows that each DNS record we created can be resolved on both Domain Controllers in our lab environment.
2. Server Certificates for the ISE Nodes in the ISE Distributed Cluster
To get Server Certificates on our ISE Nodes, we need to create a Certificate Signing Request (CSR) inside of each ISE Node. Once the CSR is created then we need to submit it to a Certificate Authority Signing or Issuing server to have a valid Server Certificate created so we can import into the ISE Nodes.
Lets launch a browser to the first ISE Node. In this case we are using Chrome and the URL we are browsing too is going to be “https://ise.zsiga.lab”. You should see a Privacy error message that will look different depending on which Internet browser you are using. The reason why you will get this Privacy error is because by default the ISE Nodes are using a self signed Server Certificate that you do not have imported into your local Certificate stores.

Go ahead and accept the Privacy error to get to the login screen. Enter the admin credentials for the ISE Node to log into the GUI.
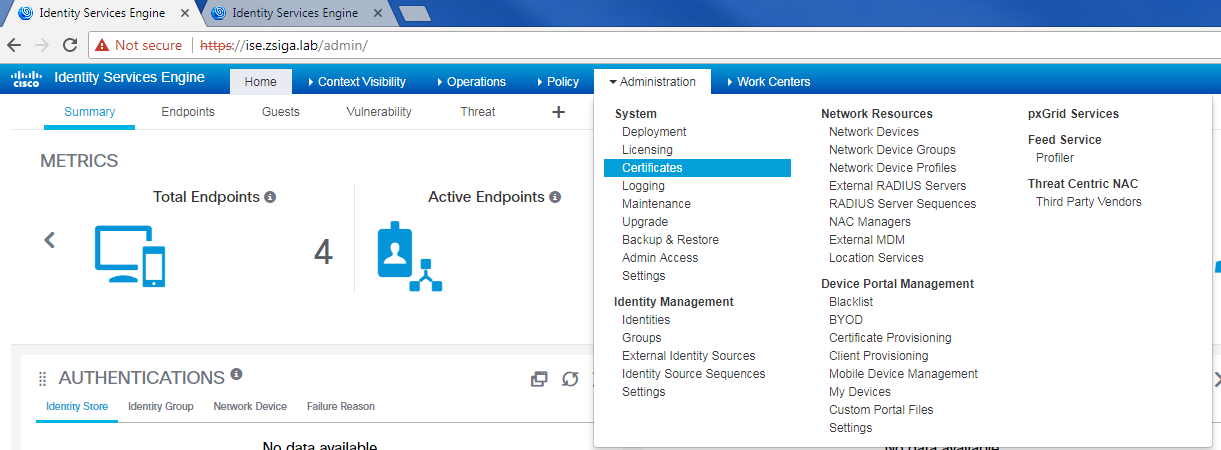
Once logged into the ISE Node, go to Administration -> System -> Certificates.
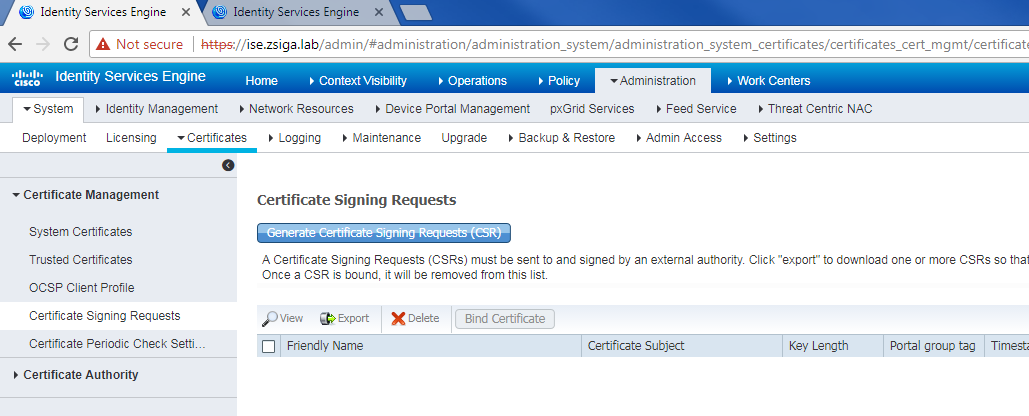
Inside the Certificates window, go a head and click on Certificate Signing Request. On this next window, click Generate Certificate Signing Requests (CSR).
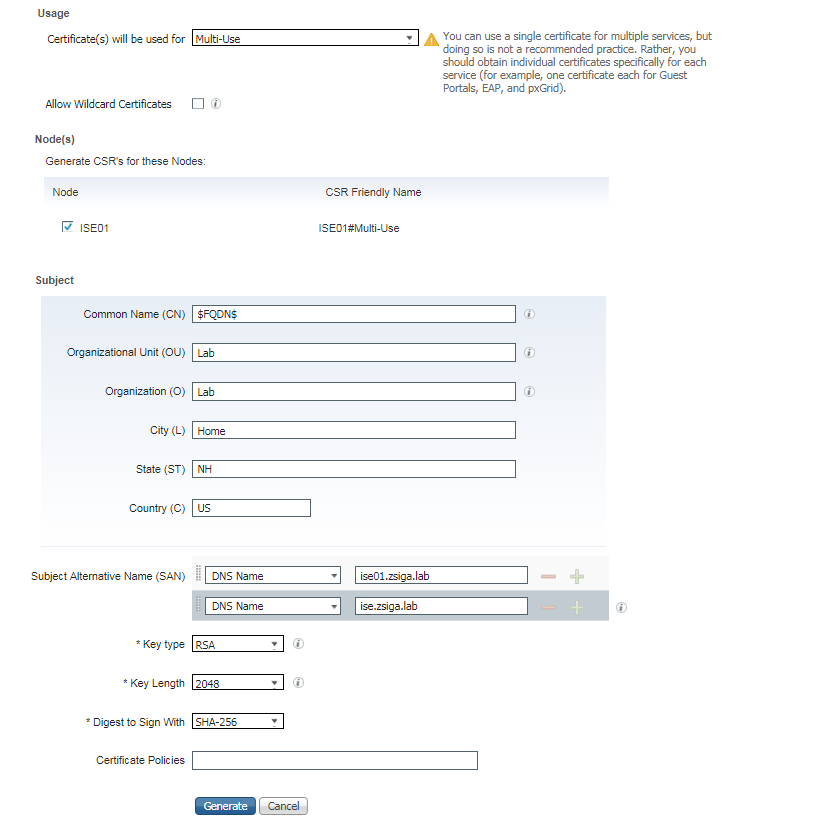
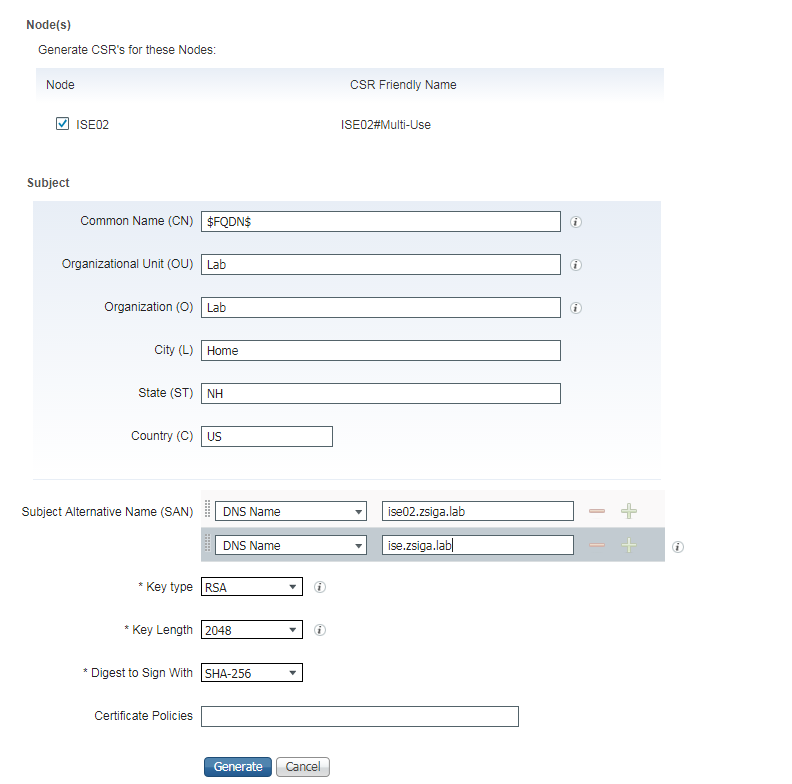
On the Certificate Attribute page, there is going to be a good amount of information you will need to supply here. We are going to be using a Multi-Use Certificate that can be used for all protocols and functions on the ISE Node (Admin, EAP Authentication, Guest Access, etc…). We need to make sure to check the Node that we are creating a CSR for, so in our case here we selected “ISE01”. For my Certificate Subject I used the following in the screenshot below. You should use whatever is appropriate for your environment. Just make sure to leave the “$FQDN$” variable in the Common Name (CN) Field.
For the Subject Alternative Name (SAN), you will always need a DNS SAN for the FQDN of the ISE Node. So for ISE01, I added ise01.zsiga.lab. The Issued Certificate will not bind to the CSR without this SAN entry. I also add any relevant other SANs to the CSR at this time. For example, my Alias ise.zsiga.lab. All of this is shown in the screenshot below. Once you have all of your values filled in and selected, click Generate.
The next window shows that the CSR has successfully been generated. Click Export to save the CSR to your local computer.
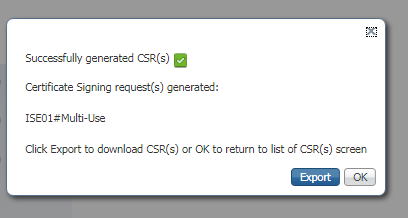
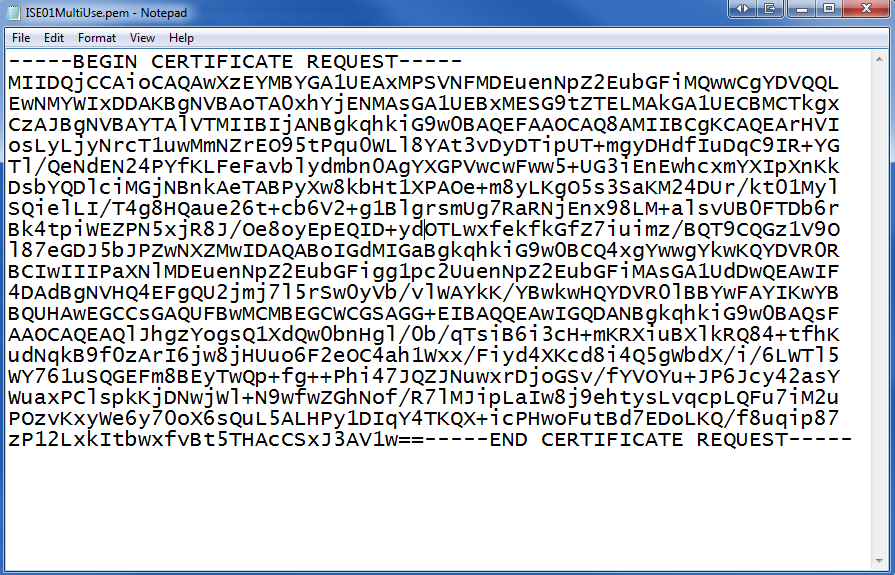
When exported in your browser, you should see something like this showing that it was downloaded to your computer. We want to open this file in a text editor, I used notepad.
![]()
Inside your text editor, we want to copy all of the text that is in this file.
Now we must get into our Certificate Authority. In this lab we are using a windows Server 2008 R2 Certificate Authority. This server is running a web enrollment site that we can utilize to submit our CSR and have a Server Certificate issued.
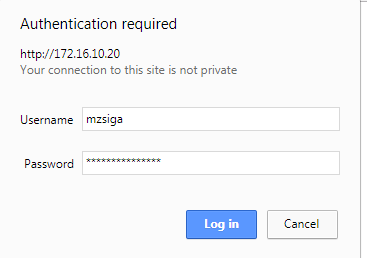
We are going to browse to our CA Server, in this case it is 172.16.10.20 (DC01). The Certificate Web Enrollment site is “CertSrv”
![]()
If promoted for credentials, enter appropriate credentials to log into your Certificate Web Enrollment. In this lab, I am using my “mzsiga” account to do this.
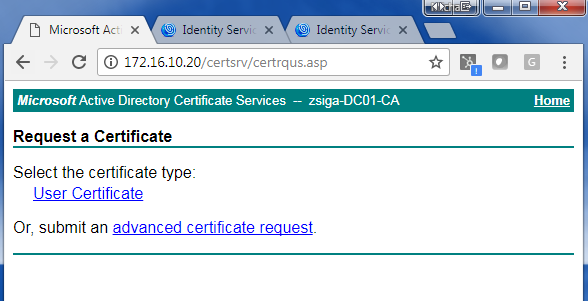
Once logged into this site, You should see something similar to the below screen. Click Request a certificate.
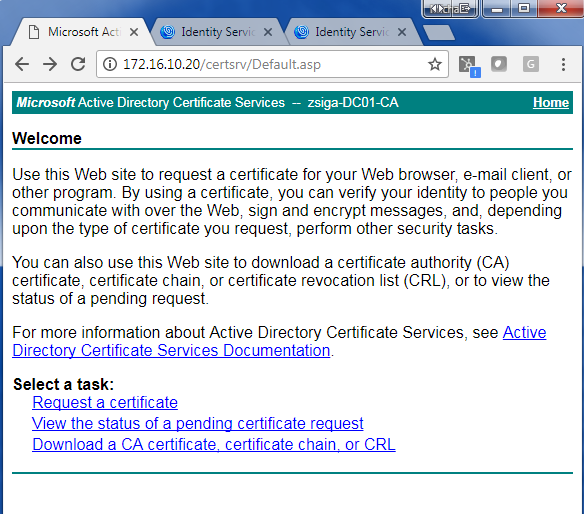
On the following window, we will want to select advanced certificate request.
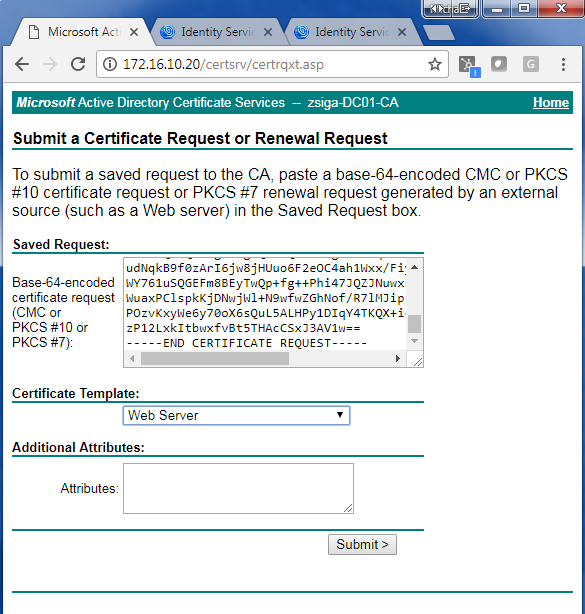
Now on the Certificate Request window, we will want to paste the CSR text in the Base-64-encoded certificate request window. After that is completed, we will want to use the Web Server Certificate Template for this Certificate. Click on Submit when you are done filling everything out.
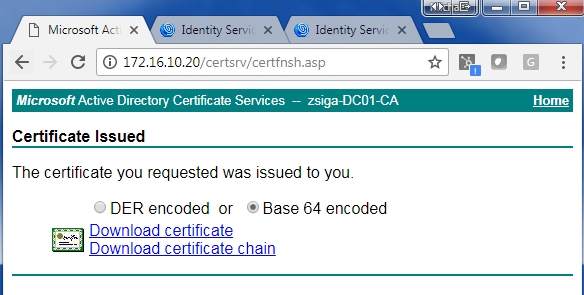
On the Certificate Issued page, we will want to select the Base 64 encoded option and click Download Certificate. This is our issued certificate that we will want to bind to the CSR in ISE. At this window, we will also want to click the Download certificate chain. You will also want to make sure you have the CA Root Certificate handy.
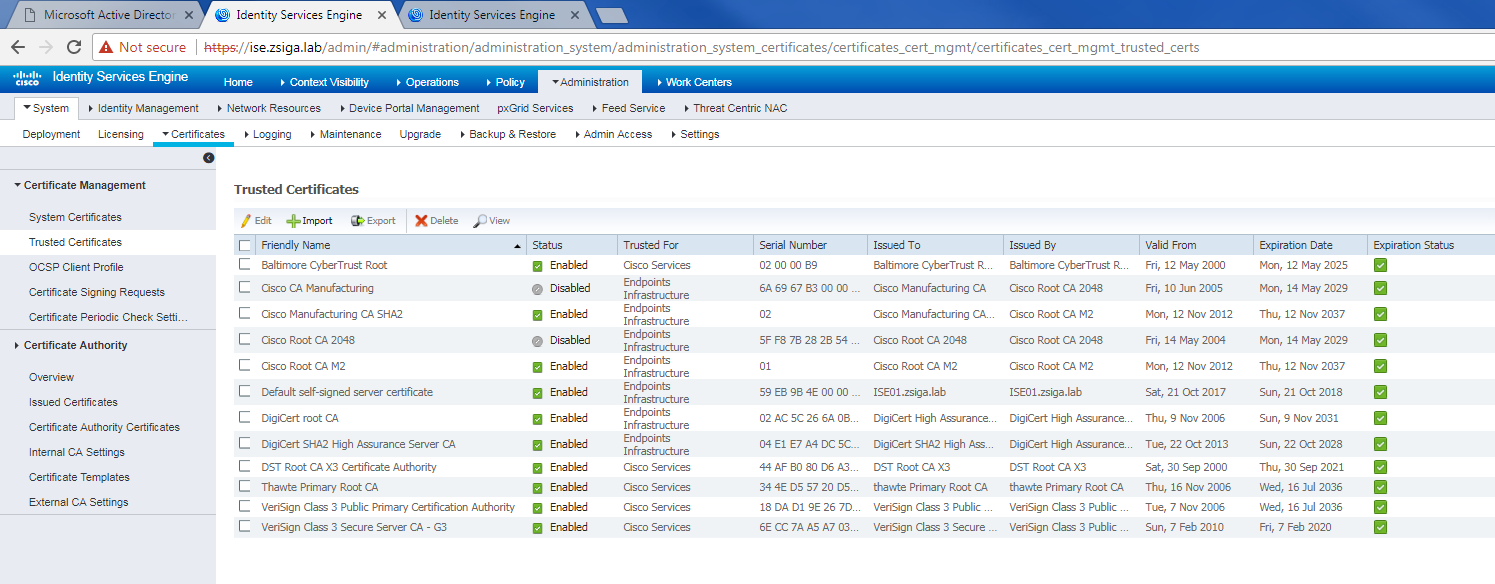
Before we bind the issued certificate to the CSR on the ISE Node, we want to import the CA Root Certificate, any CA Issuing Certificates and any Certificate Chains in the Trusted Certificate store on the ISE Nodes.
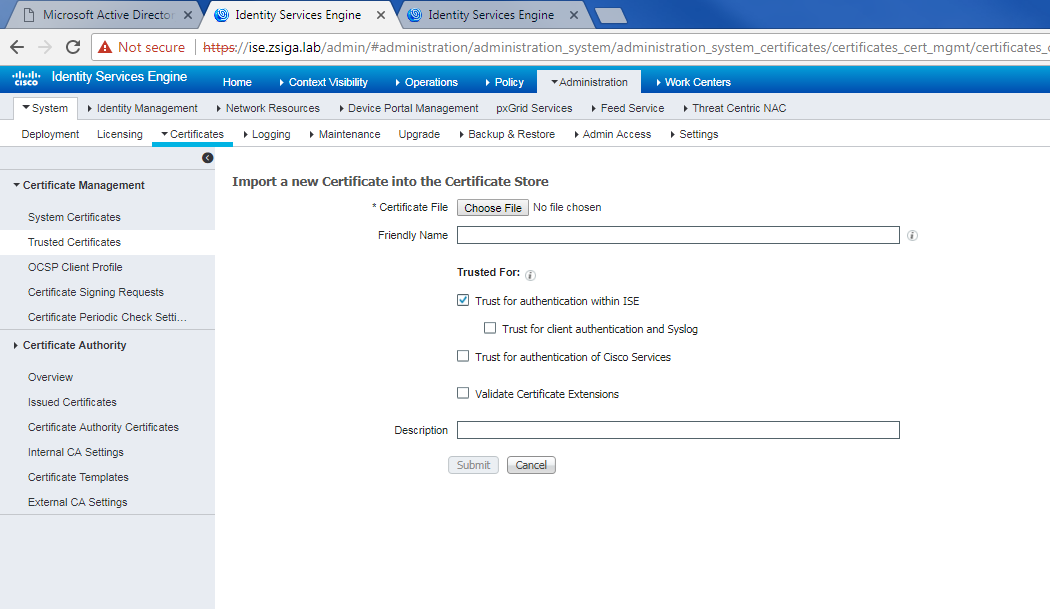
On the ISE Server go to Administration -> System -> Certificates -> Trusted Certificates. You should see something similar to the below screenshot. Click Import.
On the Import screen, you will want to browse to your CA Root Certificate by clicking Choose File.
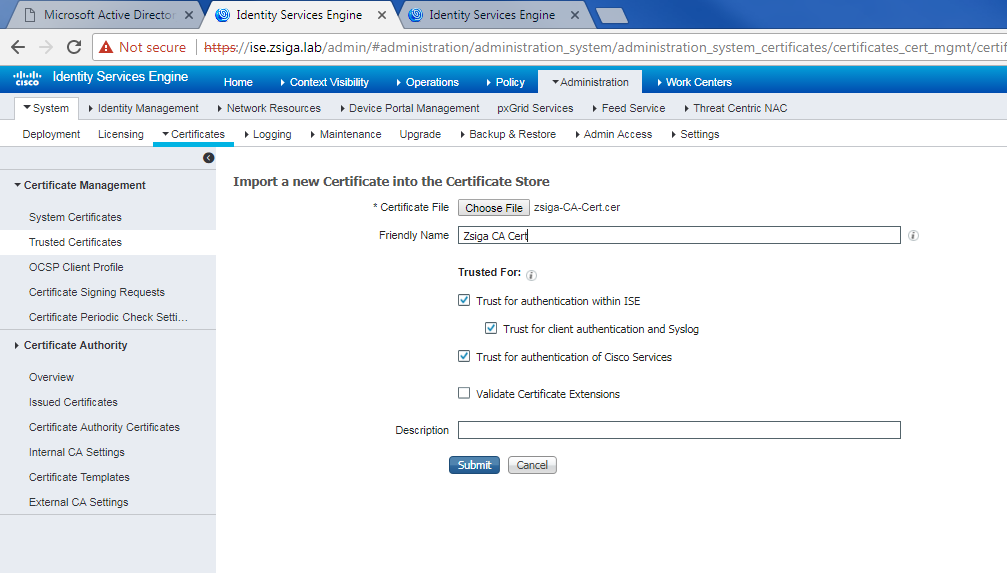
Once you have selected your CA Root Certificate, you can give it a Friendly name. In our case I gave the zsiga.lab CA Root Certificate the friendly name of “Zsiga CA Cert”. After this, you will want to make sure Trusted for authentication within ISE, Trust for client authentication and Syslog, and Trust for authentication of Cisco Services are all checked. Click Submit when done.
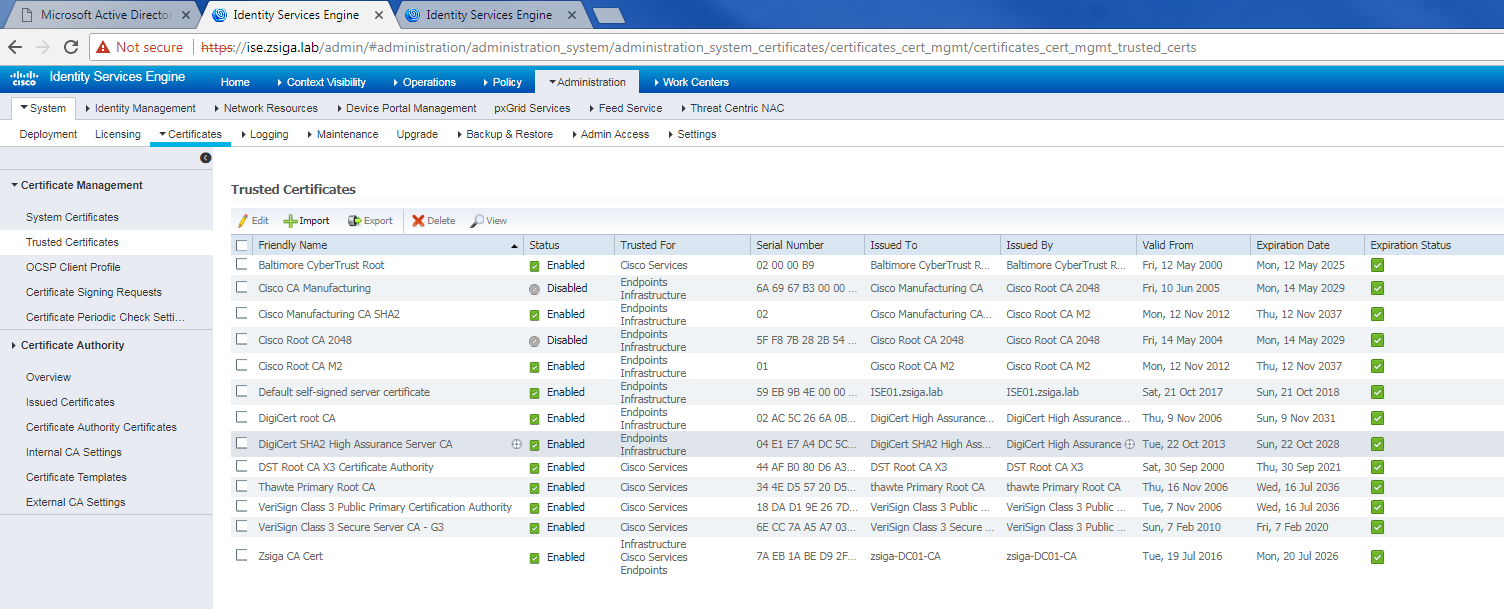
Once the Trusted Certificate has been important, you should see it in your Trusted Certificate Store like the below screenshot. Follow this same process to add all of your Root, Signing, and Issuing CA Certificates or chains.
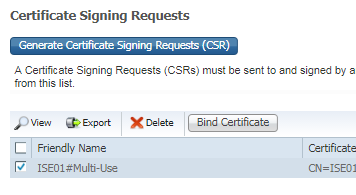
Now we are going to bind the issued certificate to the CSR on the ISE Node. On the ISE Node, under Administration -> System -> Certificates -> Certificate Signing Requests we should see the CSR we created a few steps ago.
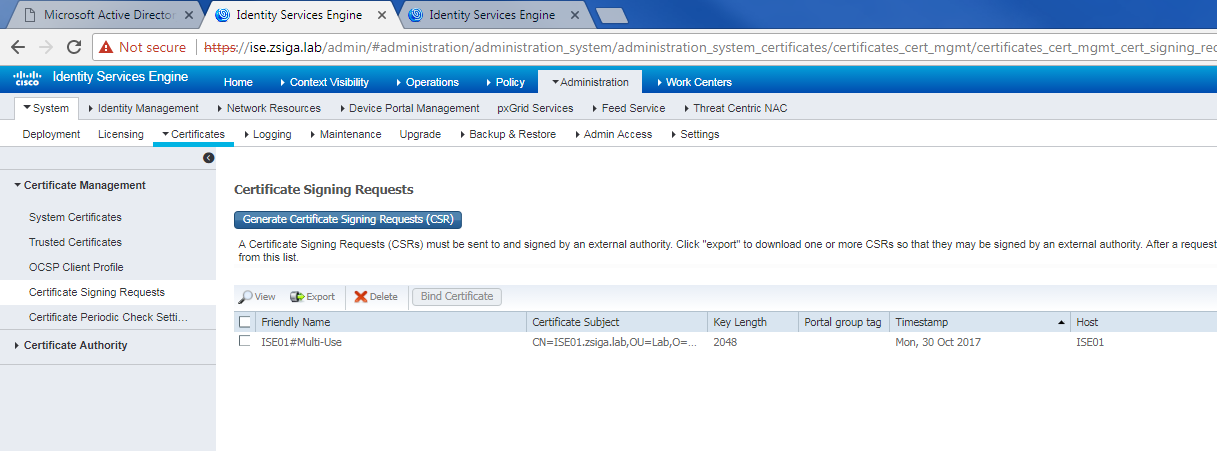
We will want to select the Certificate Signing Request by checking the checkbox next to it, and then click Bind Certificate.
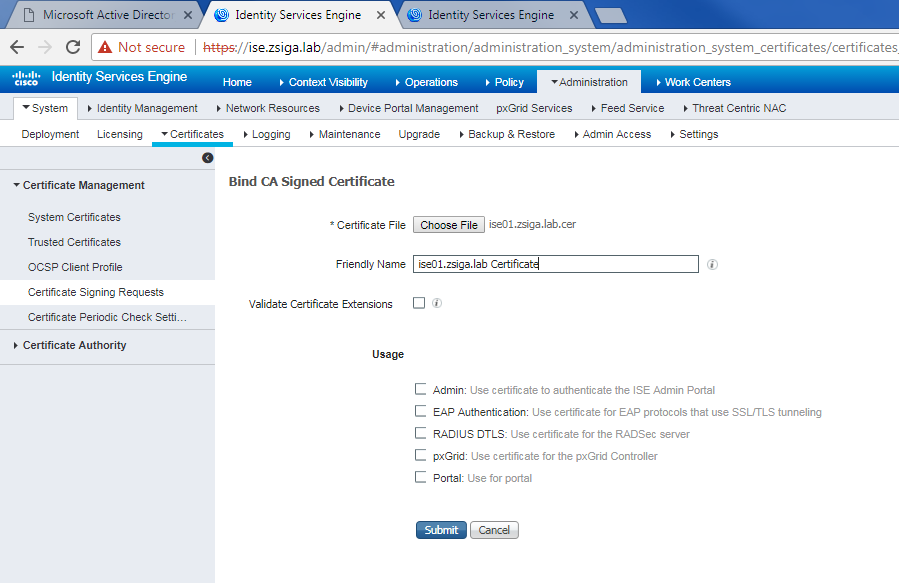
On the Bind Certificate window, we will want to browse for our issued Certificate by clicking Choose File.
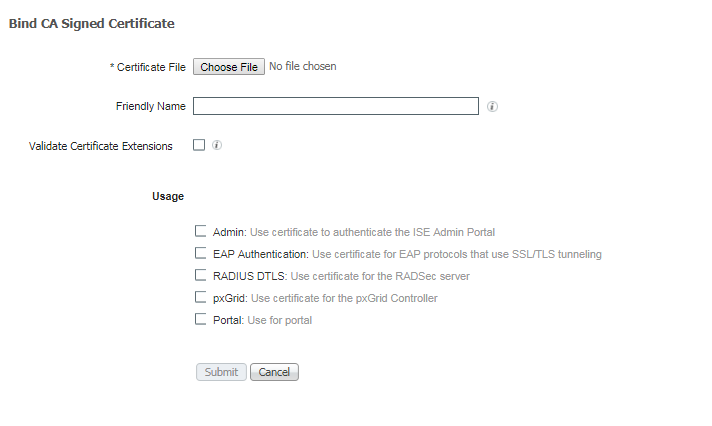
Once the issued Certificate has been selected, I like to give it a good friendly name. In this case I gave it ise01.zsiga.lab Certificate. For now, I do not select any options under Usage. Click Submit.
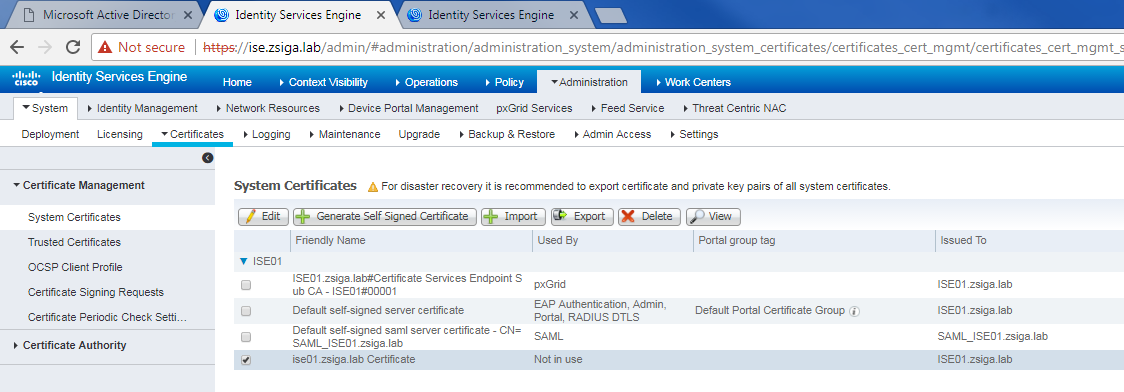
Now that the binding of the CSR is completed, ISE should redirect you to the System Certificates store, which you should see the issued certificate but it is not being used yet. I like to make sure the Certificate is binded and that I imported all of the CA Root, Signing, and Issuing Certificates in the Trusted Certificate Store. If we make the new Certificate usable for the different services but do not have the proper CA Certificates / Chains installed you can break the web GUI. (I have done this in the past and it is not a fun time)
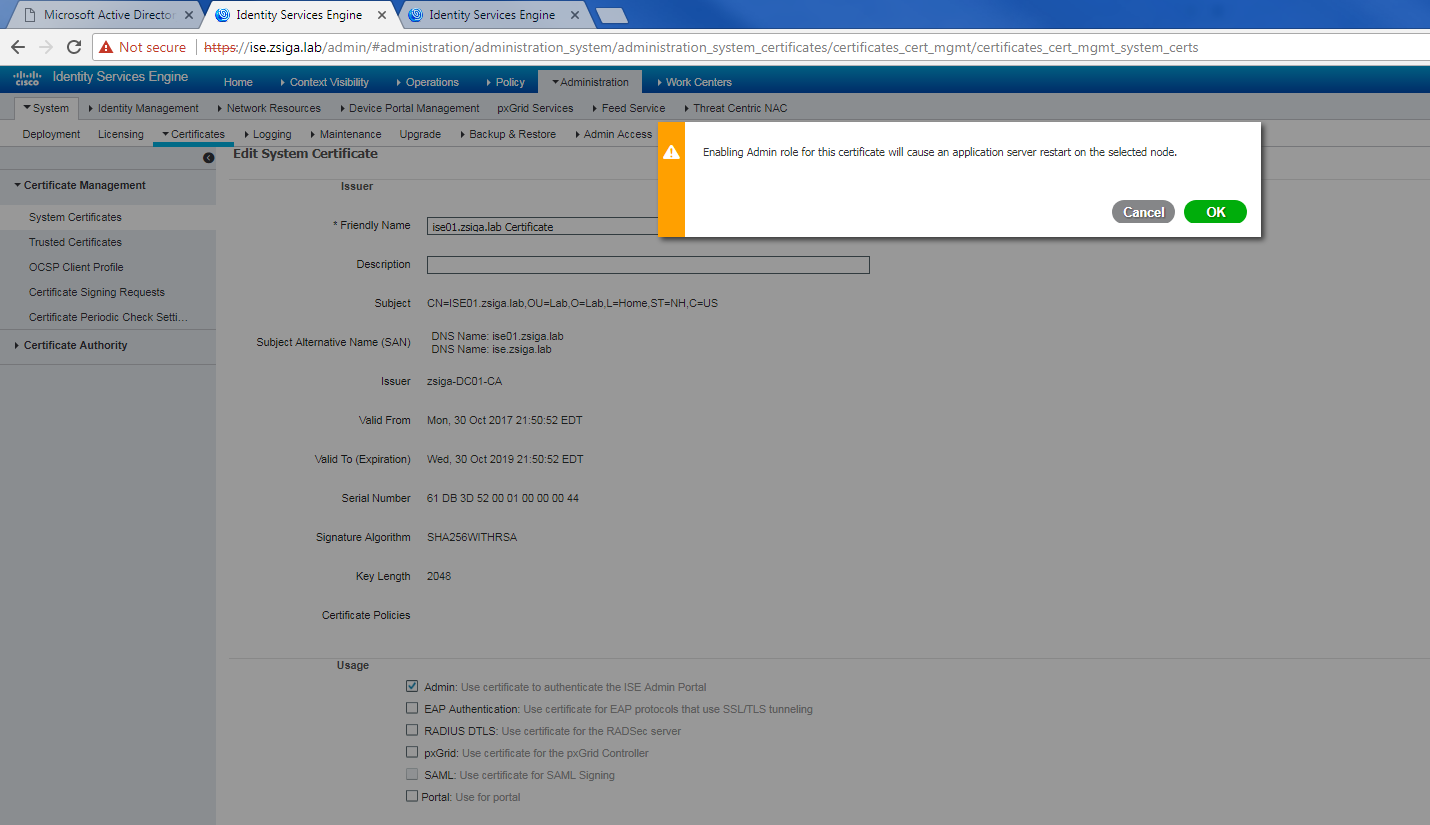
Lets go ahead and edit our new Server Certificate to make it usable.
On the next screen, lets select the Admin checkbox. Once selected a popup screen will display stating that the application server will need to restart on this ISE Node. This is fine, just select ok.
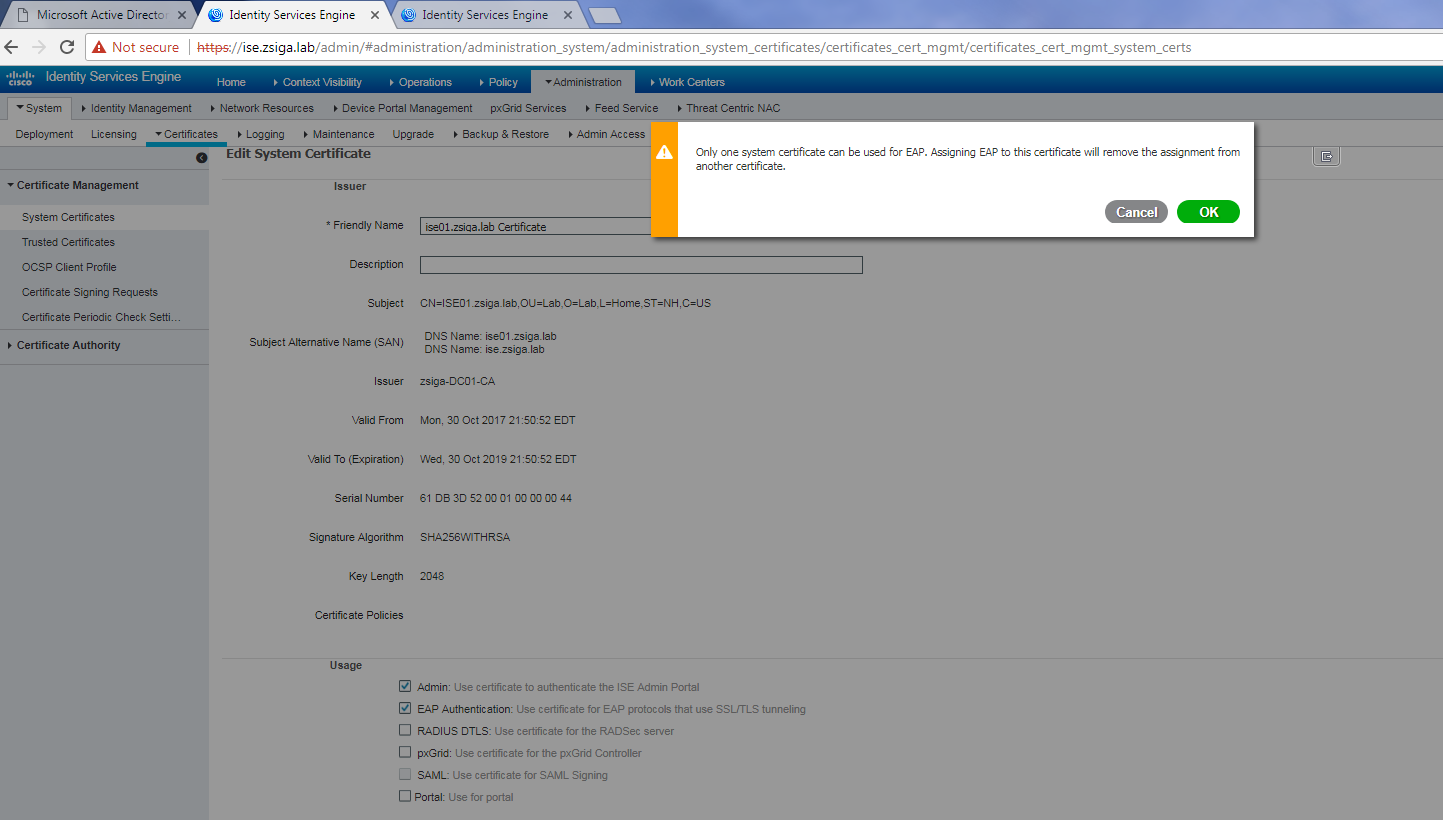
While we are selecting what the Certificate will be used for, lets go a head and check the box next to EAP Authentication. Guess what, we will get another popup screen but this time it will state that only one system certificate can be used for EAP. This is perfectly fine, just select ok. With both Admin and EAP Authentication selected, click save at the bottom of the Edit Certificate window.
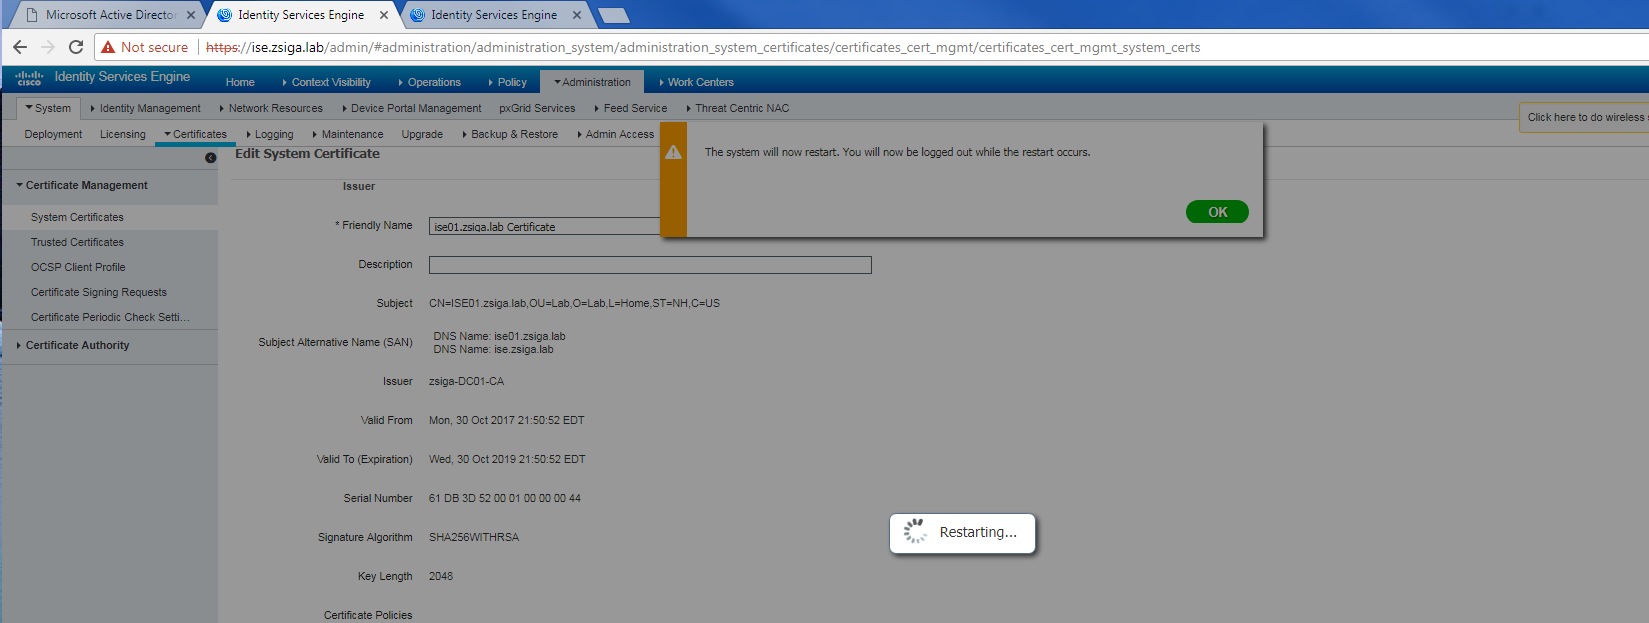
After saving the certificate changes, you will get another popup window stating that the system will reboot.
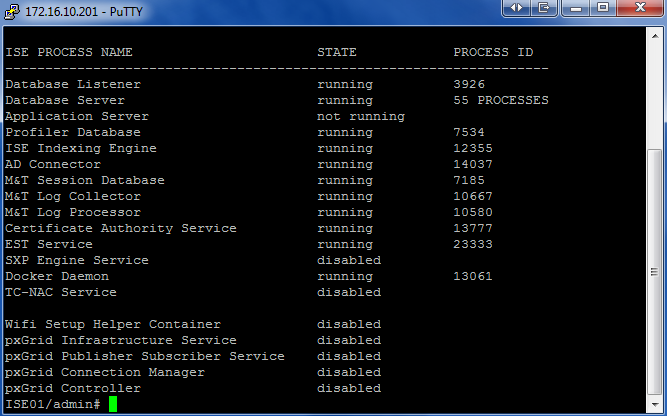
At this point in time, I like to SSH into my ISE Node to check the status of the Application Server. I like to know where it is throughout the process. I also like to know when it is back online so I can verify the Certificates are good to go.
Launch your SSH client of choice, login with the admin credentials. Issue the “show application status ise” command to see where the ISE Node is with this process. Repeat this command until the Application Server is in the Running State again.
Once the Application Server is in the Running State again, lets browse to our “https://ise.zsiga.lab” to see if the Certificate is now a valid Certificate within our PKI environment.
We are good and the screenshot below shows that ise.zsiga.lab has a valid Secure connection.
![]()
You will want to repeat this entire process for each ISE Node, so that every ISE Node in your cluster has valid Certificates from your PKI environment. Below are a couple of screenshots from our second ISE Node, ise02.

3. Creating the Cisco ISE Distributed Cluster and adding nodes to it
Log into the Web GUI of what will be your deployment’s Primary Admin node. In our lab this is going to be ise01.zsiga.lab and we can access it via our DNS alias entry of ise.zsiga.lab. The alias entry can be really helpful when you have a long naming standard for your servers.
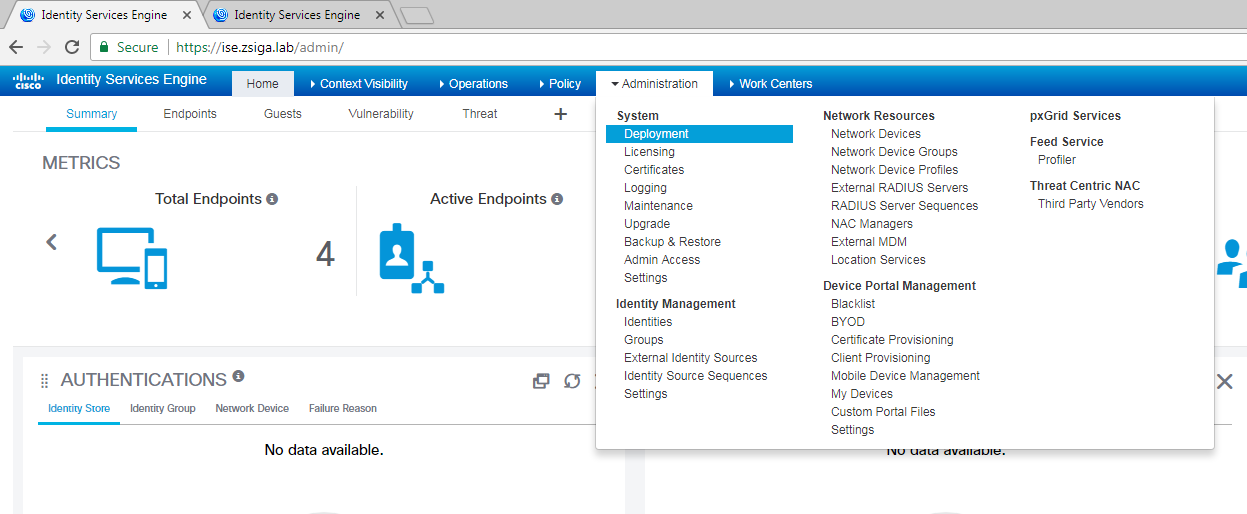
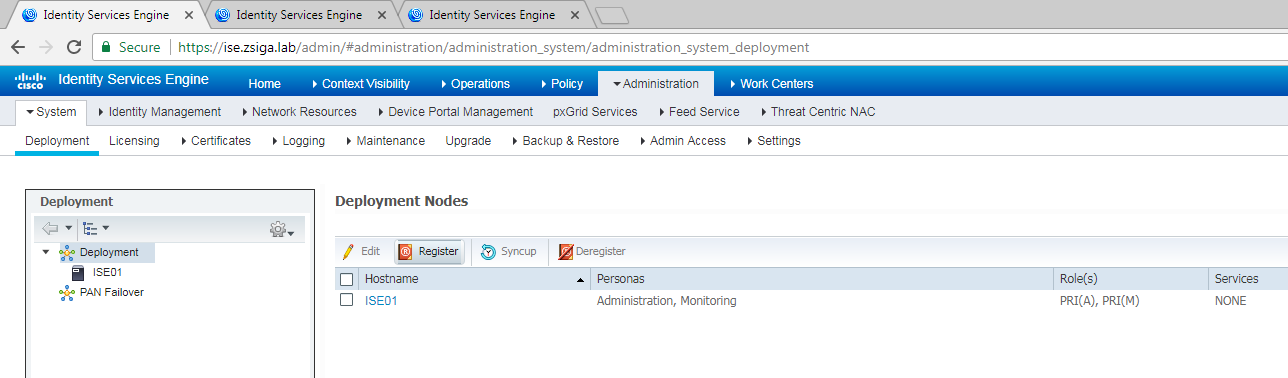
Once logged into the Web GUI, you will need to navigate to Administration -> System -> Deployment.
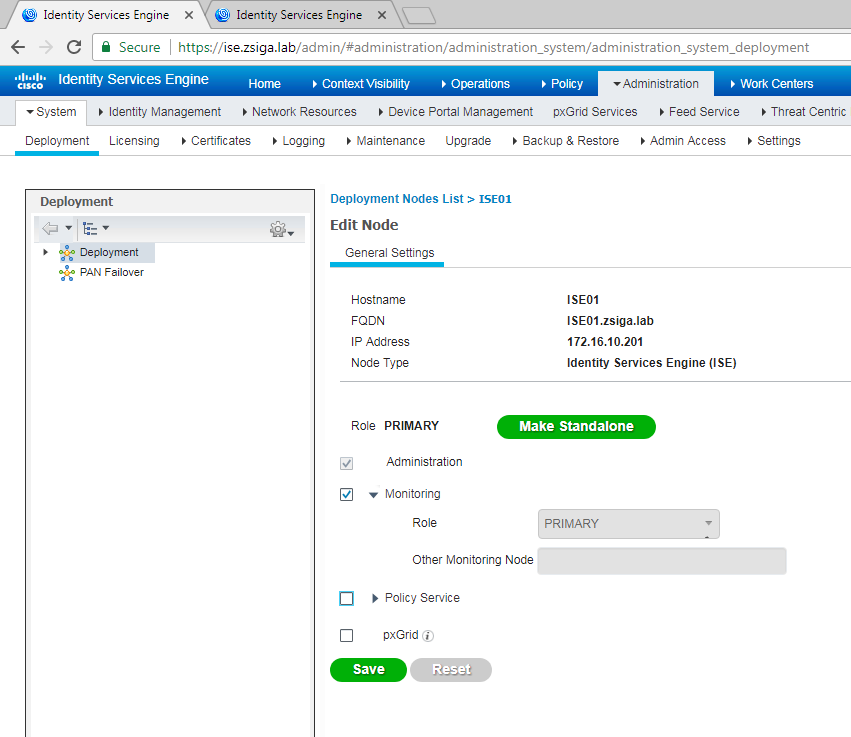
If its the first time navigating to the deployment screen you will get a pop up that lets you know your current deployment is in standalone. This is ok, and we will be changing it momentarily.
Click Ok to move on to the Deployment screen where you will see the current node you are modifying. Go a head and click the name of the node to edit its deployment settings.

Once on the Edit Node screen we are going to click the Make Primary button and for our deployment we are going to remove the Policy Services persona from this server. Your deployment might be different, so add and remove the personas / roles that match up to your deployment.
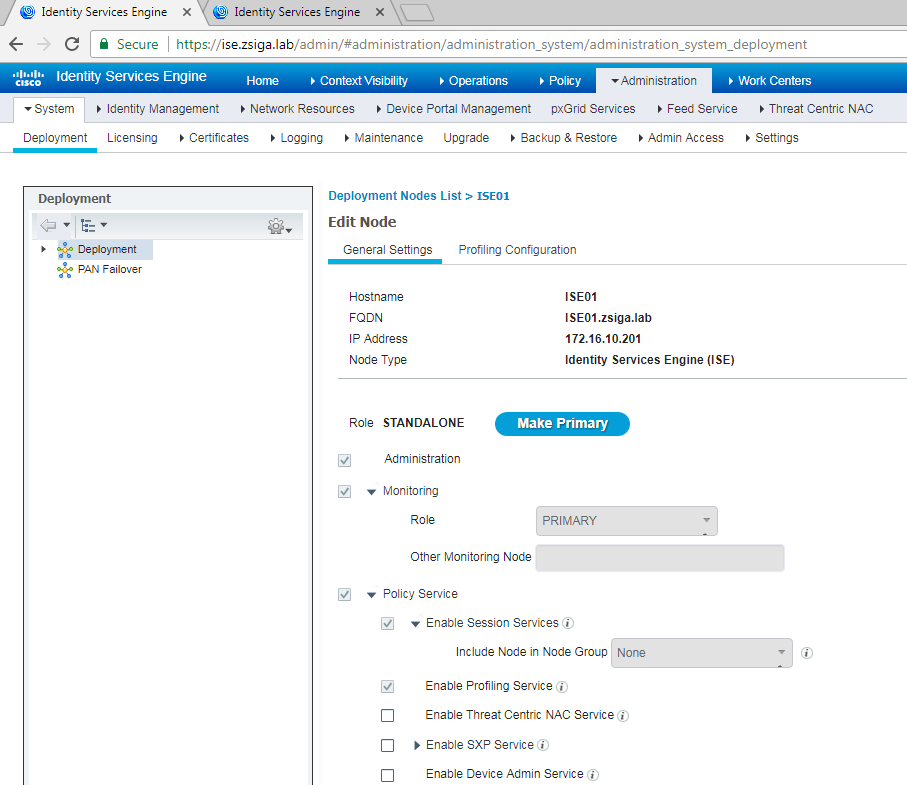
Now that you have all of the Personas selected, go a head and click the Save button. Your settings should look similar to the screenshot below before clicking Save.
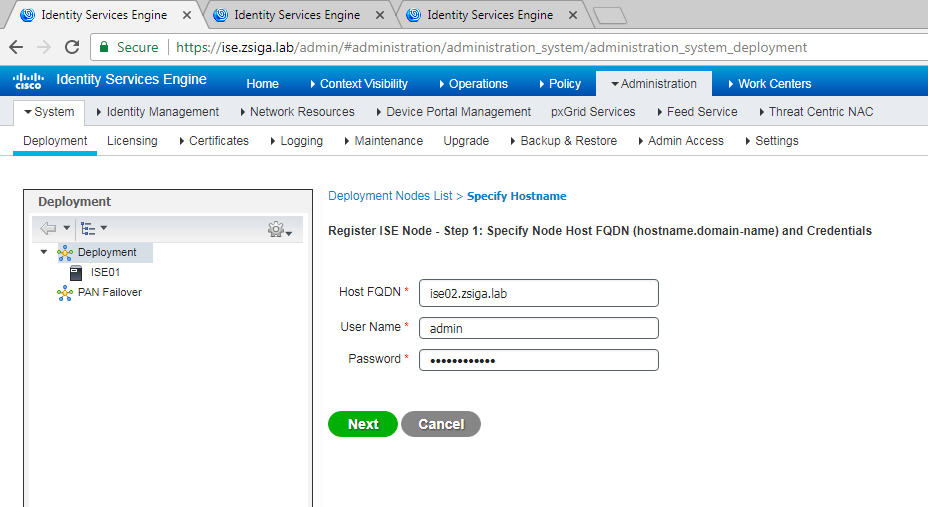
Now that we have a Distributed Deployment configured, but with only one ISE Node, its time to add the other ISE Nodes into this cluster. To do this, at the same location, Administration -> System -> Deployment, click Register.
On the register node screen, you will need to enter the specific Host name (FQDN is mandatory here) and the registering ISE Node’s admin credentials. Once you have entered the required information click the Next button to continue.
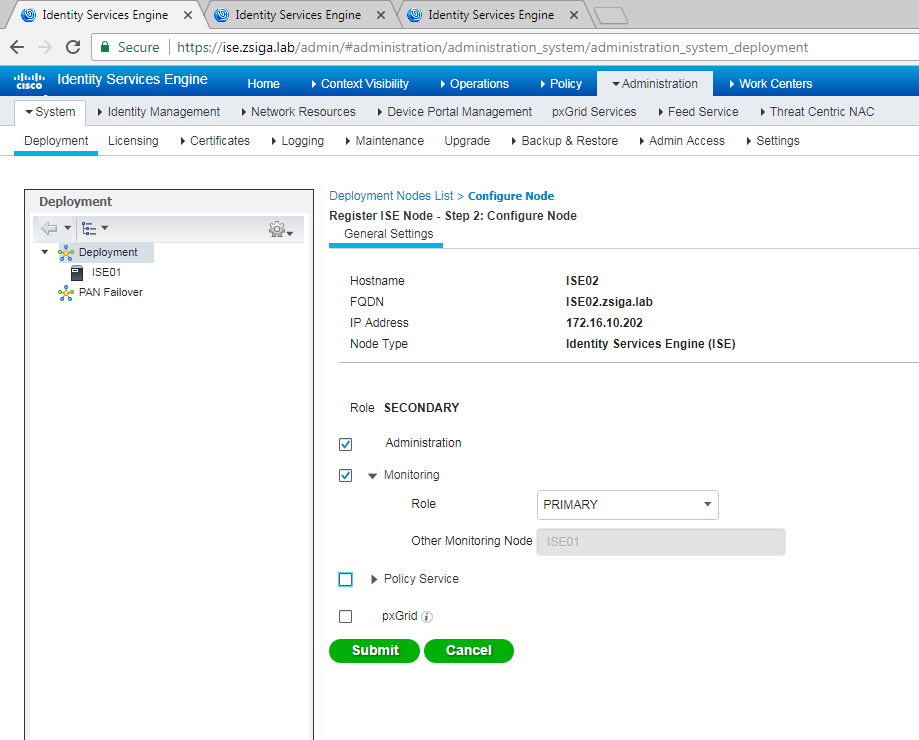
The next screen is where we can select / deselect the different Personas and roles this new ISE node is going to have within this cluster. For our deployment here, we are adding the second ISE node to the clusters ise02.zsiga.lab. ISE02 is going to be our Secondary Admin node and our Primary Monitor Node. We are not going to run Policy Services on this node either as we will have ISE03 and ISE04 be dedicated as Policy Services Nodes, or PSN. Once you are satisfied with your choices, select Submit to add the node to the Cluster.
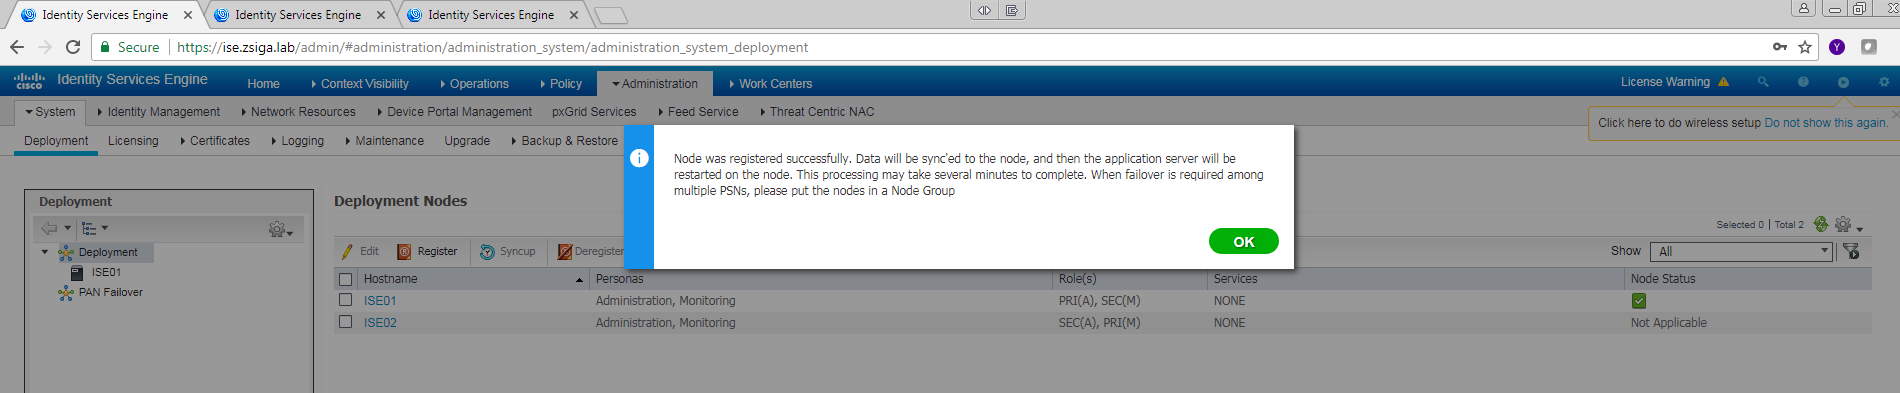
Once the new node is added to the cluster a pop up window will be shown stating that the replication sync has started between the new node and the cluster. This will take sometime to complete and differs depending on the data already in the Cluster.
We are going to continue adding our other two nodes to the Cisco ISE distributed cluster we have created. Let’s get ISE03 added to our cluster first.
Before we add our First Policy Services Node, or PSN, we will create a Node Group for them. On the Deployment page, there is a settings button that is a little hard to find. Below is a screenshot to help you find it.
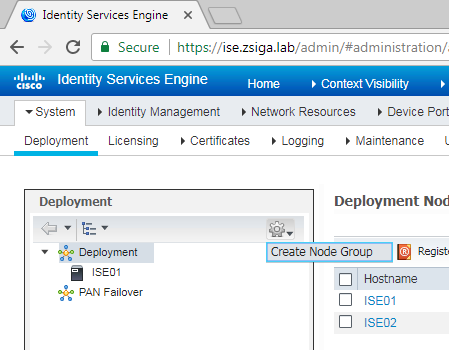
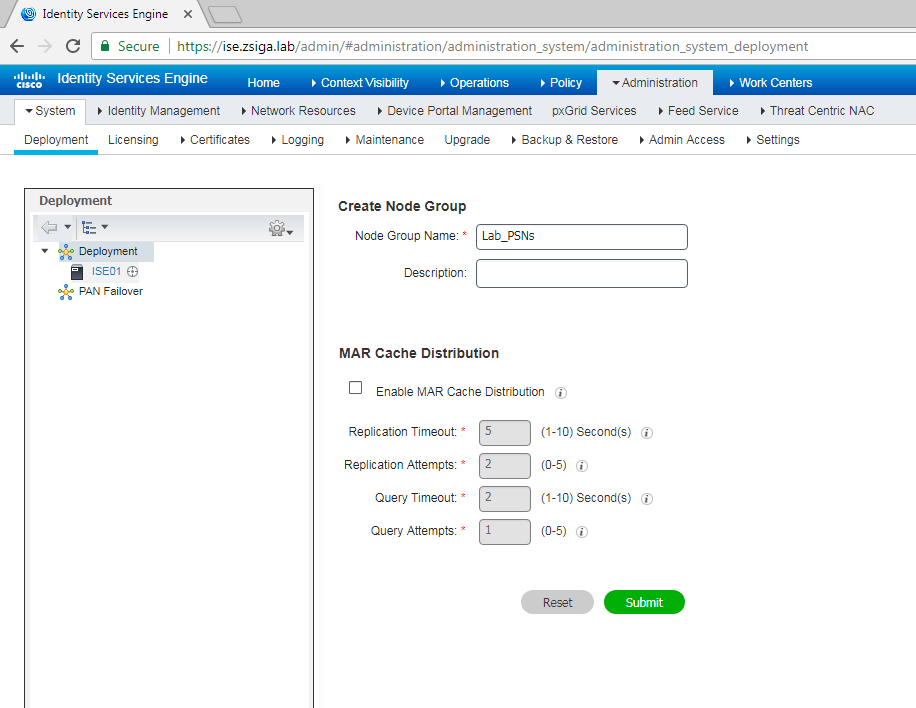
On the Create Node Group page, we are just going to give our Node Group a name for now and click Submit. In our Lab we called our Node Group Lab_PSNs.
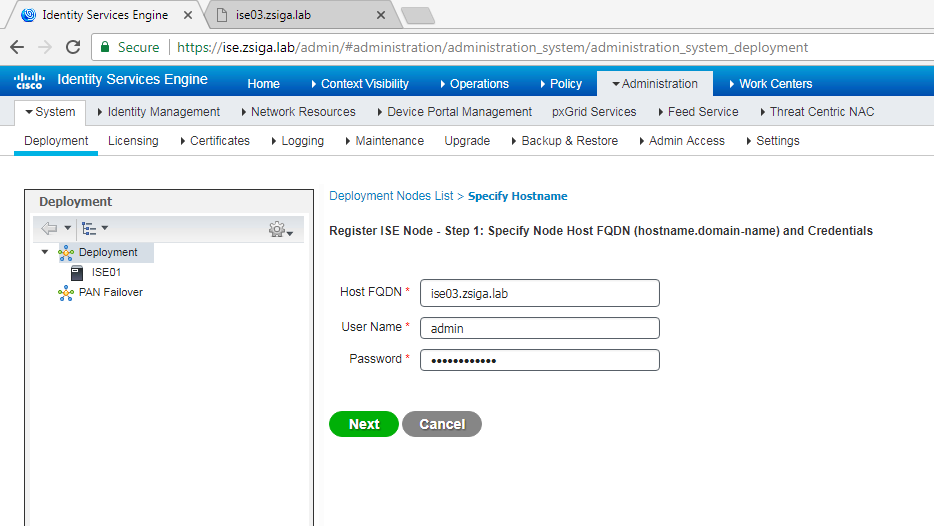
Now lets go back to the Deployment window so we can register ISE03 into our cluster. To do this lets click on the Register button.
When the Register a Node window shows we will fill in all of the required information and click Next
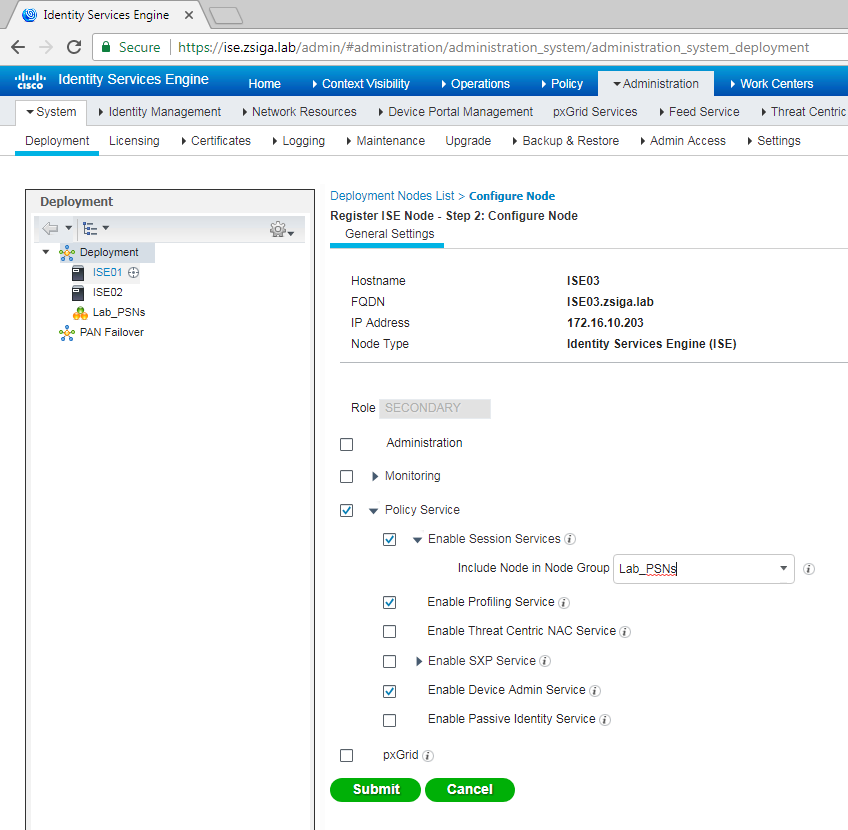
For the personas / roles on ISE03, we are only going to select Policy Services. We are going to enable Session Services, Profiling Service, and Device Admin Service. One more thing before we click submit, lets go a head and select the Node Group under Session Services that we just created called Lab_PSNs. Your screen should look something like the below screenshot. Once completed, go a head and select Submit.
Just like our second ISE Node, ISE02, ISE03 is going to take sometime to replicate with the cluster but we can go ahead now and add our fourth node ISE04 to the cluster.
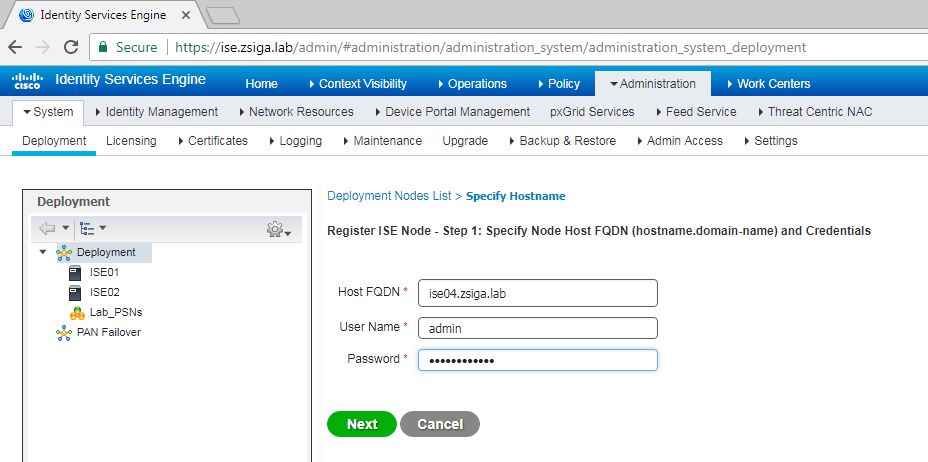
Back on the Deployment page, lets select Register to start the process of adding ISE04 to the cluster.
On the Register ISE Node Page, we are going to put in ISE04’s information and select Next.
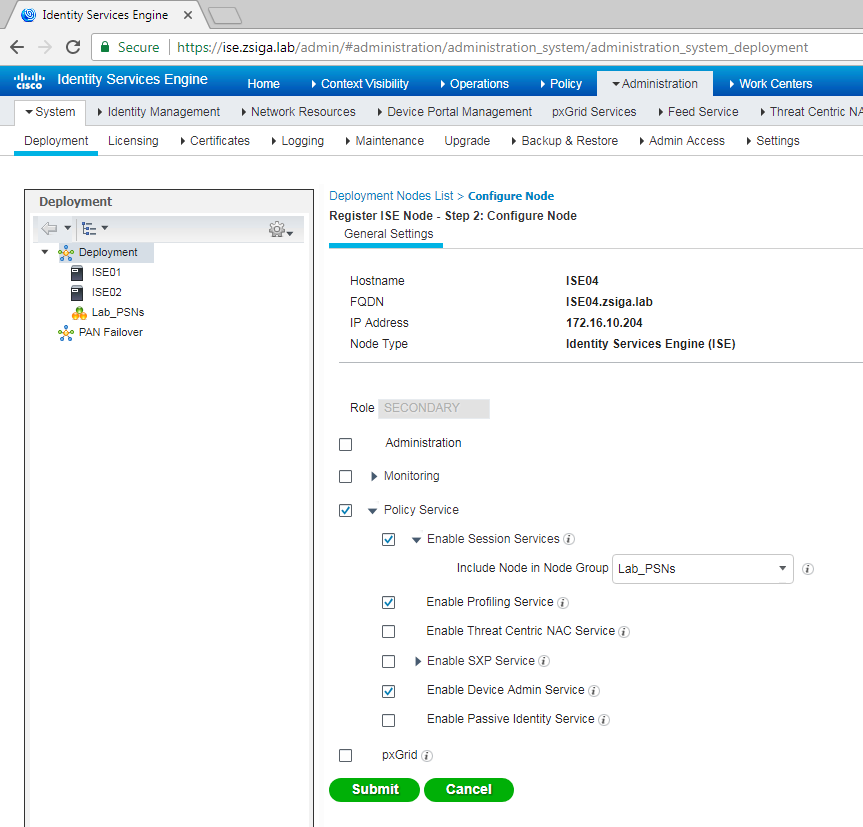
On the Personas / Roles configuration for ISE04, we are going to duplicate the exact same settings as we did for ISE03, including the Node group configuration. ISE04 is going to be our Second Policy Services Node, or PSN. When done making your changes, click submit
Once again, like the other ISE Nodes, ISE04 will need time to replicate and sync with the ISE Cluster. When all of the replication has completed, you should see something very similar to the below output on your Primary Admin Node under the Deployment window.
![]()
Now that’s it! We have a healthy four node Cisco ISE 2.3 Distributed Cluster.
Stay Tuned for our next episode in this blog series where we will start to authenticate devices and users!!
Related Resources:
Ask questions and give feedback
- You can leave a comment on the blog!
- You can leave a voicemail at (617) 913-4103
- You can email us at Feedback@zigbits.tech
Engage with Zigbits further:
- Subscribe to the podcast on an iPhone or on an Android
- Follow Zigbits on Twitter!
- Follow Zigbits on LinkedIn!
Engage with me further:
Transparency:
This post may contain affiliate links to products or services were I may receive a level of compensation from your actions by following those links. This is seamless to you and does not add any additional cost to the products or services in question. In addition, I do not let any affiliate relationship cloud my judgement or my recommendation of a product or service. My recommendations will always be above reproach. This is my commitment to you Ziglets!