
Hey Friends, Nerds, and Geeks! In Today’s Cisco ISE 2.3 Blog Series installment we are going to reflect on our work in ZBISE09 where we completed our Wired PEAP-MSCHAPv2 Use Cases and then we are going to implement our Wired Cisco ISE EAP-TLS Use Cases.
The Use Cases we are going to be implementing today are our Wired Cisco ISE EAP-TLS specific Use Cases of Domain PC, Domain User, and Domain Privilege User. We have a lot to cover and not a lot of time, so let’s get to it!
You’ll Learn
- How to properly create Cisco ISE EAP-TLS Use Cases
- How to properly configure Cisco ISE EAP-TLS with examples
- Where to Install Identity Certificates on a Test VM
- My Validation & Testing Process to ensure success
Resources
- Network Design Fundamentals
- Network Design Principles
- Other Network Design Techniques
- Demystifying The Roles
- My Network Design Course Weekly Status Emails
- Cisco ISE Community
- The EAP-TLS Authentication Protocol – RFC 5216
- ZBISE01 – Basic Cisco ISE 2.3 VM Installation
- ZBISE02 – Building a Cisco ISE 2.3 Distributed Cluster
- ZBISE03 – Overview of our Cisco ISE 2.3 Use Cases for the ZBISE Blog Series
- ZBISE04 – Cisco ISE 2.3 Adding the ISE Cluster to Active Directory
- ZBISE05 – Virtual Wireless LAN Controller (vWLC) Install
- ZBISE06 – Cisco ISE 2.3 Adding Network Access Devices (NADs) – Cisco Switch
- ZBISE07 – Cisco ISE 2.3 Adding Network Access Devices (NADs) – Cisco vWLC
- ZBISE08 – Cisco ISE 2.3 Wired Authorization Profiles
- ZBISE09 – Cisco ISE 2.3 802.1x Auth – PEAP Wired Use Cases
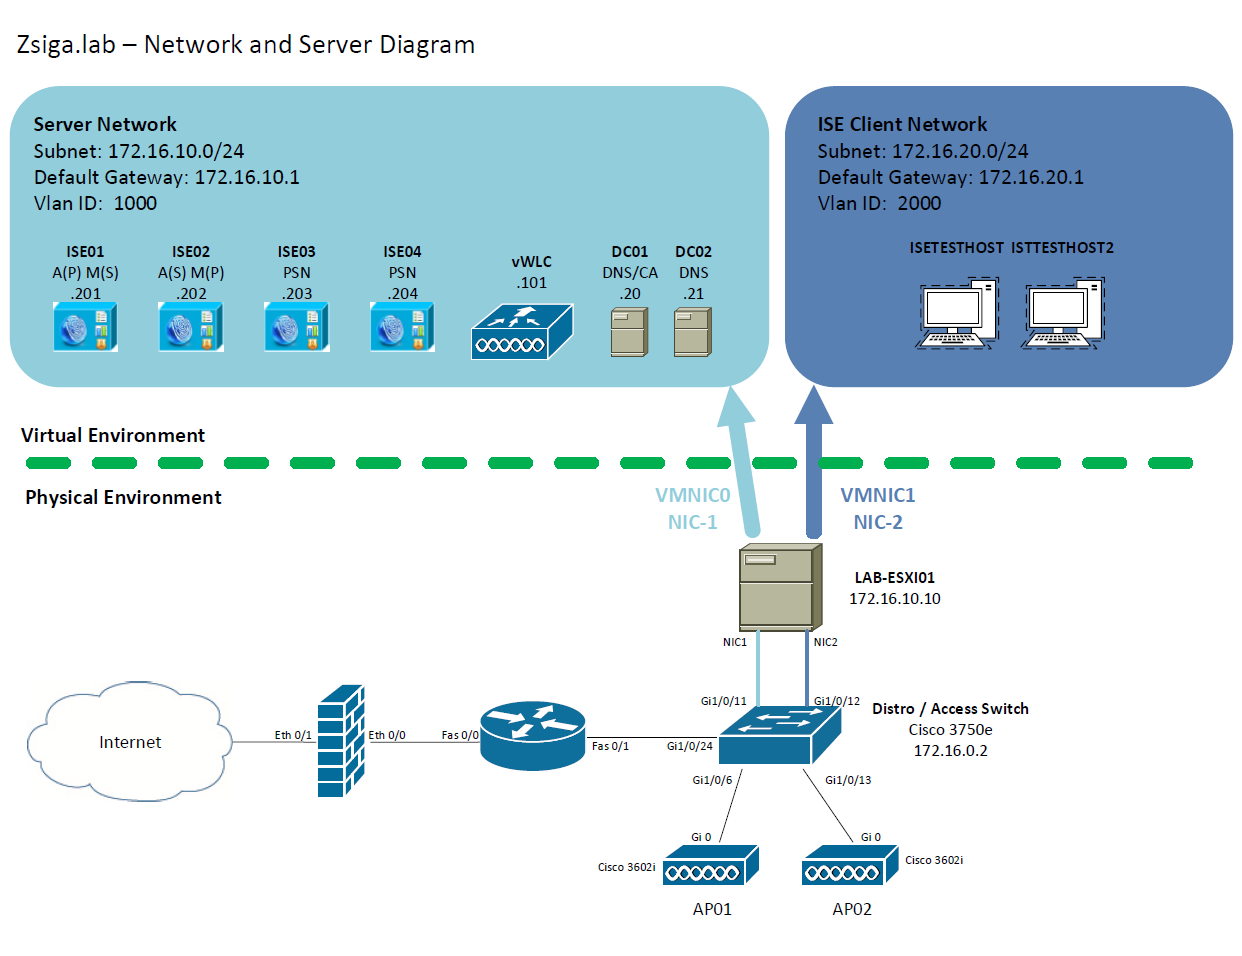
Network and Server Diagram:
Here is our reference diagram that we will be using throughout this blog series.
Wired Use Cases
Here is our Wired Use Cases table for reference as we go through today’s installment of creating our Cisco ISE EAP-TLS specific Use Cases of Domain PC, Domain User, and Domain Privileged User.

The Steps!!
In Today’s post, there are a number of different steps that we will be completing. Here is a quick high-level summary of what we are going to do:
- Reflection on ZBISE09…We took the easy road!
- Create a Certificate Authentication Profile
- Modify our Wired PEAP Authentication and Authorization Policies and Retest
- Create our New Cisco ISE EAP-TLS Use Cases
- Install Identity Certificates on our Test VM
- Enable DOT1X with EAP-TLS Auth on our Test VM
- Validation & Testing of our EAP-TLS Use Cases Configured
1. Reflection on ZBISE09…We took the easy road!
In ZBISE09 we added our PEAP specific Use Cases, but when it comes down to it, we took the easy road when configuring our Authentication and Authorization Policies.
In most deployments of Cisco ISE, we will want to assign different permissions based on how a device, or user, authenticates. This is usually even true between PEAP-MSCHAPv2 and EAP-TLS policies, both are 802.1X Authentications methods but that doesn’t mean we have to apply for the same permissions, now does it?!?!?!
One of the most common examples in my experience is with BYOD. Traditionally anything that is within Active Directory will be authenticated via EAP-TLS while anything from BYOD-specific use cases would be authenticated via PEAP-MSCHAPv2. We would then match the Authentication method in our Authorization policies so we can apply different levels of access between EAP-TLS authenticated sessions and PEAP-MSCHAPv2 authenticated sessions.
If we take a moment to look at how we configured our PEAP-MSCHAPv2 use cases, we utilized the built-in Wired_802.1X condition which allows in our deployment for both EAP-TLS and PEAP-MSCHAPv2 to be utilized for the same authentication policy.
You can see this in the below screenshots.
In this ZBISE installment, we are going to add a Certificate Authentication Profile to allow us to enable our Cisco ISE EAP-TLS use cases. While doing so, we will also modify our PEAP-MSCHAPv2 Use Cases to specifically match against the specific PEAP-MSCHAPv2 authentication method.
Enough reflecting and talking about it, actions are better than words so let’s get this Lab moving!! 🙂
2. Create a Certificate Authentication Profile
For our Cisco ISE EAP-TLS specific use cases, we need to add a Certificate Authentication Profile since we will be authenticating our sessions via Certificates. This Certificate Authentication Profile will map the Subject Alternative Name of the Certificate and query our Zsiga.Lab Domain for it.
If you haven’t logged into your ISE Cluster, do so now. Remember, if you have been following our Cisco ISE 2.3 Lab Deployment from the start you can use the alias ISE.FQDN to login to your ISE Cluster, just like we did below. For our Lab our FQDN is https://ISE.ZSIGA.LAB.
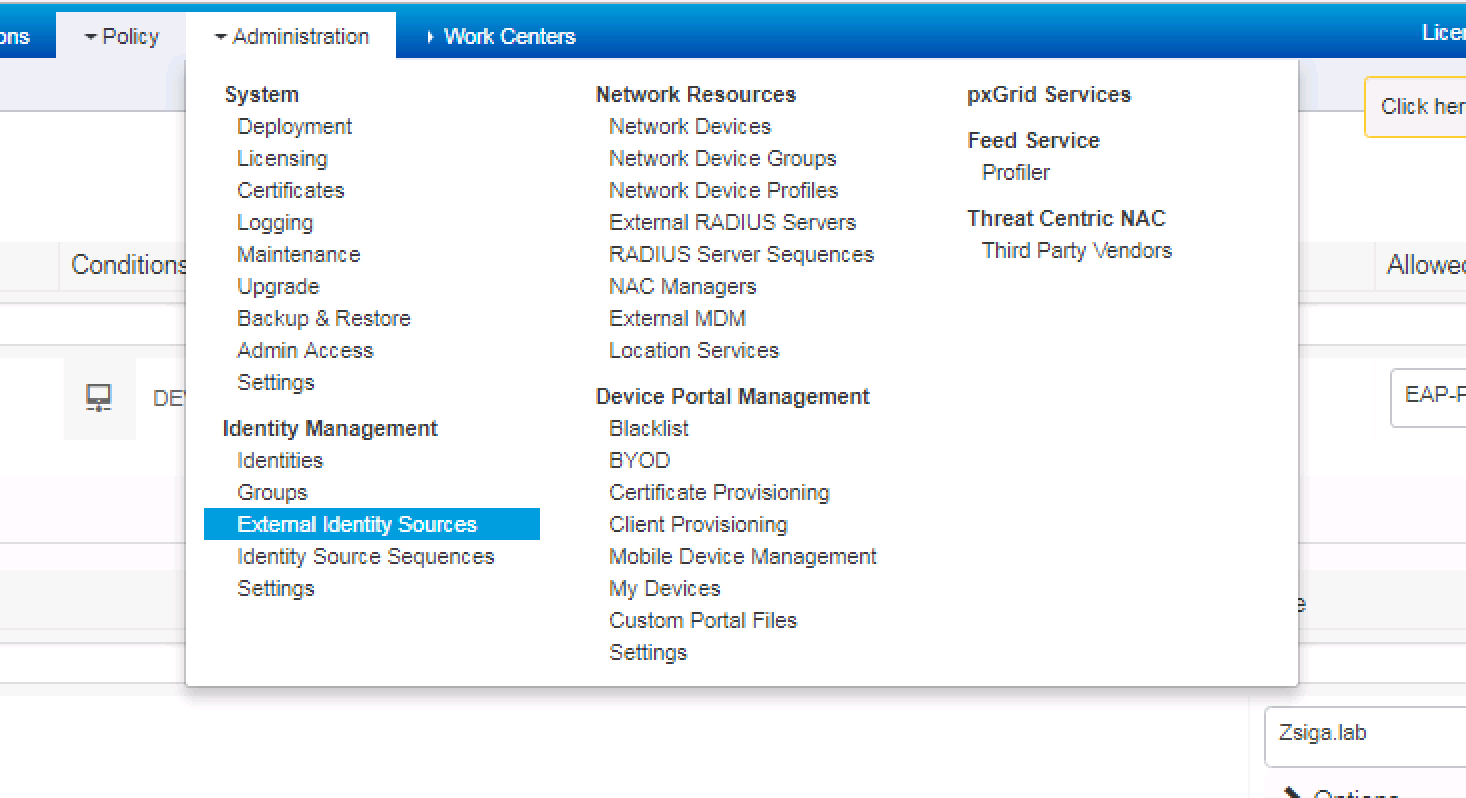
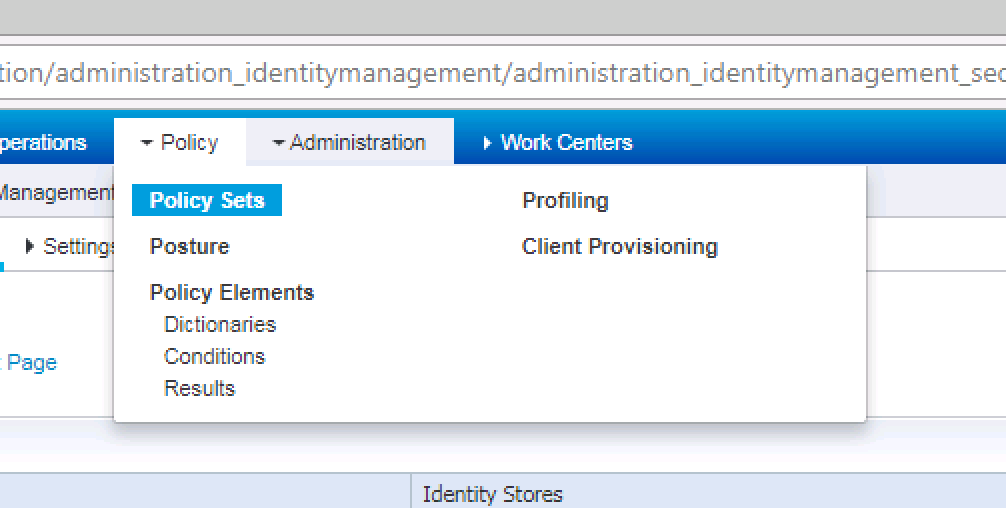
Once logged into our ISE Cluster, let’s traverse to Administration -> Identity Management -> External Identity Sources.
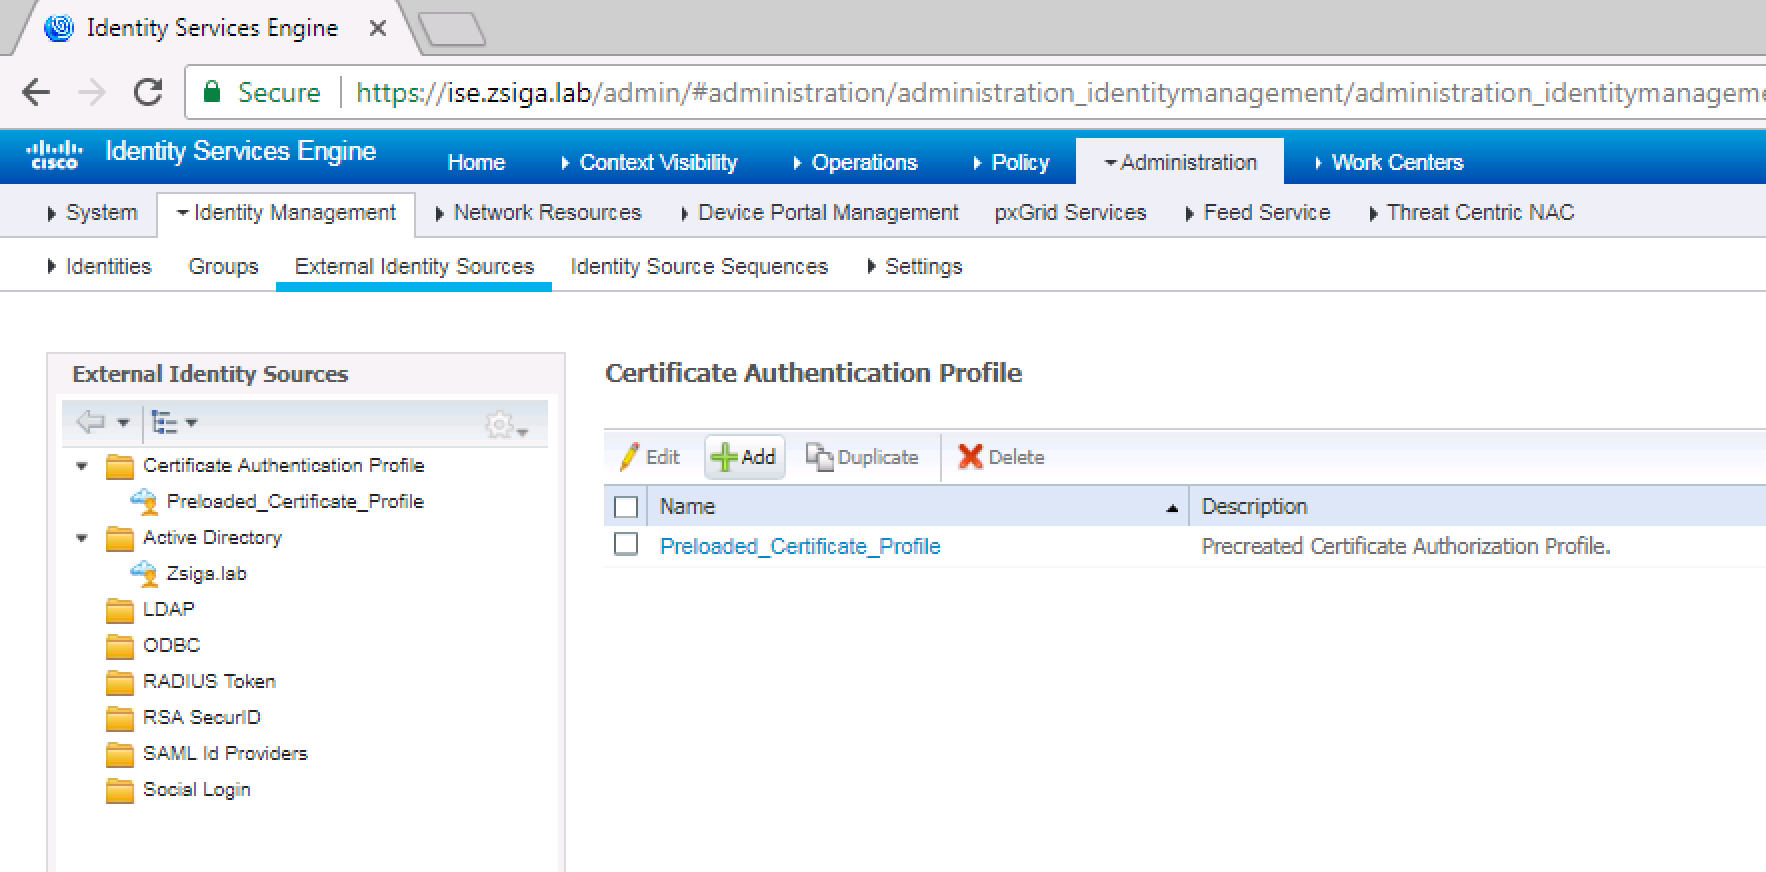
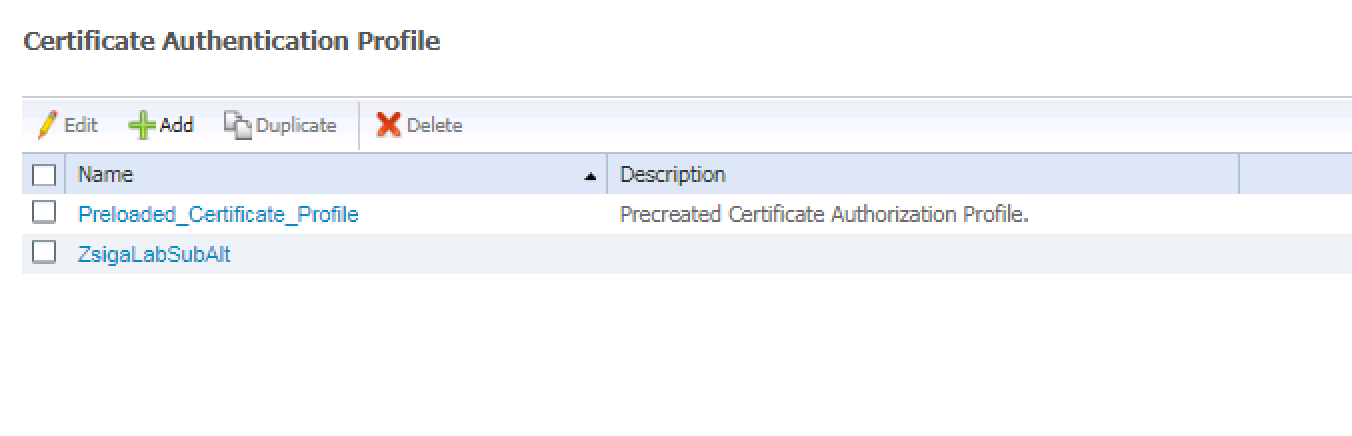
Once the External Identity Sources page loads, select the Certificate Authentication Profile folder to expand it if it’s not selected already. There will be a Pre-defined Certificate Authentication Profile, and as normal I prefer to leave these alone. Let’s Click the Add button on the right side of the screen to create our own Certificate Authentication Profile.
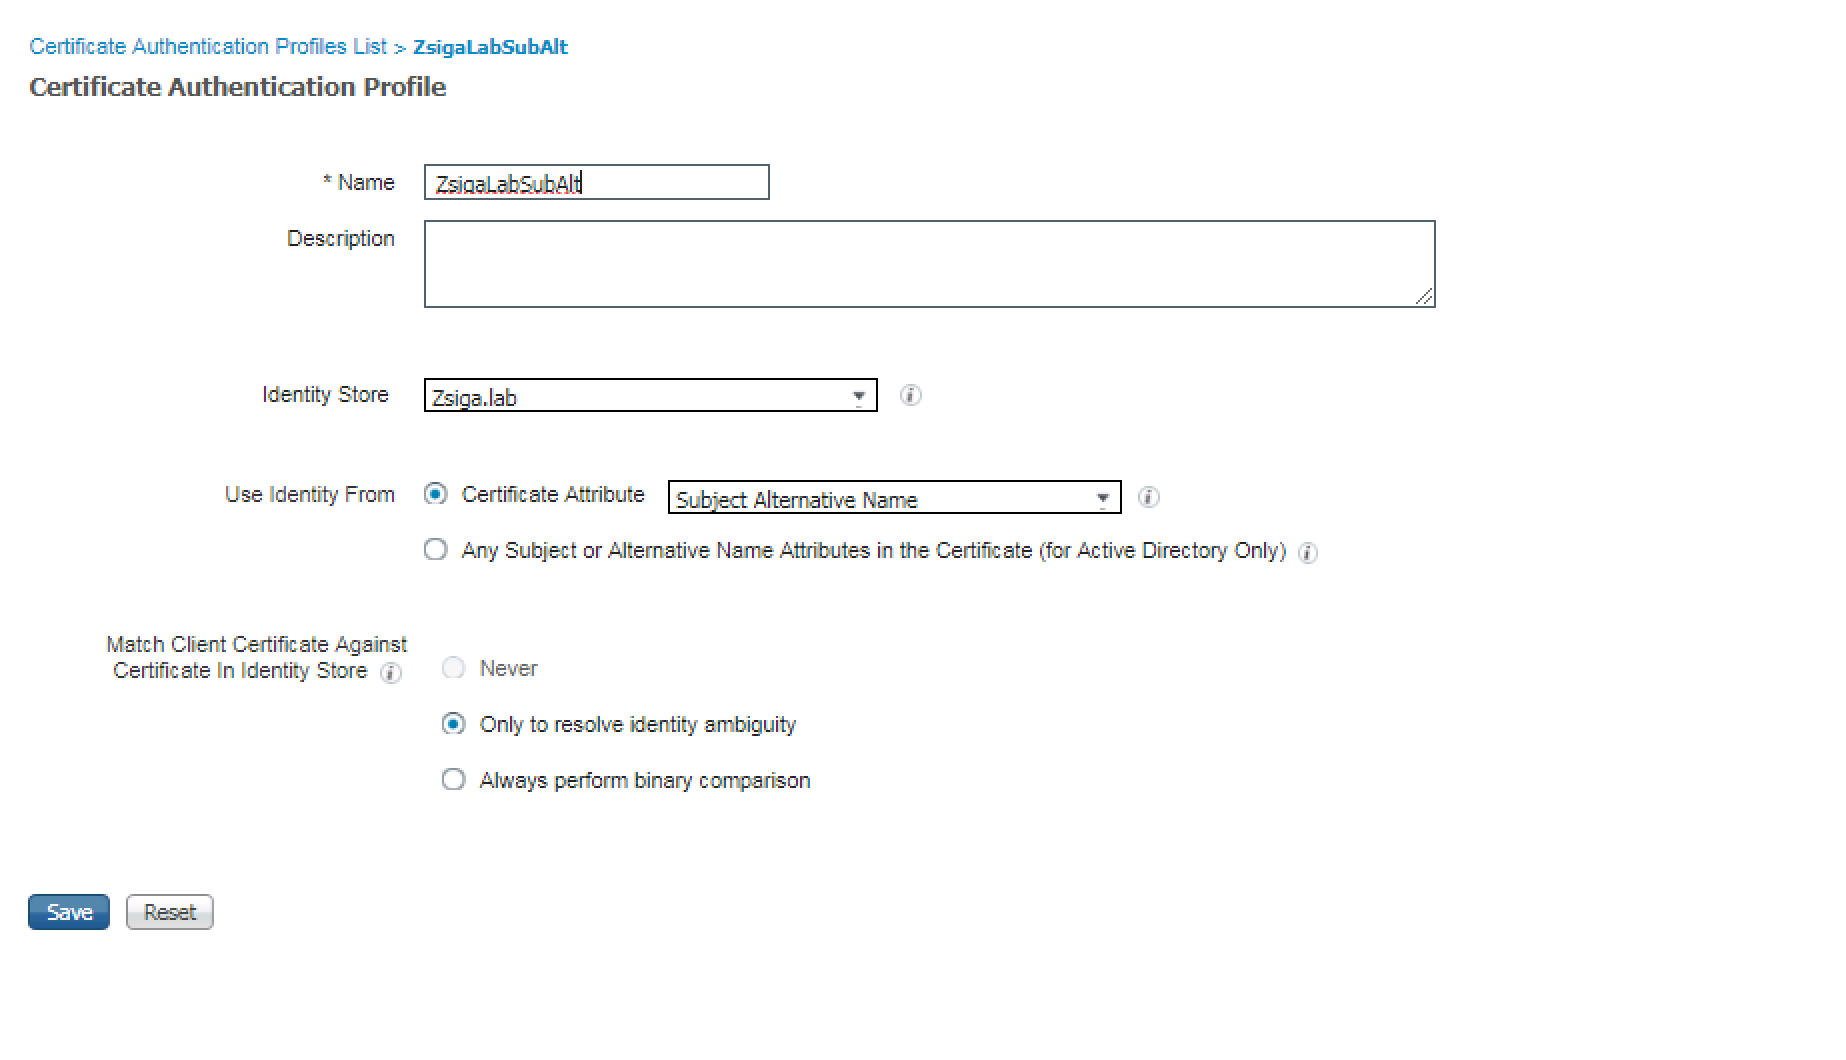
Now, you will be given some options to fill out for your Certificate Authentication Profile: Name, Description, and a few other items.
For our Deployment, we want to make sure we select our domain, Zsiga.Lab, in the identity Store dropdown. Then we will want to make sure we select Subject Alternate Name in the Use Identity Form – Certificate Attribute dropdown. When everything has been filled out and selected, click submit or save. Your Certificate Authentication Profile should look similar to the screenshot below.
That’s it for this section, lets move to step 3!
3. Modify our Wired PEAP Authentication and Authorization Policies and Retest
Now that we have what we need to make our Cisco ISE EAP-TLS specific rules, let’s go back into our PEAP policies to make them more specific. Traverse to Policy -> Policy Sets.
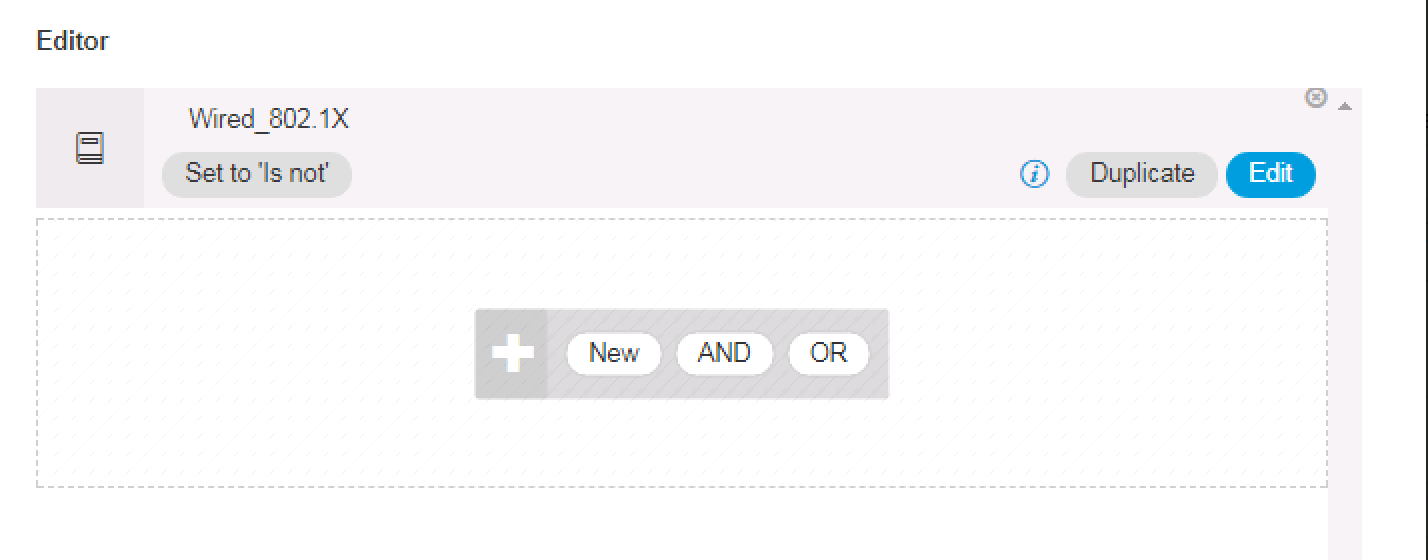
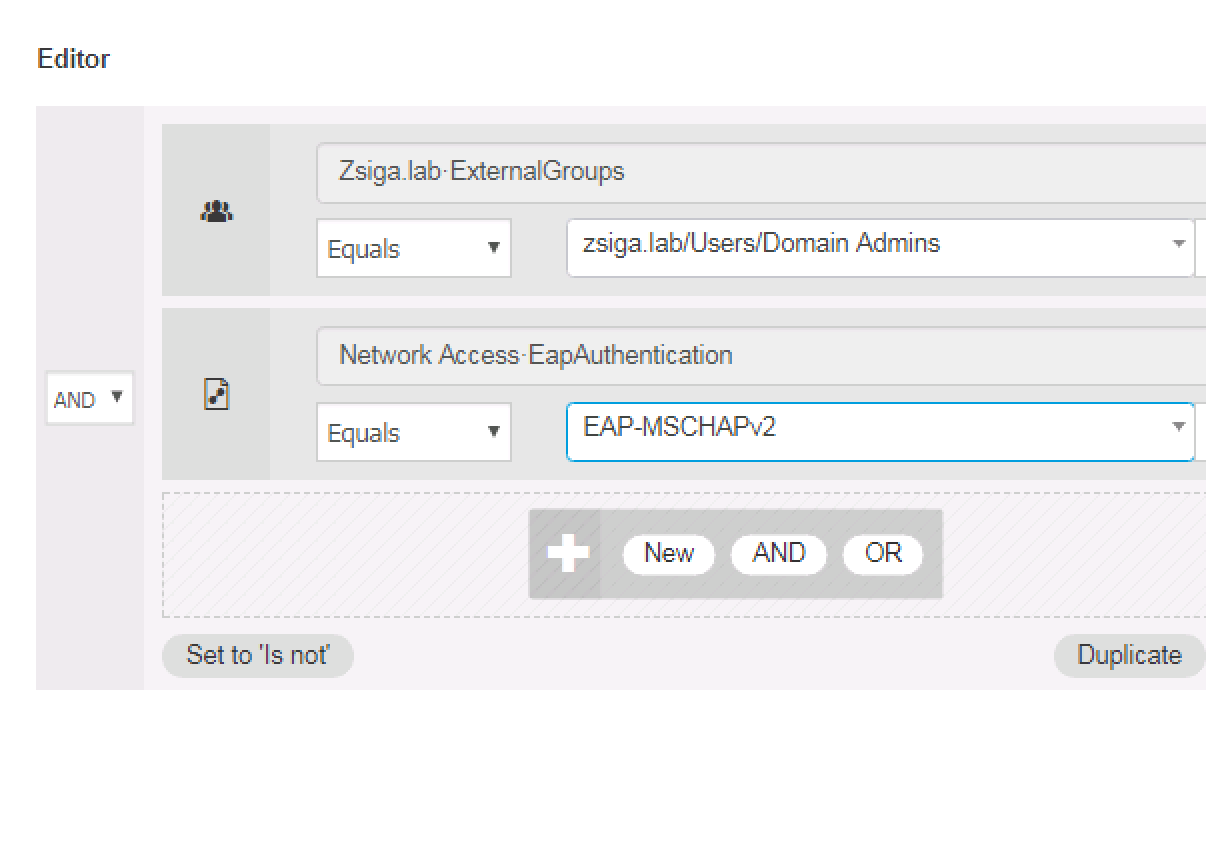
We will want to edit our Wired Policy Set, specifically our Authentication section. Our current rule, let’s rename it to be WIRED DOT1X With PEAP-MSCHAPv2, and then for the condition let’s remove Wired_802.1X and replace it with Network Access:EapAuthentication Equals EAP-MSCHAPv2. This process is shown in the following series of screenshots:
Edit the Authentication Policy, change the name:

Remove the Wired_802.1X Condition
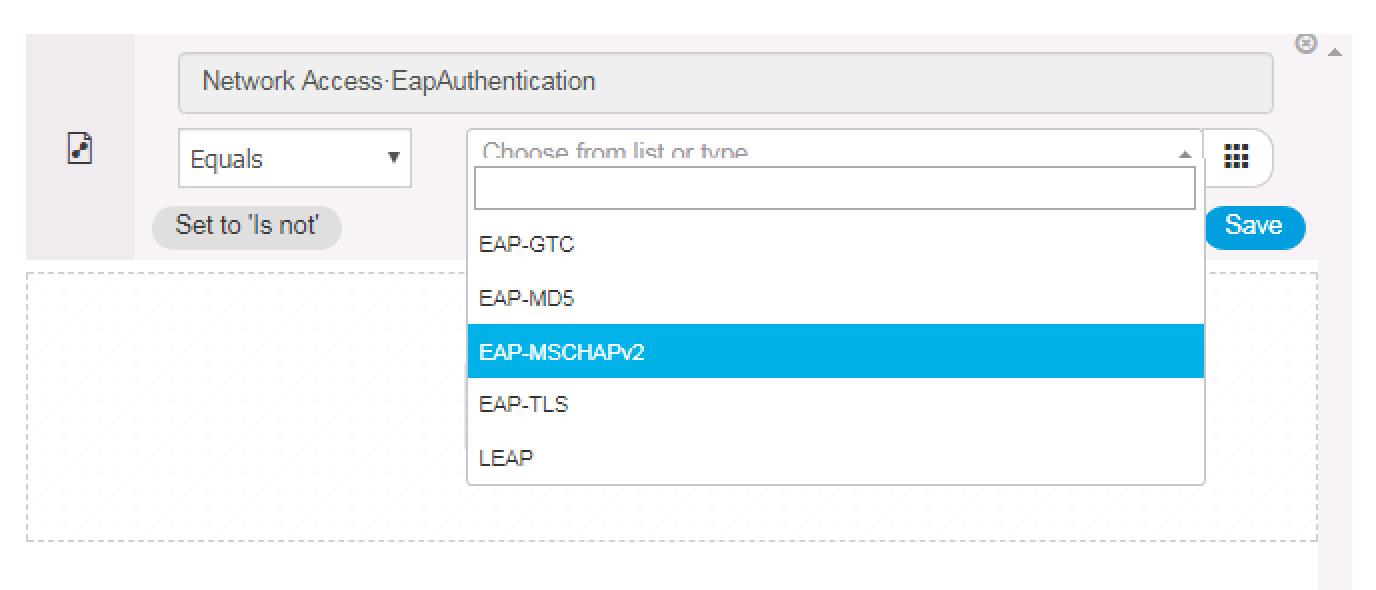
Search for the Network Access EapAuthentication Attribute and add it as a condition.
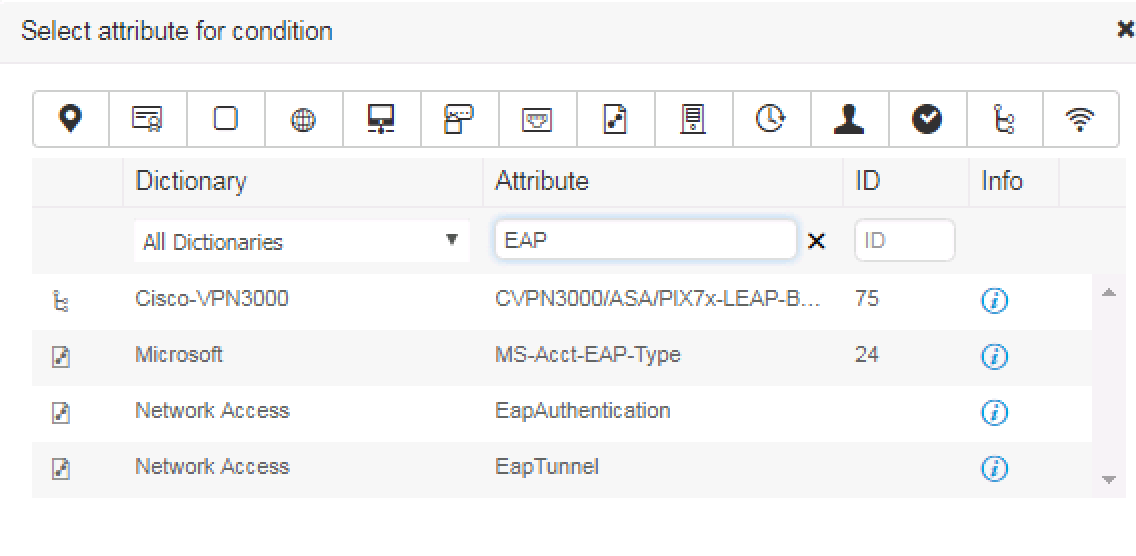
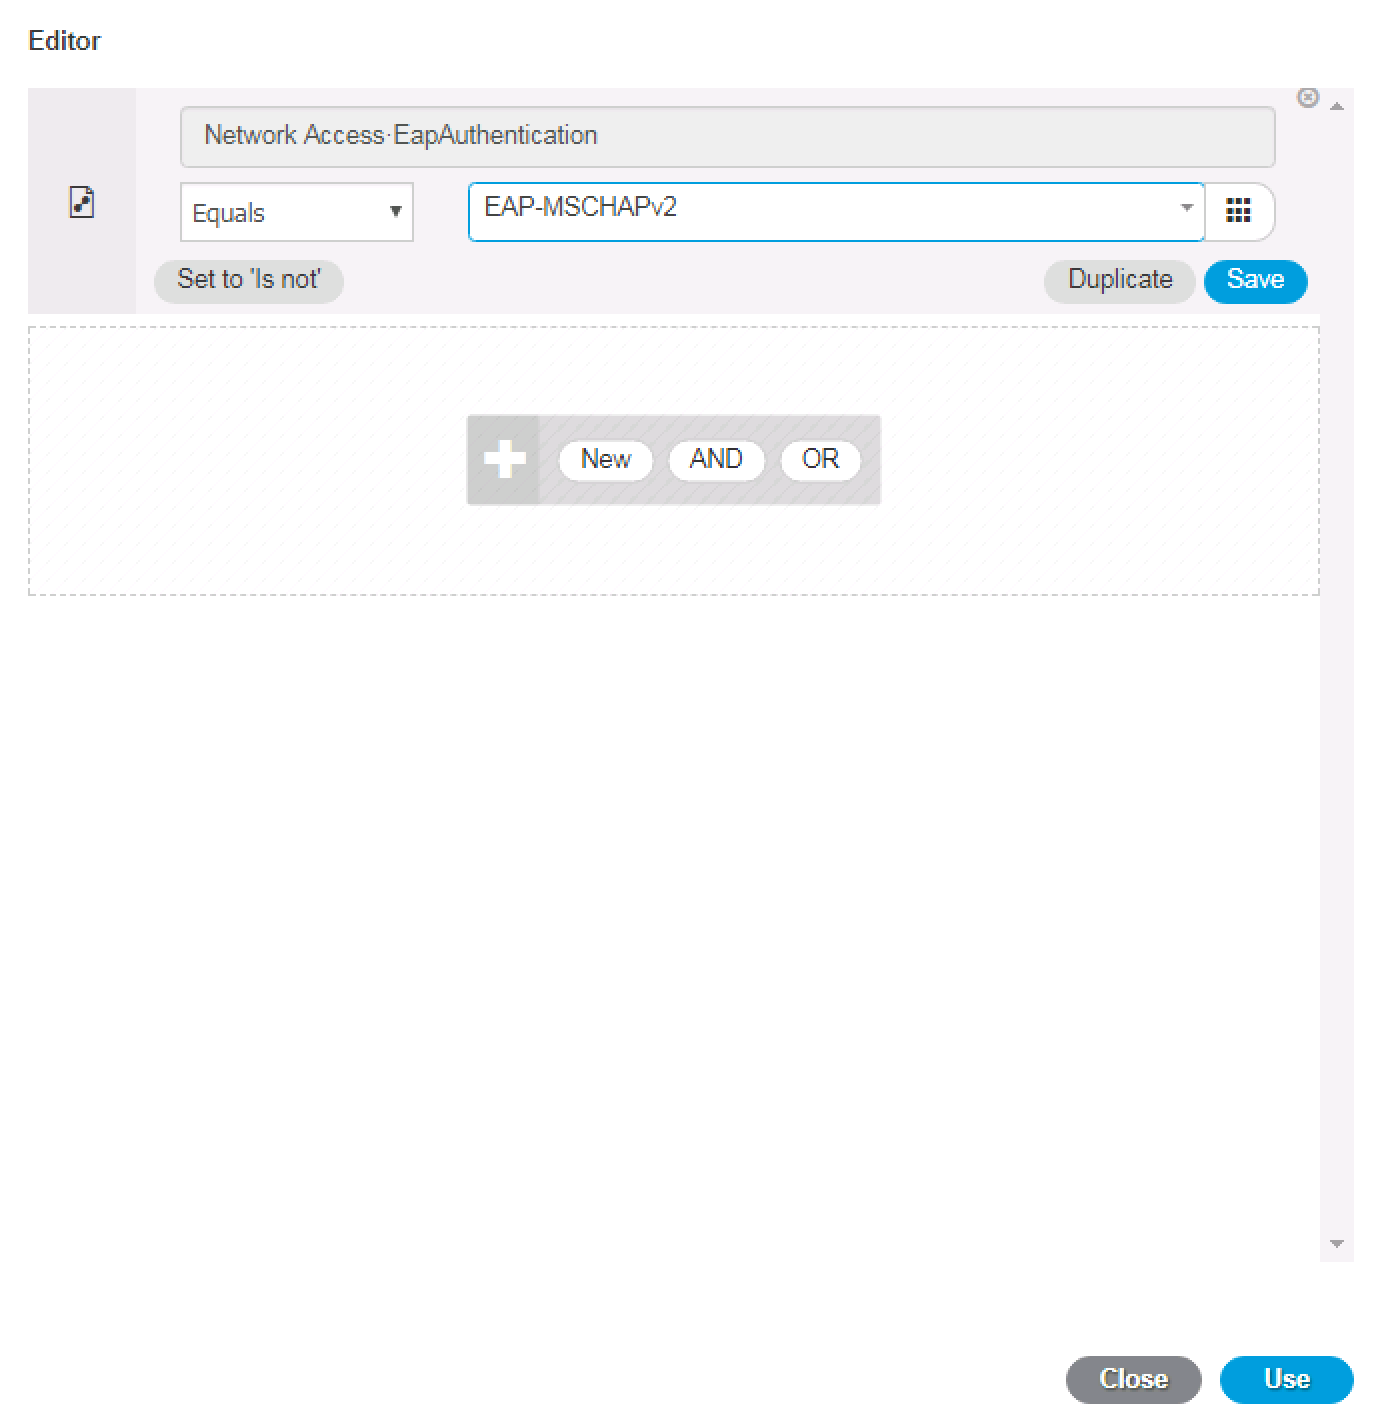
Select EAP-MSCHAPv2 as the matching value we want.
And Save it!
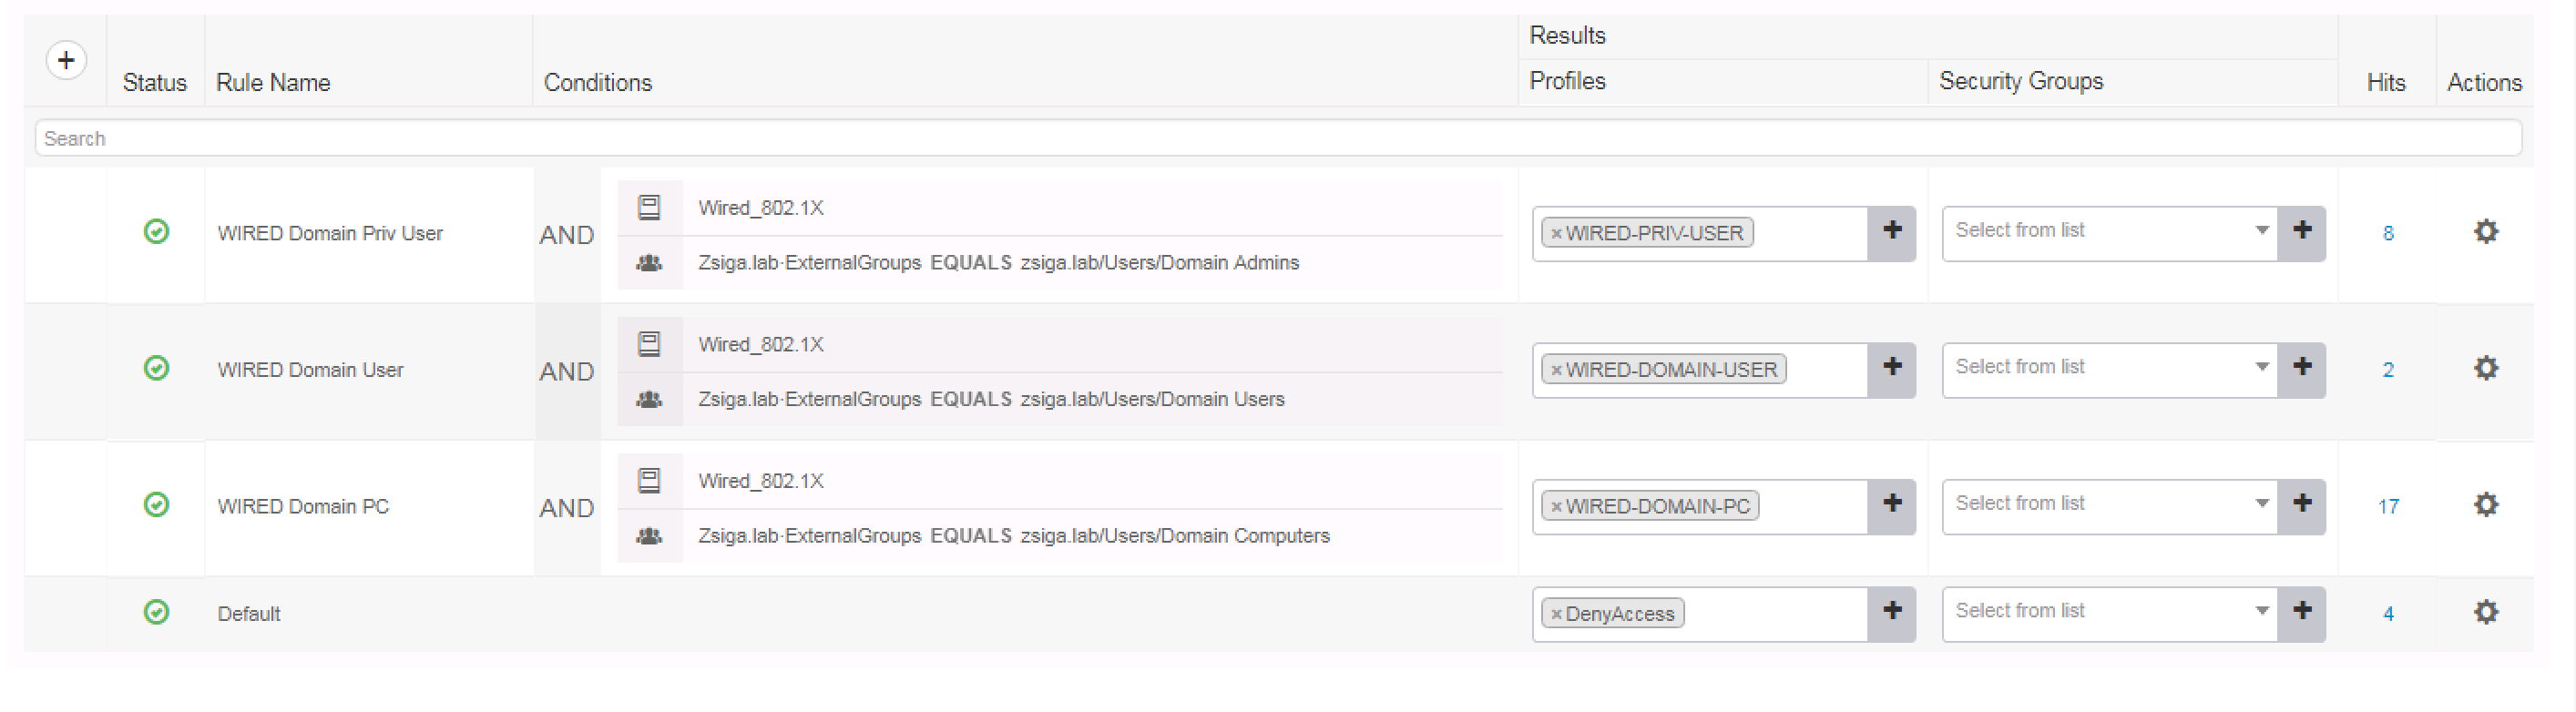
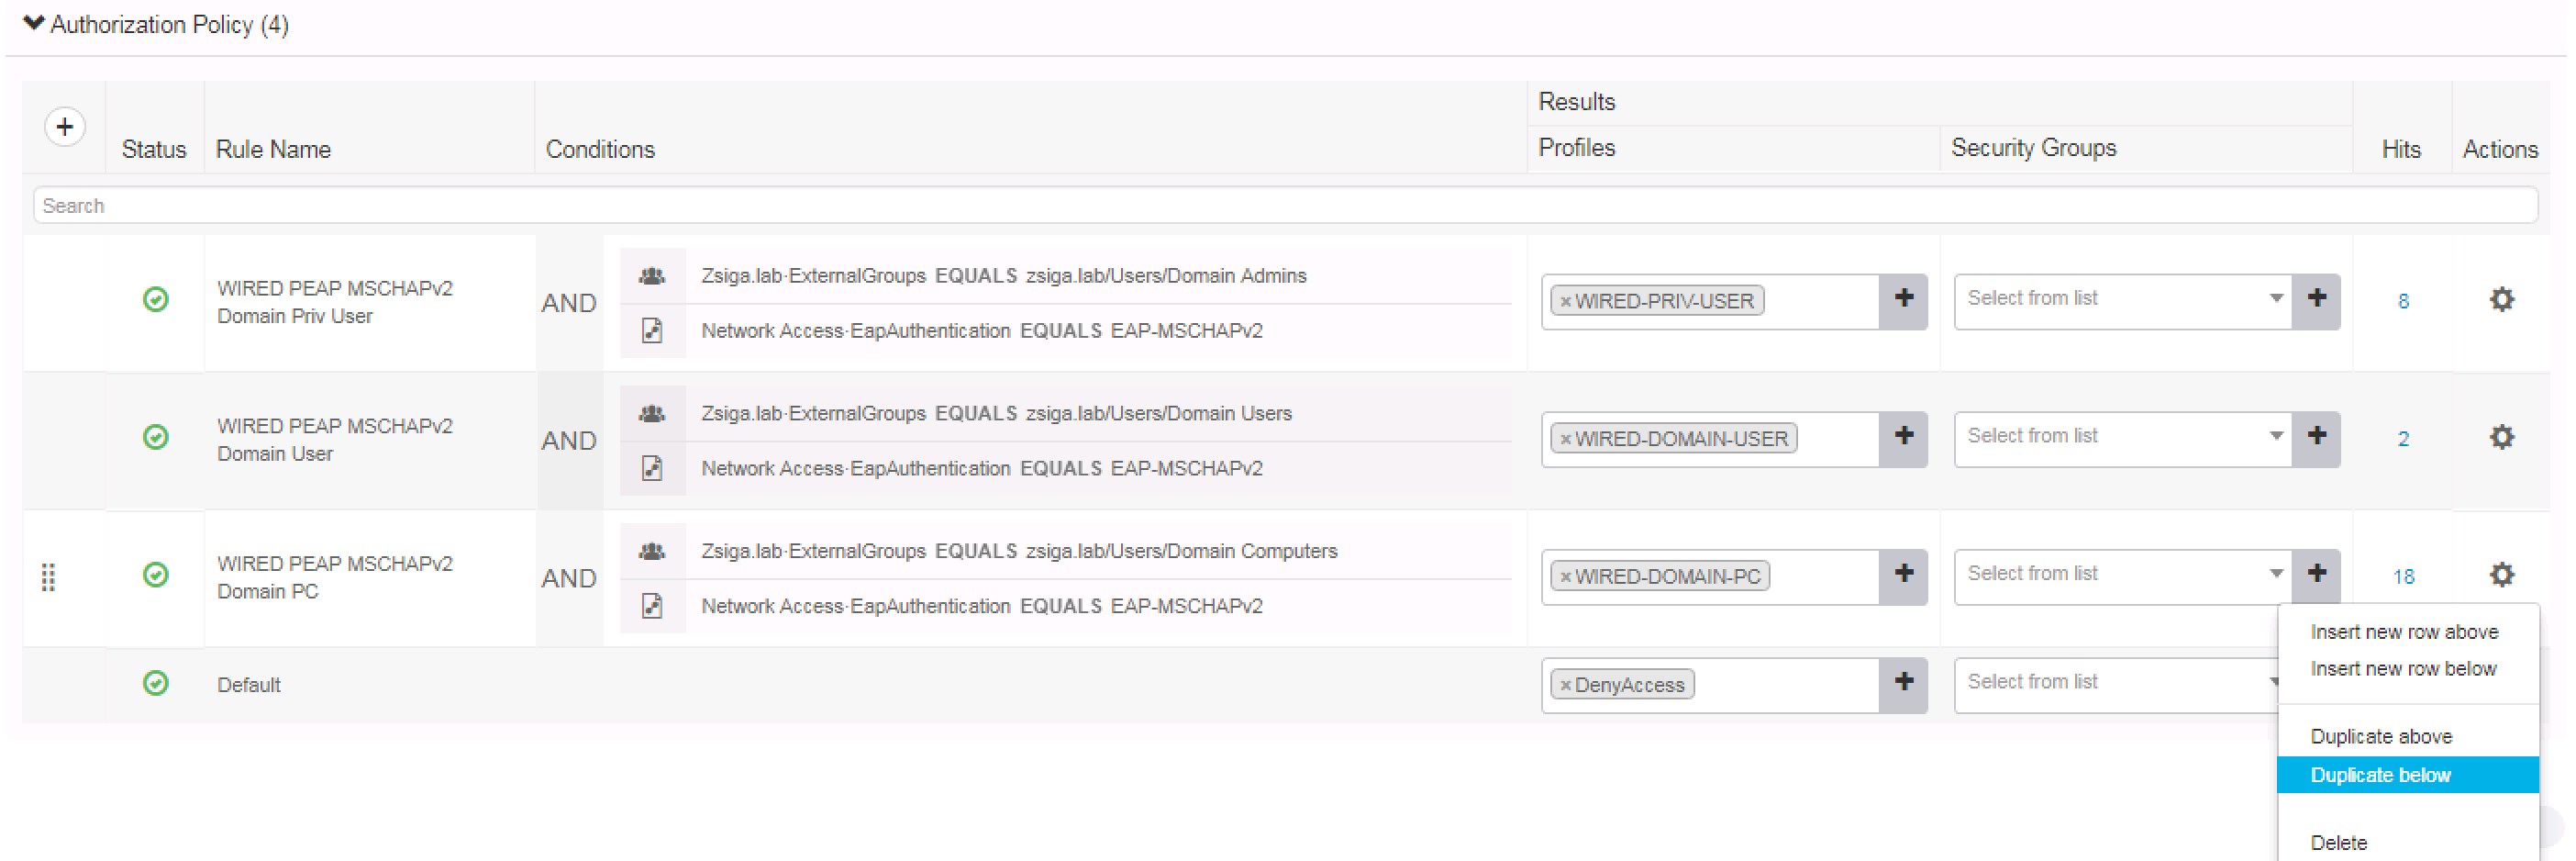
That’s it for the Authentication Policy in terms of PEAP-MSCHAPv2, now let’s update our Authorization Policy to match this Authentication method.
We are going to be following the same steps as we did in the Authentication section, but this time we will just do it in the Authorization section. Edit the policy in question, remove Wired_802.1X, add Network Access:EapAuthentication Equals EAP-MSCHAPv2, and Save.
Below are screenshots showing this process on one of our Authorization rules.
Edit the Authorization Rule in question, update the name if you prefer.
Remove the Wired_802.1X condition. Then search and add the Network Access:EapAuthentication Equals EAP-MSCHAPv2 Attribute / Condition Pair.
When all satisfied and completed, click save to make these changes stick! 🙂
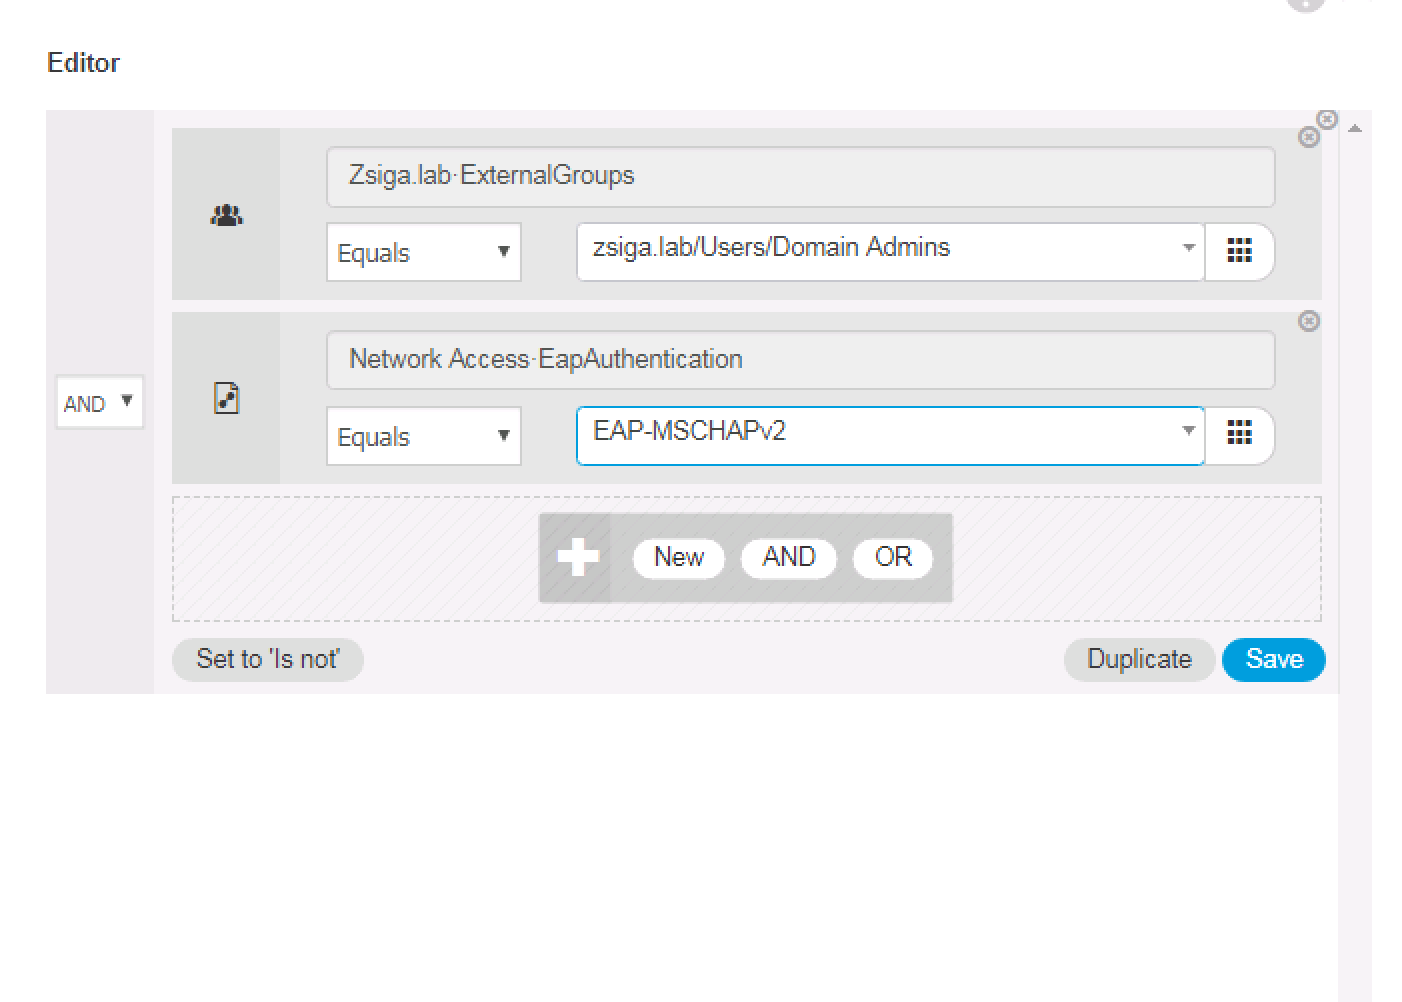
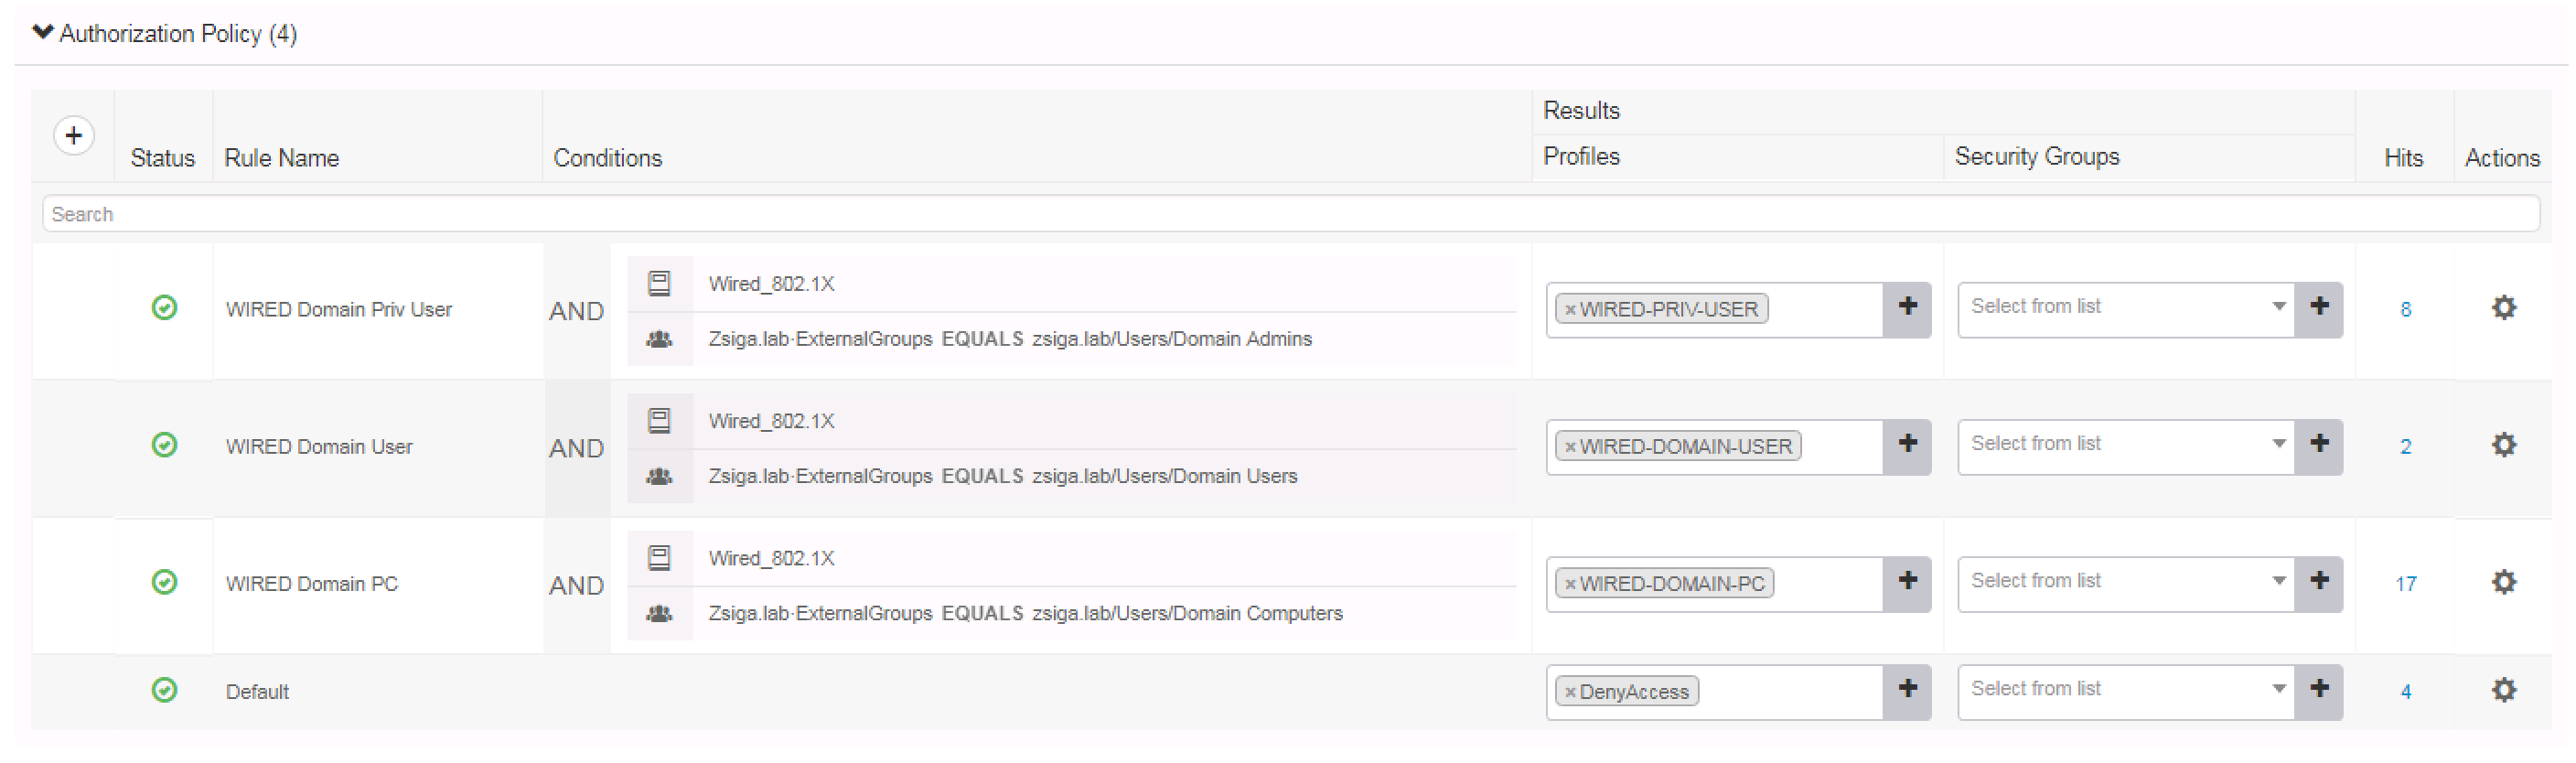
Your Authorization Policies should look similar to the below screenshot when all of these changes have been completed.

Now that we have just made a whole bunch of changes, what should we do? That’s right, we should retest our PEAP specific Use Cases to make sure they still function as expected!
Just to recap our PEAP specific use cases real quick, we have Domain PC, Domain User, and Domain Privilege User.
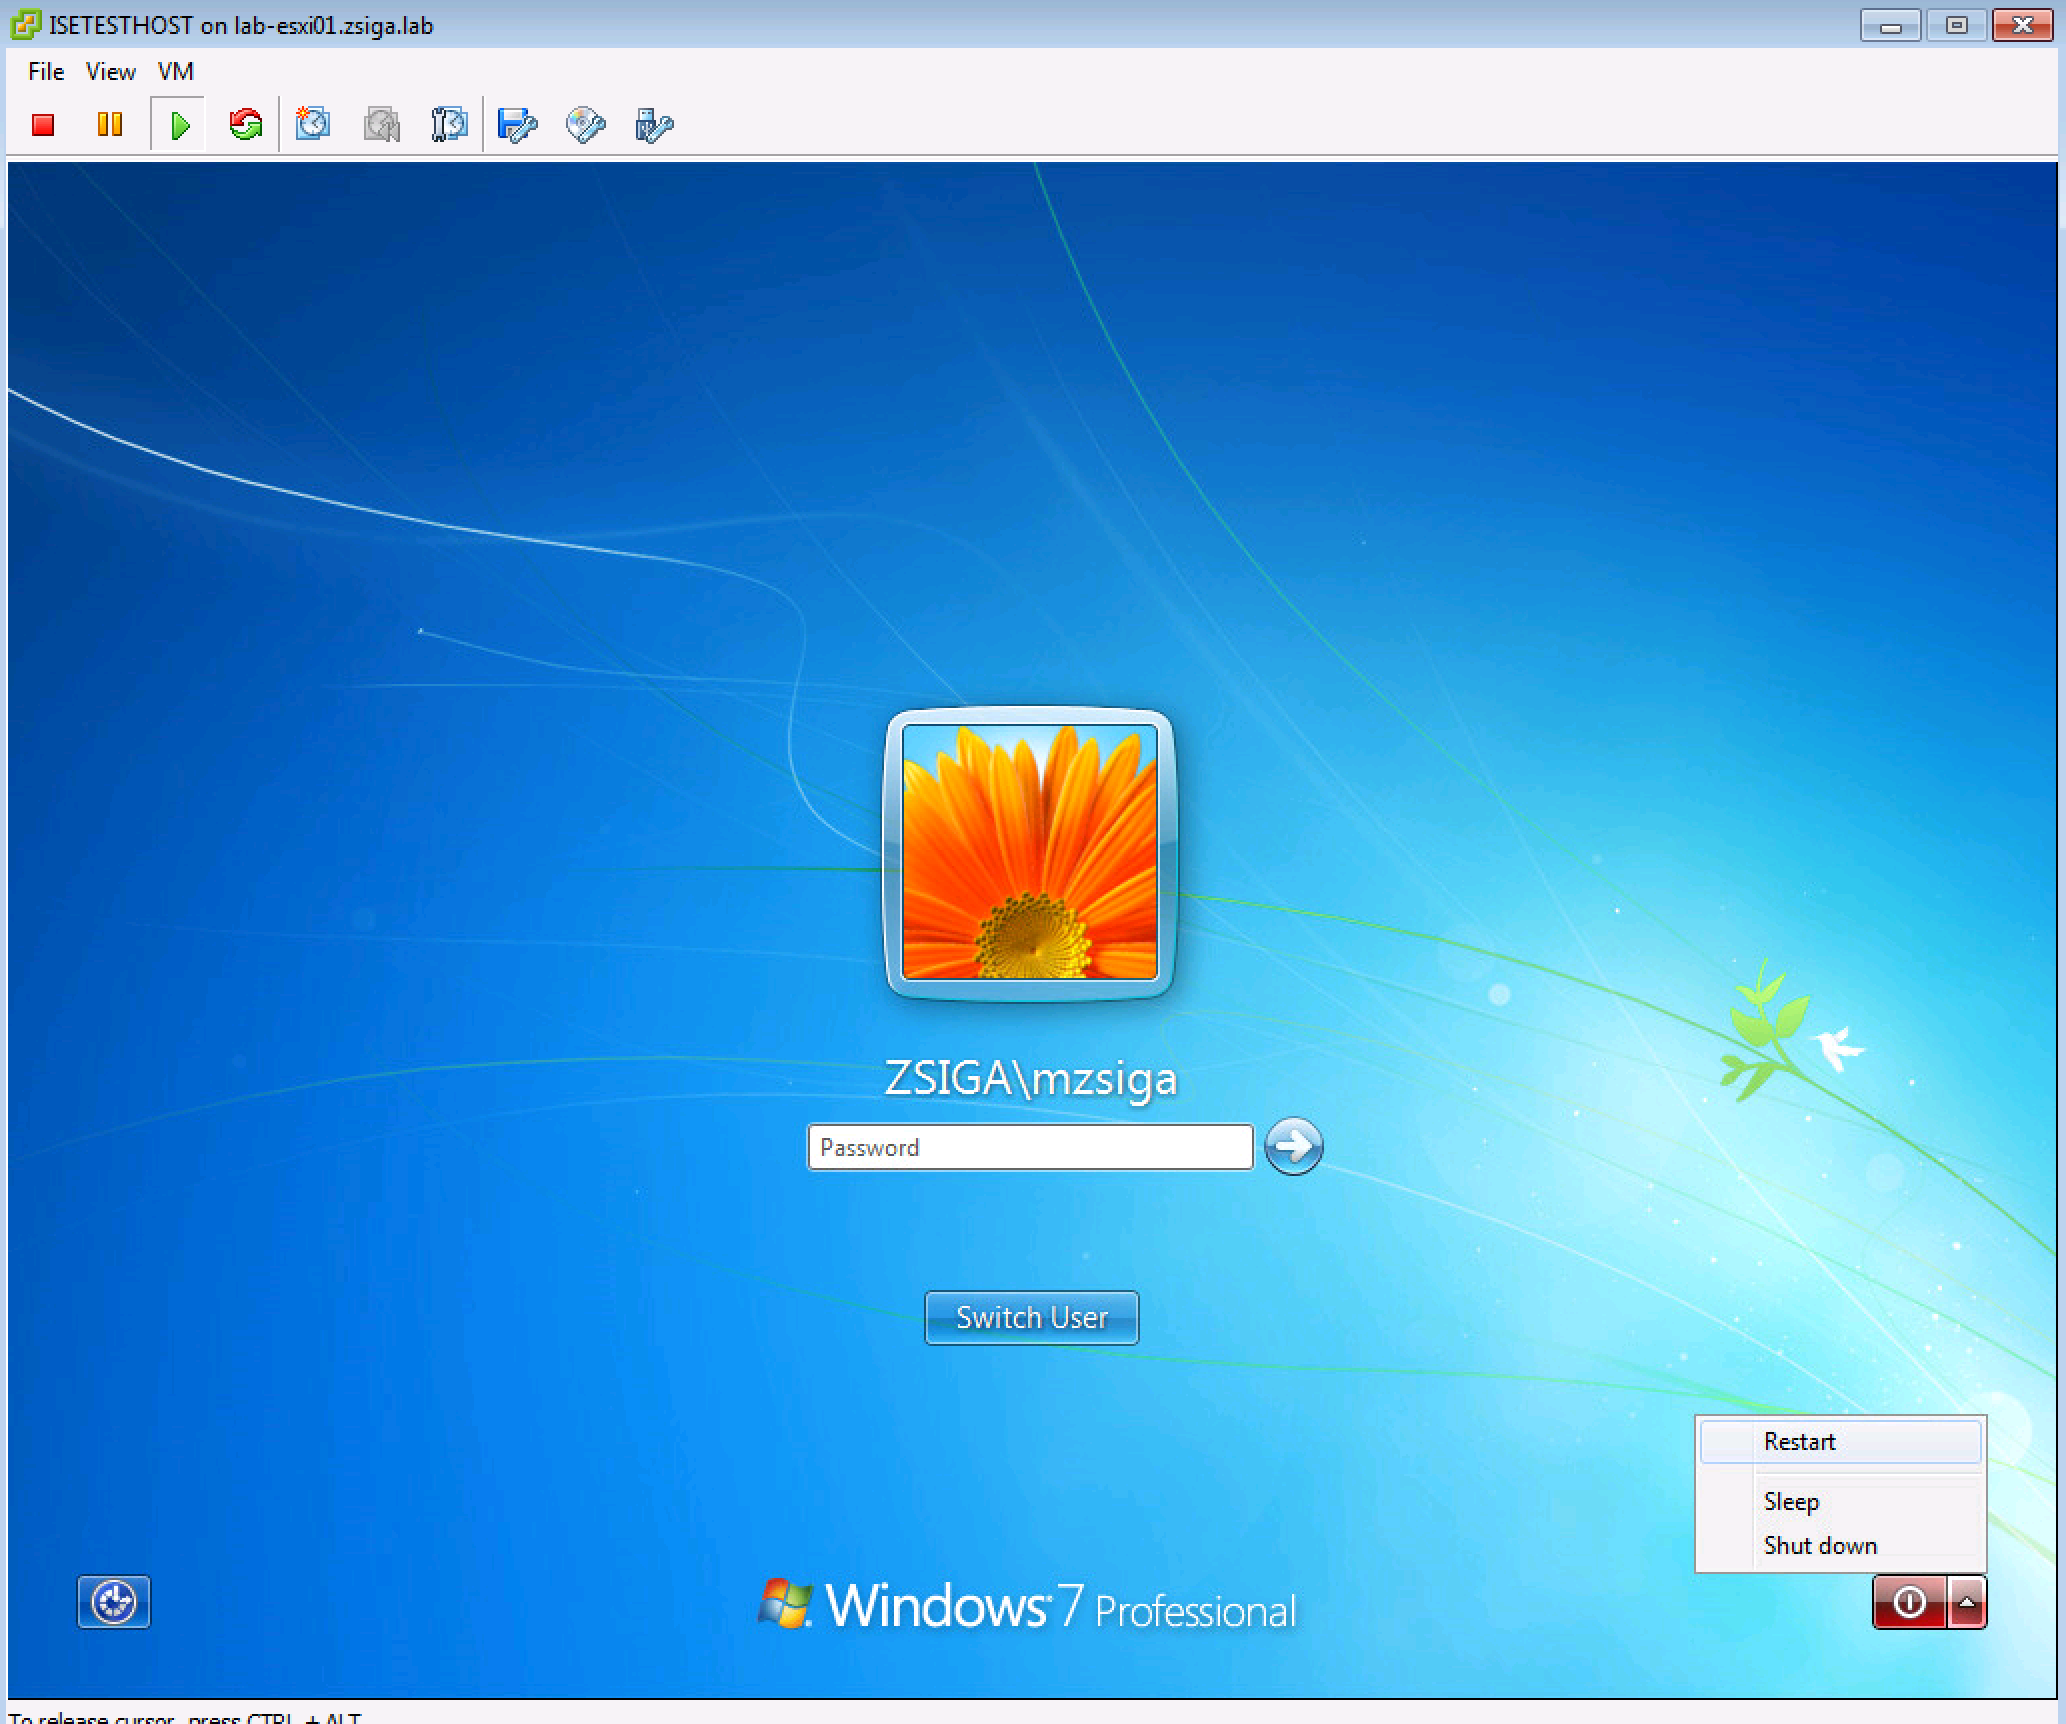
Let’s start out by restarting our ISE Test VM.
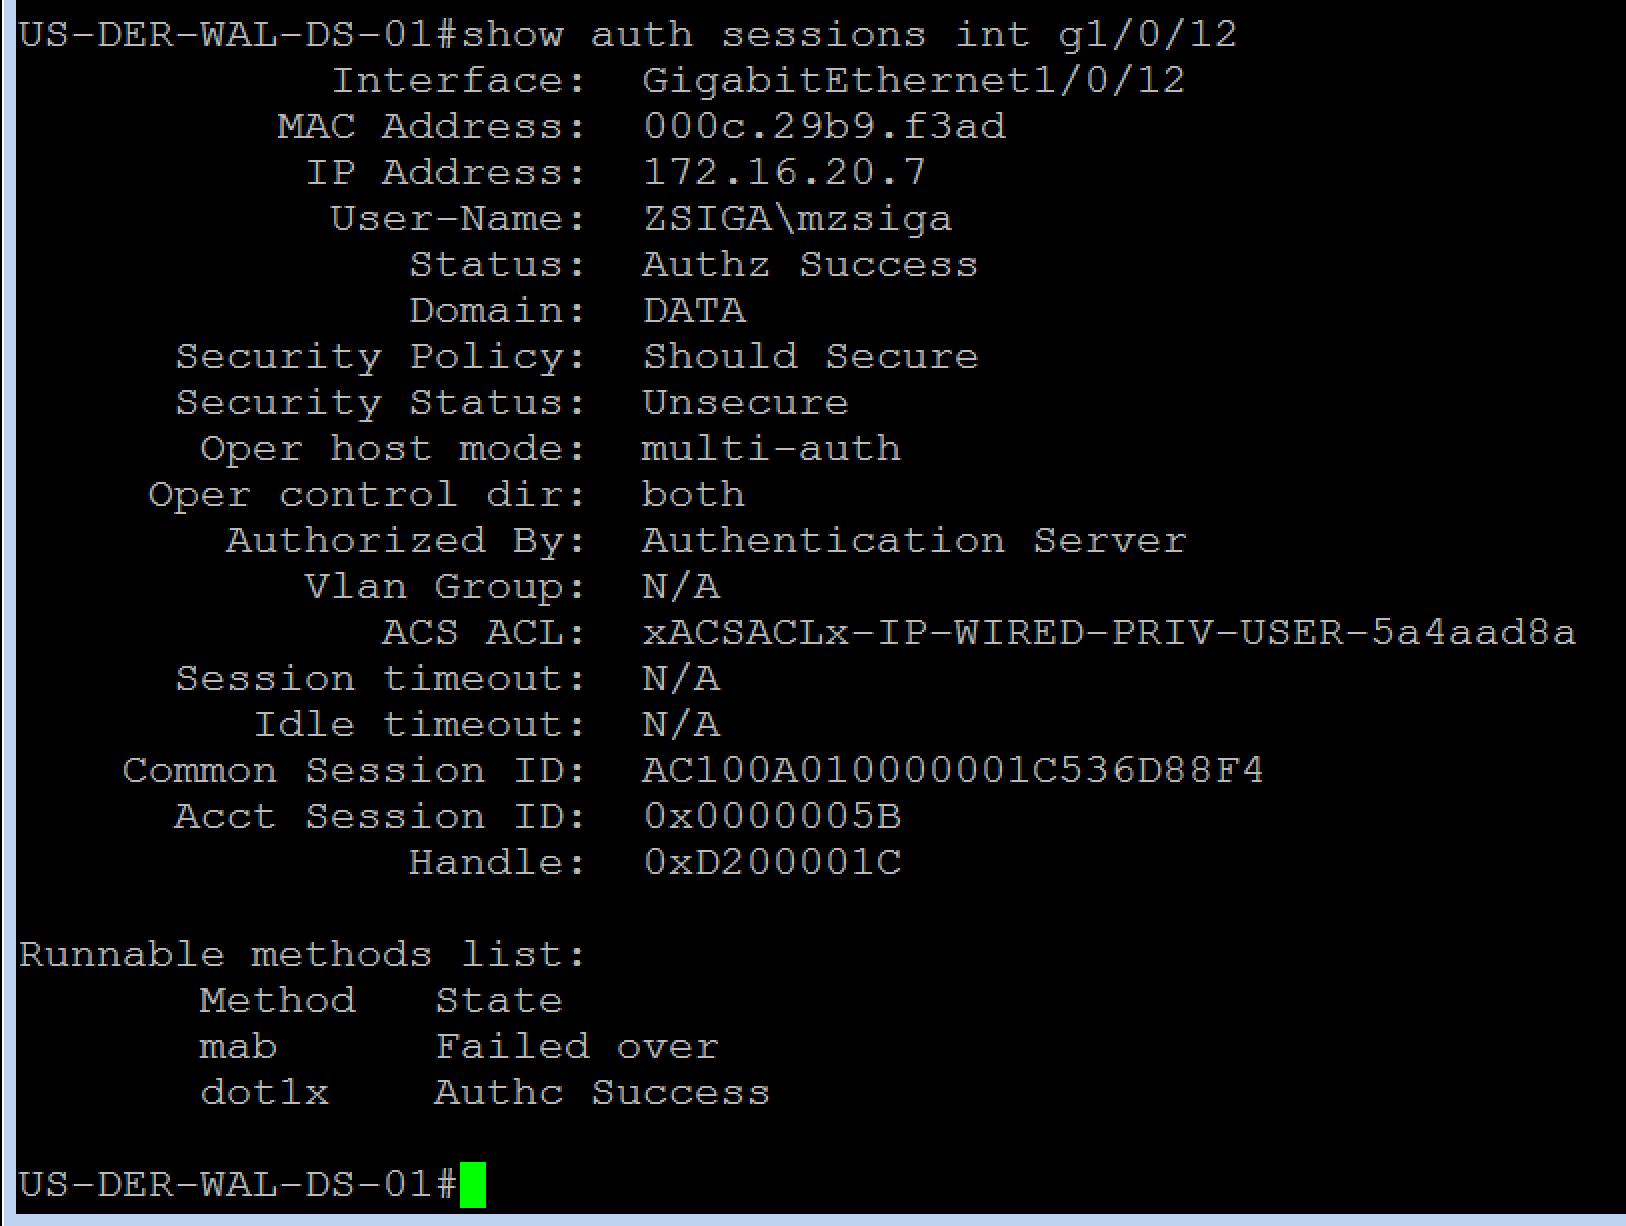
While our ISE Test VM is rebooting, we will want to make sure we can check the port status, so log into your switch via whatever manner you prefer and issue the “show auth session int G1/0/12” command. (The interface might be different in your lab environment)
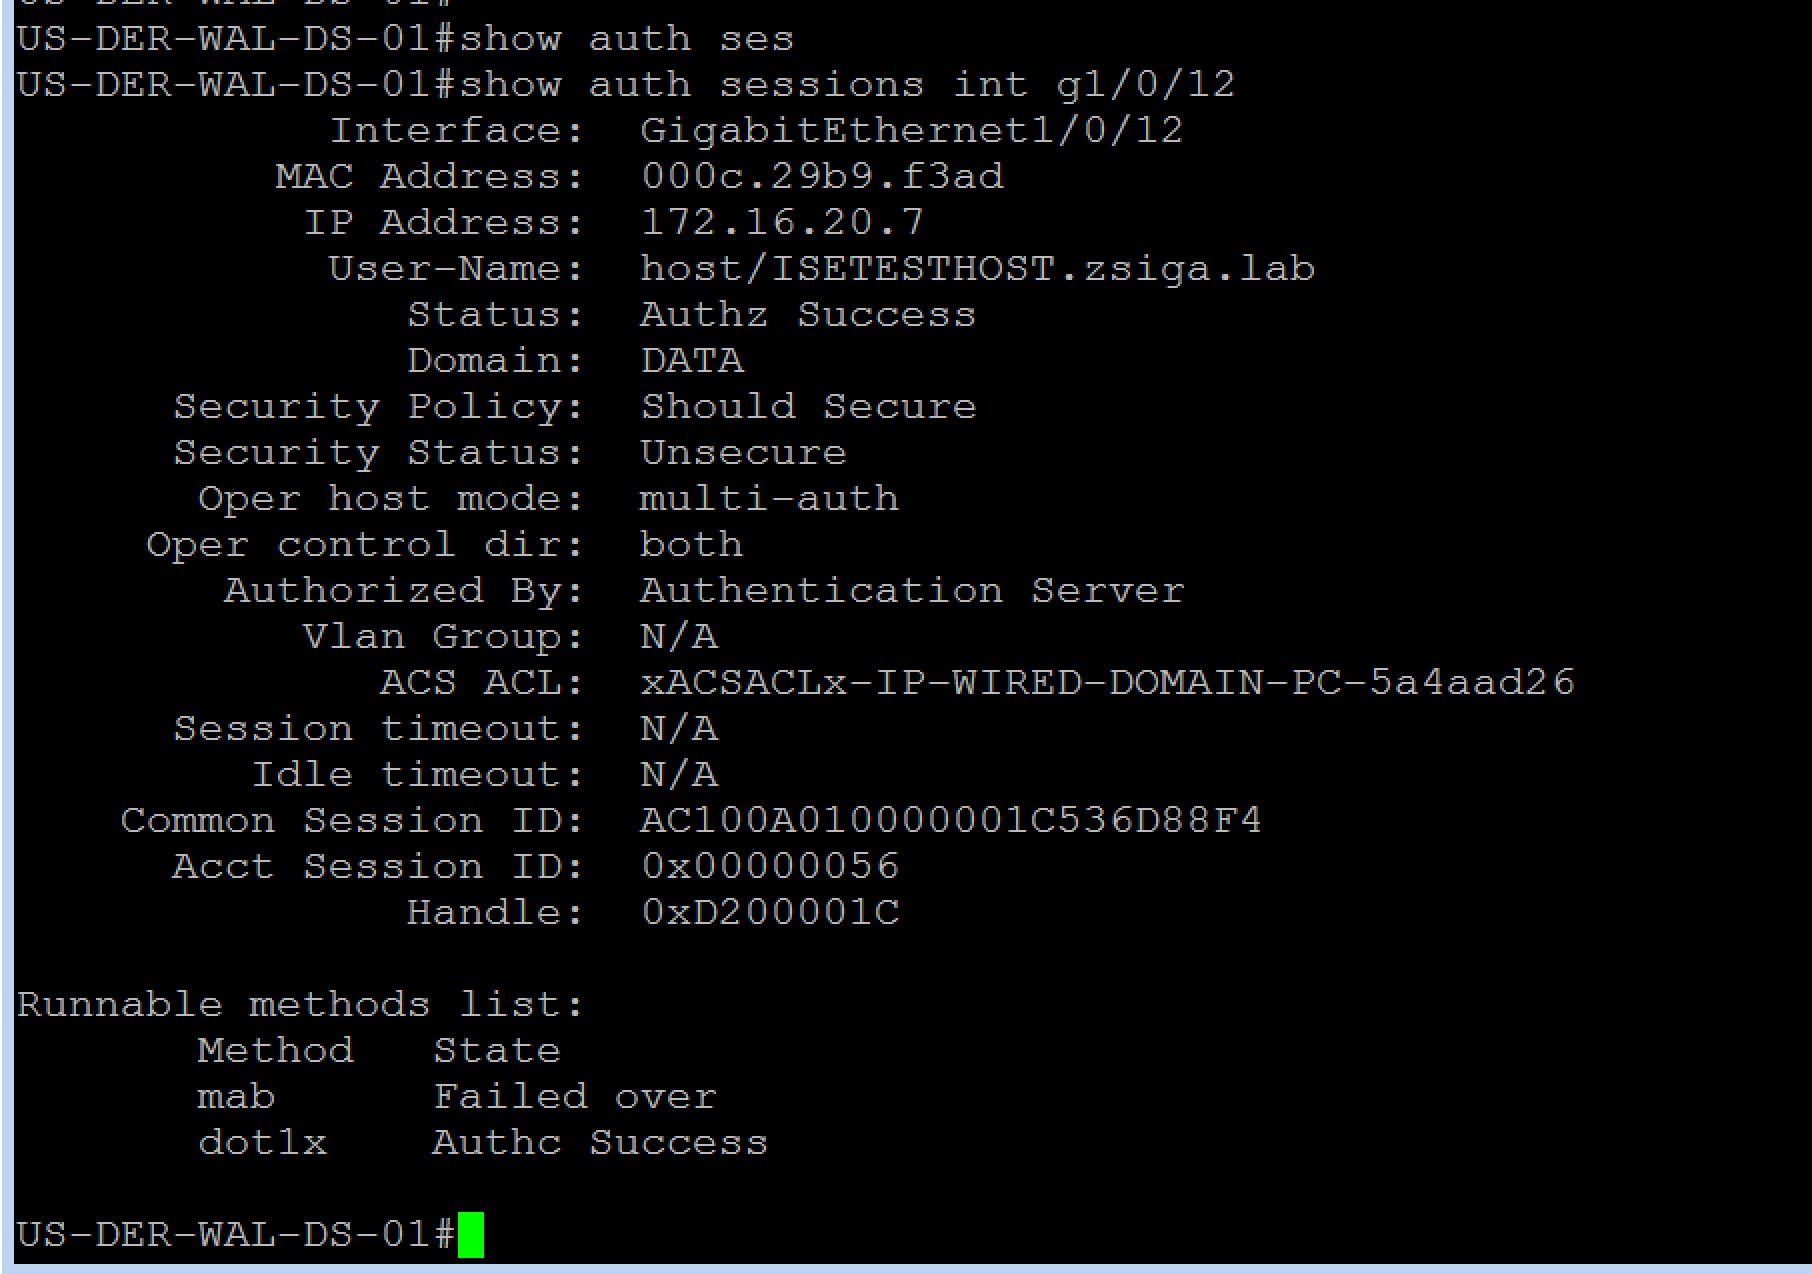
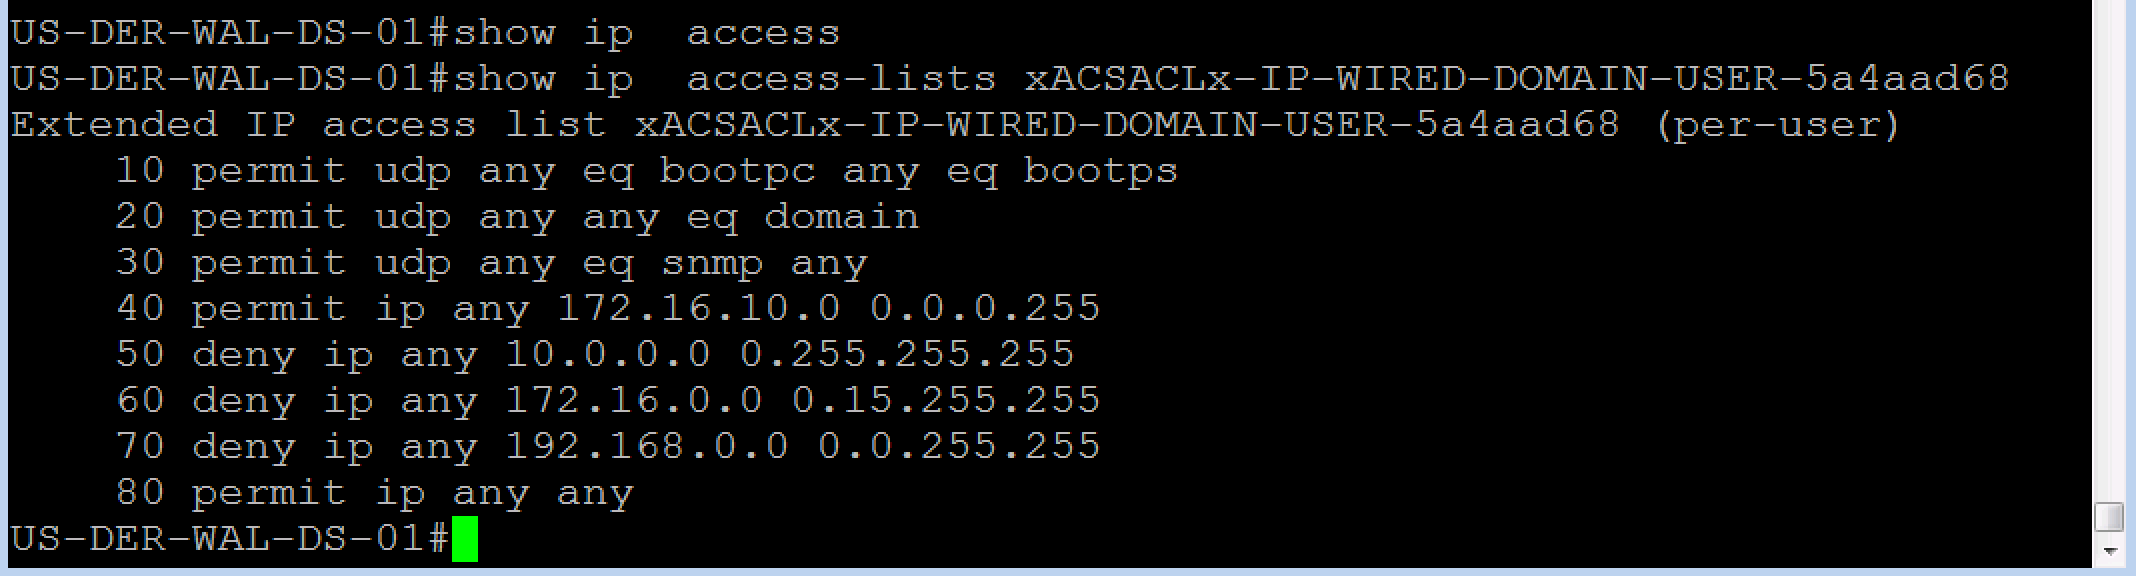
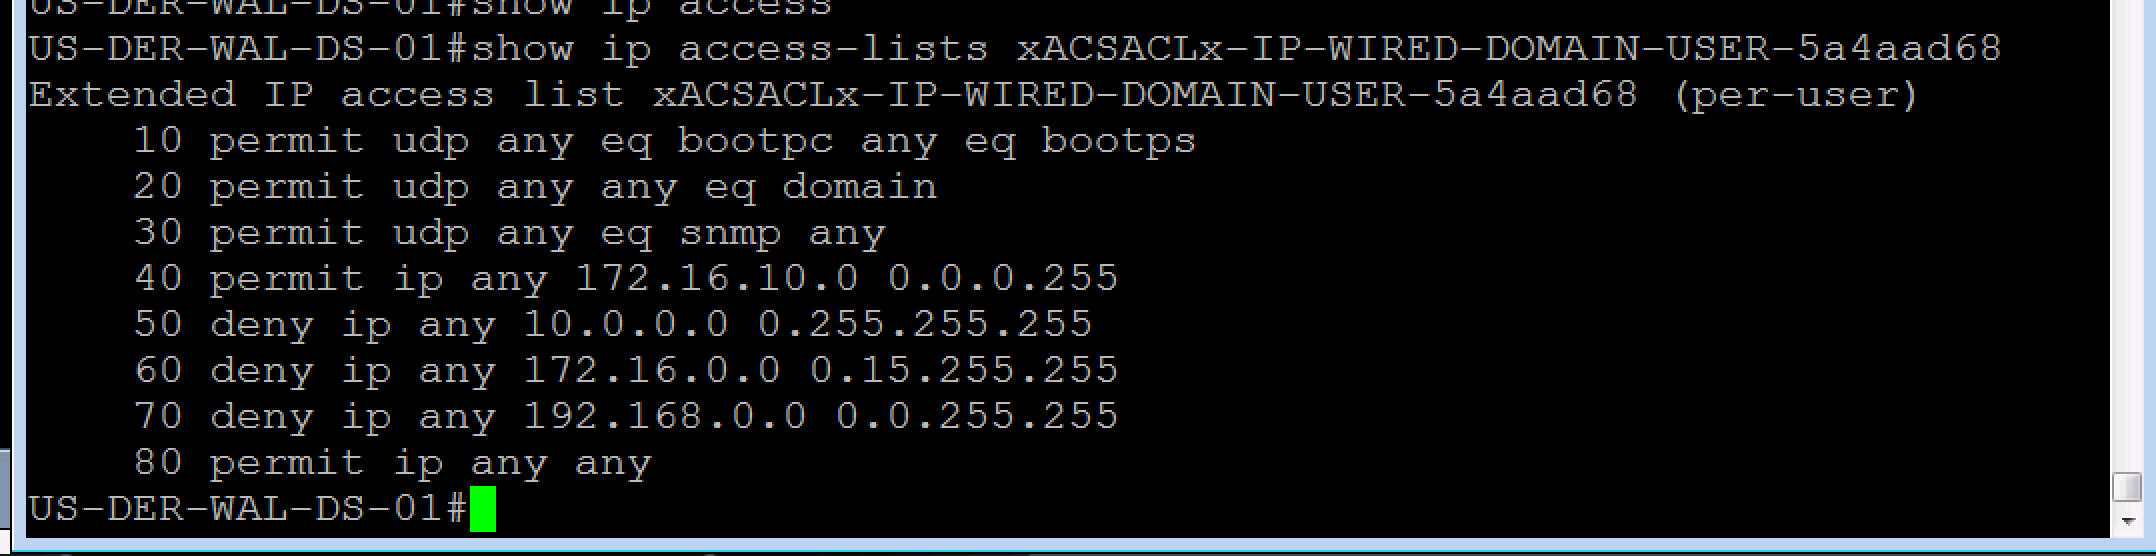
As we can see in our screenshot above, we successfully authenticated via 802.1X and have a downloadable ACL for our Domain PC use Case. Let’s check this dACL real quick. Reminder, coping with the dACL name in your ssh/telnet session is the easiest way to complete the show command.
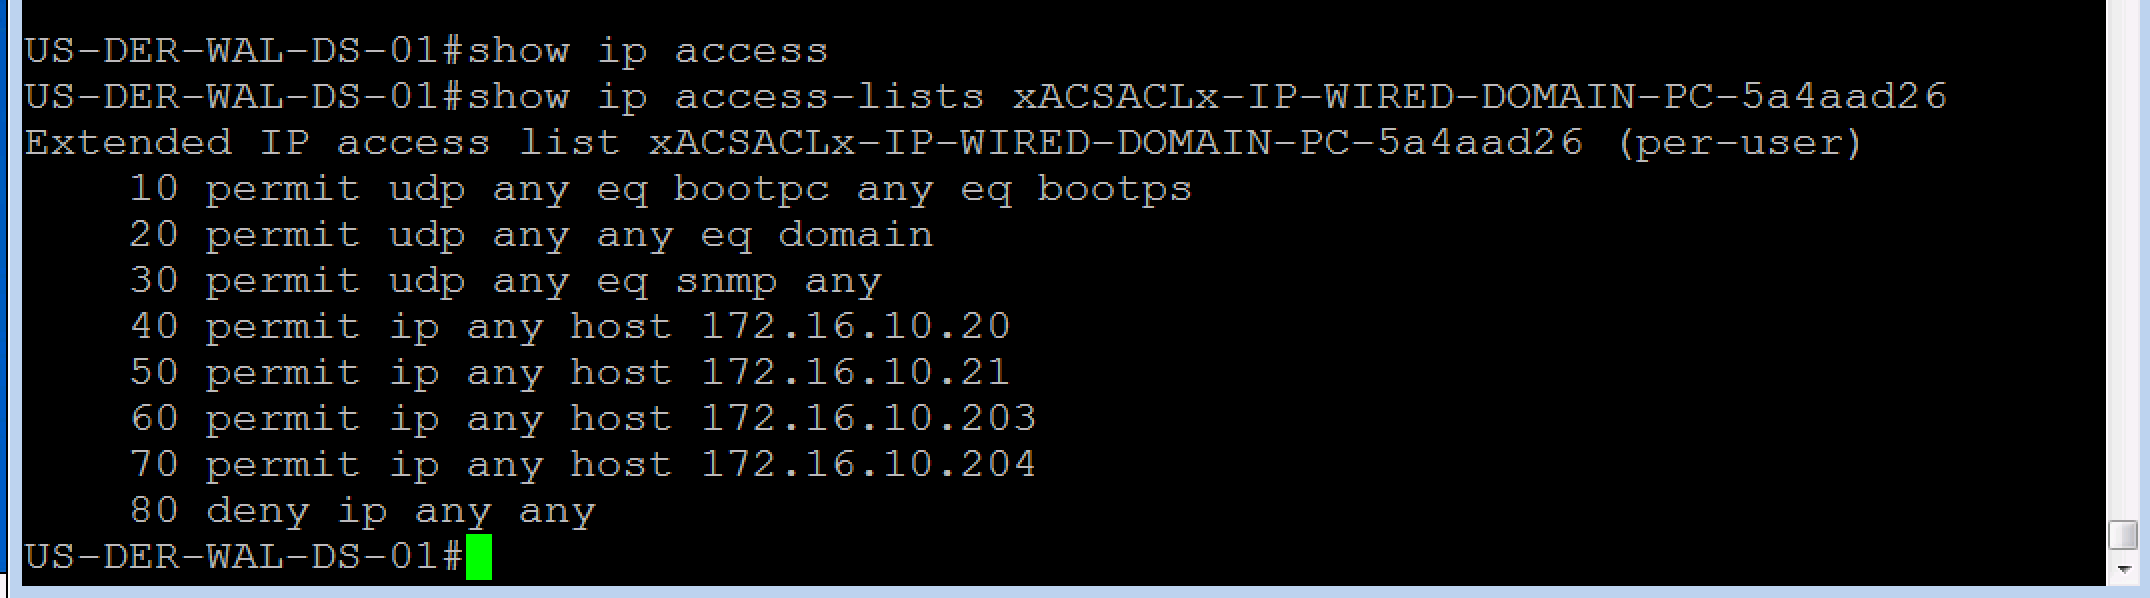
As expected, we have the proper Domain PC dACL being downloaded and applied. Let’s jump over to our ISE Radius Live log to see what it says.
Look at that, it also shows the same thing. One PEAP Use Cases retested, two to go! Chugga chugga choo choo!

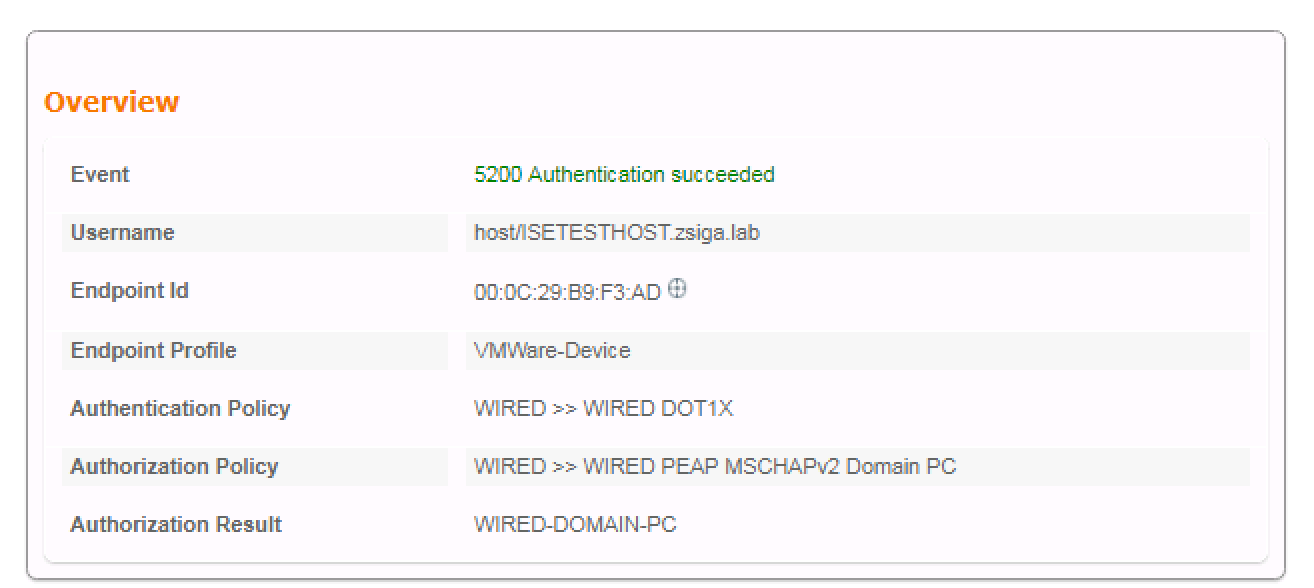
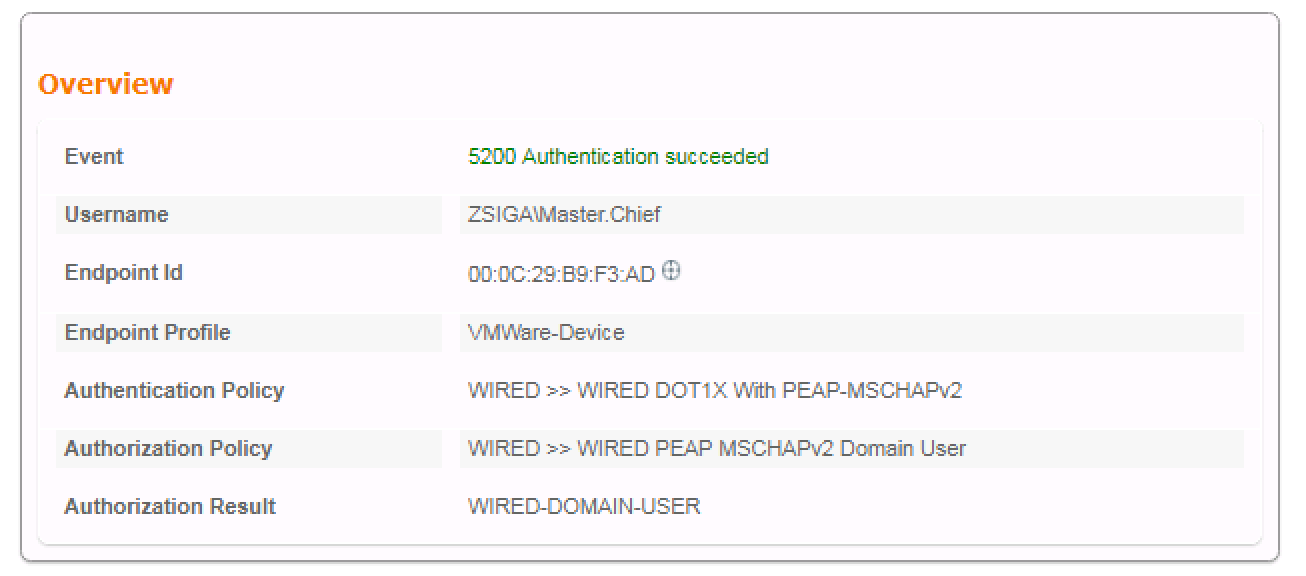
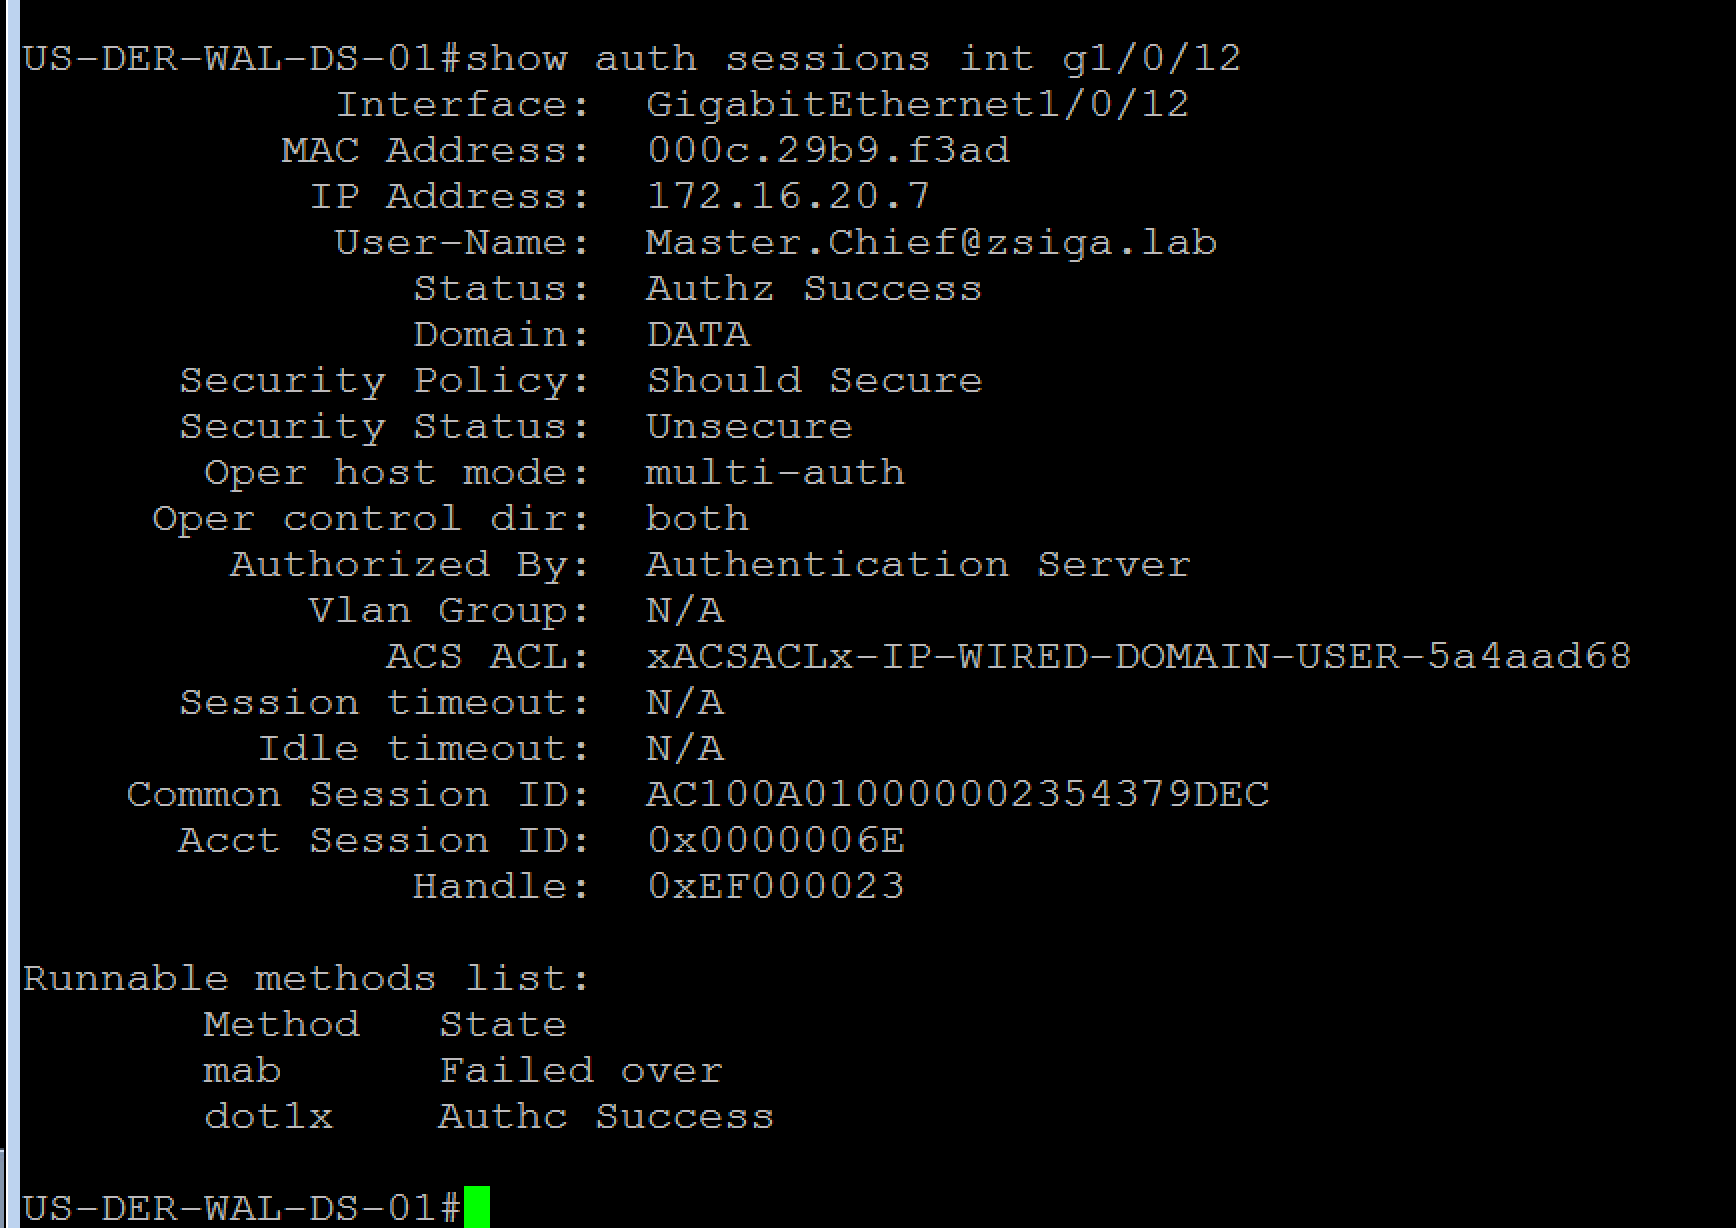
Now let’s log into our Test VM with our Normal Domain User, in our lab that is Master.Chief. If we take a look at our port with our handy Show Auth Sessions command again, we will see that we have properly authenticated via 802.1X and we have a dACL for our Normal Domain User.

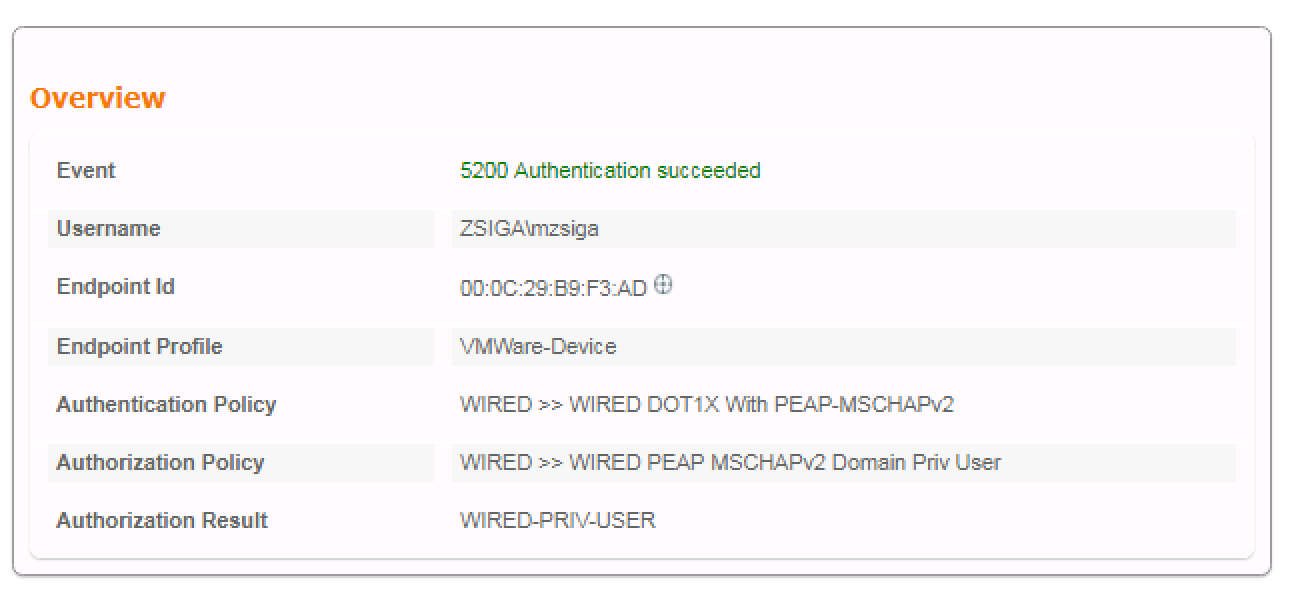
As always let’s head on over to our ISE Cluster and check our Radius Live Log. As we can see, Master.Chief authenticated via 802.1X, specifically PEAP-MSCHAPv2.

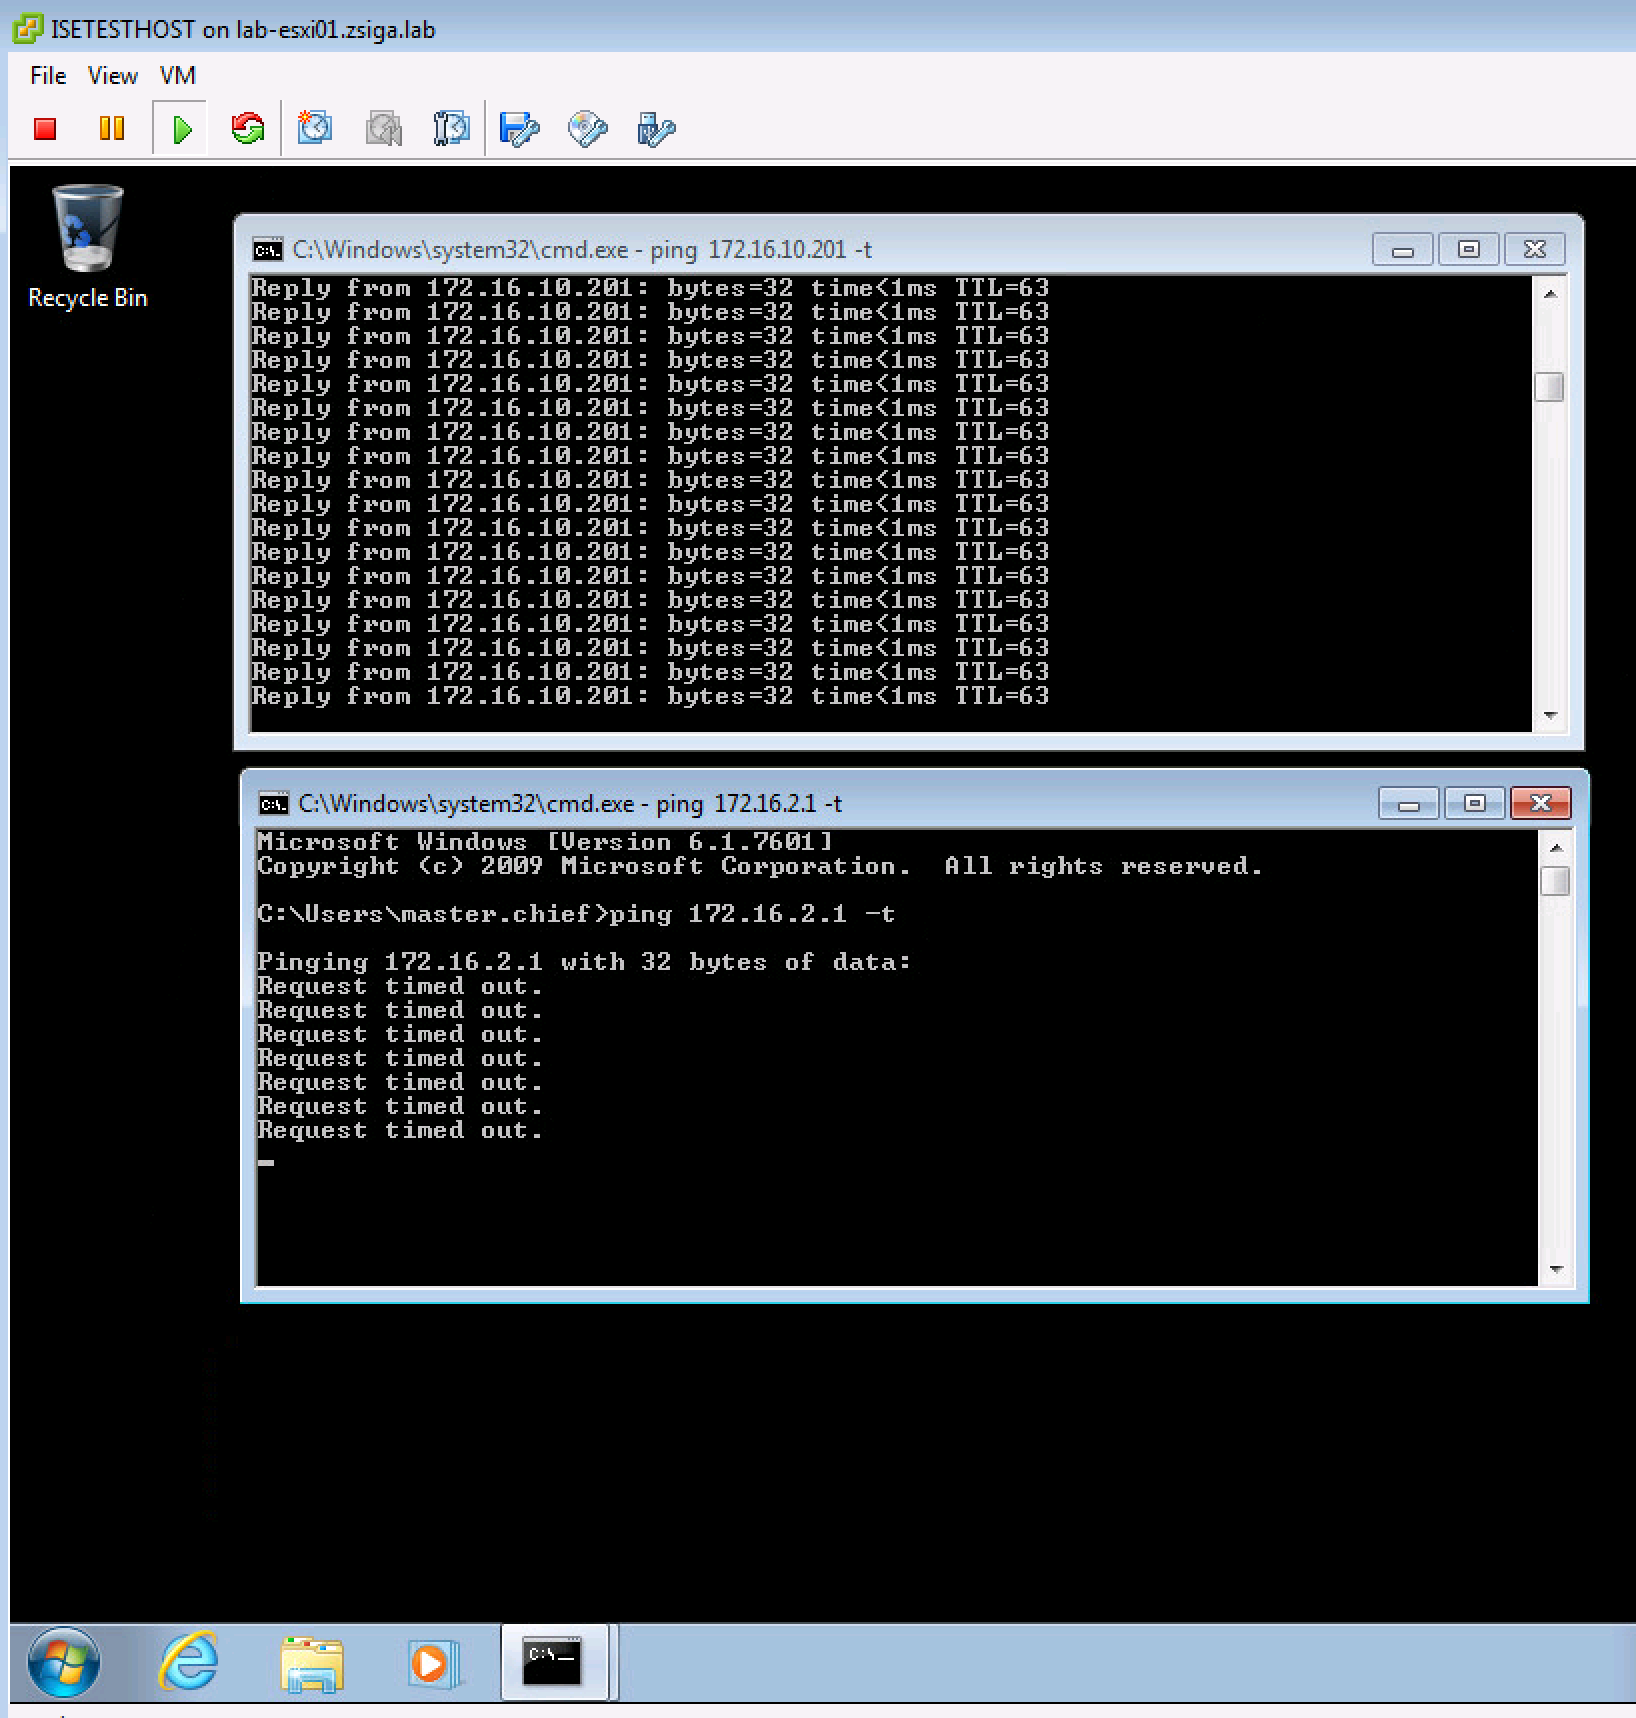
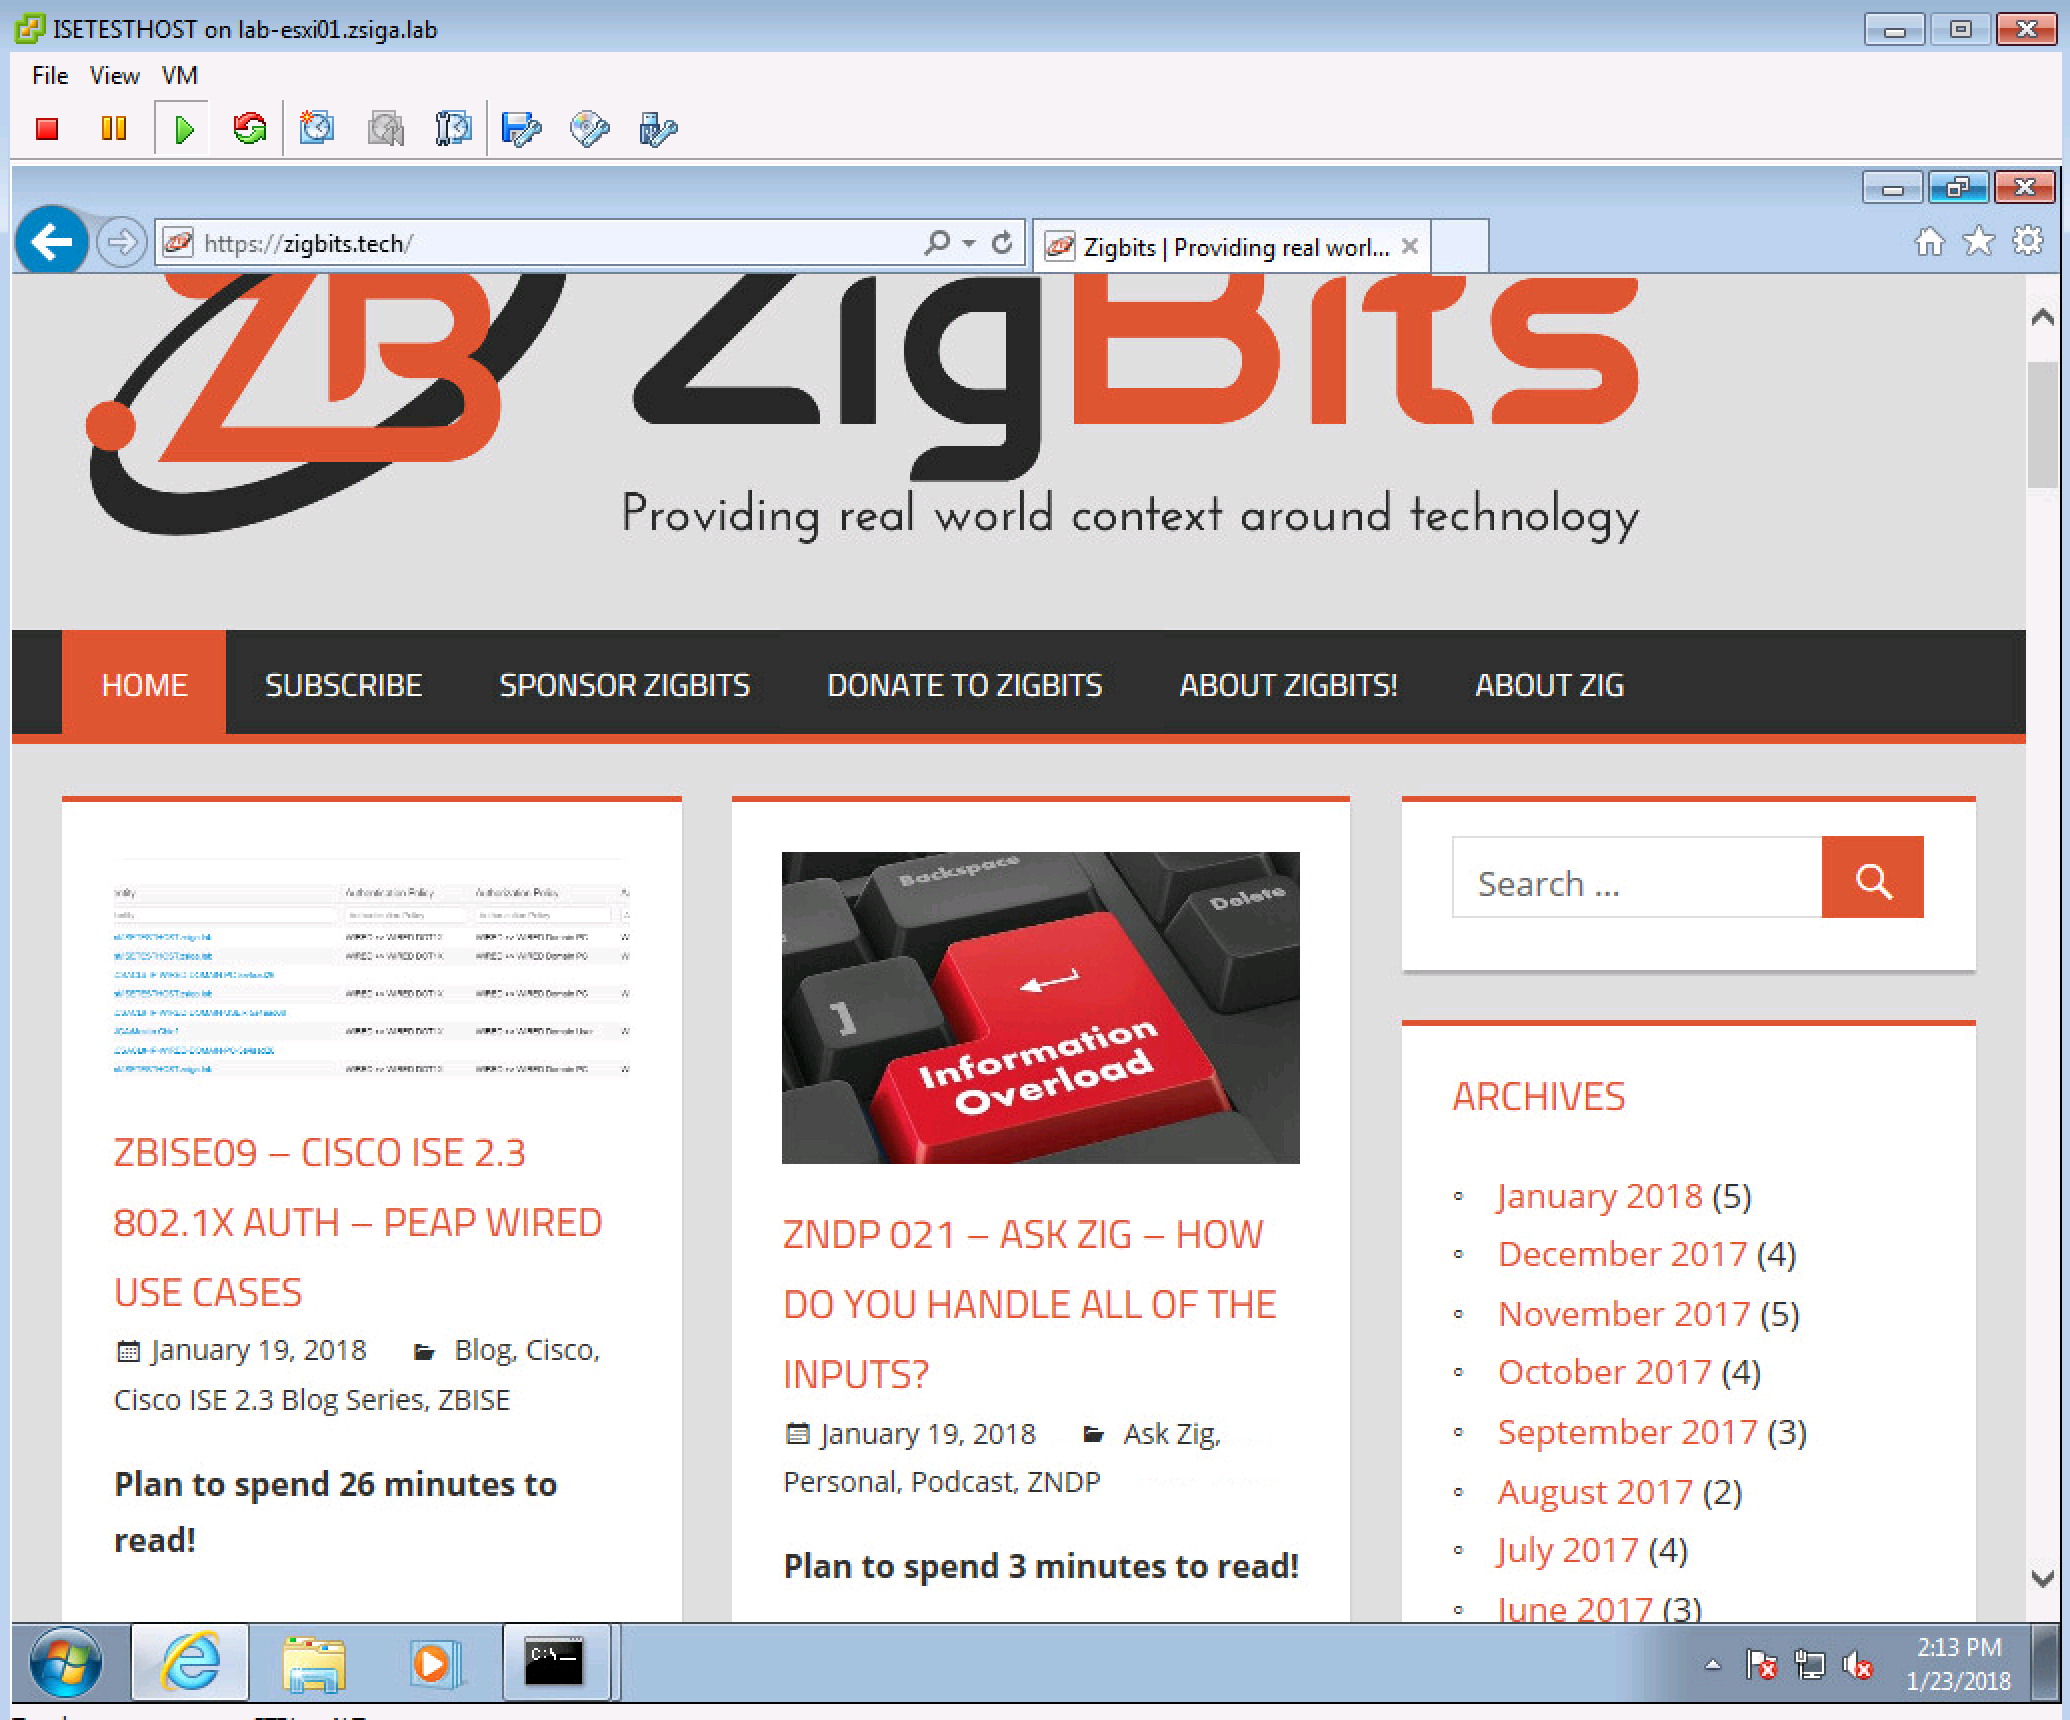
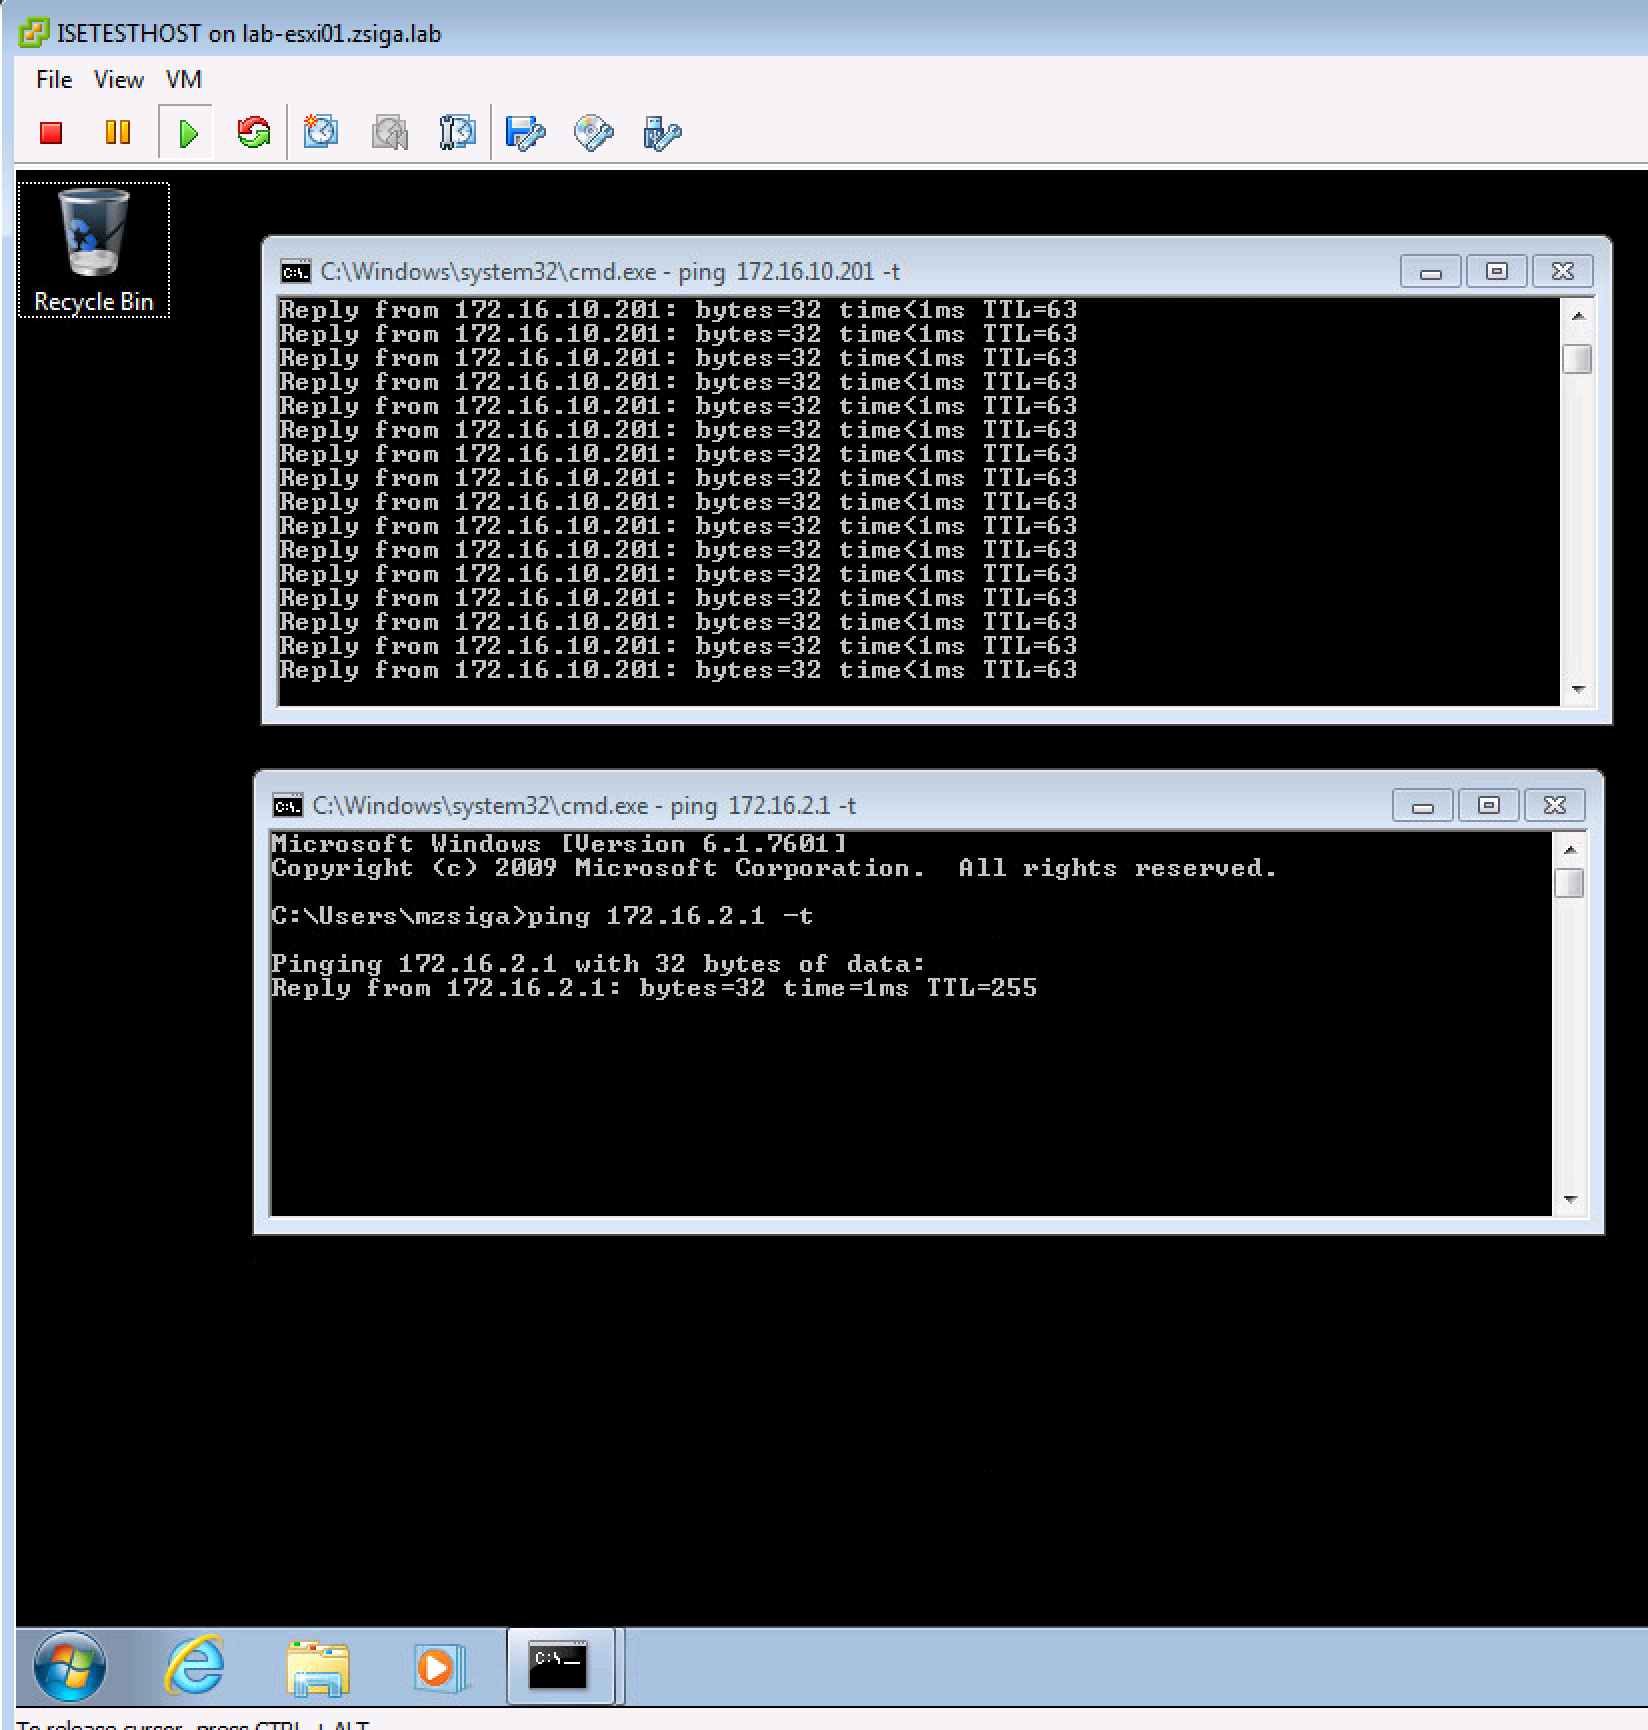
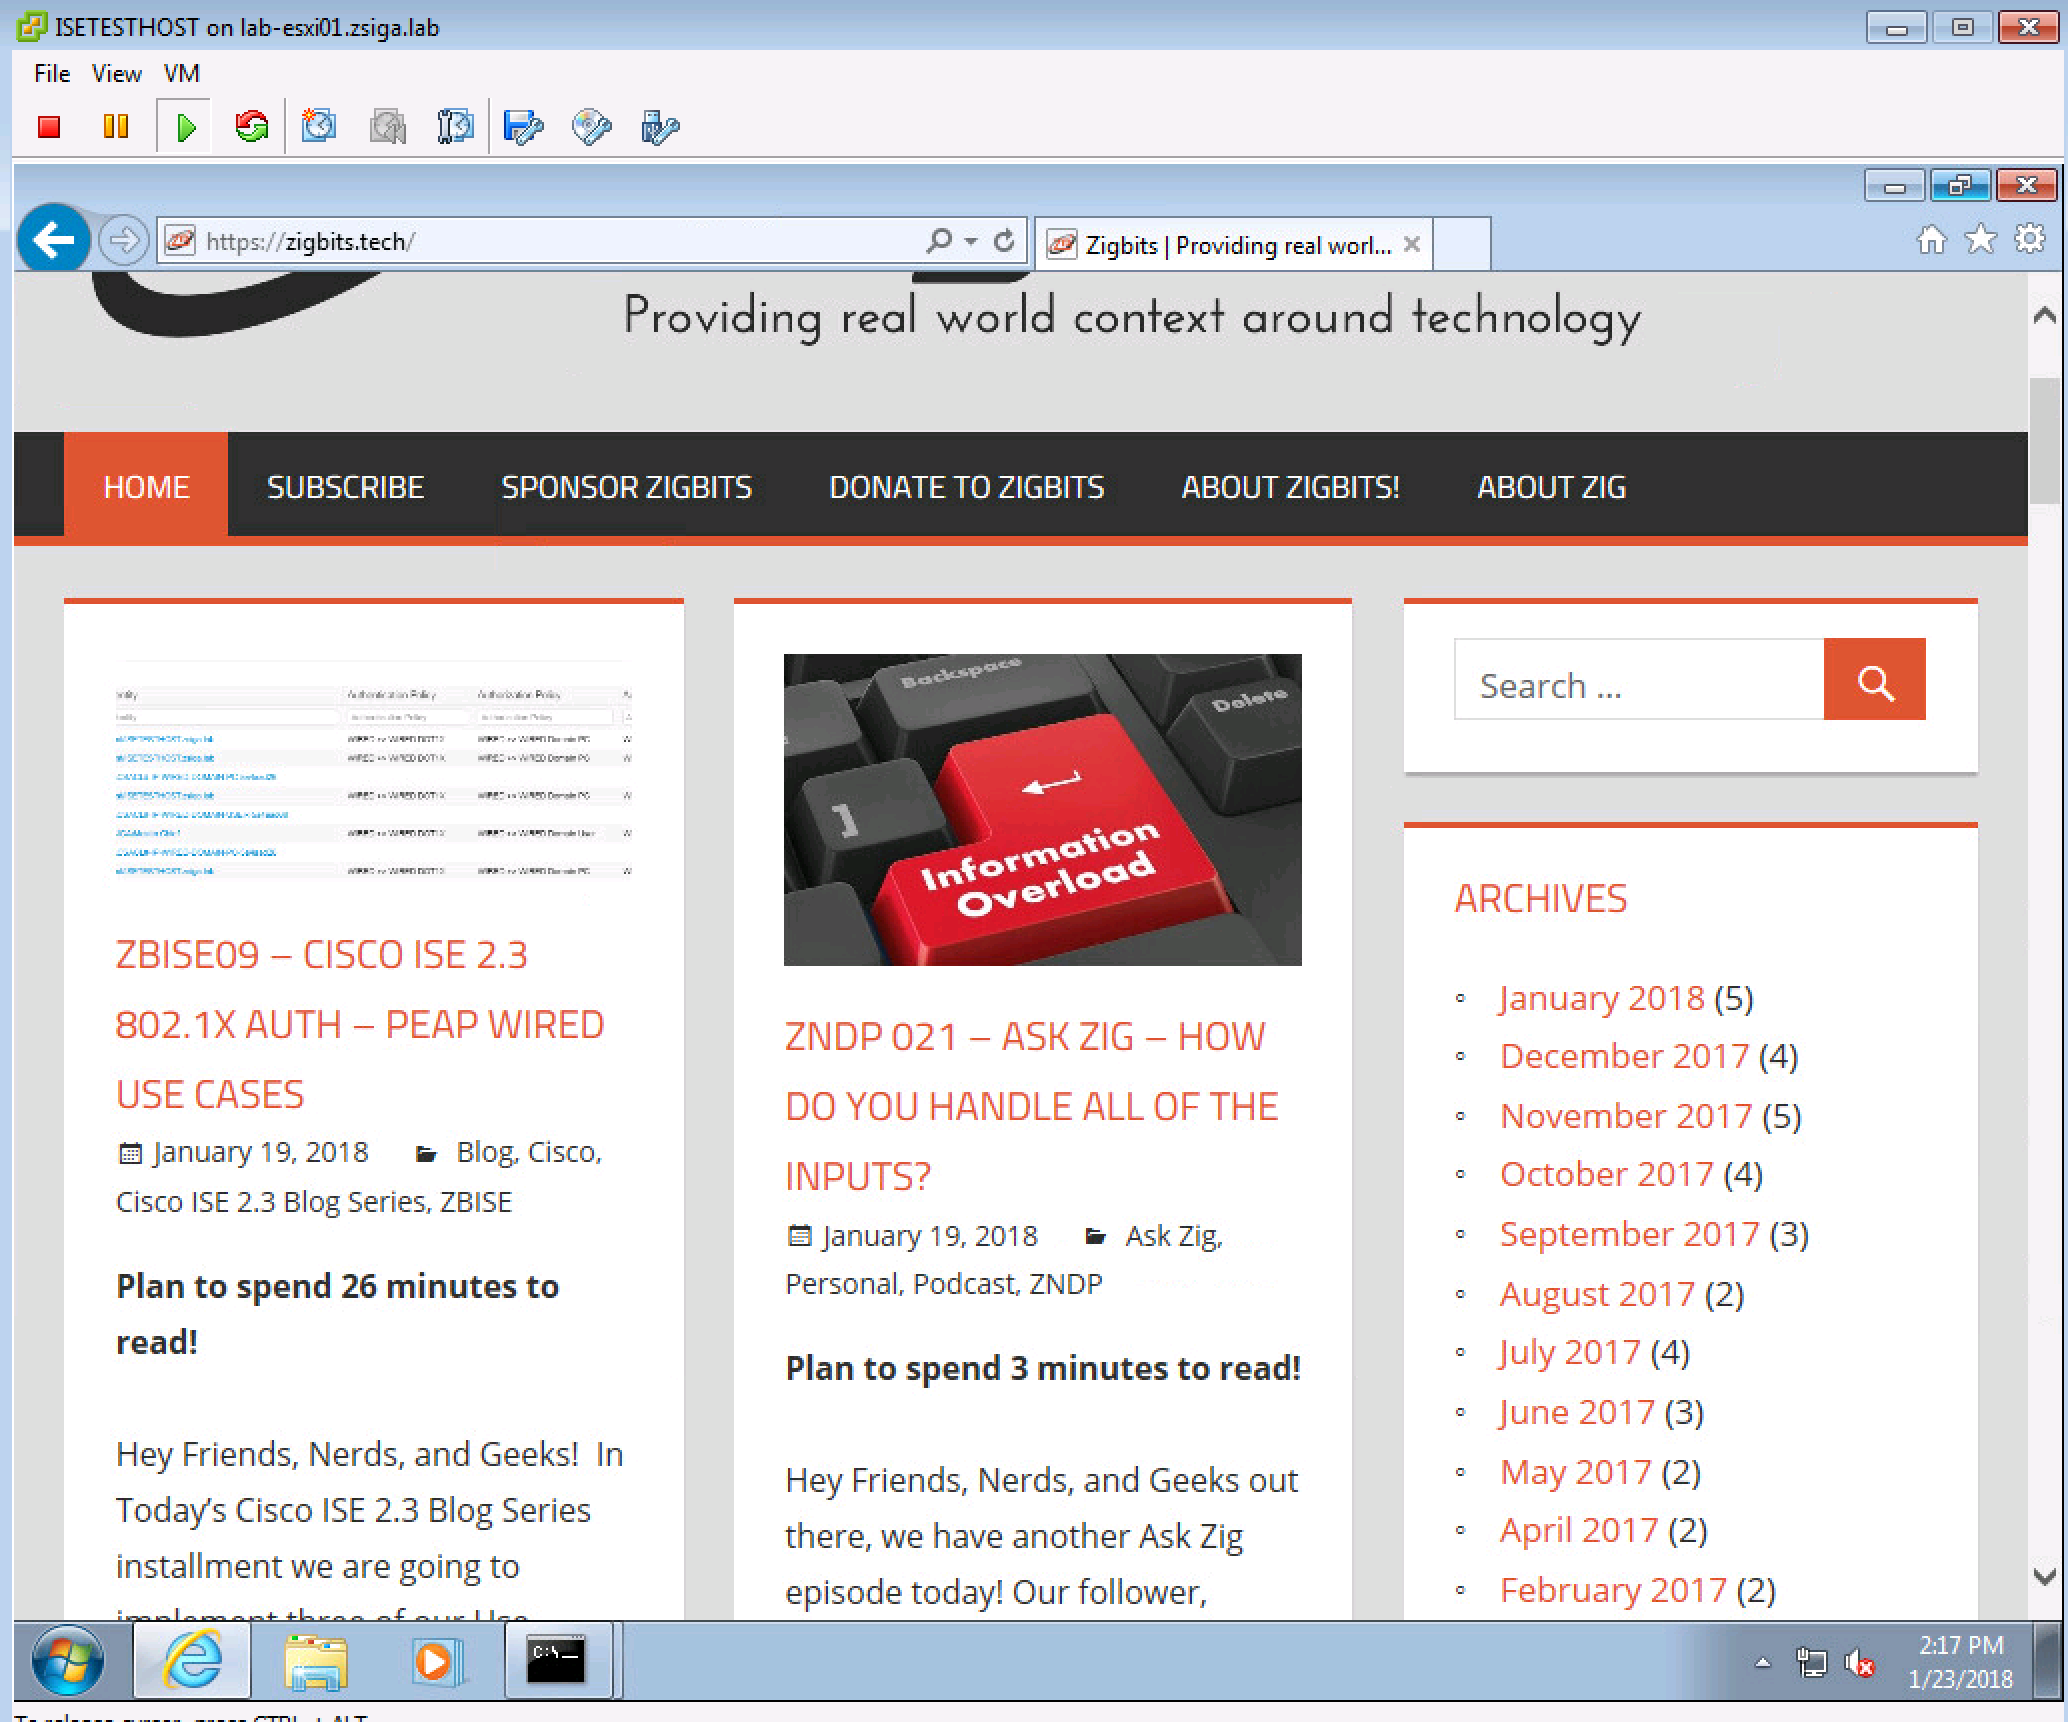
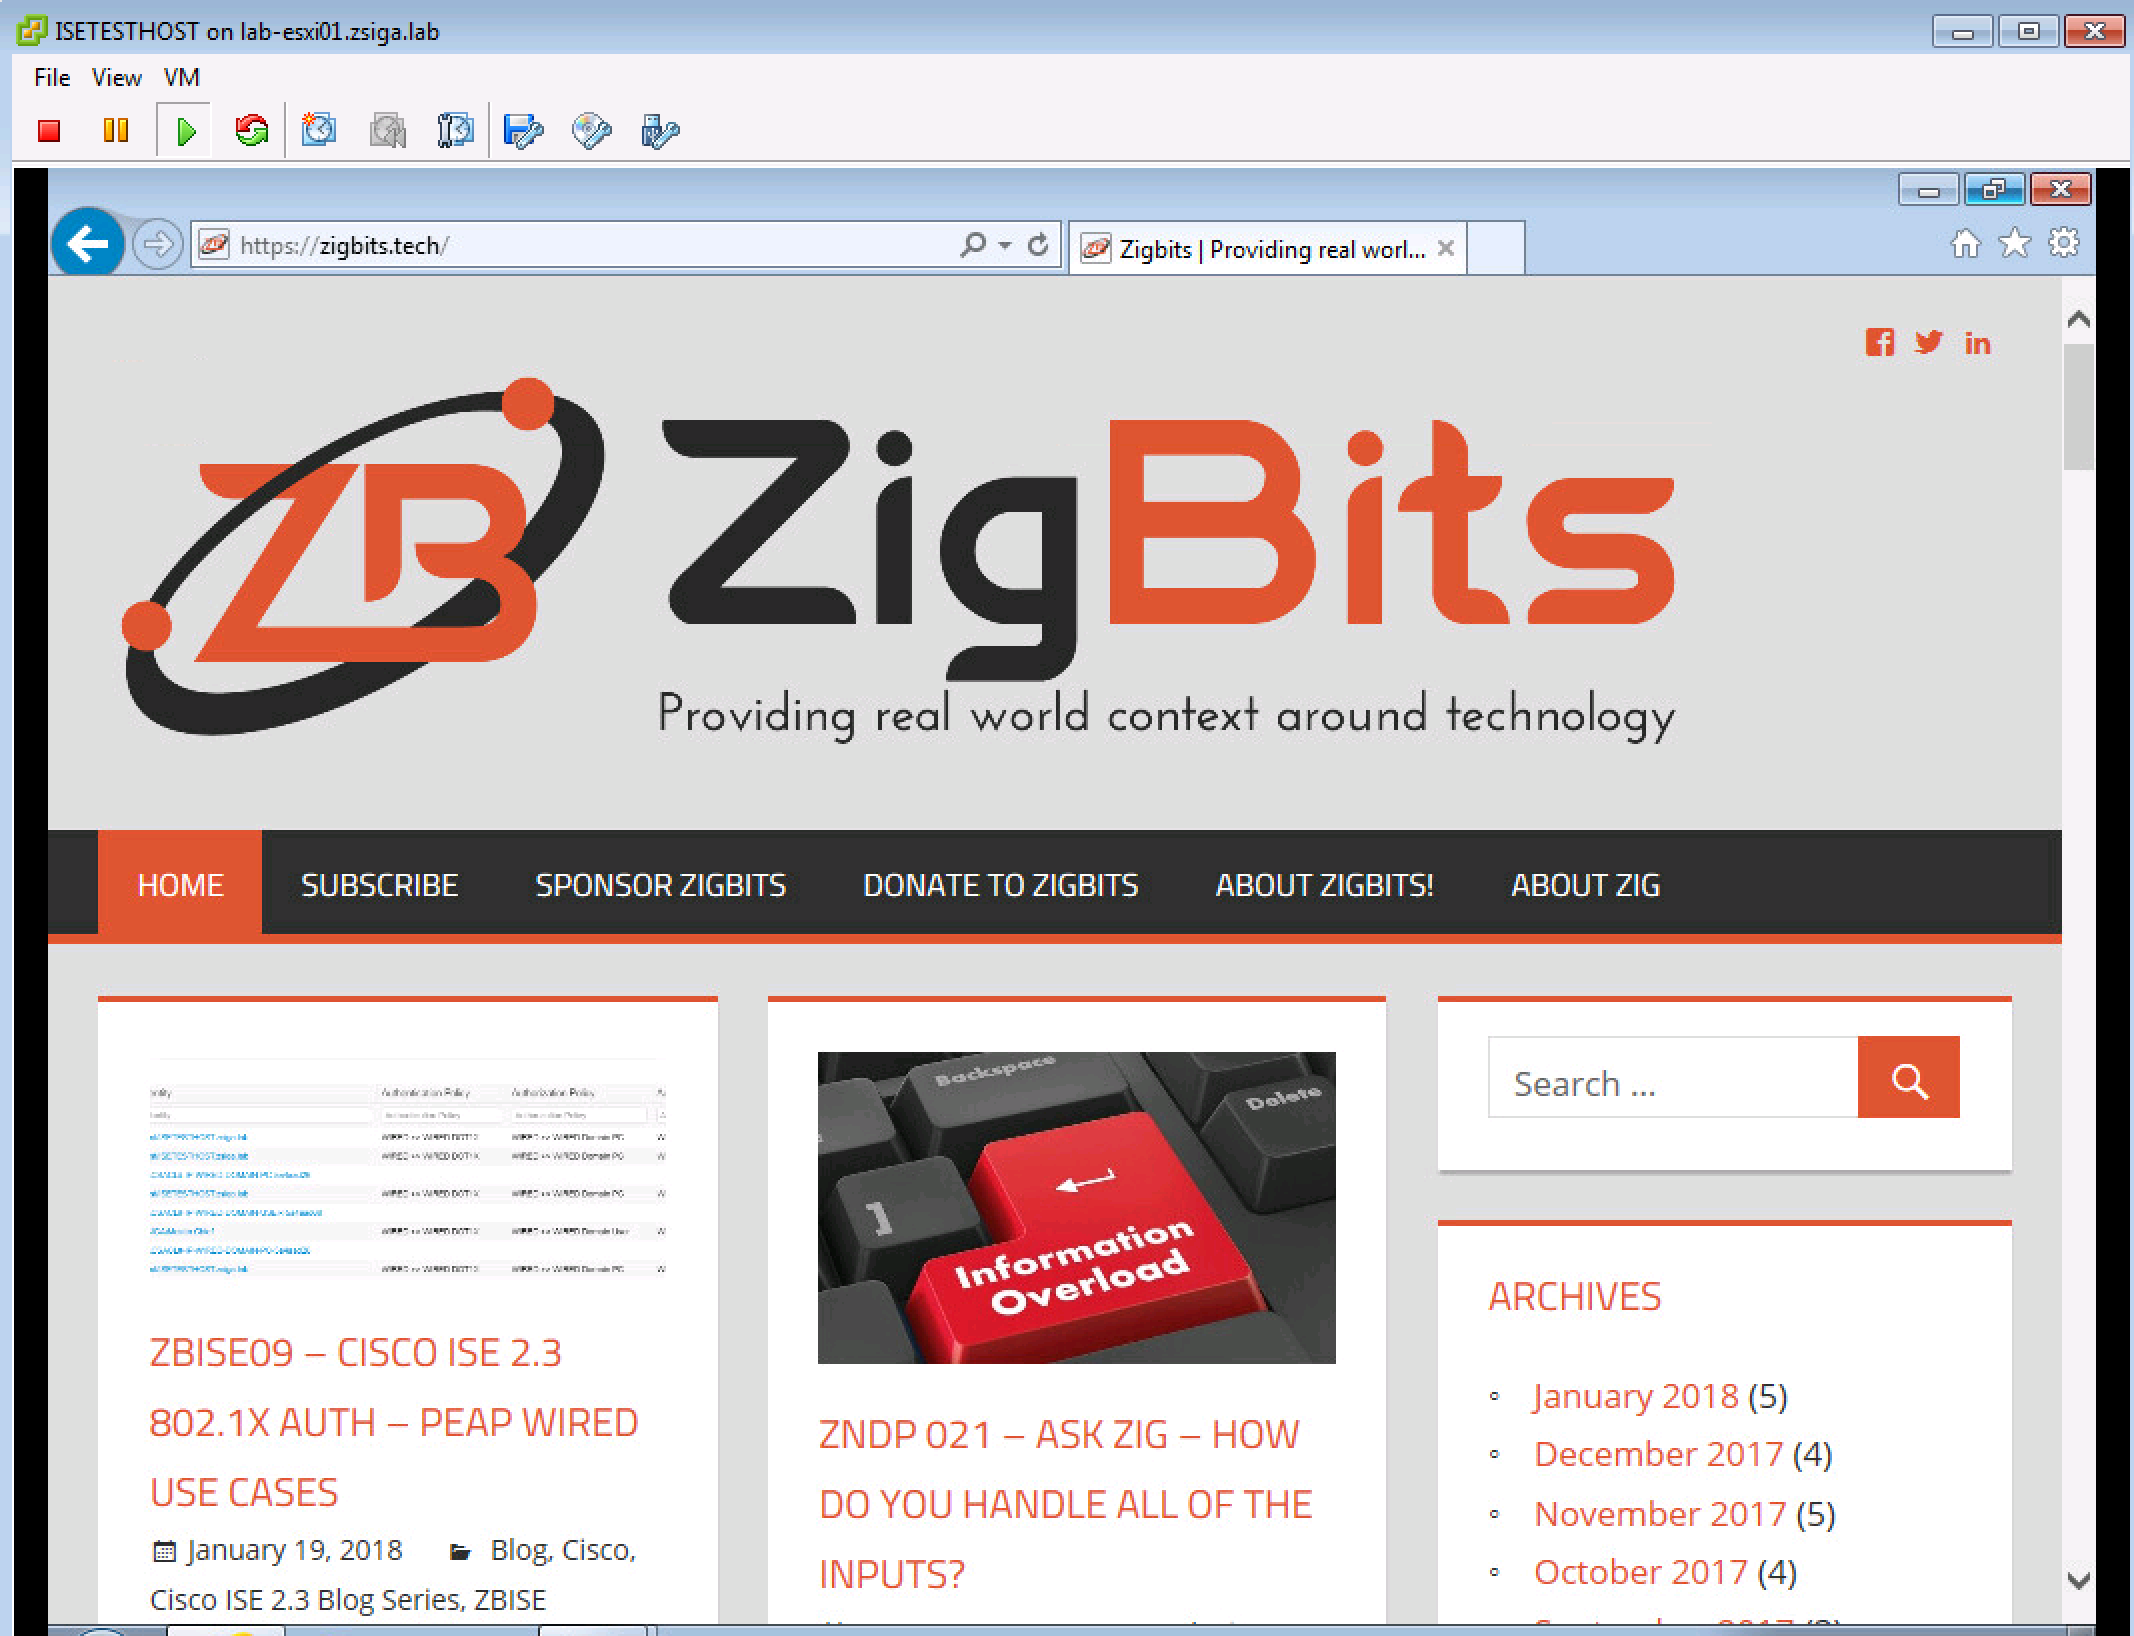
We must now follow through with our testing of this use case to make sure Master.Chief only has the access he should have. Let’s trying to ping 8.8.8.8 (Google) and 172.16.2.1 (Lab Wireless Network Default Gateway). Once that has been verified let’s attempt to browse to https://zigbits.tech, which should be a great test for internet connectivity!!
As you can see in the screenshot below, our Master.chief session can ping 8.8.8.8 but cannot ping 172.16.2.1 as expected. This session can also browse the internet, as we can see the Zigbits.tech page loads perfectly fine in our browser! This Domain User Use Case has been successfully retested! Moving on to Use Case Number 3.
Let’s go ahead and reboot our Test VM.

As our Test VM is rebooting, we should be able to see the Domain PC Use Case get it one more time.

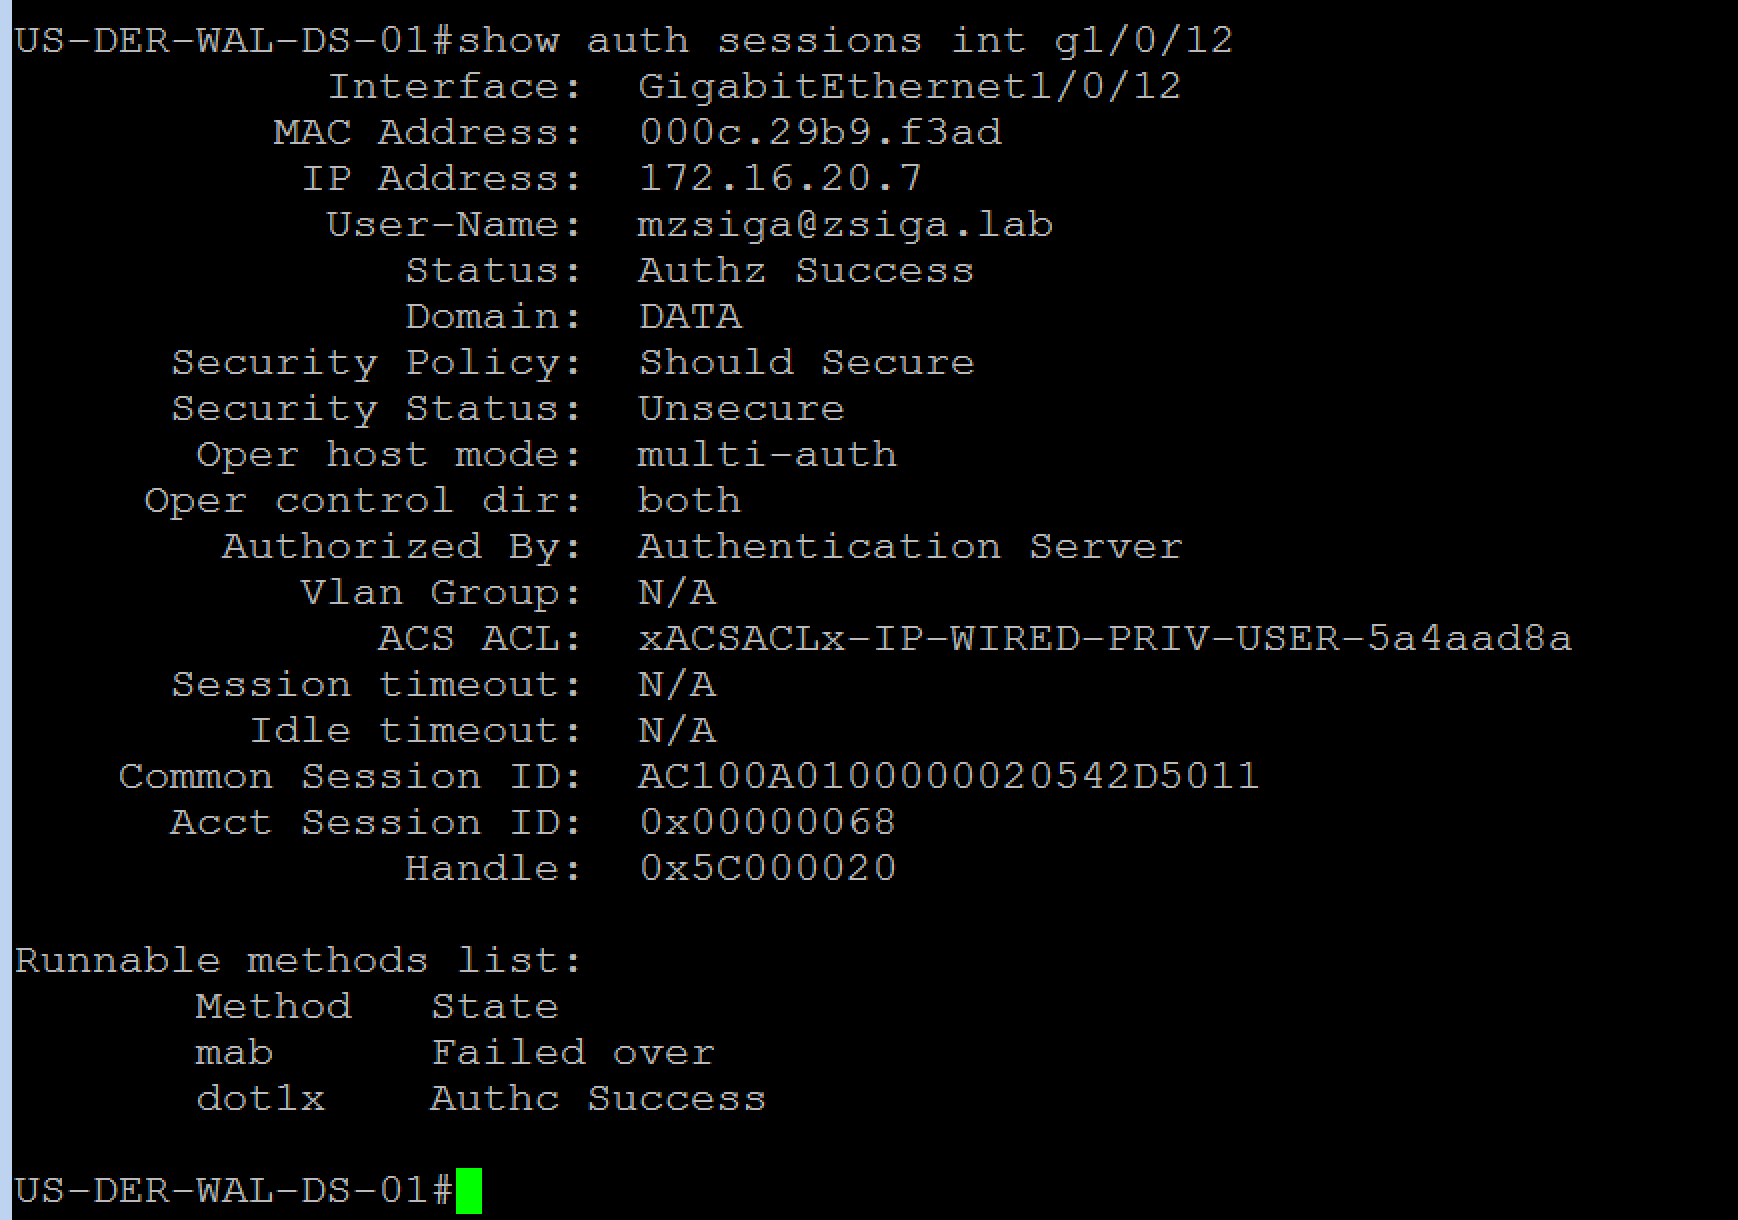
Now that our Test VM has been Authenticated via the Domain PC Use Case, let’s login with our Domain Privilege User account.
If we check our Switch’s Auth Sessions again, we will see that our Domain Privilege User received the proper policy with the proper dACL.

Let’s now check to see what our ISE Cluster says. As we look at our Radius Live Logs, we can see that our Domain Privilege User received the proper policy and was authenticated via PEAP-MSCHAPv2 as expected.

Let’s just verify our Privilege User has full access as we expect it to. We should be able to ping both 8.8.8.8 and 172.16.2.1, and we can!
Let’s trying browsing to https://zigbits.tech like usual. Just like the screenshot below, it worked! That’s it for our three PEAP Use Cases.
Now let’s actually move into creating our Cisco ISE EAP-TLS specific Use Cases, shall we!?!?!?!
4. Create our New Cisco ISE EAP-TLS Use Cases
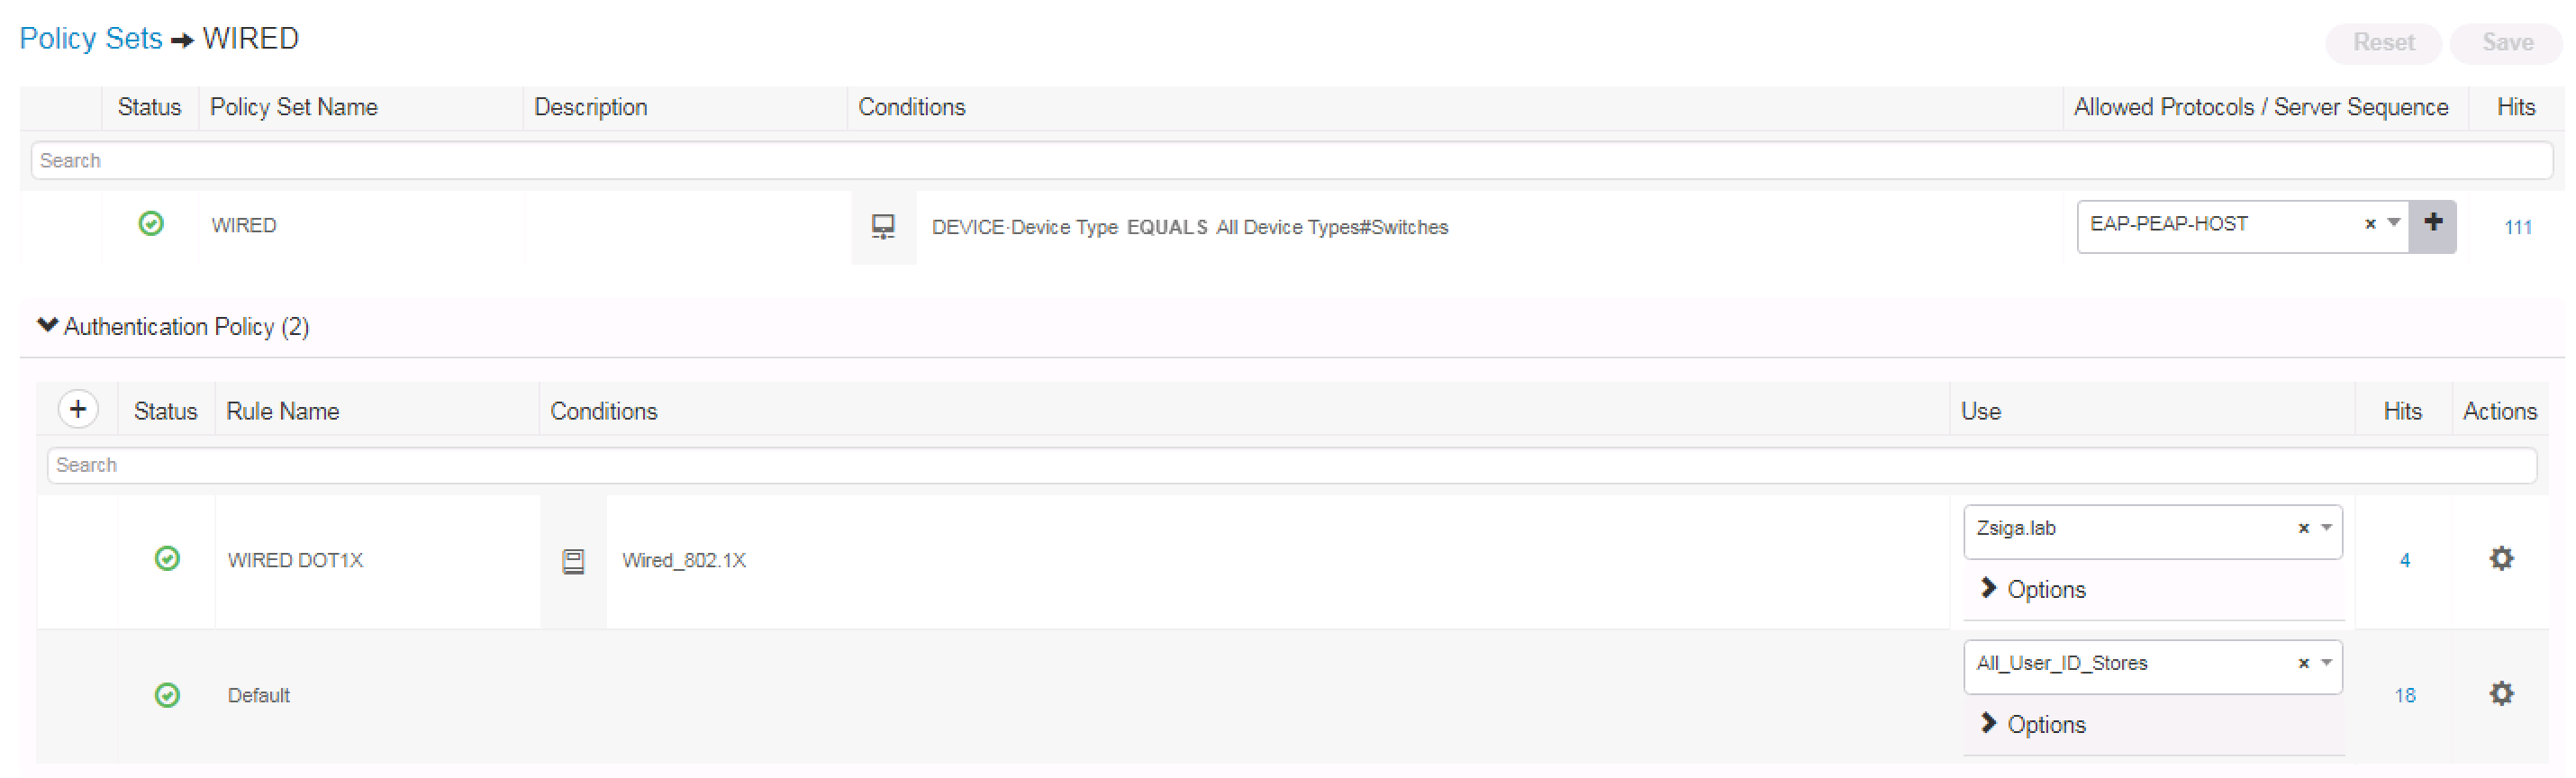
Now we get to add some New Cisco ISE EAP-TLS Use cases. First, let’s add our specific Cisco ISE EAP-TLS Authentication policy. We can start this off by duplicating our PEAP-MSCHAPv2 Authentication policy as shown in the below screenshot.

With the duplicate rule, change the name and modify the condition. Our Name for this rule is WIRED DOT1X With EAP-TLS and the condition is the same attribute, Network Access:EapAuthentication, but selecting the EAP-TLS method instead of the EAP-MSCHAPv2 method to match on. The final change we need to make here is what Identity Store to use for this Authentication rule. We want to select the newly created Certificate Authentication Profile we created in Step 2 called ZsigaLabSubAlt. When all the changes are completed for the Authentication policy, your configuration should look similar to the below screenshot!!

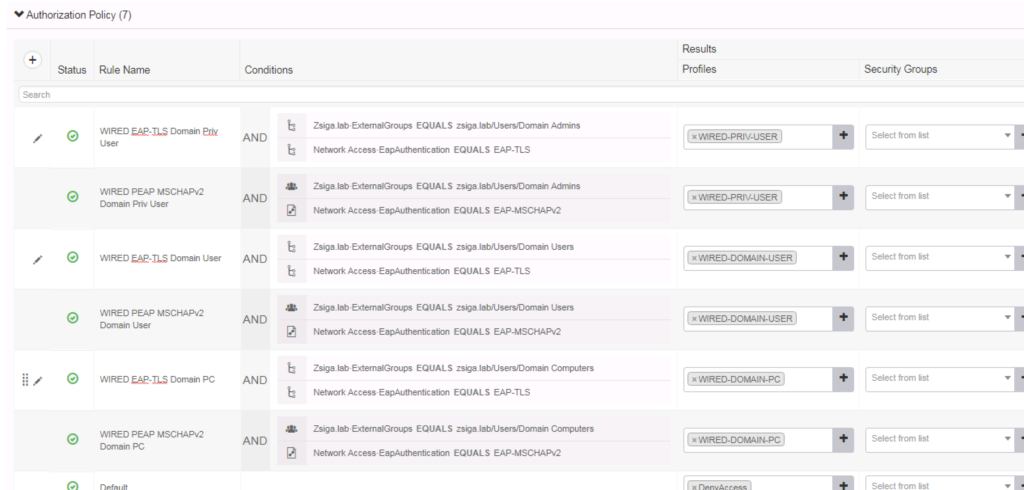
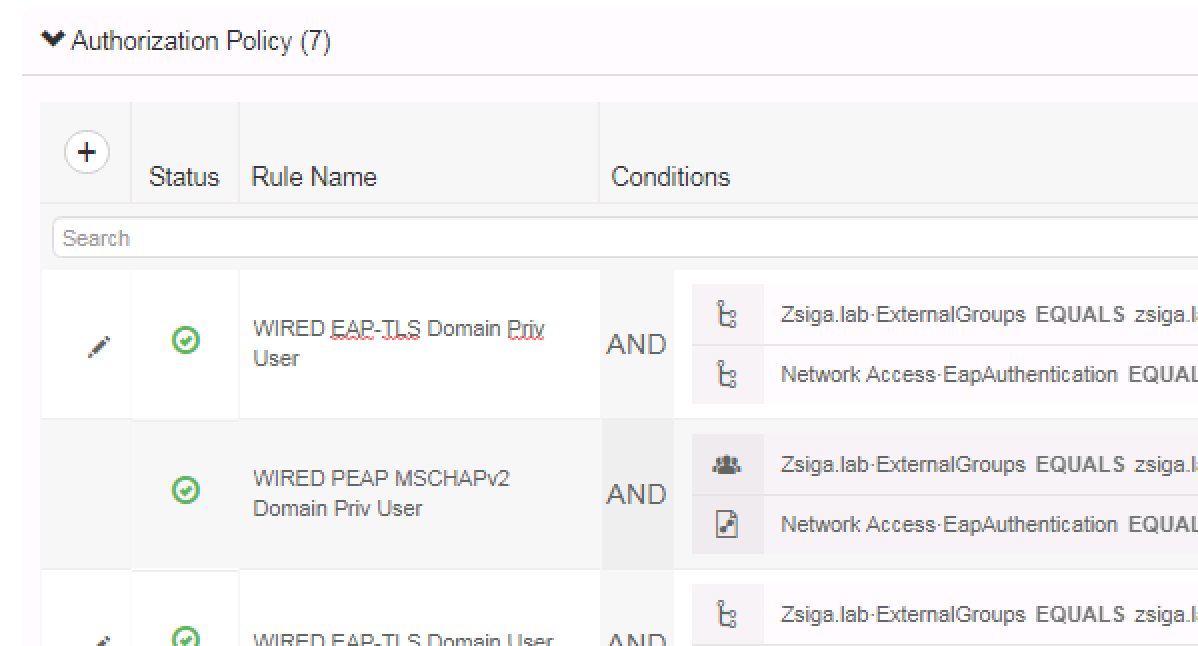
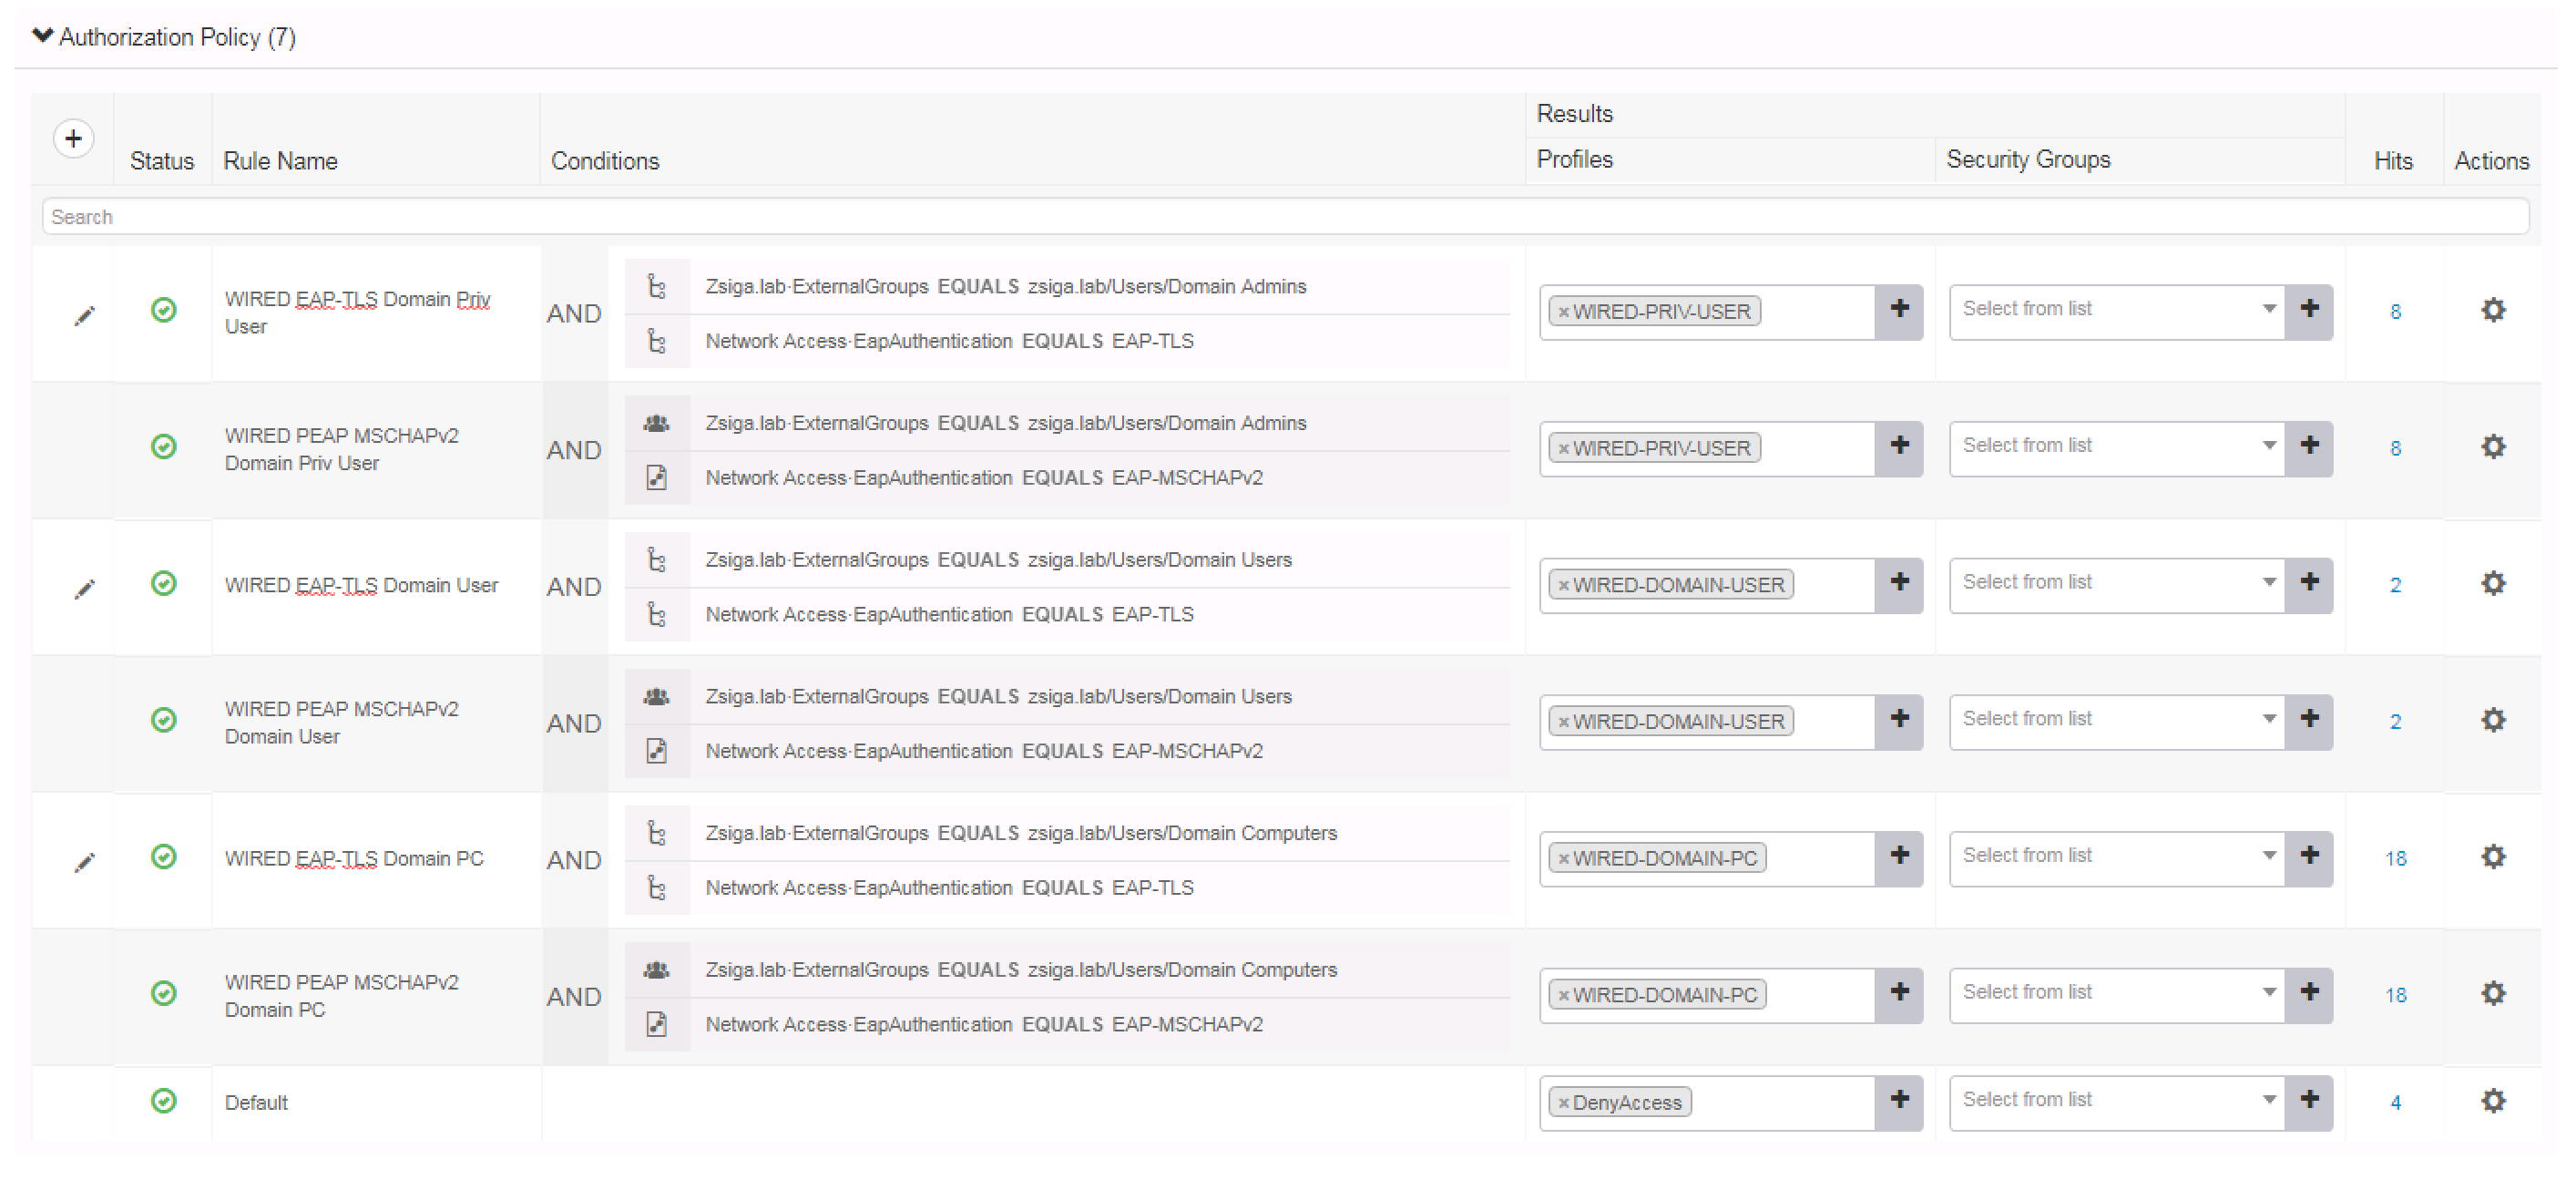
Now that we have our EAP-TLS Authentication Rule configured, let’s add our EAP-TLS Authorization Rules. The Simplest way to achieve this is to duplicate each of our PEAP-MSCHAPv2 rules, then modify the name and the condition to reflect EAP-TLS. By now you should be on your road to becoming an expert with this new ISE GUI.
Duplicate your PEAP-MSCHAPv2 rules and modify the names/conditions to EAP-TLS
This is what your authorization policy should look like when you are completed!!
This was the easier part today. The ISE Configuration for EAP-TLS is not that intrusive. Now we need to figure out our Identity Certificates for our Test VM which can be a process depending on your organization’s PKI environment.
5. Install Identity Certificates on our Test VM
A lot of the tasks in this section and the next can, and should be, completed with Group Policy Objects or GPOs. Utilizing GPOs will make Operating and Managing the environment a whole lot easier. When I am deploying ISE for a Proof of Concept or an initial deployment, I do complete these tasks manually to help with the testing and validation of customer Use Cases. Once the Testing and Validation phase is completed, then I recommend the customer to push a number of GPOs globally to assist with their own ISE role out in their organization.
PEAP and EAP-TLS are similar but one uses MSCHAPv2 for Identity Authentication while the other uses Identity Certificates for Identity Authentication. To accomplish the latter with EAP-TLS, we need to have Identity Certificates installed for our Domain Computer and Domain User accounts. The easiest way to do this at scale is to utilize the Domain Certificate Auto Enroll Feature that will Auto install Identity Certificates as the Domain Computer and Domain User Account login via Active Directory.
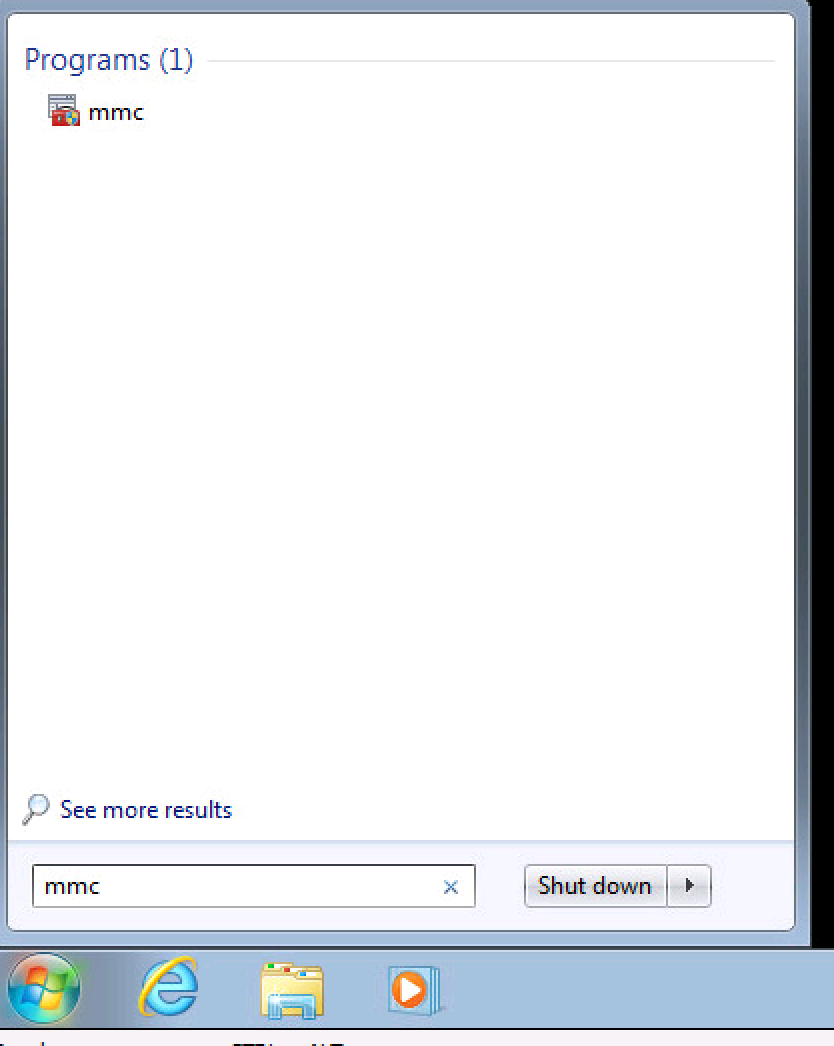
Let’s check to see if our Test VM already has Identity Certificates installed. On our VM, let’s launch an MMC snap-in and add both the Computer Certificate Store and the User Certificate Store.
Below, I just clicked on the Start Menu icon in the menu bar and then searched for MMC, and it showed up.
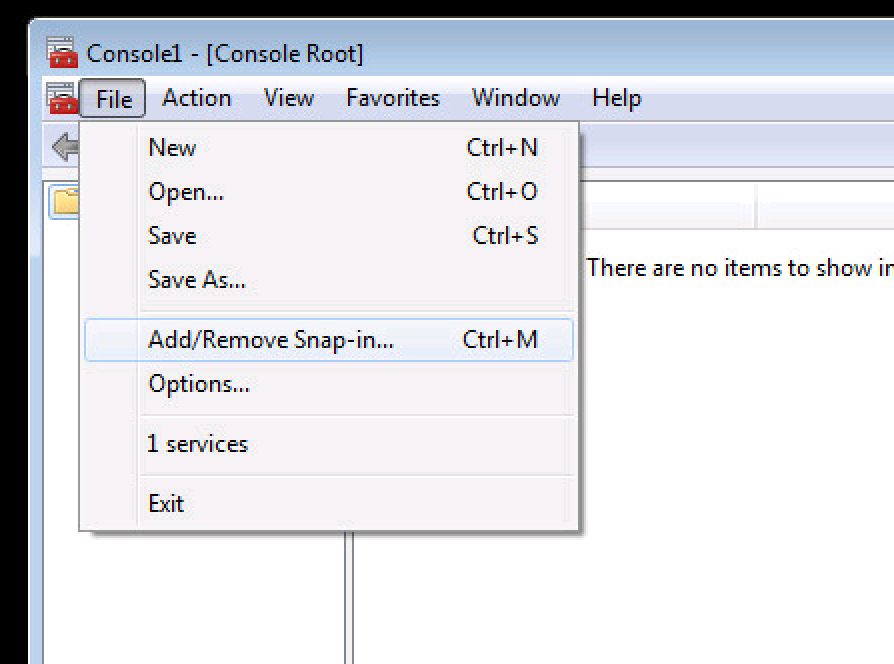
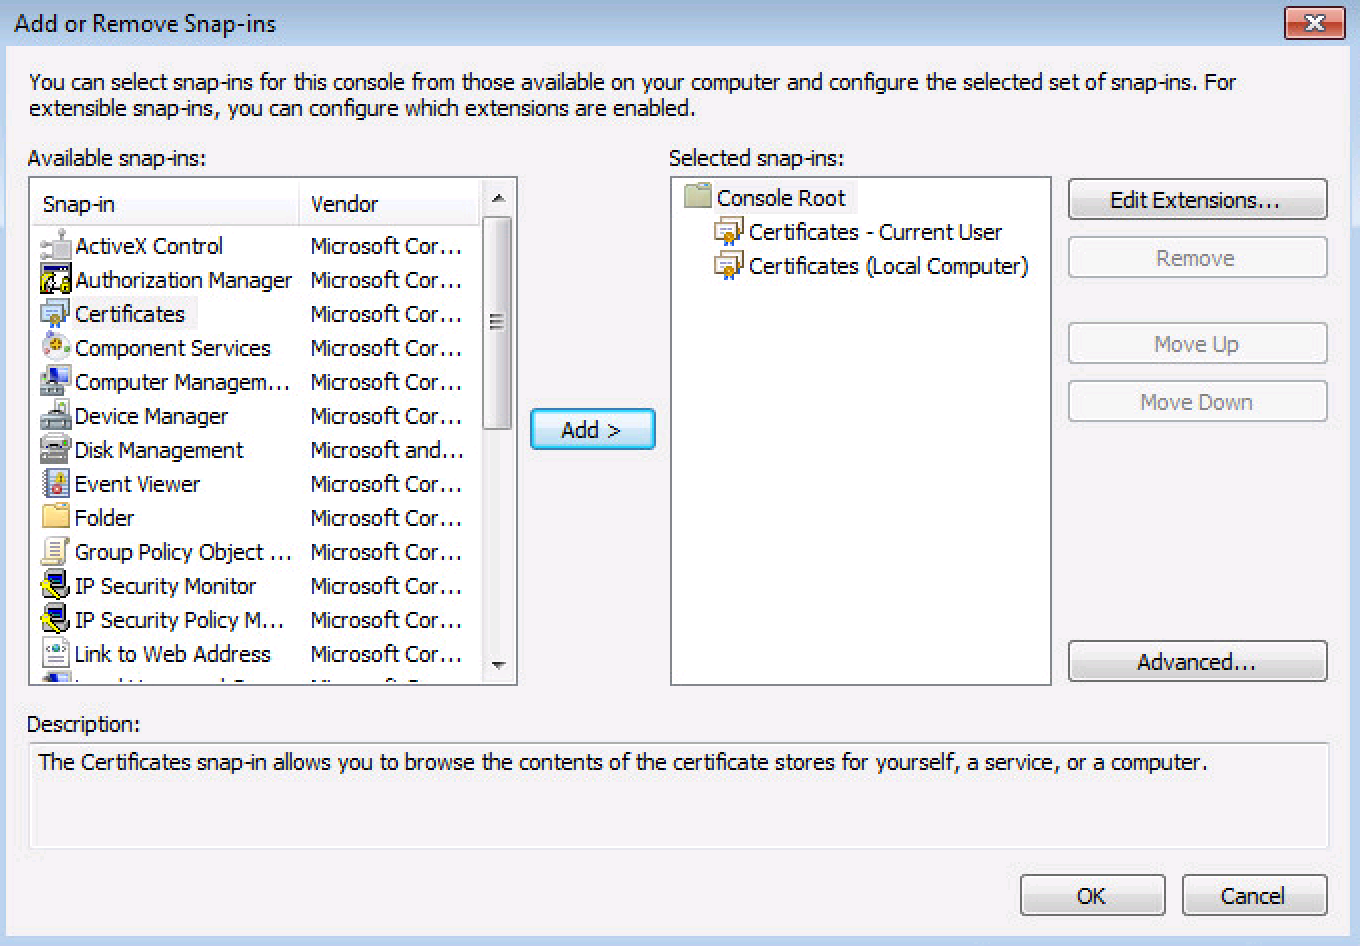
Inside the MMC Console, click File -> Add/Remove Snap-in…
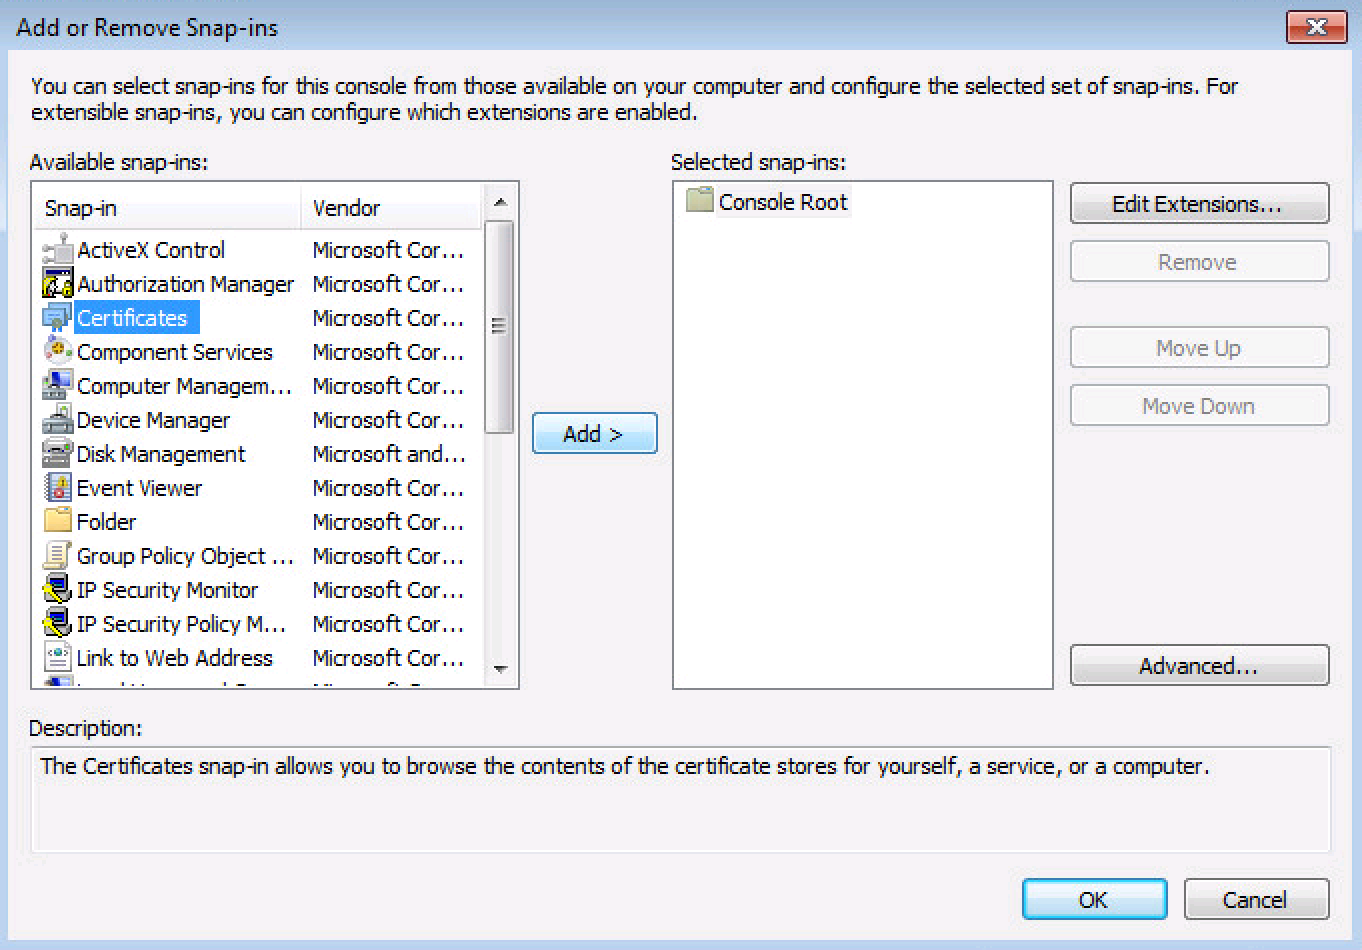
Now, let’s select the Certificate Snap-in and click OK.
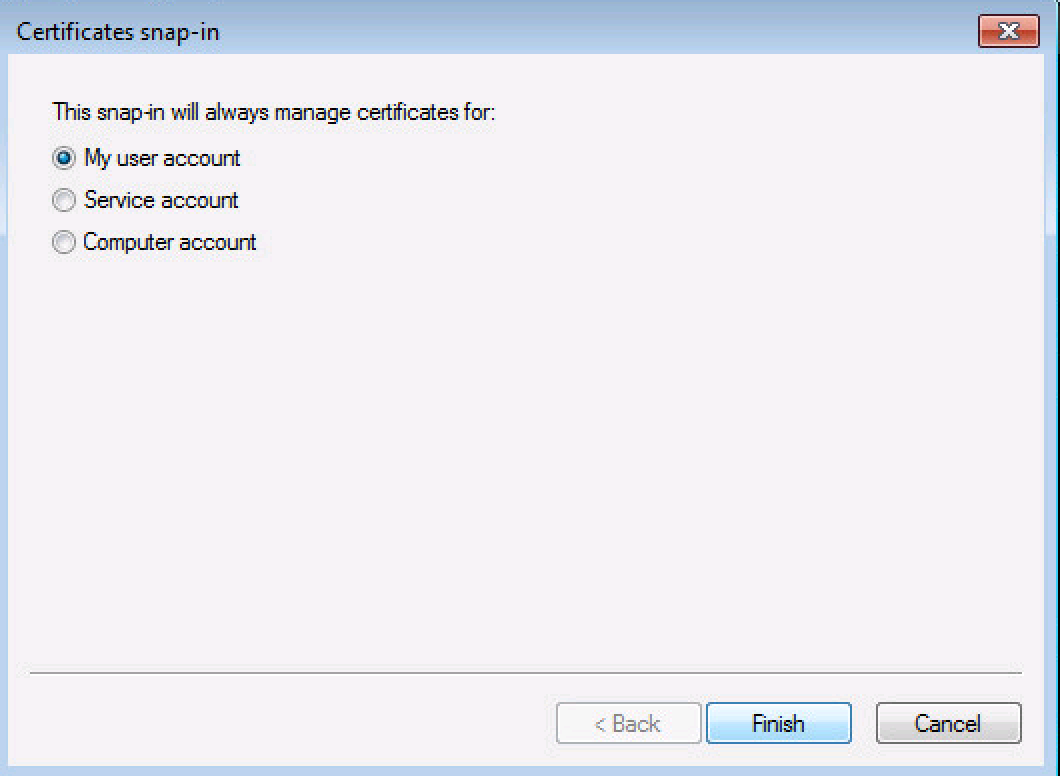
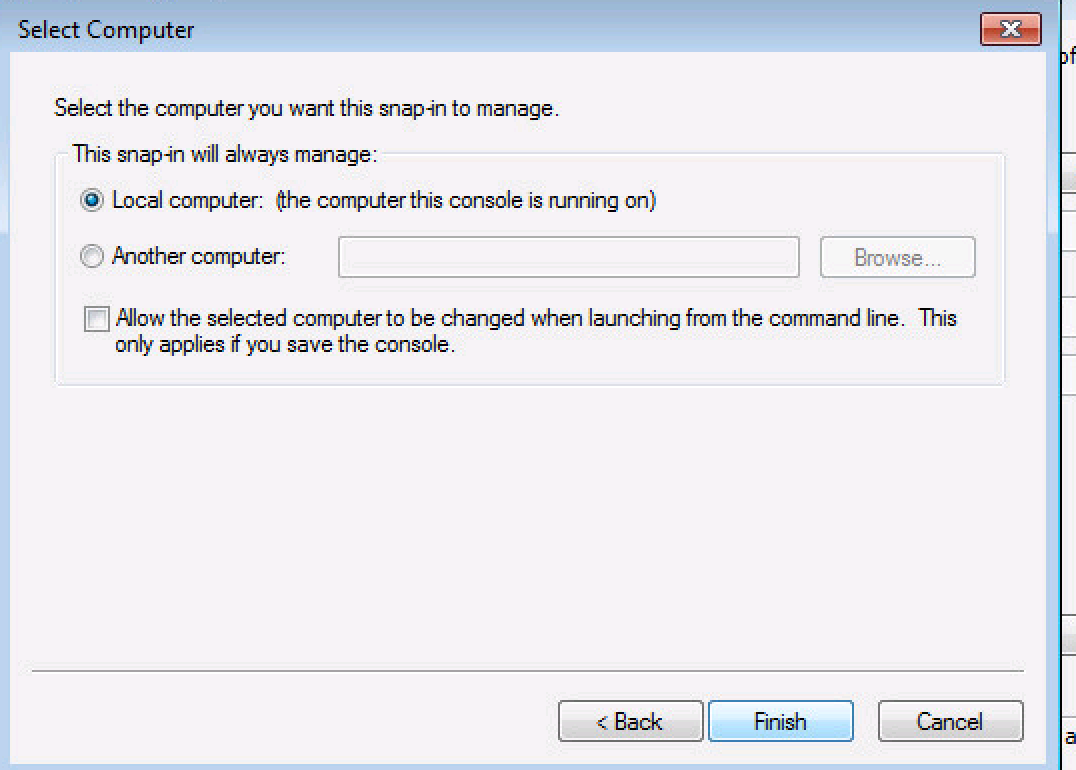
When asked which Certificate Store you want to manage, select My user Account, then click Finish.
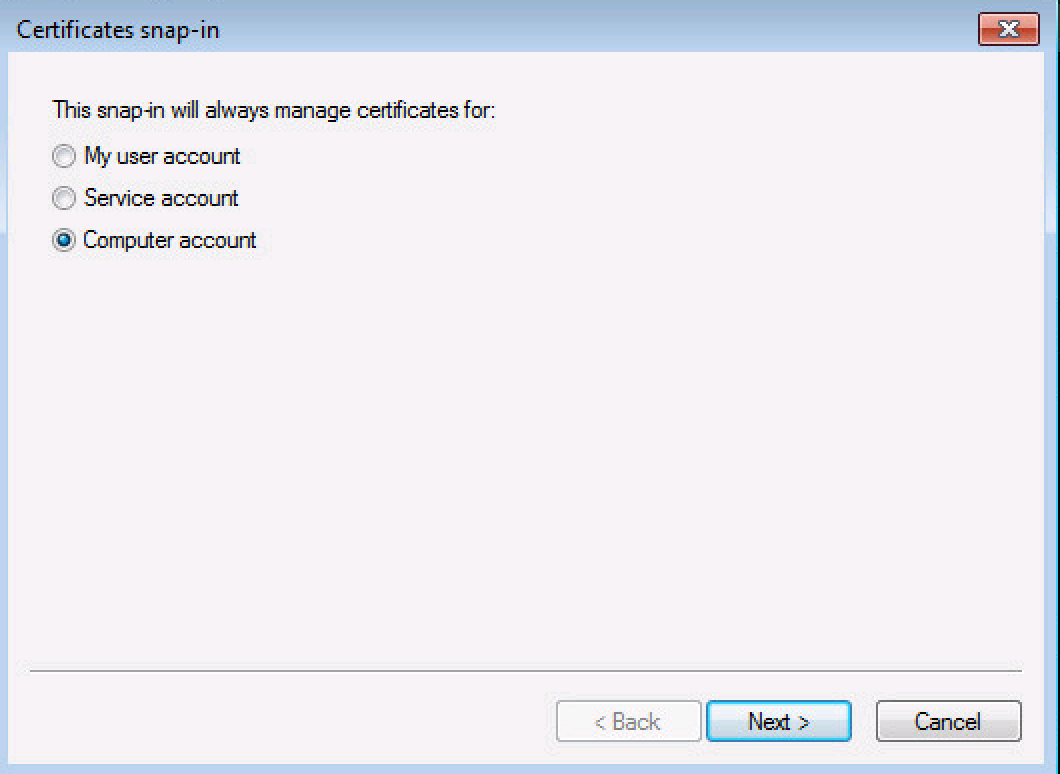
Repeat this process by adding a Certificate Store, but this time select Computer Account and then select Local computer
Your MMC Console should look like the below screenshot. You should have two Certificate Snap-in’s configured, one for your User Account and one for the Computer Account. One satisfied, Click OK.
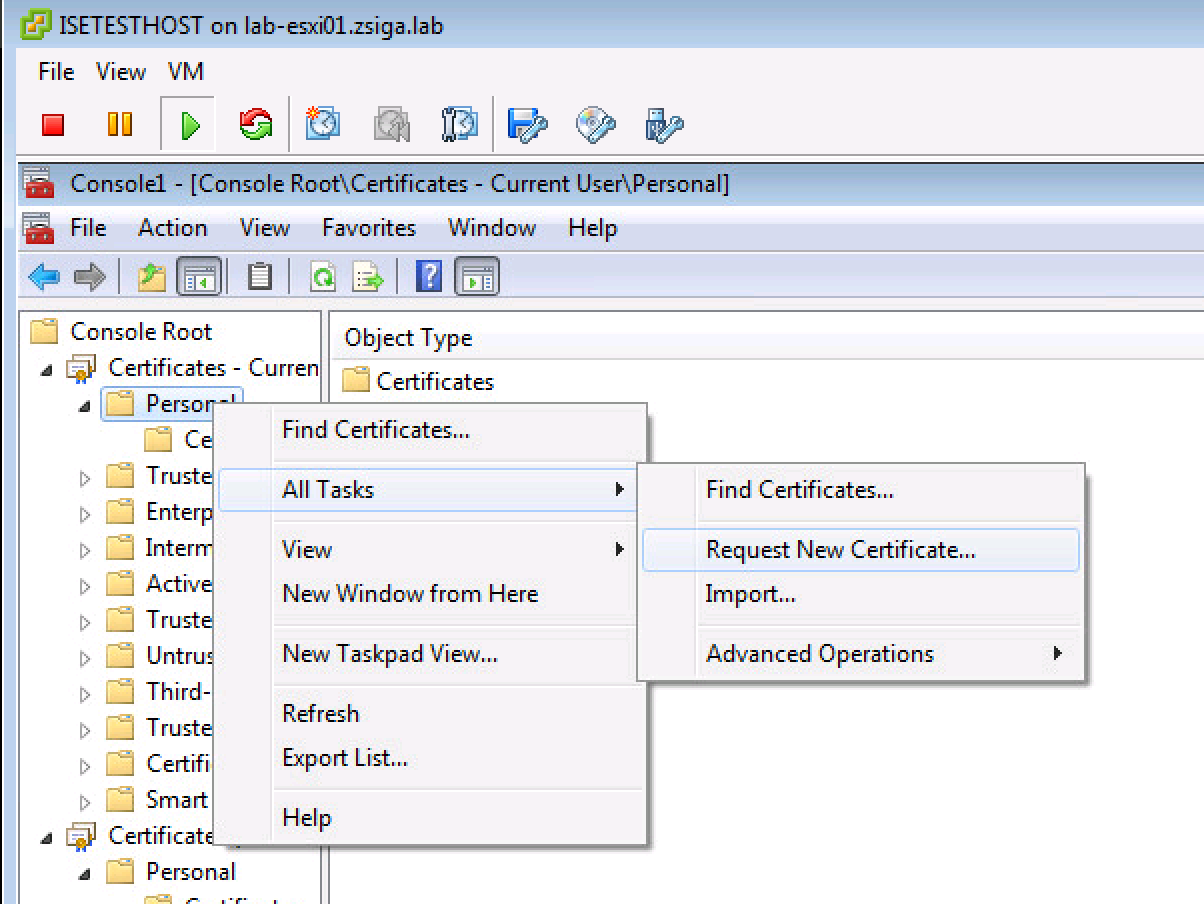
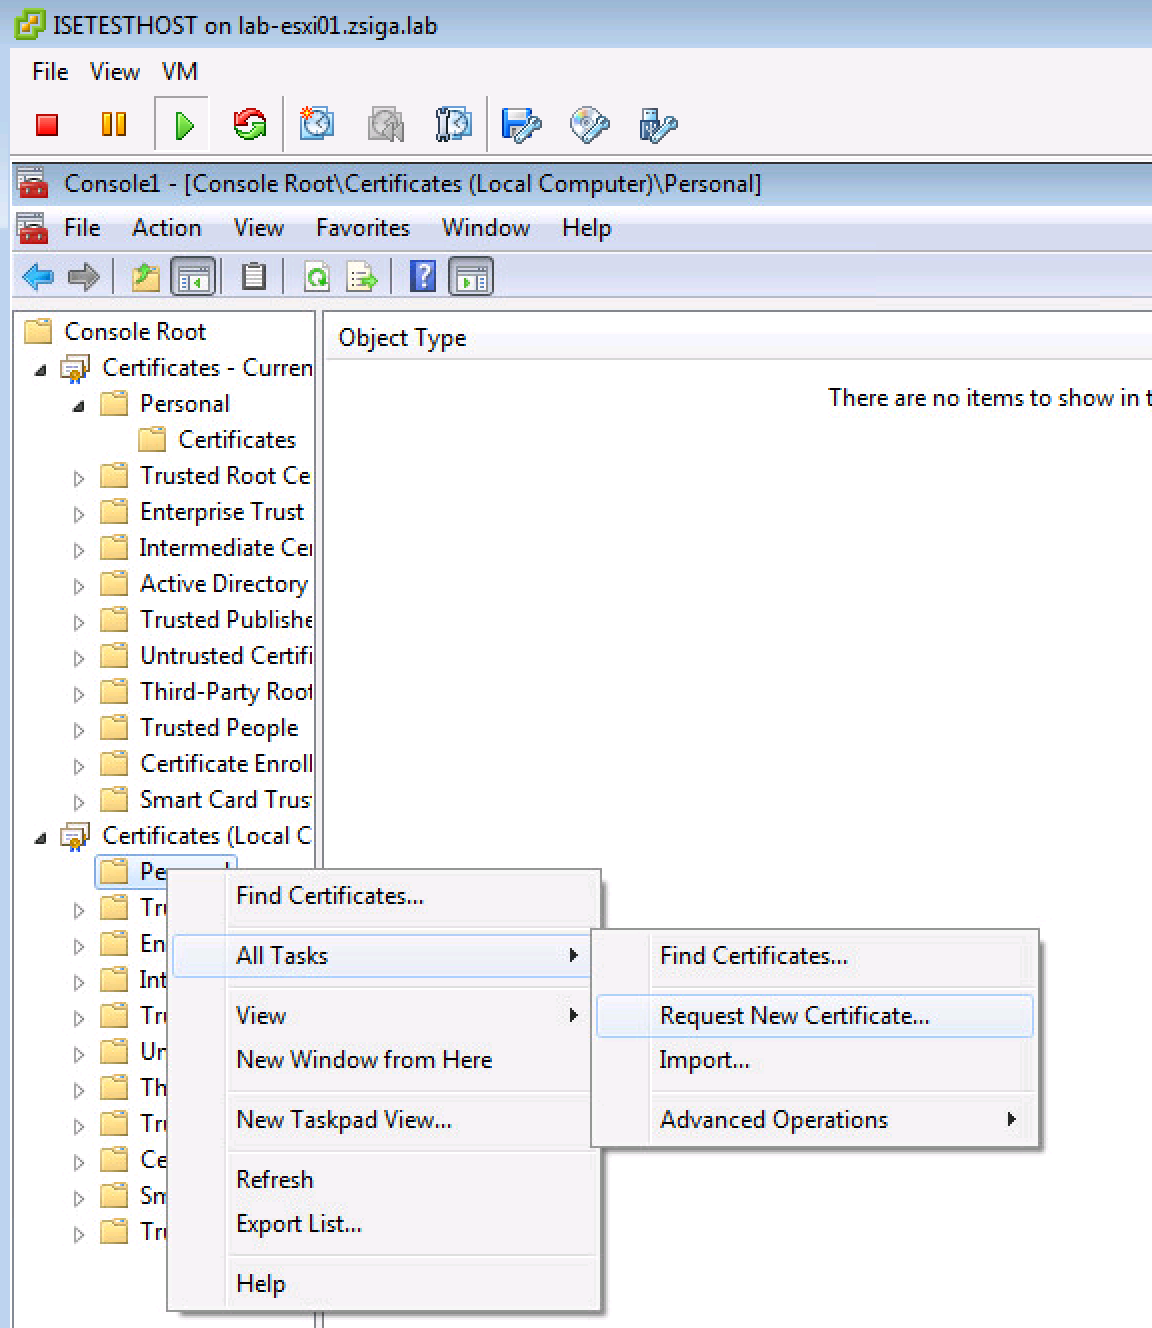
When we dig down into the Certificate Store, we can easily check to see if we have any Identity Certificates by looking in the Personal Folder. It looks like our User account didn’t have an Identity Certificate, so let’s go ahead and add one now. If we right-click on the Personal folder, under All Tasks, click the Request new Certificate… option.
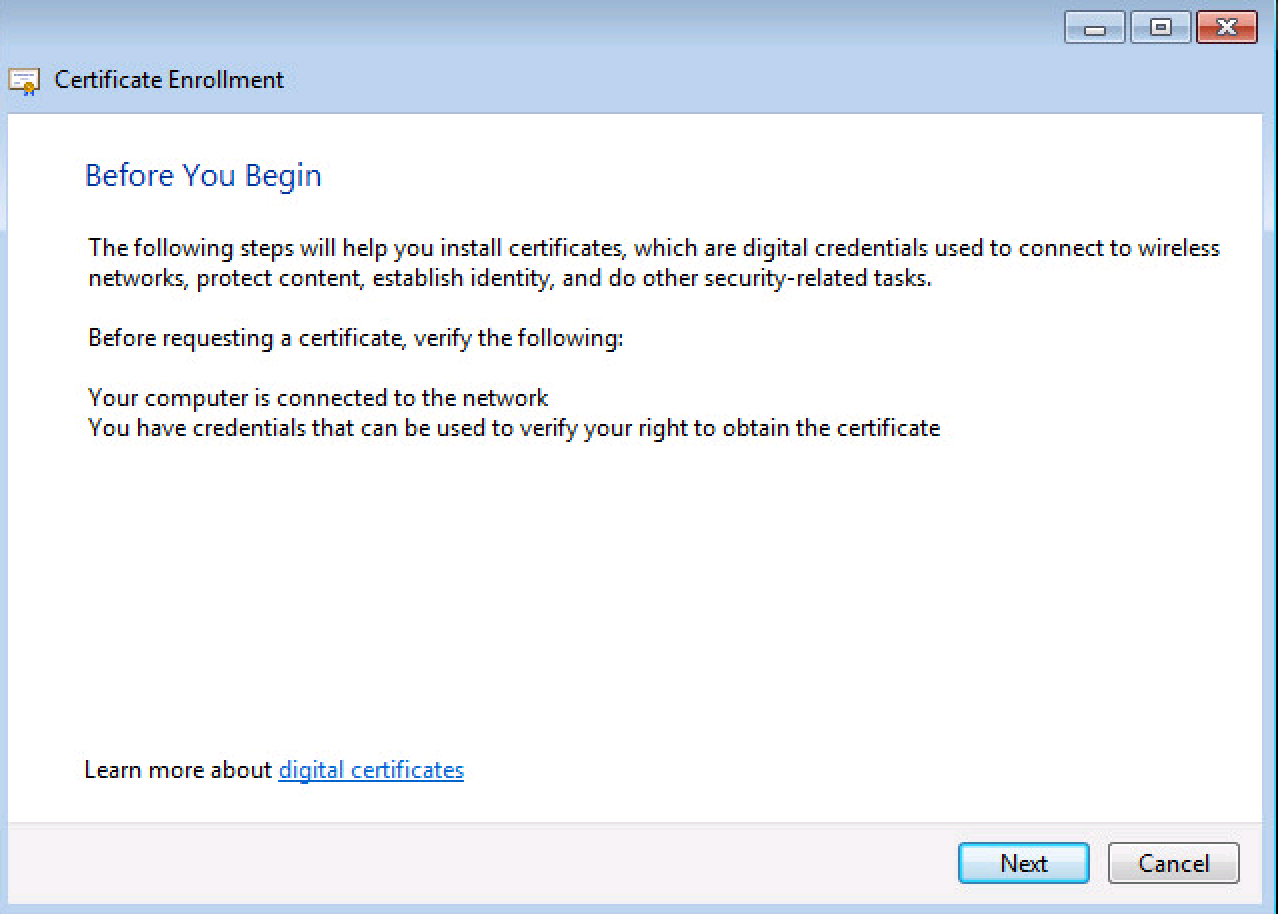
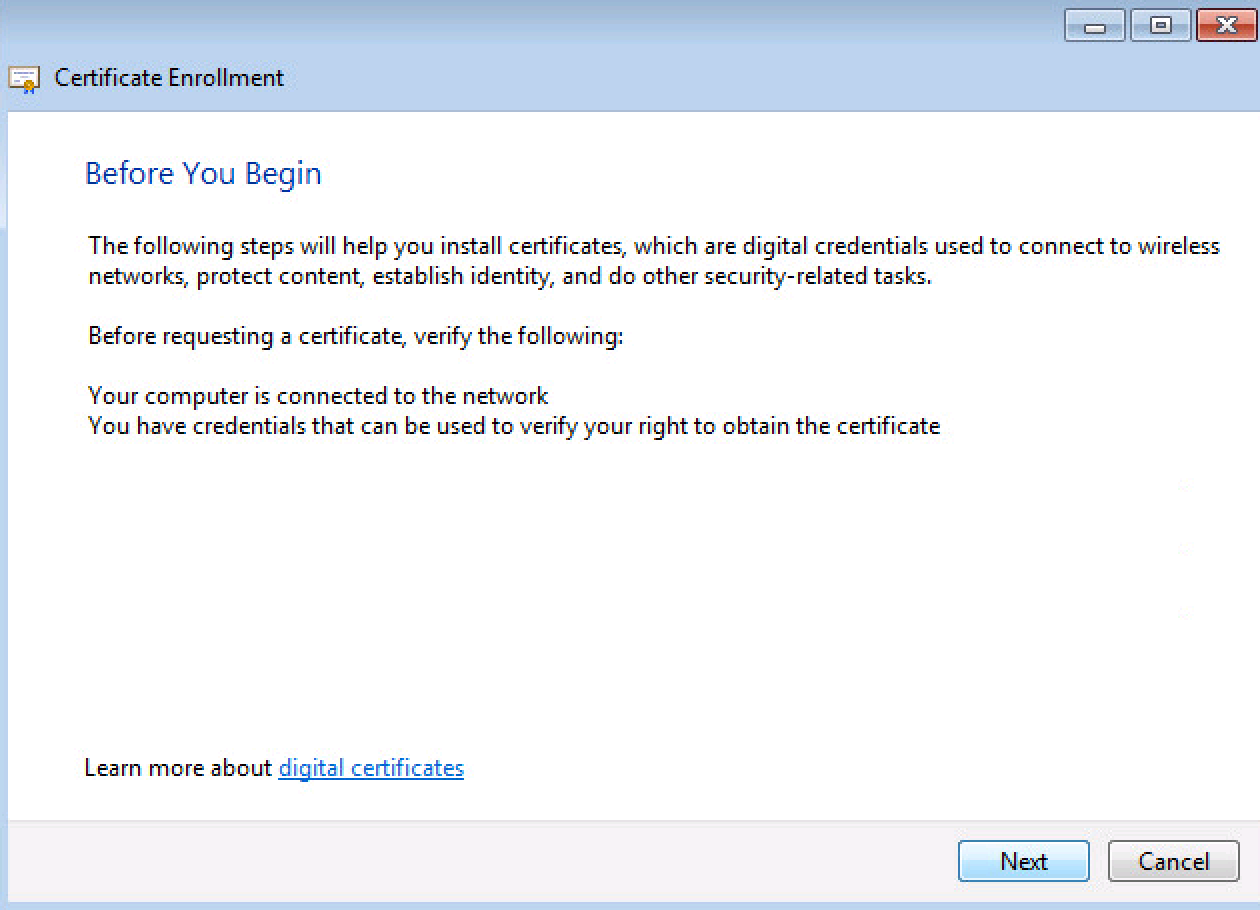
The Certificate Enrollment Wizard will open, click Next on the first Window.
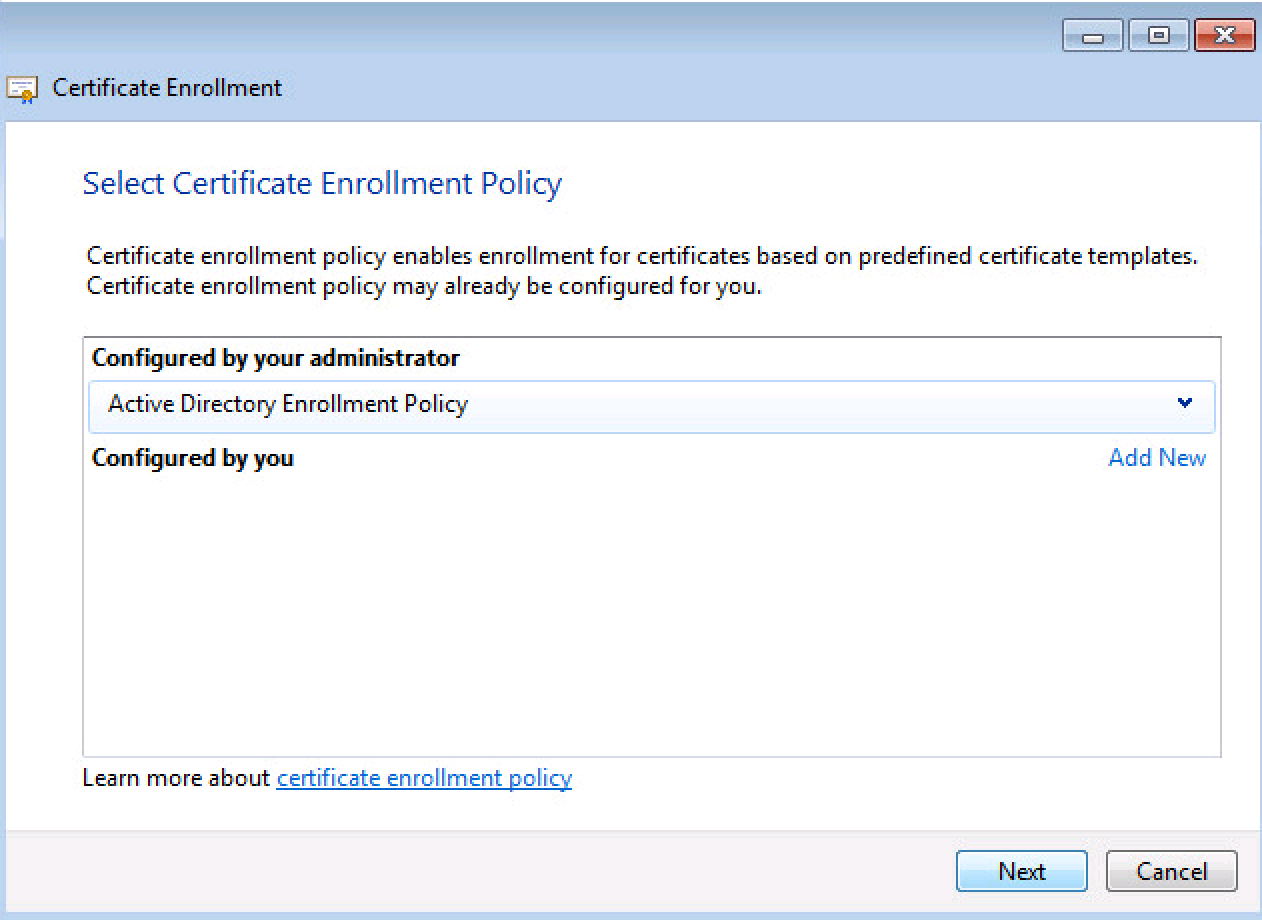
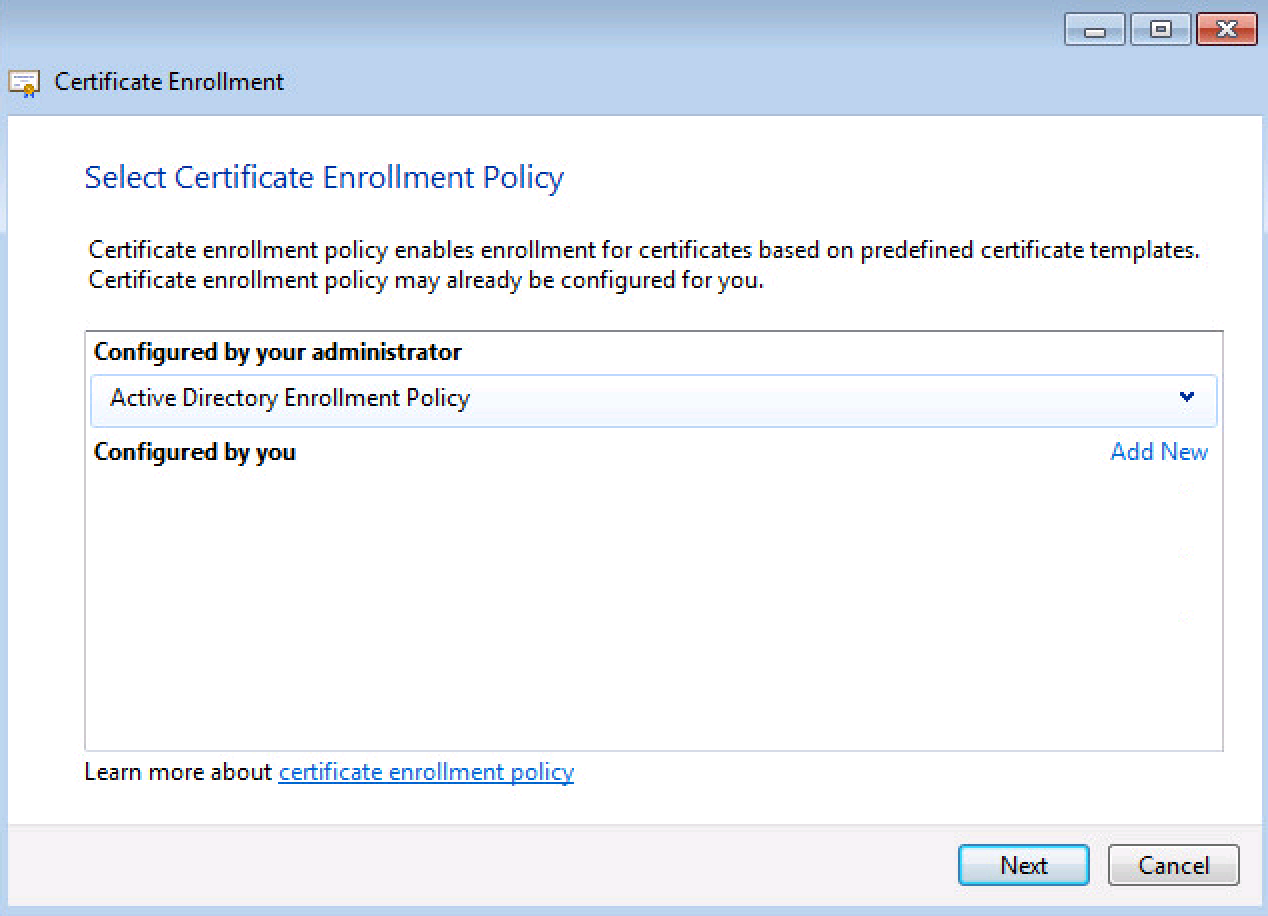
On the Select Certificate Enrollment Policy window, we want to select the Active Directory Enrollment Policy and click Next.
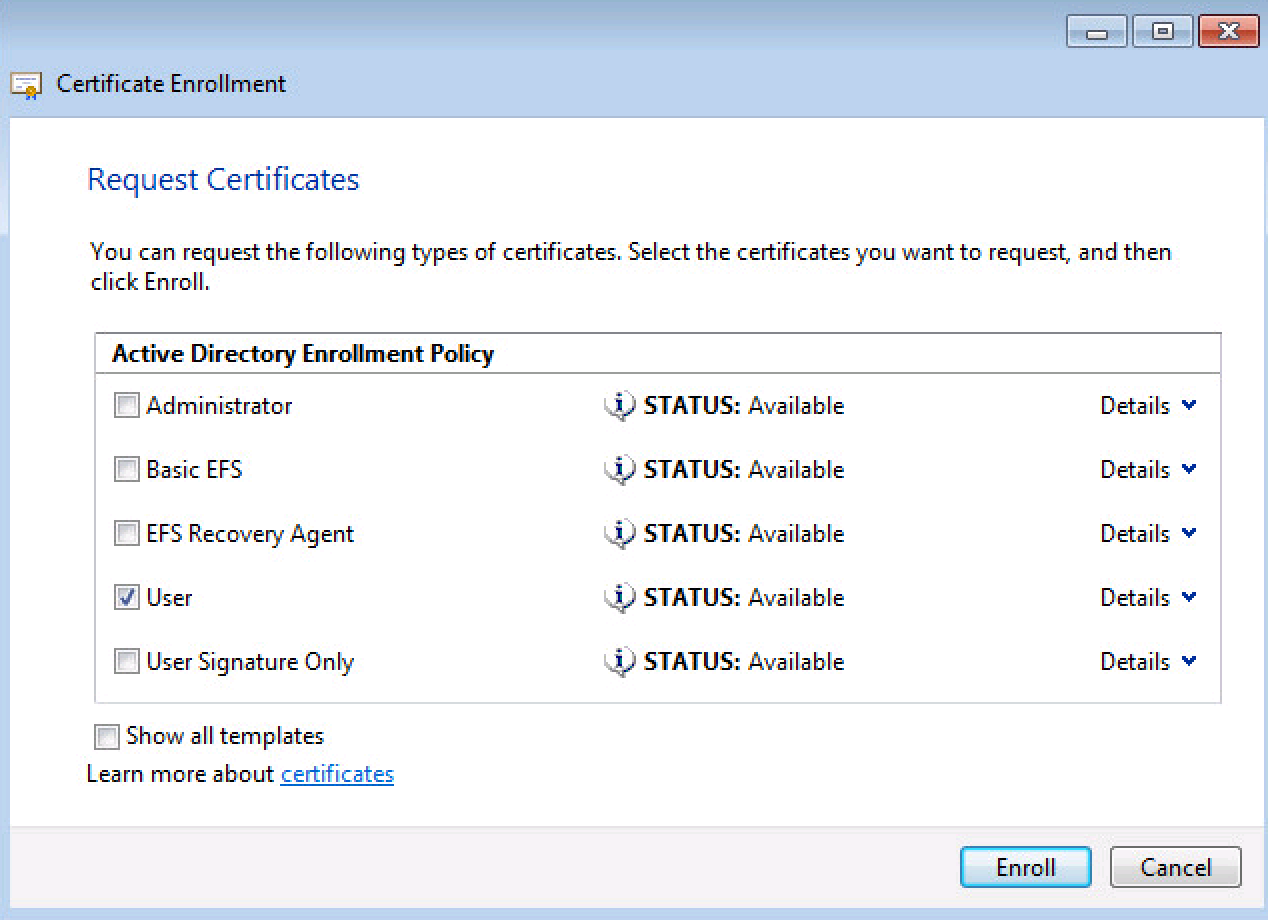
Most likely there will be a number of Auto Enrollment policies. In our case, we want to select the User policy and click Enroll.
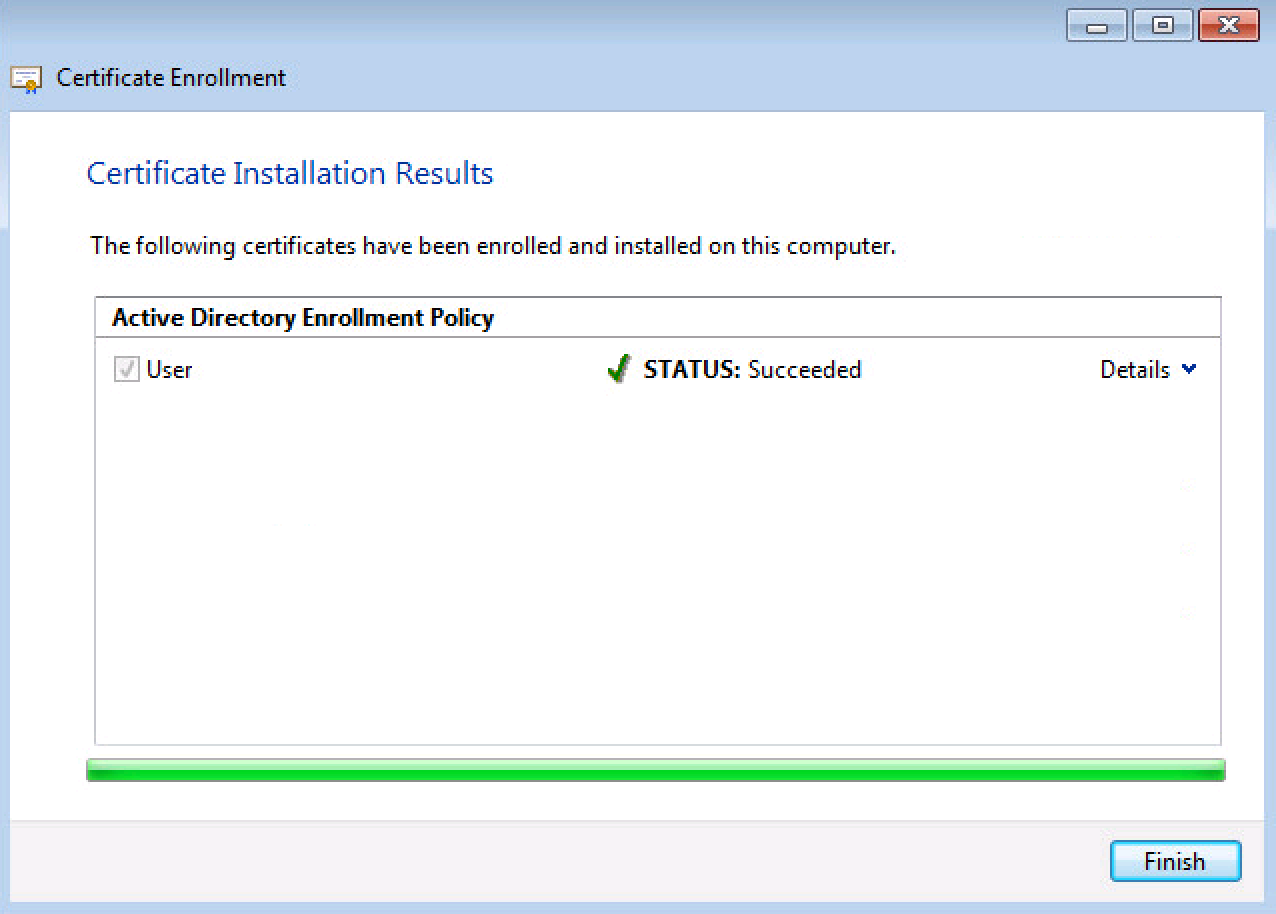
The Enrollment should return successful and you can click Finish. If it’s not successful, this is usually a Permission issue between the User account and the Certificate Authority Auto Enrollment Policy.
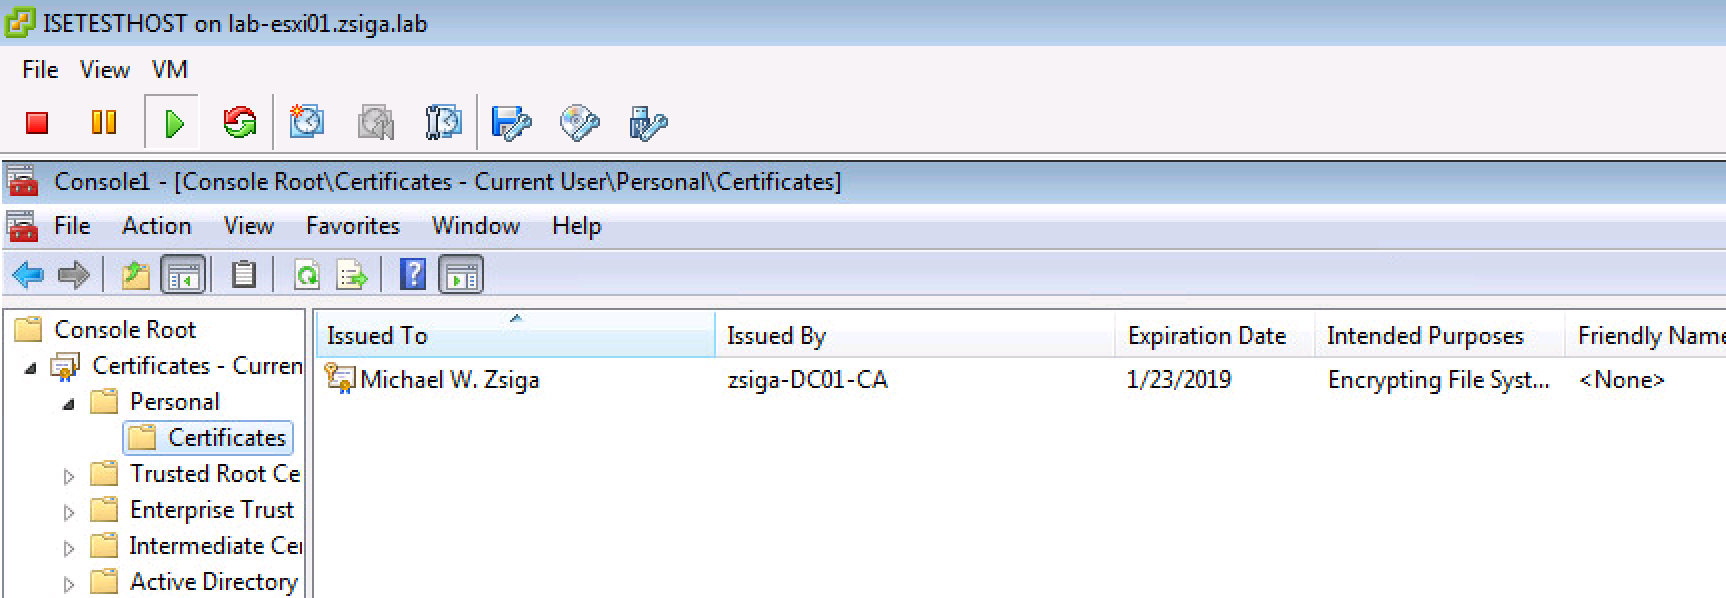
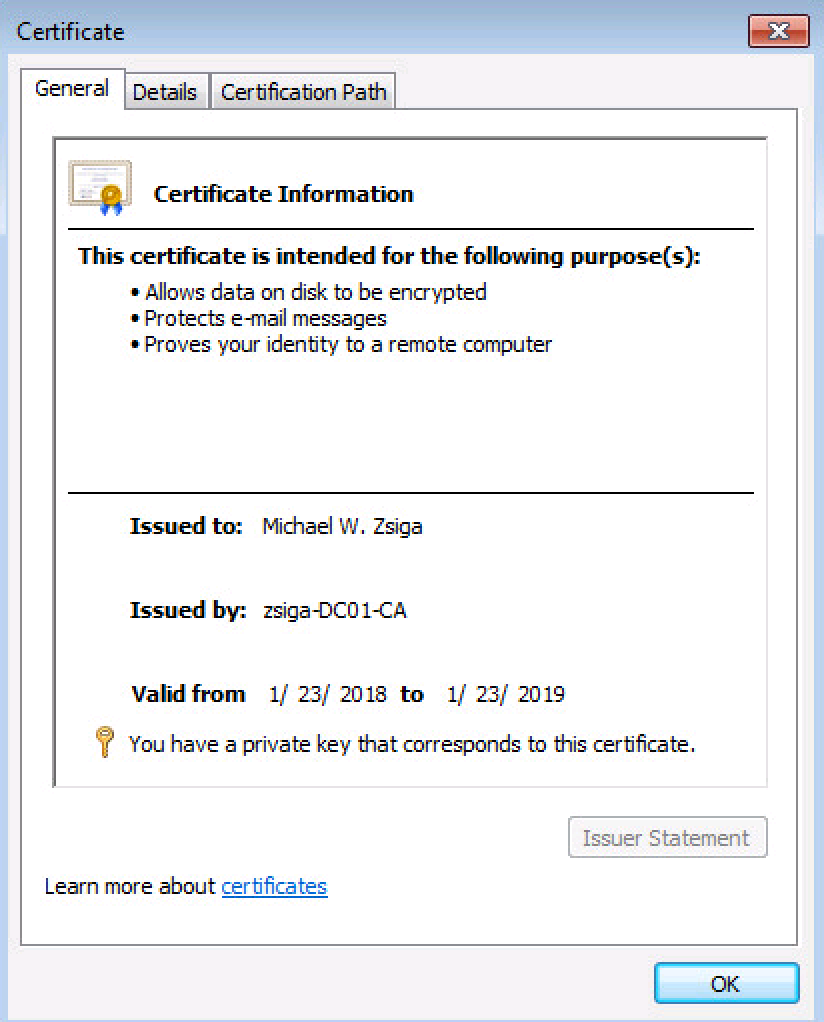
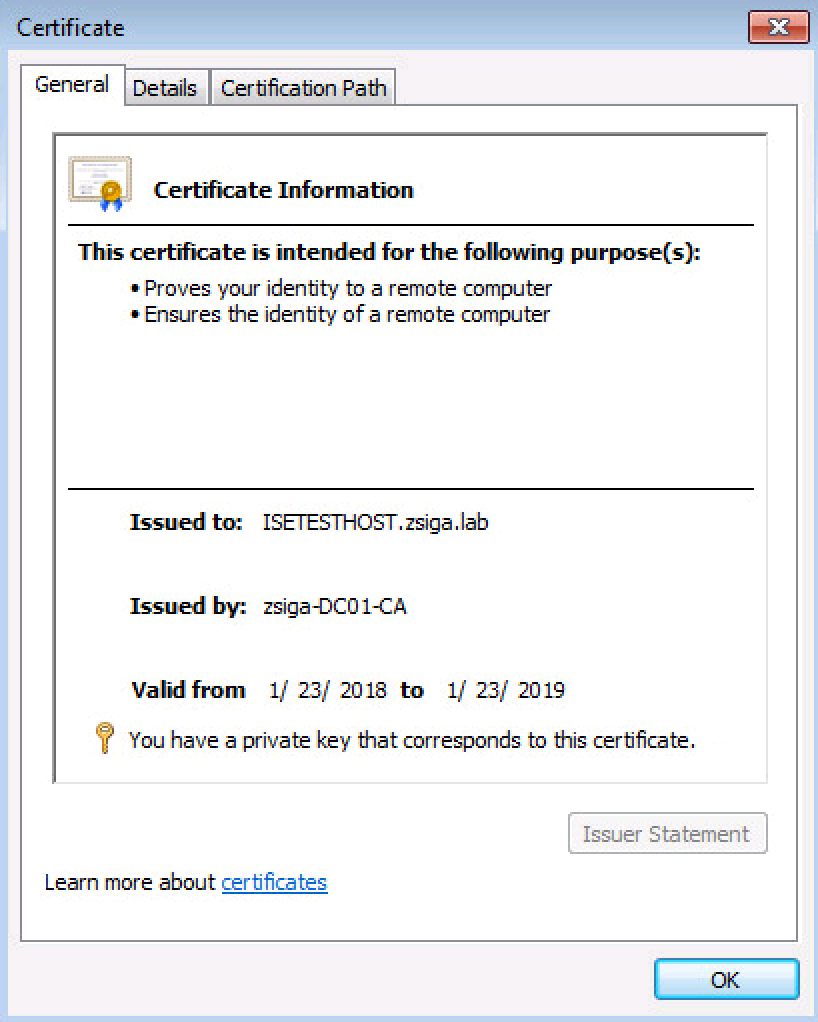
Now if we look under the Personal -> Certificates Folder, we will see an Identity Certificate for our User account. We can even open it up to see all of the different attributes it has.
Now we are going to repeat this same process but this time in the Computer Certificate Store. Right-click on the Personal Folder, select All Tasks -> Request new Certificate…
This will seem similar to the User Auto Enrollment Wizard, just click Next to continue.
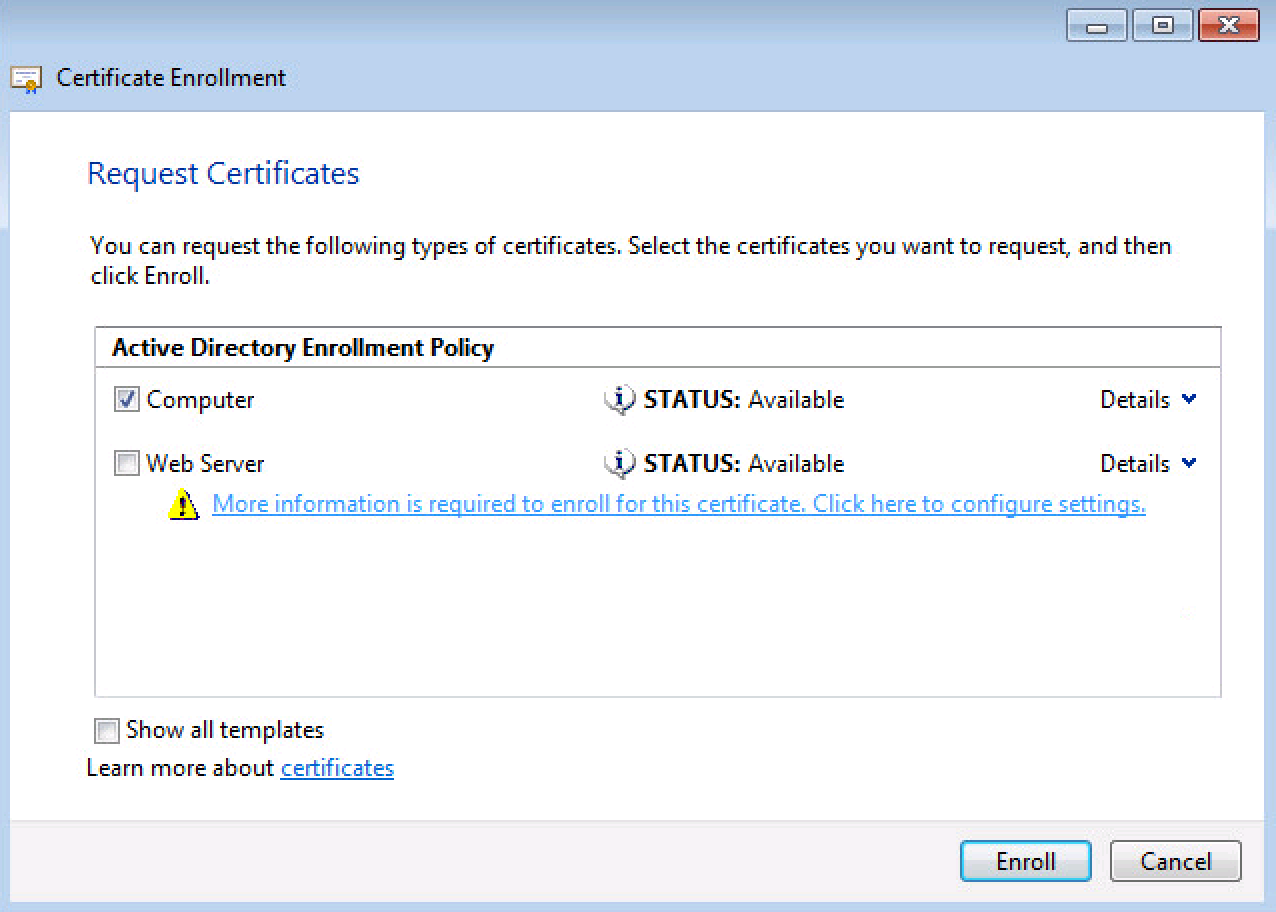
When given the choice to select an Enrollment policy, select the Active Directory Enrollment Policy, and click Next.
This next screen is a little different because instead of saying a number of User specific certificate options, we are seeing Computer / Server options. Let’s select the Computer policy and click Enroll.
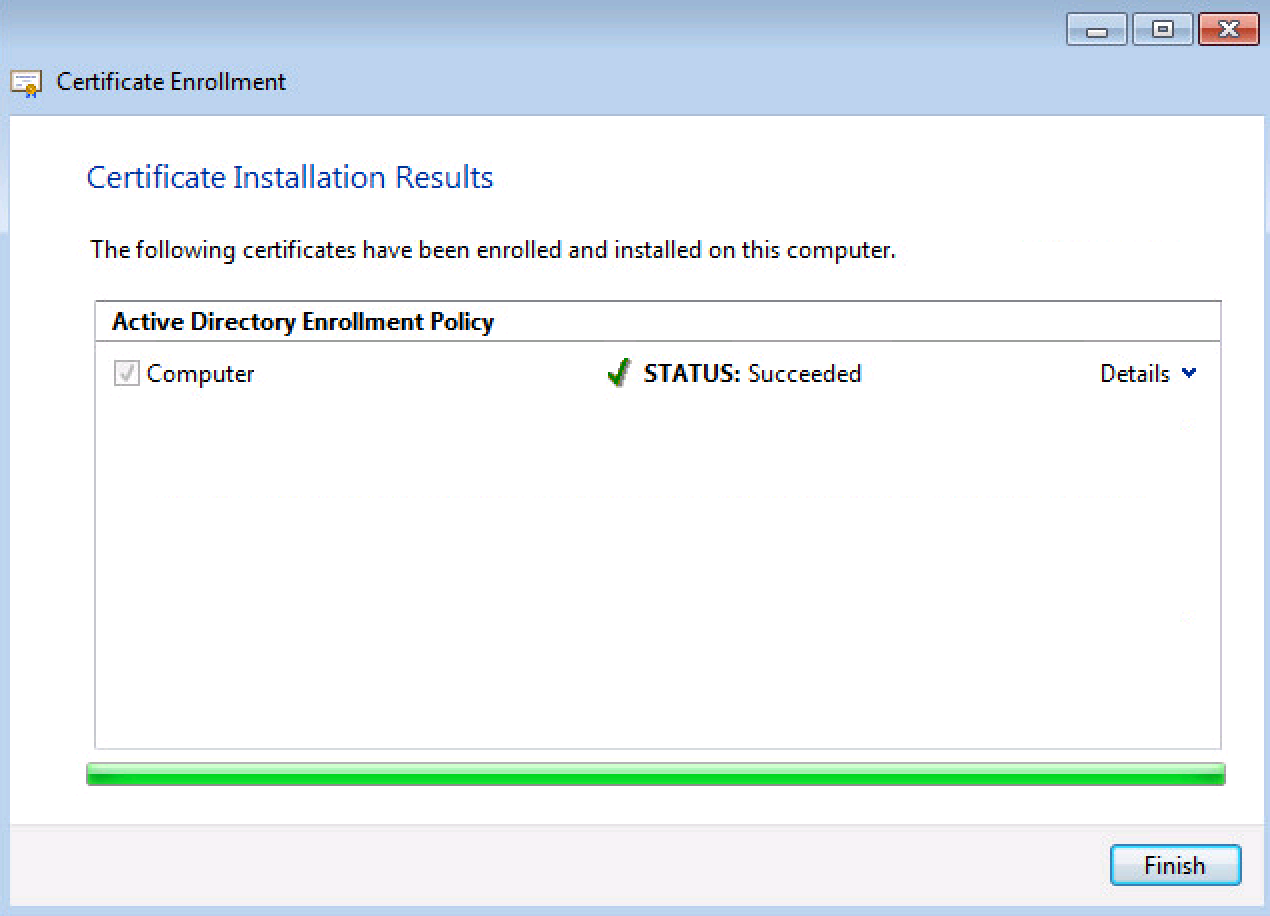
The Enrollment should return successful and you can click Finish. If it’s not successful, this is usually a Permission issue between the Computer account and the Certificate Authority Auto Enrollment Policy.
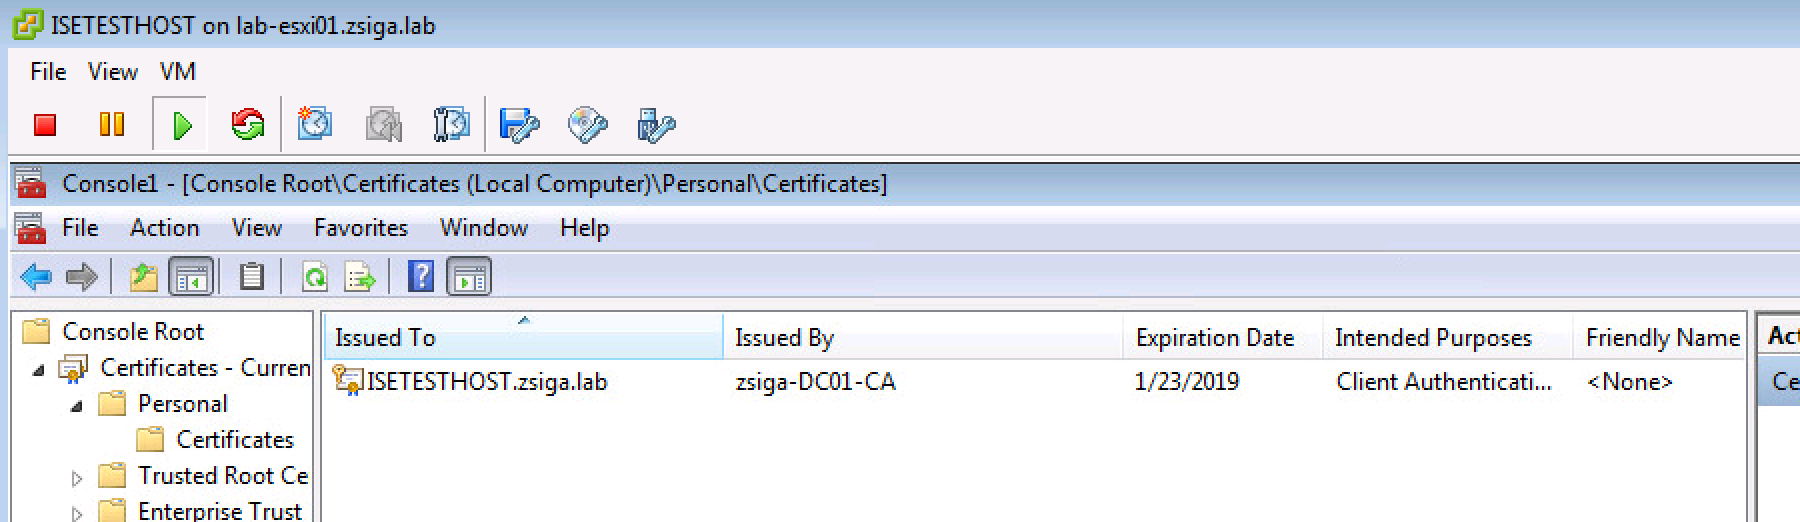
Just like with the User Certificate, if we drill down into the Personal – > Certificate Folder, we will find the newly installed Identity Certificate for our Test VM.
We are sooo close to authenticating with Cisco ISE EAP-TLS, just a couple of more steps!!!! 🙂
6. Enable DOT1X with Cisco ISE EAP-TLS Auth on our Test VM
This is our last configuration section before we start testing our Cisco ISE EAP-TLS Use Cases. All we have to do now is configure our Test VM for EAP-TLS Authentication instead of PEAP-MSCHAPv2 Authentication.
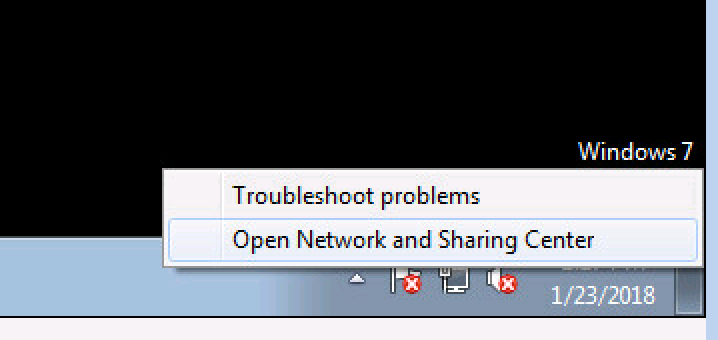
On our Test VM, we will need to change our NIC settings related to 802.1X. I prefer right-clicking on my NIC icon in the lower right of the menu bar and selecting the Open Network and Sharing Center option.
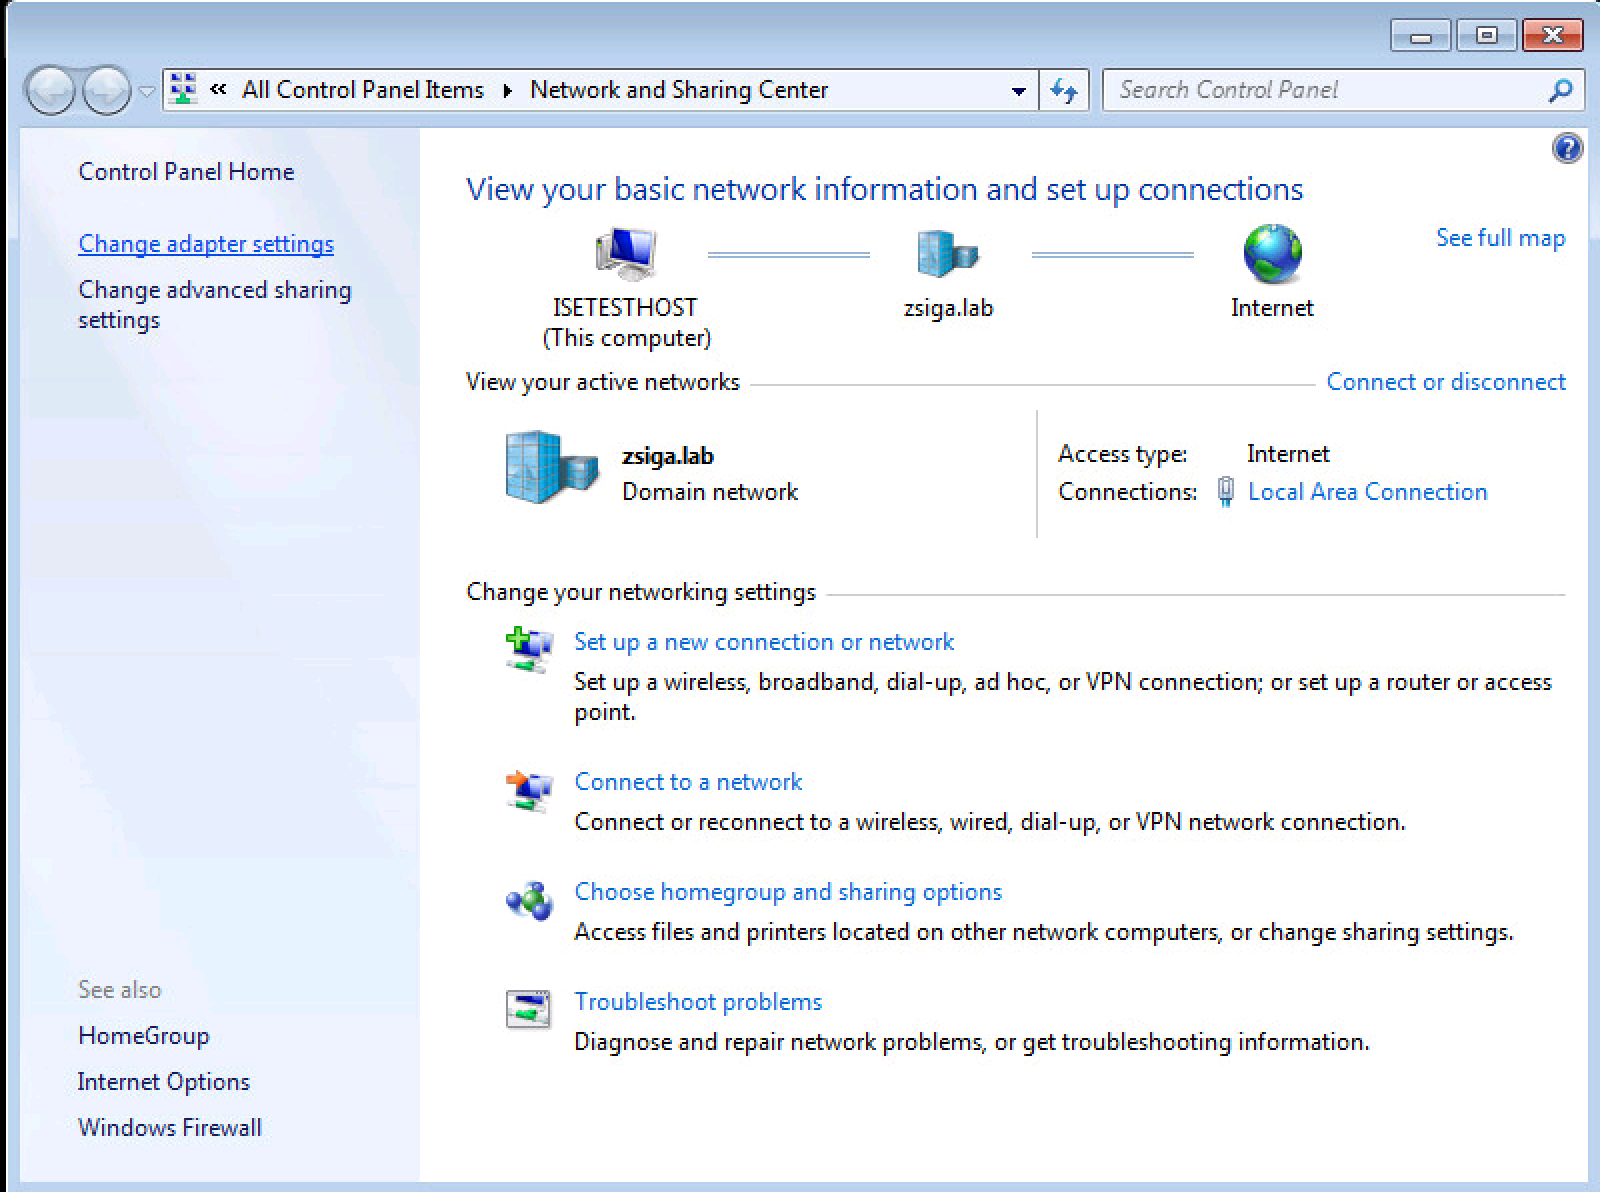
Once in the Network and Sharing Center, select Change adapter settings on the left pane.
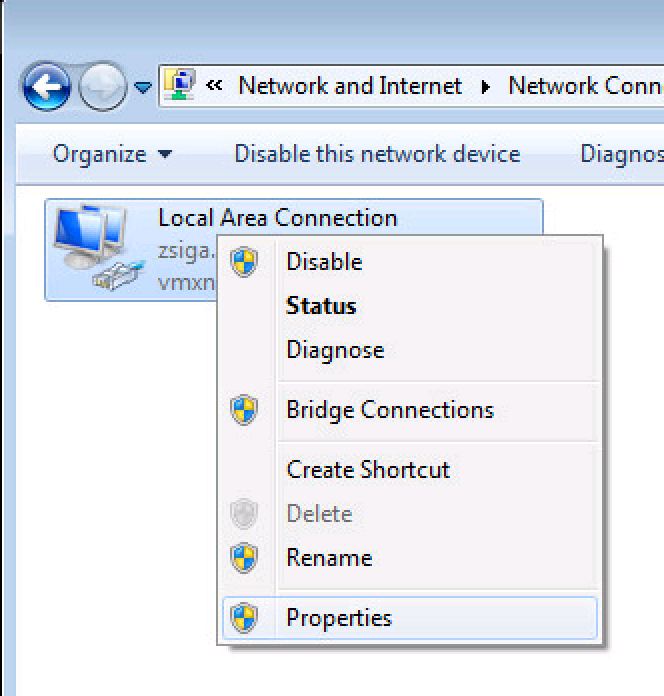
Find your NIC in question, right-click, and select Properties.
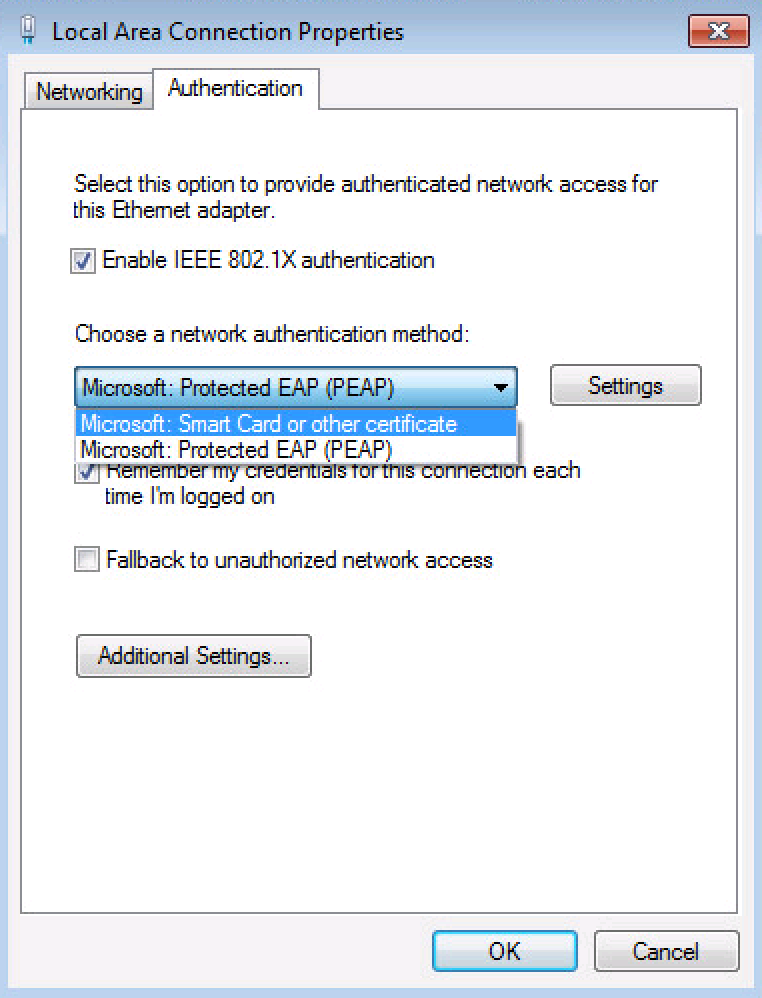
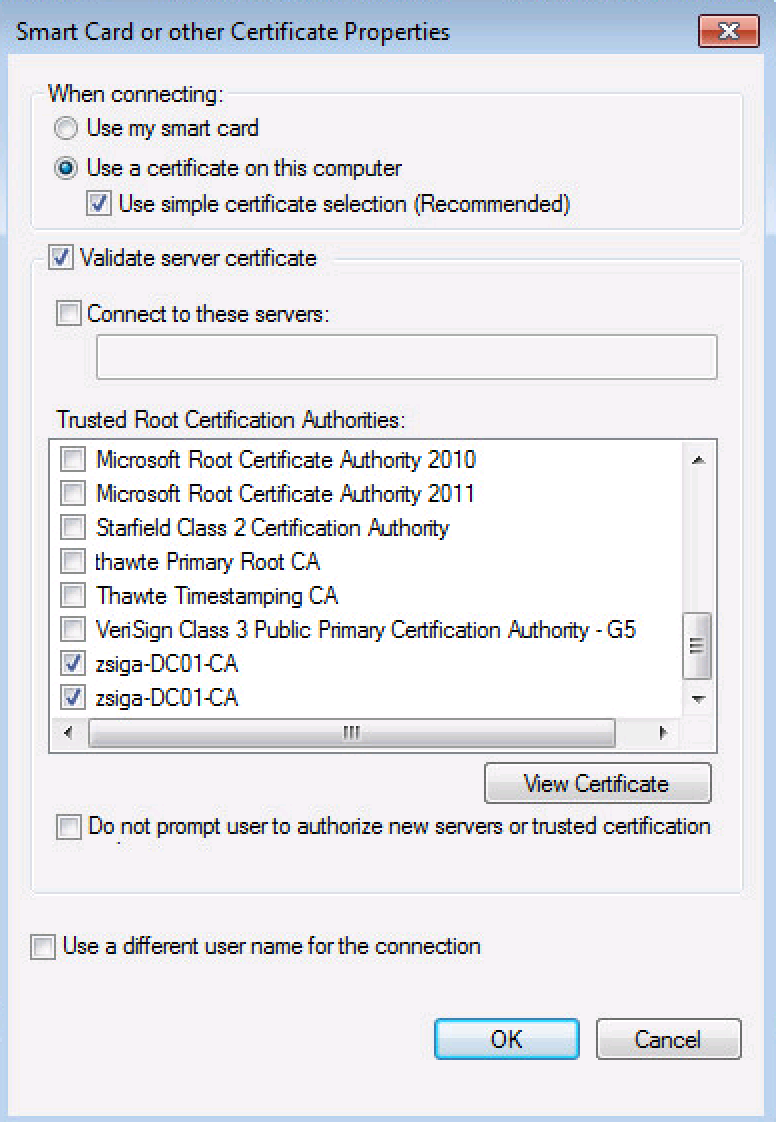
Select the Authentication Tab at the top of this window, then we will want to change the network authentication method in the dropdown from PEAP to Smart Card or other Certificate. With this selected, click the Settings button to the right.
Where it says Trusted Root Certification Authorities, make sure your Root CAs are selected. Then click OK twice to close out of these windows.
Finally, let’s reboot our Test VM and then we can start our Validation and Testing phase!!!!!

7. Validation & Testing of our Cisco ISE EAP-TLS Use Cases Configured
YAYAYAYAY We can test our Cisco ISE EAP-TLS Use Cases. In the previous step, we rebooted our Test VM, so we should be able to log into our Lab switch and run the Show Auth Sessions command to see where everything stands. Let’s do it!
Remember, SSH/Telnet using your preferred client to your Lab switch, in my case I am using Putty, and my Lab switch’s management IP address is 172.16.0.2.
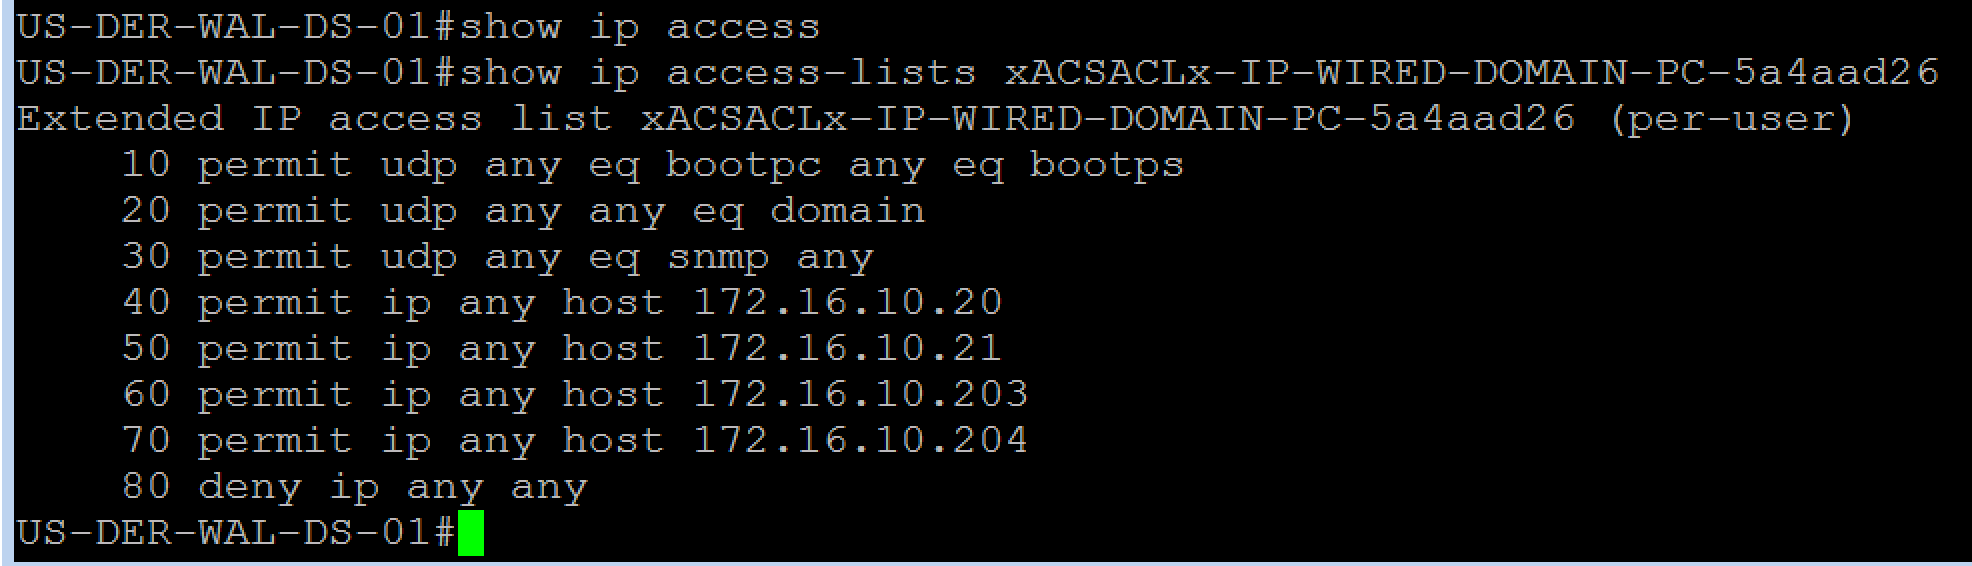
Once logged into our Lab Switch, we are going to use our show auth session command to see what has happened. The below screenshot shows that our Domain PC was successfully Authenticated via 802.1X and a dACL was downloaded and applied to the session. If we look at the dACL real quick we can see it is the correct dACL for this Use Case.

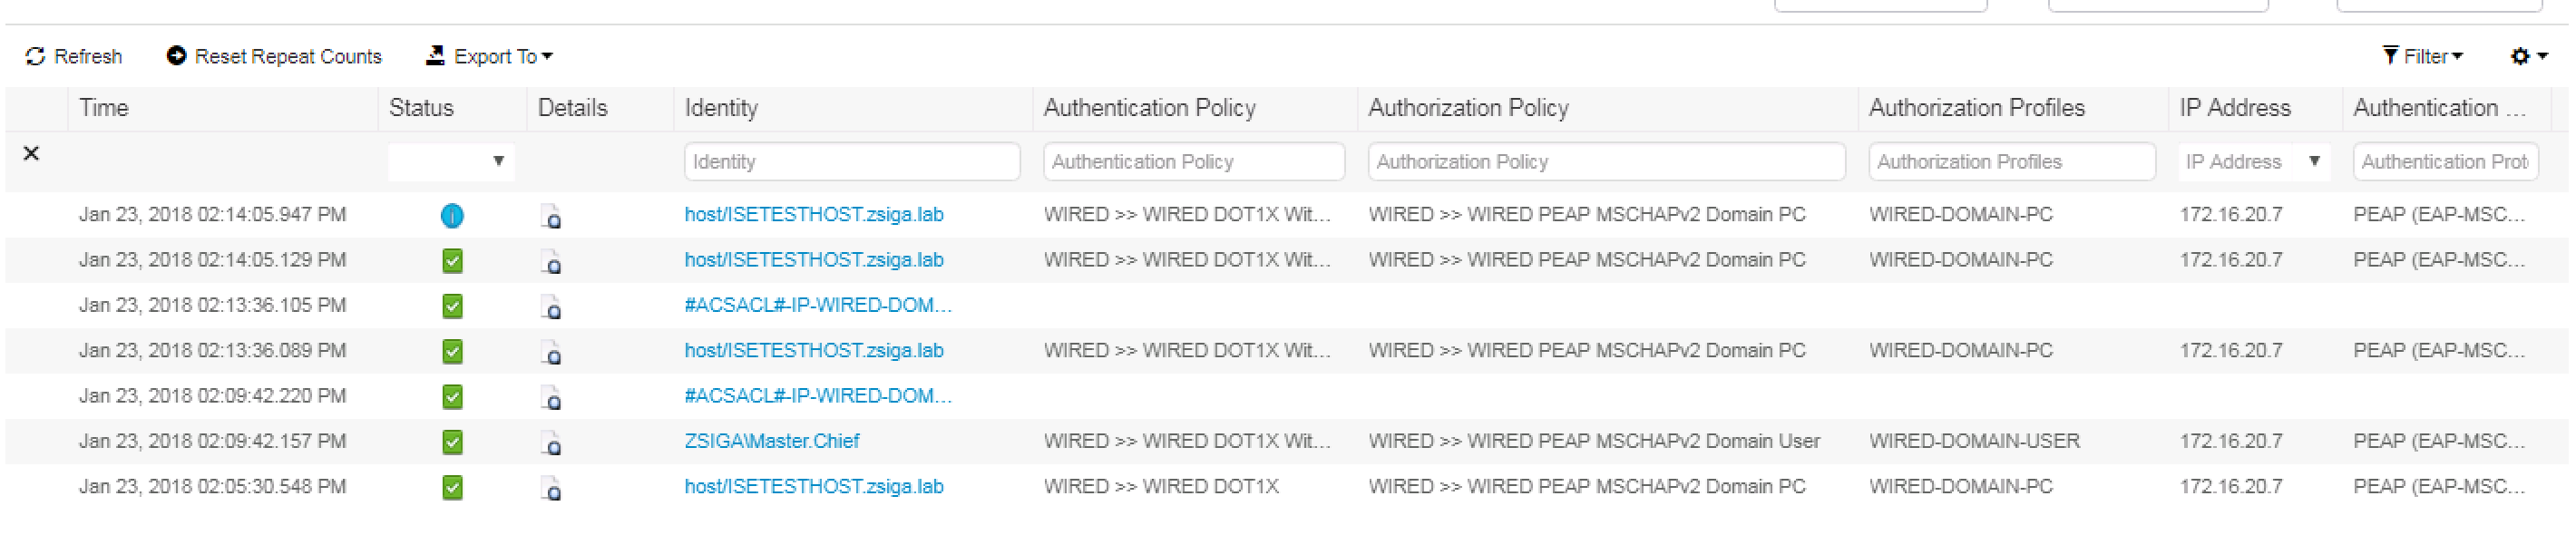
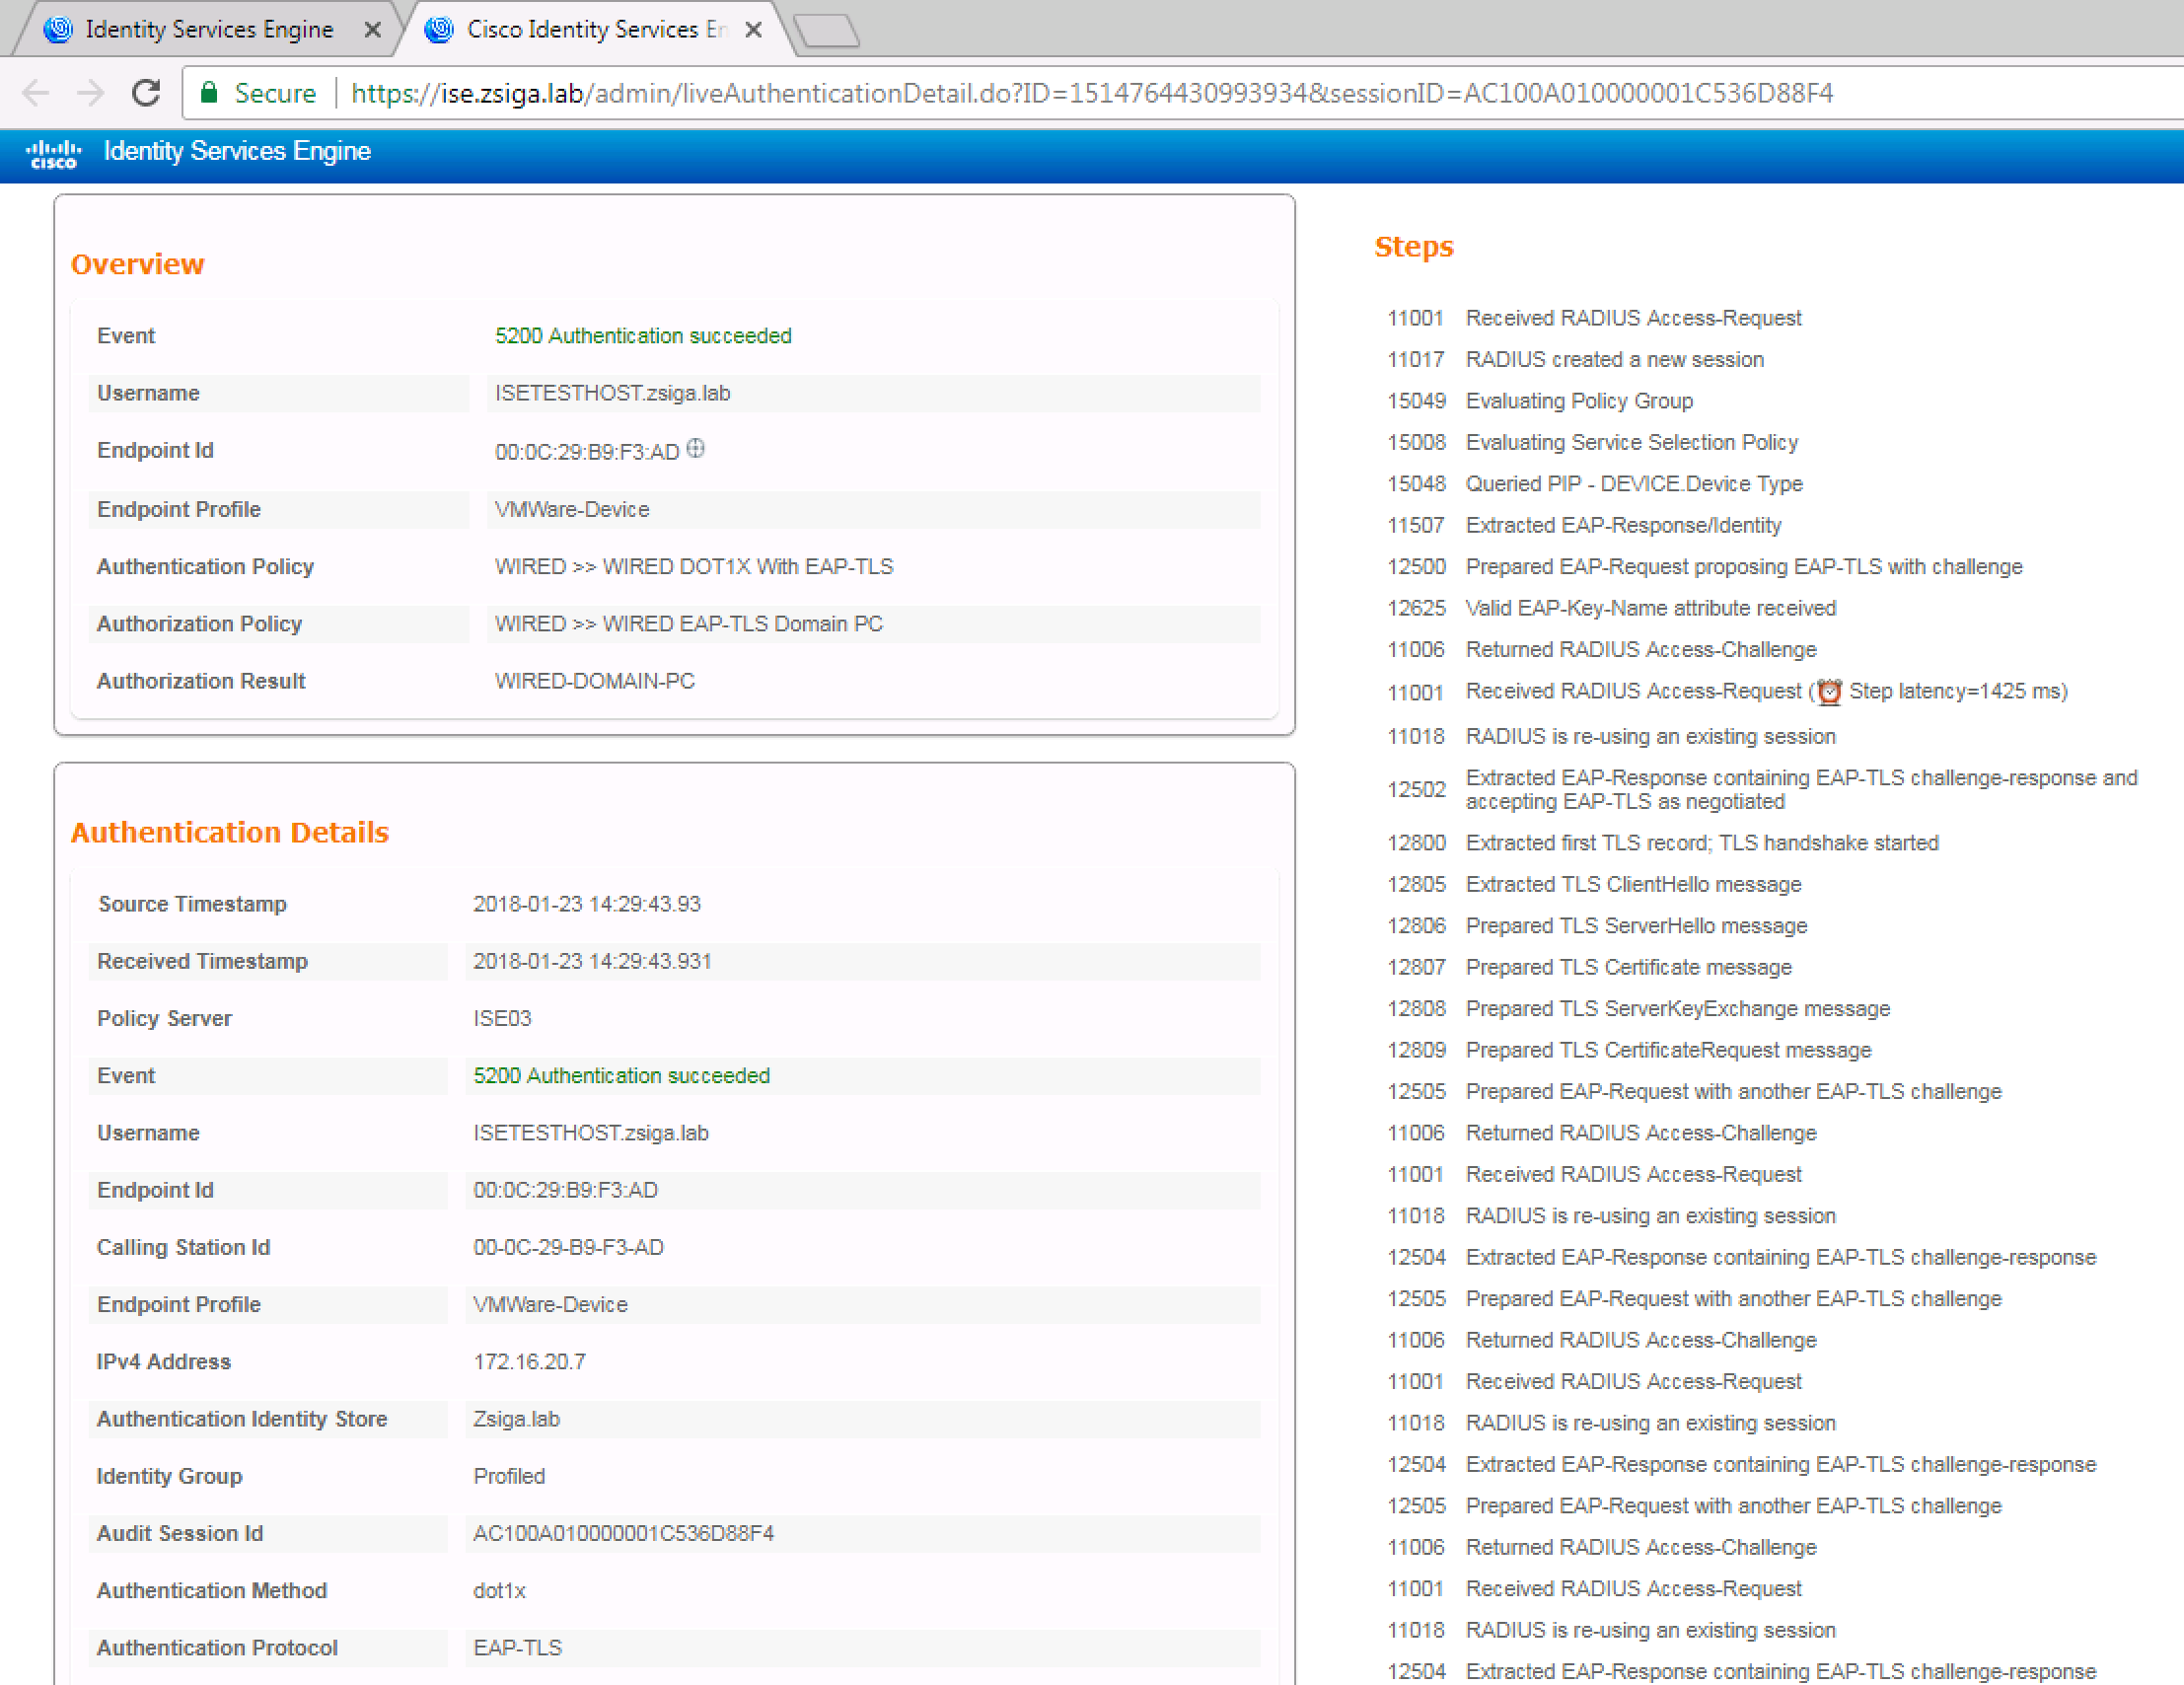
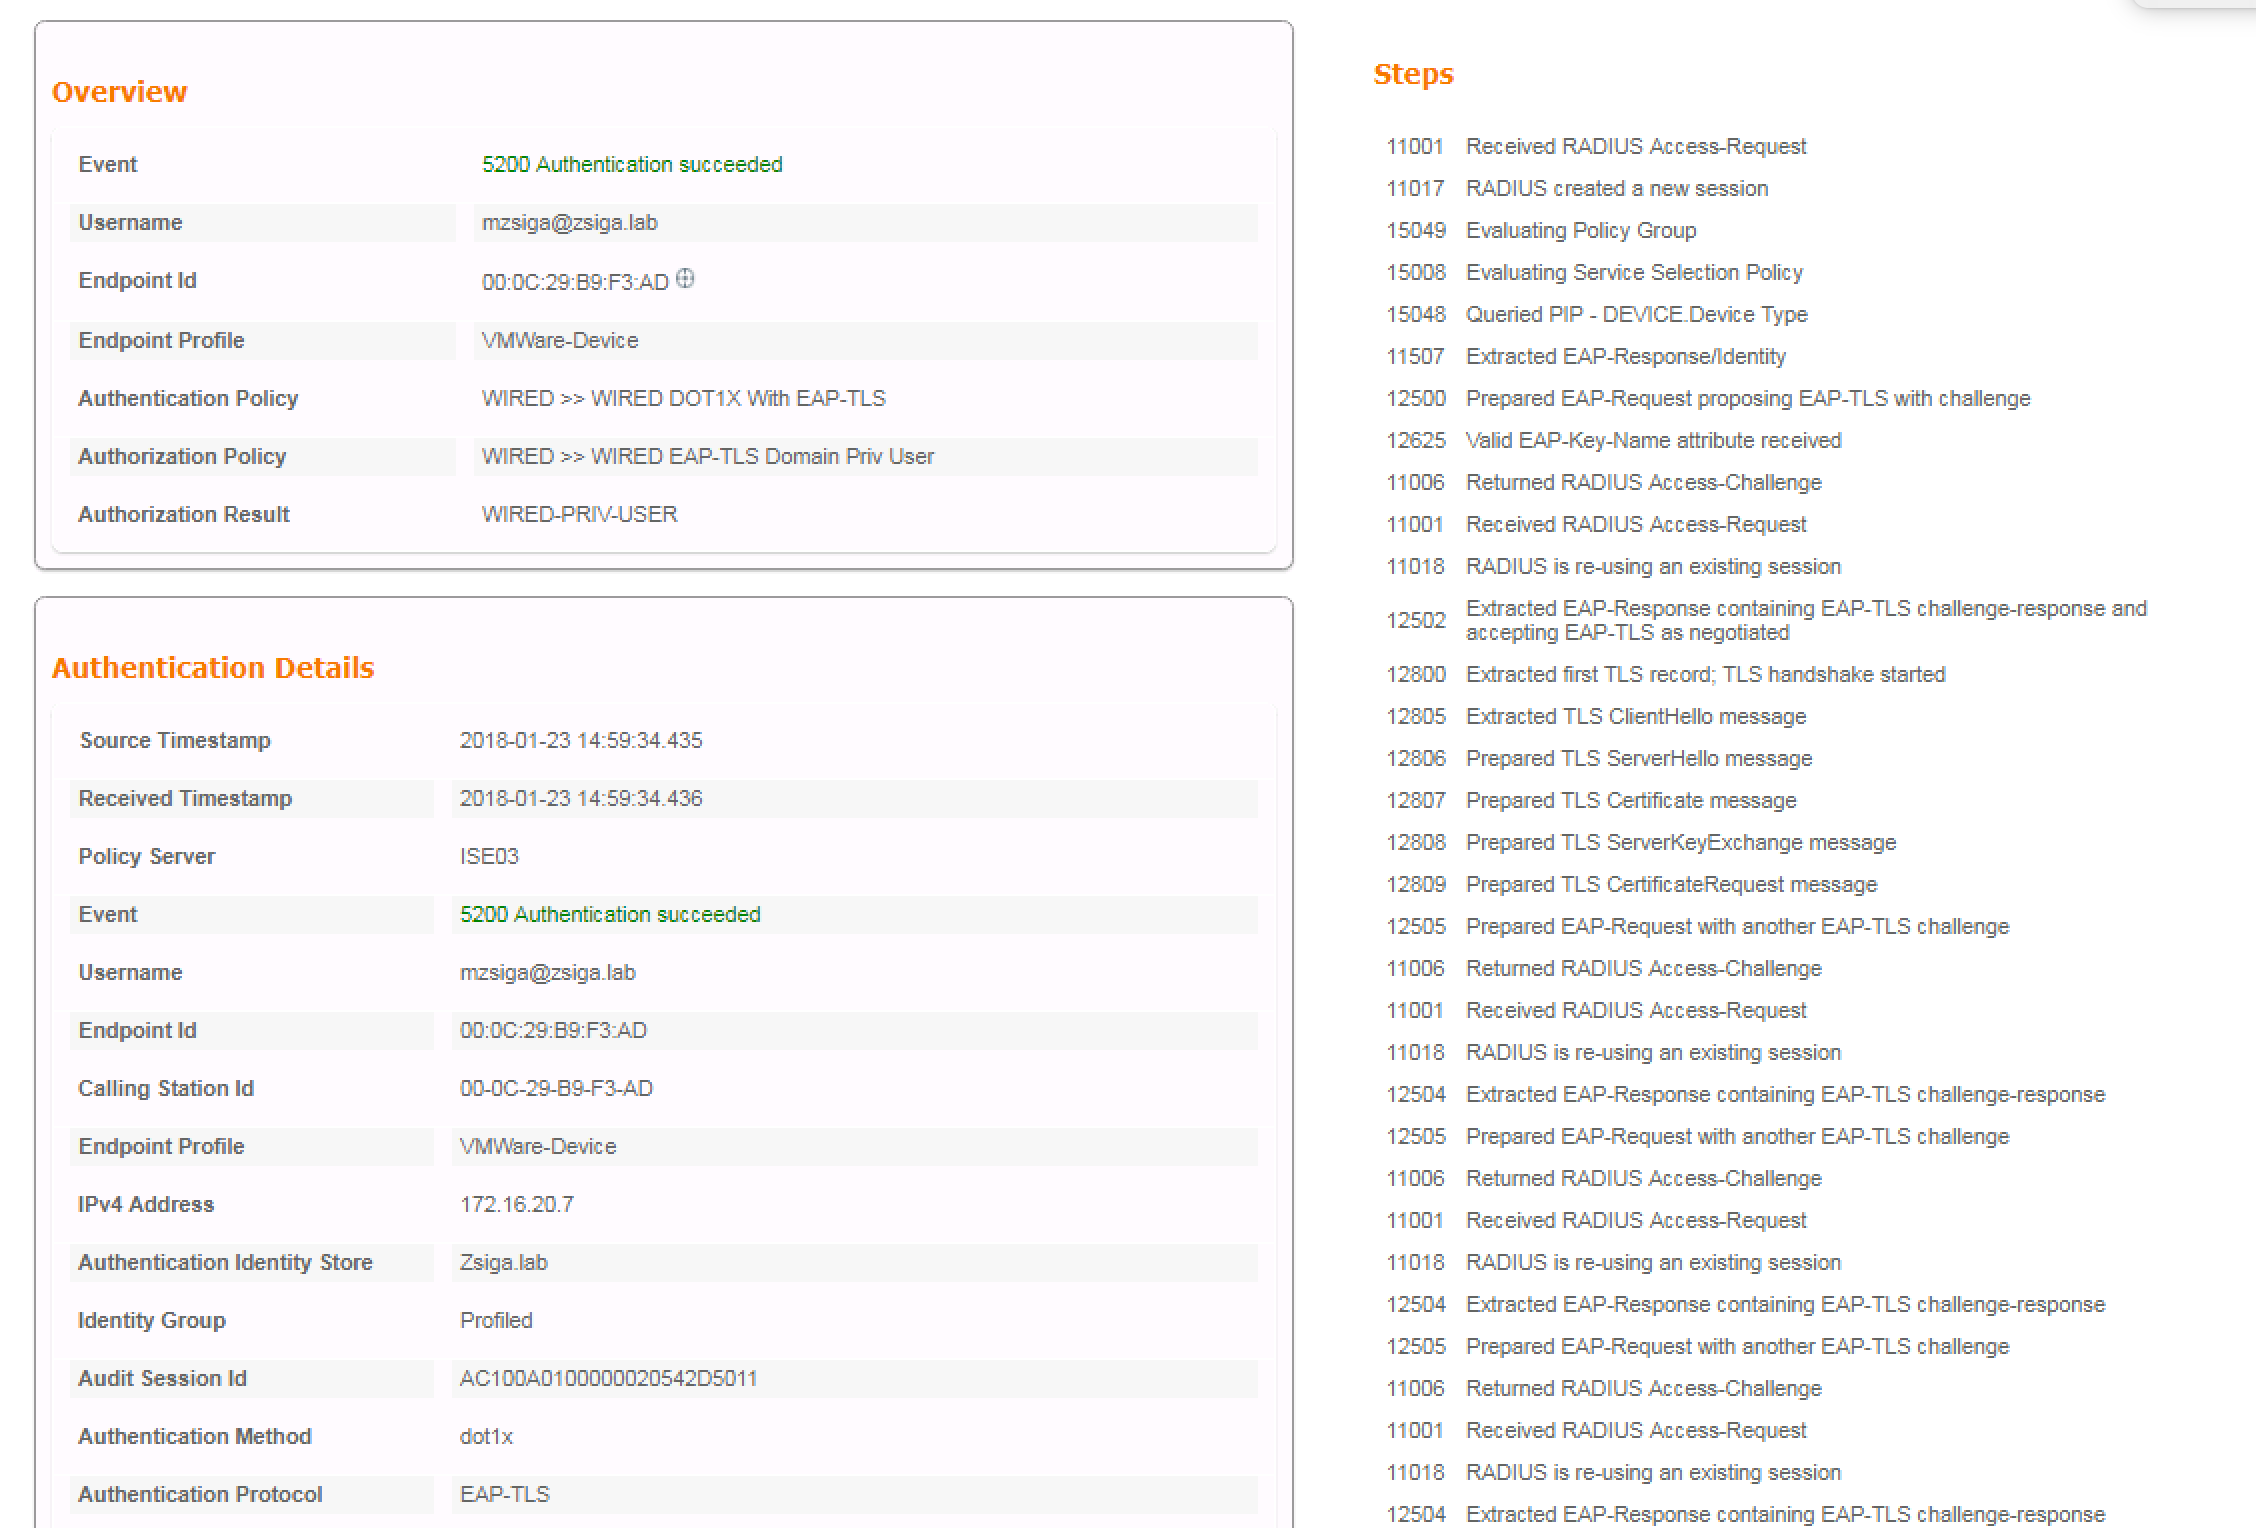
Now we must look at our ISE Radius Live Logs to see how exactly did our Test VM authenticate. In the below screenshot we can see that our Test VM hit the newly created Cisco ISE EAP-TLS Domain PC use case and if we look to the far right we can see the authentication method is EAP-TLS!!! If you do not see this authentication column you might need to add it, or you can also select the details page for one of the successful sessions. Take a look at the next two screenshots that show each of these views respectively.

Now that we have validated our Domain PC EAP-TLS Use case, let’s login with our Domain User Account to see if it also uses EAP-TLS to authenticate.
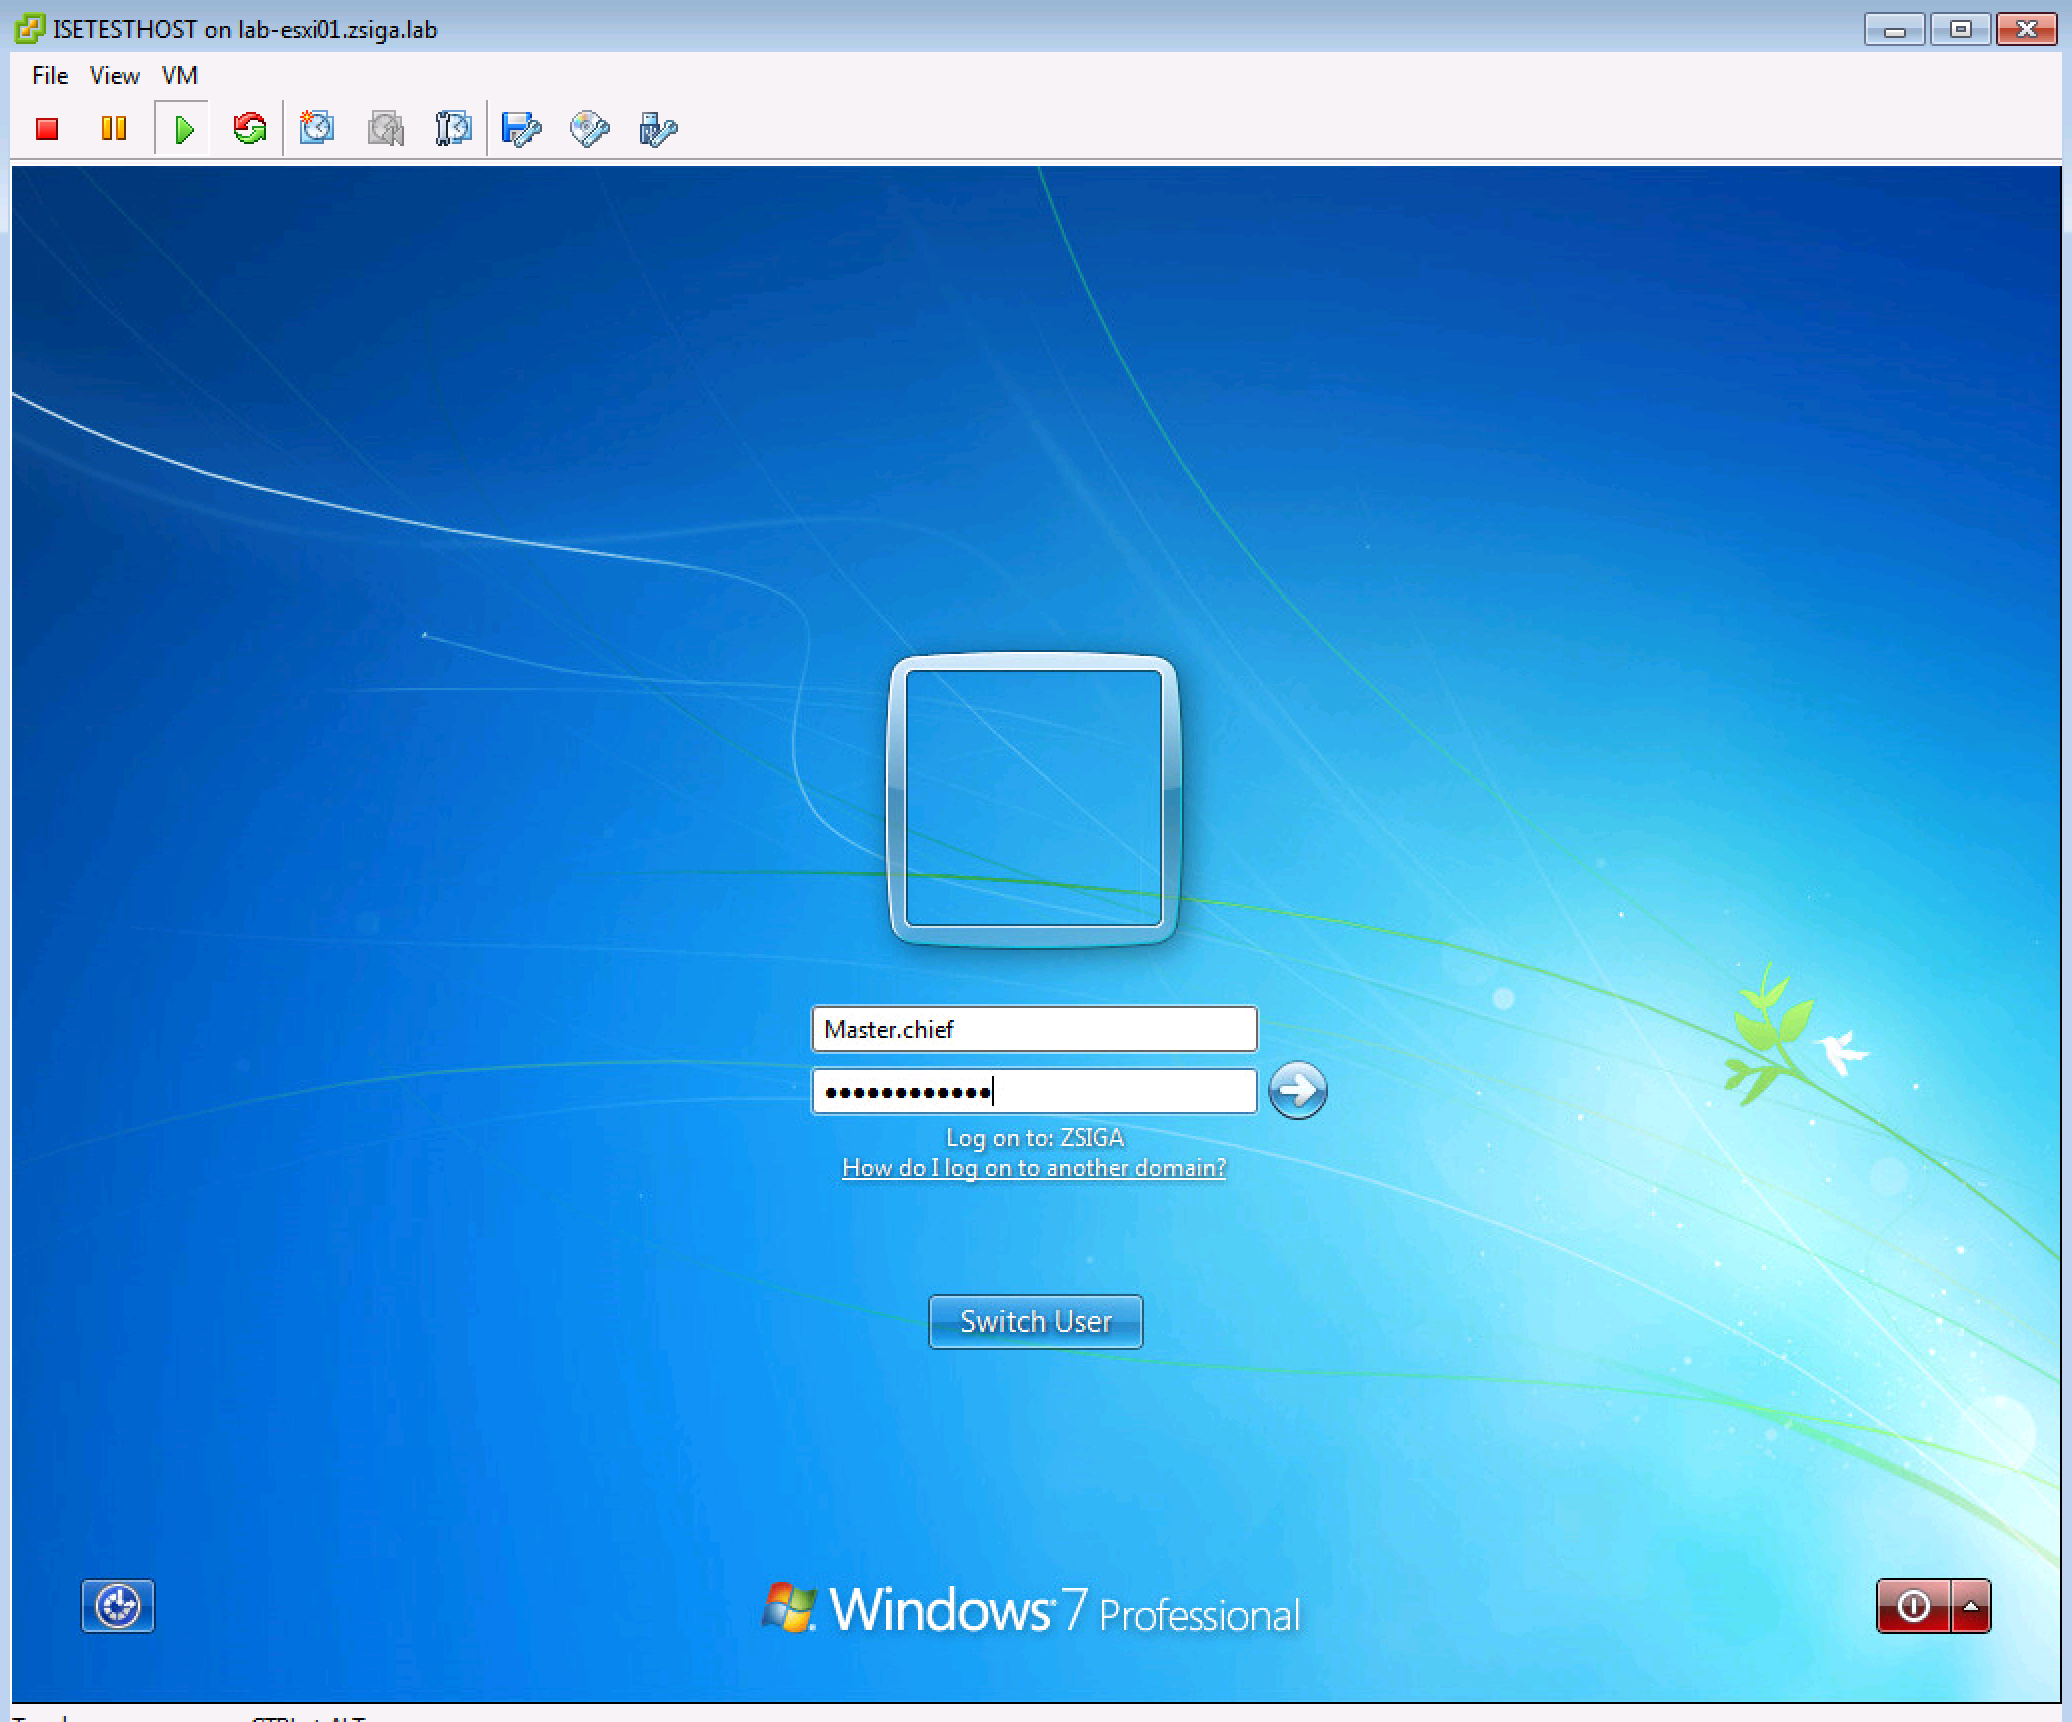
Once you’ve supplied your Domain User credentials and have hit enter to log in, flip back to our SSH/Telnet session to our Lab Switch and run our favorite command…Show Auth Sessions!! As we’ve been getting used to now, we should see a successful 802.1X authentication on the switch side of things, with the proper dACL downloaded and applied.
For us to fully validate this Use Case, we need to check the ISE Radius Live Logs and then complete our test plan.
In our ISE Radius Live Log, we should see the same successful authentication for our Domain User Use case, and if we look in the Authentication Column, we should see EAP-TLS, and we do! We are rocking and rolling today!!

Now for our testing plan. We are going to attempt to ping 8.8.8.8 and 172.16.2.1. The first one should work and the second one should not. As expected this is the case and it is shown in the below screenshot!

Now let’s just attempt to browse to a website on the interwebs! To keep it consistent let’s browse to https://Zigbits.tech! Well look at that, it worked!
One more Cisco ISE EAP-TLS Use Case to validate. If you haven’t already, go ahead and log out of your Test VM, or reboot it. You should hit the Domain PC EAP-TLS Use Case one more time in any case, but we will not re-validate it again here.
Go ahead and login with a Privilege User Account and flip one more time to our SSH/Telnet session to our Lab Switch.
When we issue our Show Auth Sessions command, we will see that our Privilege User Authenticated via 802.1X and received the proper dACL from our ISE Cluster.

As we move over to our ISE Radius Live logs we will see the same successful Authentication and that the session used EAP-TLS to authenticate!

Now for our test plan one more time. We will attempt to ping 8.8.8.8 and 172.16.2.1, and they should both work. As Expected, they do and it is shown in the below output!

Our final test like always is to browse to https://zigbits.tech, which is successful!

That’s a wrap!!! We have all of our Wired PEAP-MSCHAPv2 and Cisco ISE EAP-TLS Use Cases deployed, validated, and in working order! Now, all we have left to accomplish for our Wired Use Cases are our MAB specific endpoints!
Come hangout with Zig and the rest of the Zigbits community in our Discord Server.
More Content for you to enjoy!

Do you need a CCIE to get the CCDE?
Do you need a CCIE, spending all of the time and resources in that process ...

Get Your License To Design with the CCDE – ZNDP 094
Show Notes Coming Soon. Show Notes Coming Soon. Come hangout with Zig and the rest of the ...

From An Architect to a People Leader with Damon Abruzere – ZNDP 093
This is going to be a similar show theme as our Demystifying Role series, but ...

Global Scale Network Design with Malcolm Booden – ZNDP 092
Today we are talking about Network Design but at the Global Scale! What do you ...
How to Make VXLAN Network Designs Simple, Scalable, and Uncomplicated with Lukas Krattiger – ZNDP 091
This is a 100% technical show, we are diving into the weeds on VXLAN and ...

How Abstraction, Orchestration, and True Automation can make your Career Successful with Tim Fiola – ZNDP 090
How Abstraction, Orchestration, and True Automation can make your Career Successful! This is all about making ...