

Hey Friends, Nerds, and Geeks! We are back after a full month’s break. Man life can really get crazy and thats an understatement here. In a months time, we went on a 10 day family Disney vacation, packed everything in our house in NH, sold said house, moved to VT with family, all while the entire family was fighting sickness after sickness. I’m winded from writing all of that! 😉 This isn’t a rant by no means, more of “wow a lot has happened” in a months time.
Well we are back today with ZBISE11, and just to catch everyone up and refresh our minds a little, this installment of our ISE 2.3 Blog Series is on the Cisco VoIP Phone with MAB Auth on Wired Use Case. Such a mouth full that one!! 🙂 Enough updating and talking, lets get into it!
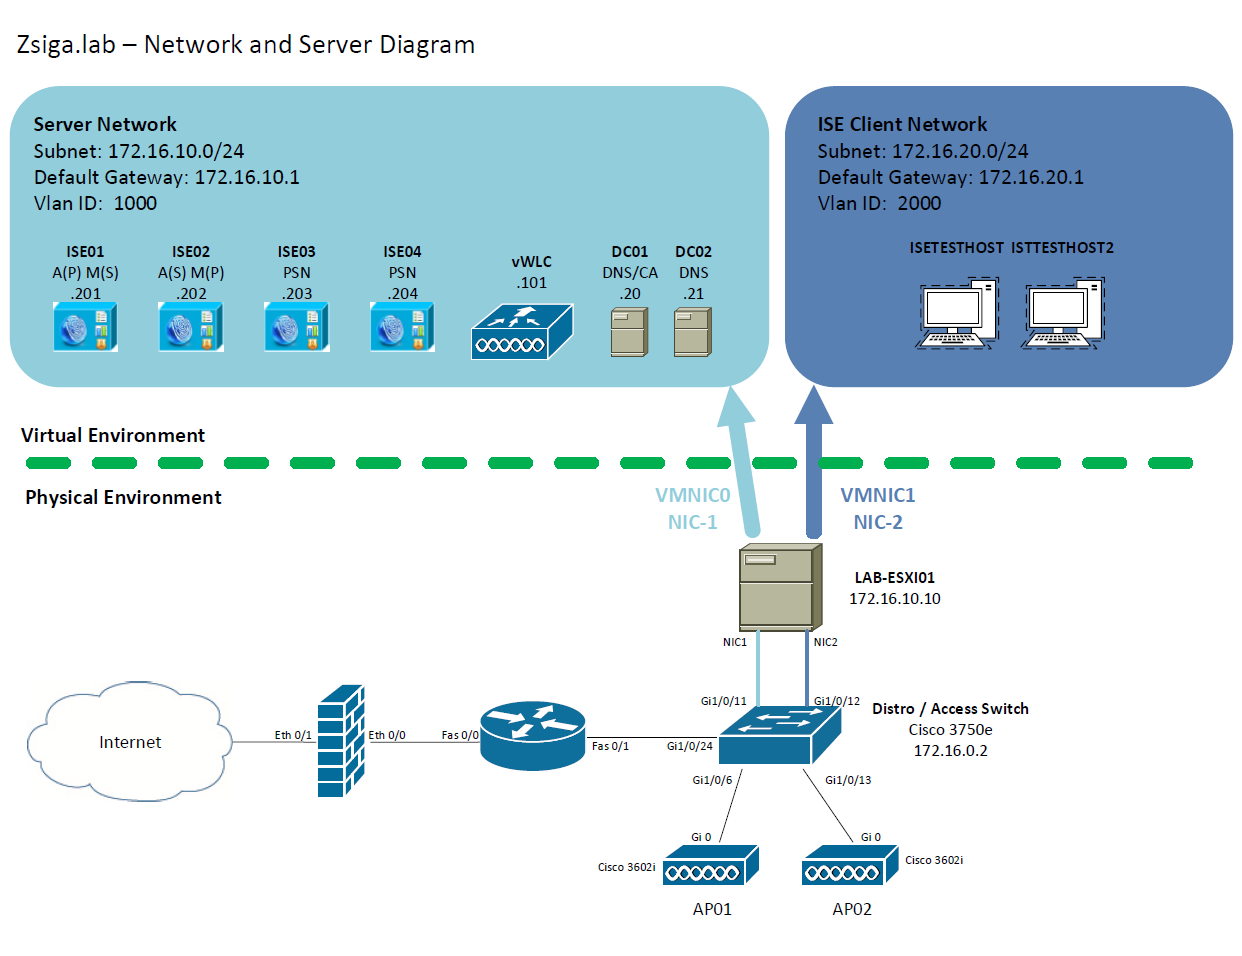
Network and Server Diagram:
Here is our reference diagram that we will be using throughout this blog series.
Related Posts:
If you haven’t seen these posts yet, you should check them out
- ZBISE01 – Basic Cisco ISE 2.3 VM Installation
- ZBISE02 – Building a Cisco ISE 2.3 Distributed Cluster
- ZBISE03 – Overview of our Cisco ISE 2.3 Use Cases for the ZBISE Blog Series
- ZBISE04 – Cisco ISE 2.3 Adding the ISE Cluster to Active Directory
- ZBISE05 – Virtual Wireless LAN Controller (vWLC) Install
- ZBISE06 – Cisco ISE 2.3 Adding Network Access Devices (NADs) – Cisco Switch
- ZBISE07 – Cisco ISE 2.3 Adding Network Access Devices (NADs) – Cisco vWLC
- ZBISE08 – Cisco ISE 2.3 Wired Authorization Profiles
- ZBISE09 – Cisco ISE 2.3 802.1x Auth – PEAP Wired Use Cases
- ZBISE10 – Cisco ISE 2.3 802.1x Auth – EAP-TLS Wired Use Cases
Wired Use Cases
Here is our Wired Use Cases table for reference as we go through today’s installment of creating our Cisco VoIP Phone MAB Auth Use Case!

The Steps!!
1. Create our ISE Policies for our Cisco VoIP Phone Use Case
Here we are again but this time we are implementing our Cisco VoIP Phone Use Case.
If you haven’t already, lets log into your ISE Cluster to start creating what is needed for this Use Case!!
Log into your ISE Cluster
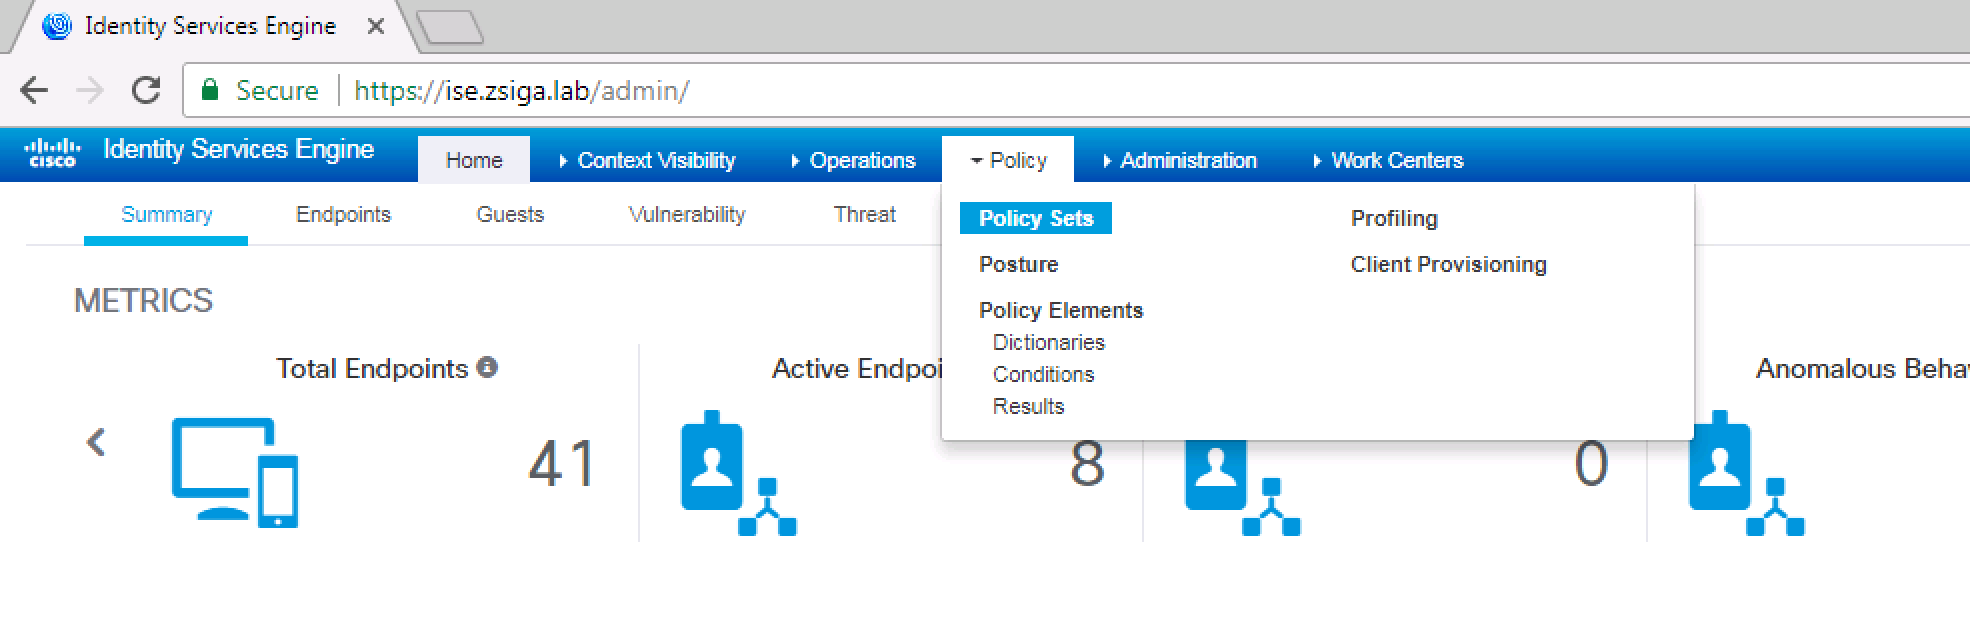
Traverse to Policy -> Policy Sets, which is shown below.
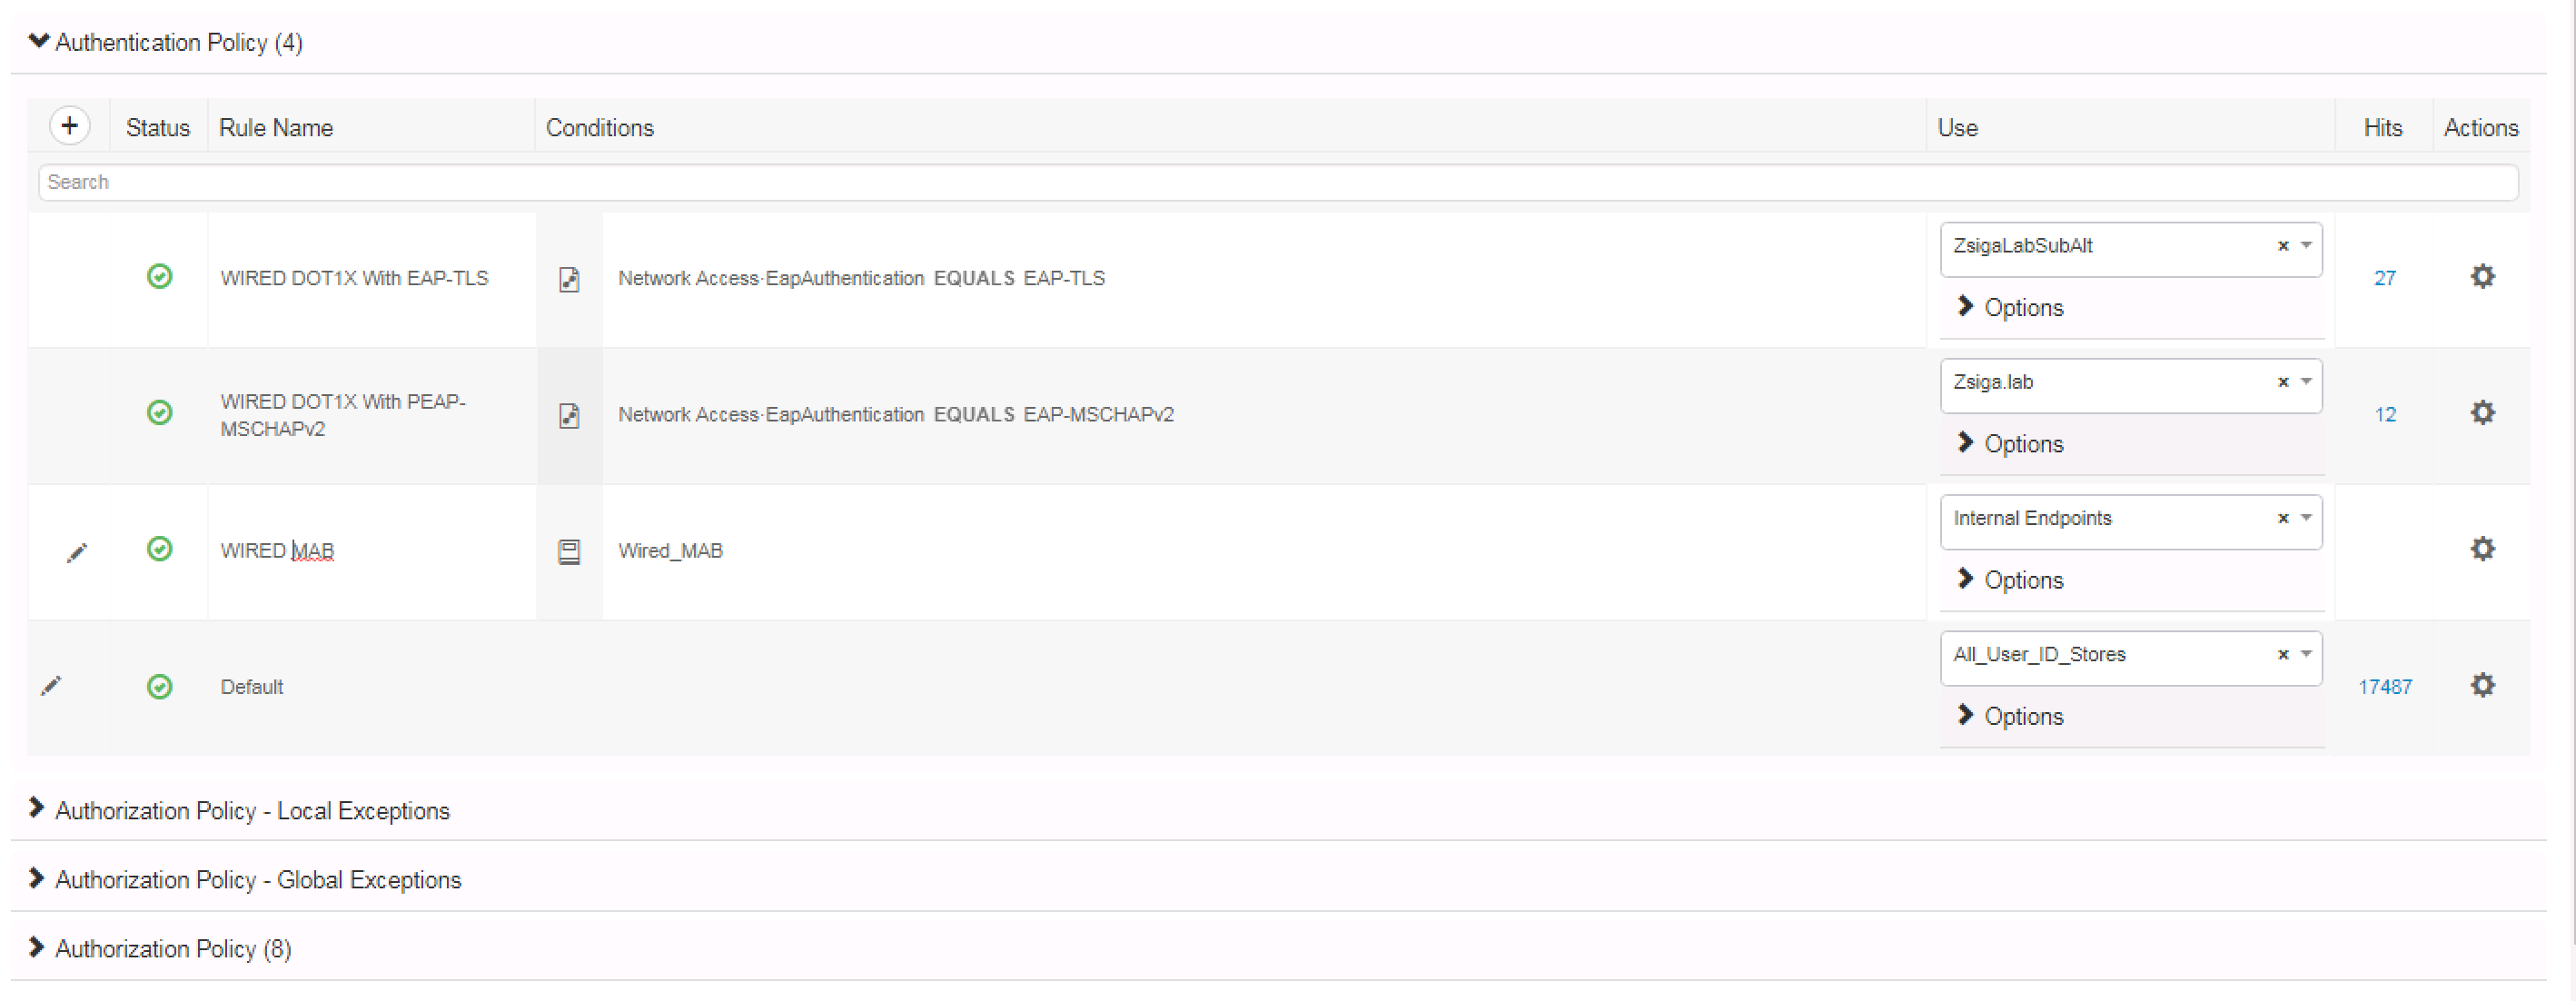
First we need to add an Authentication rule in our Authentication Policy in our Wired Policy Set to account for MAB Authentication. This rule should match Wired_MAB and should use the Internal_Endpoints Identity store. As you can see in the below screenshot, our rule is named WIRED MAB and is configured as mentioned above.
Now that we have our MAB Authentication Rule configured, we need to add our Authorization rules for this Use Case. For this specific Use Case, we are going to use an internal Endpoint Identity Group called “Cisco-IP-Phone”. This Endpoint Identity Group is used by ISE for all IP Phones that have been identified, or Profiled, as a Cisco IP Phone.
Note: ISE will take information and attributes about a device to then intelligently profile the device based on all collected data. This is called Profiling in ISE and can be a very useful capability. Most of the ISE Deployments I have completed have used some form of Profiling and more than half of them have used Custom Profiles.
Below is a screenshot of the Authorization condition in the editor of our Cisco VoIP Phone Use Case.
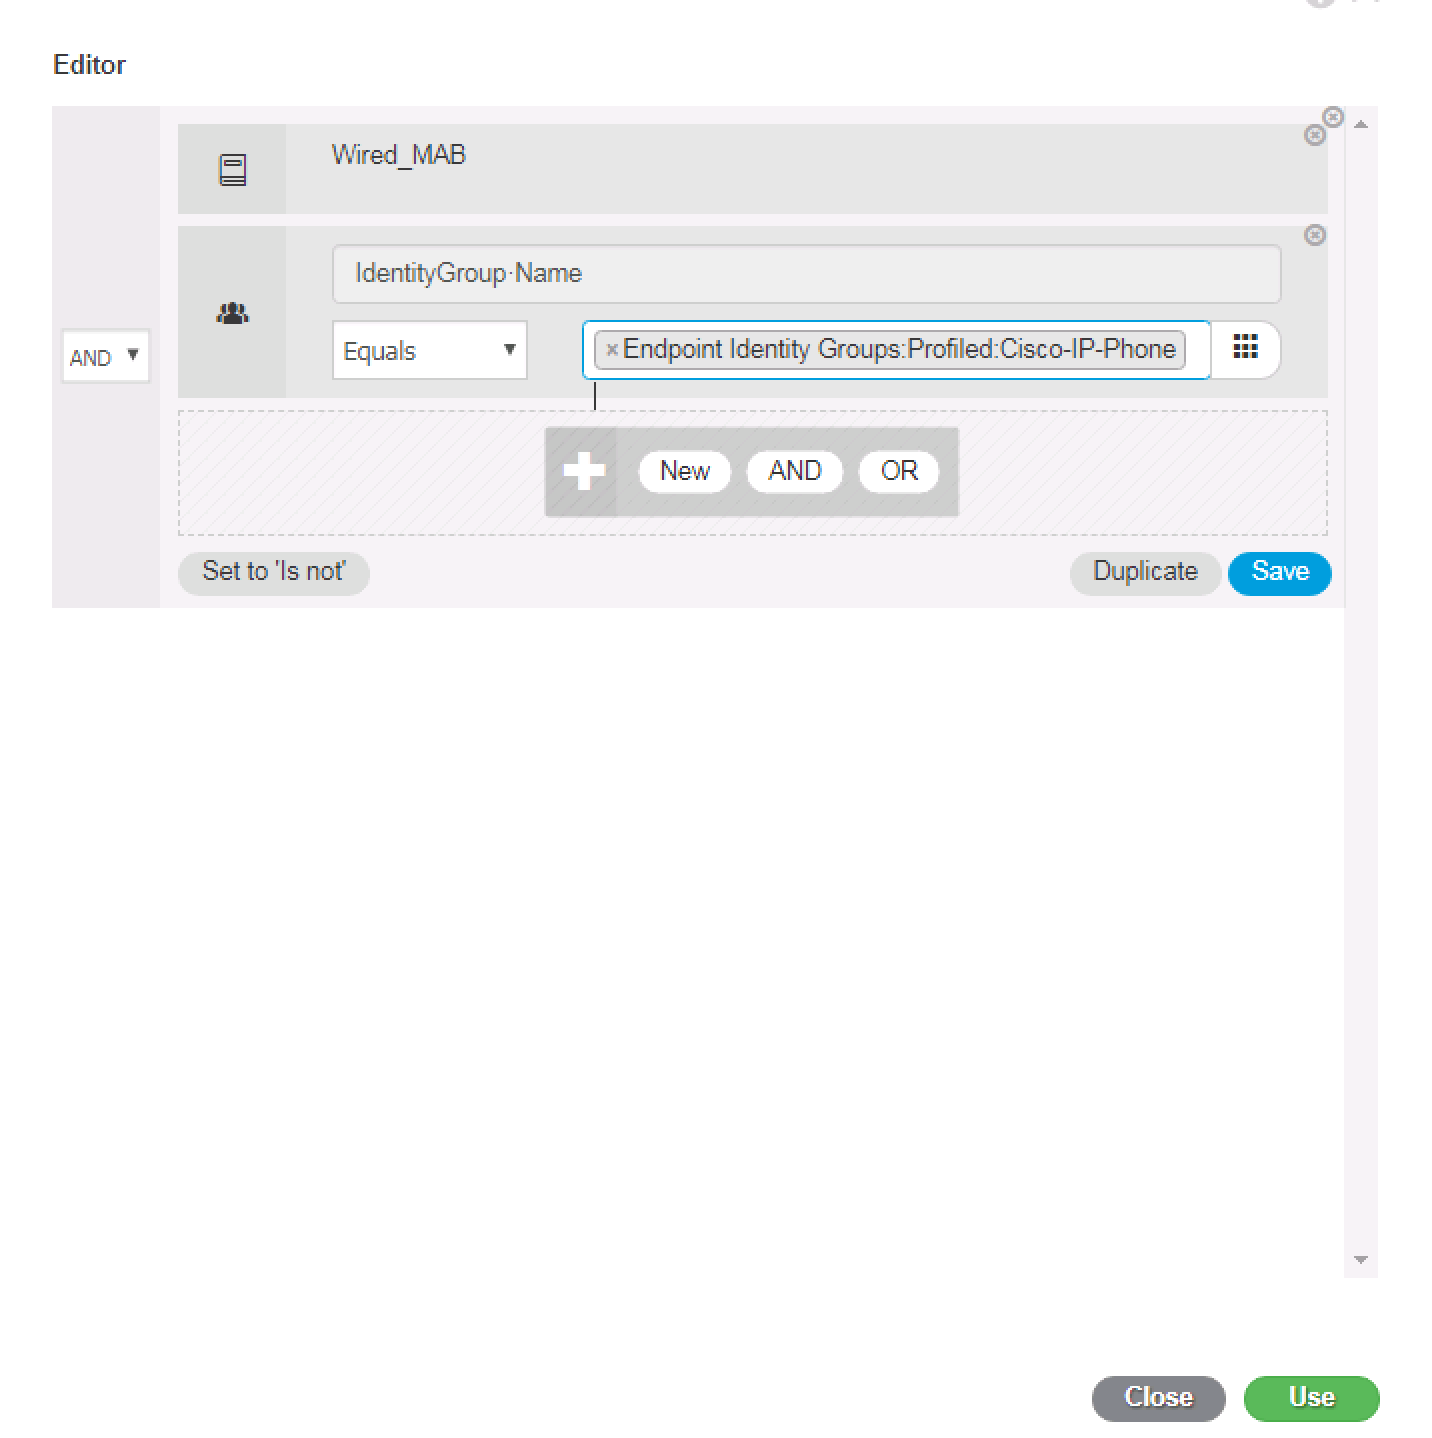
Below is a screenshot of the full Authorization Rule for this use case. We named it WIRED MAB Cisco Voip Phone. The condition reflects Wired MAB and the Profiled Endpoint Identity Group Cisco-IP-Phone. Finally, the Permissions selected is WIRED-VOIP-PHONE which we created in ZBISE08. Click Save when your rule is fully configured as you would prefer it to be.
![]()
Now on to Step # 2!!!! 🙂
2. Configure our Switchport for ISE…ISE THAT PORT…ISE THAT PORT!!
Now lets take a look at our Cisco VoIP Phone’s switchport on our Lab 3750 Switch. For this Use Case our Cisco VoIP Phone is on Port Gi1/0/18.
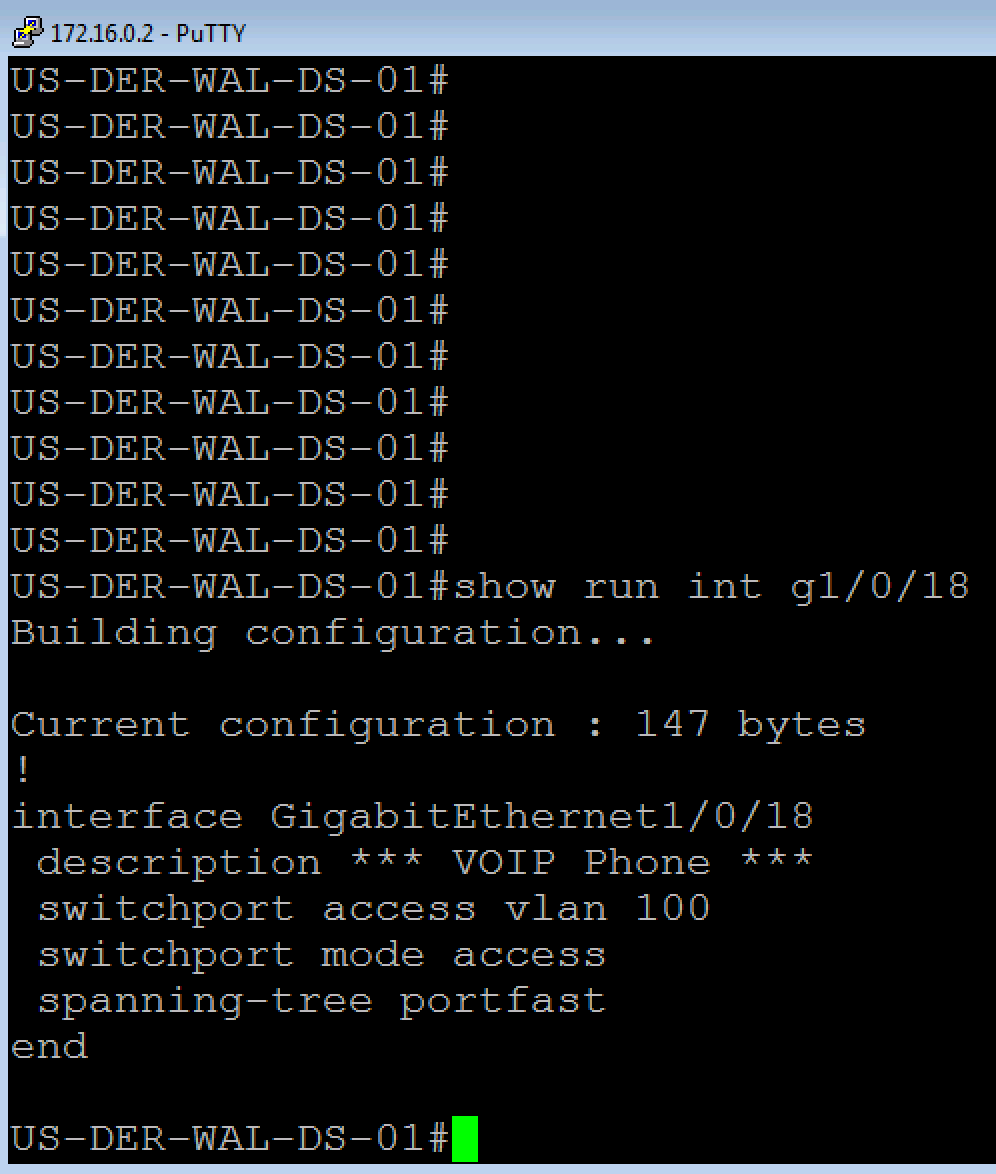
Taking a look at our port, we can see that it has not been ISED yet! Well lets go ahead and ISE that Port!!
Note: For some reason, when I say ISE that port, I feel like we should start chanting: ISE that Port…ISE that Port…ISE that Port! 🙂
Lets pull the ISE Port Configuration from ZBISE06.
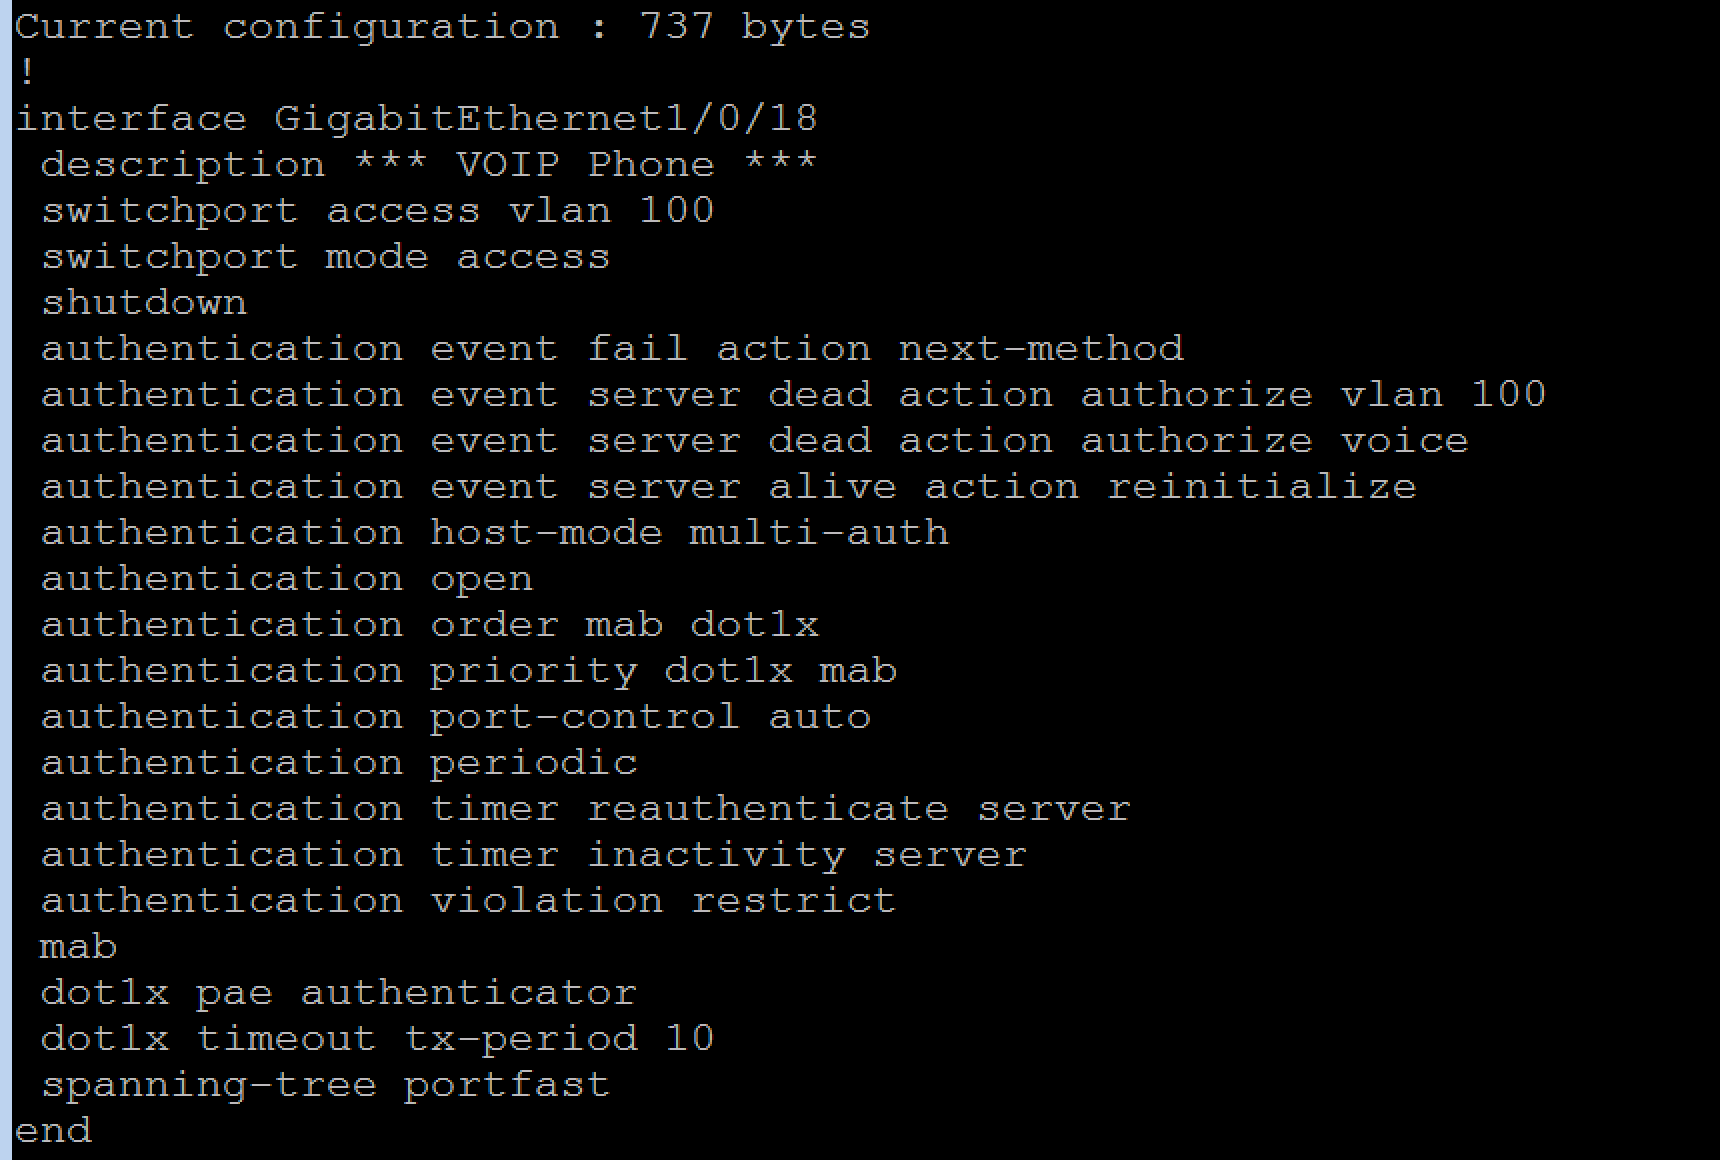
Below is what we are going to use for our ISE Port Configuration minus the vlan ID and the dead action authorize vlan ID which have been changed from 2000 to 100.
switchport access vlan 100
switchport mode access
authentication event fail action next-method
authentication event server dead action authorize vlan 2000
authentication event server dead action authorize voice
authentication event server alive action reinitialize
authentication host-mode multi-auth
authentication open
authentication order mab dot1x
authentication priority dot1x mab
authentication port-control auto
authentication periodic
authentication timer reauthenticate server
authentication timer inactivity server
authentication violation restrict
mab
dot1x pae authenticator
dot1x timeout tx-period 10
spanning-tree portfast
Below, like usual, is a screenshot of our switchport after the ISE Port configuration has been applied.
Now we move into Step # 3!!
3. Validation and Testing of our Use Case
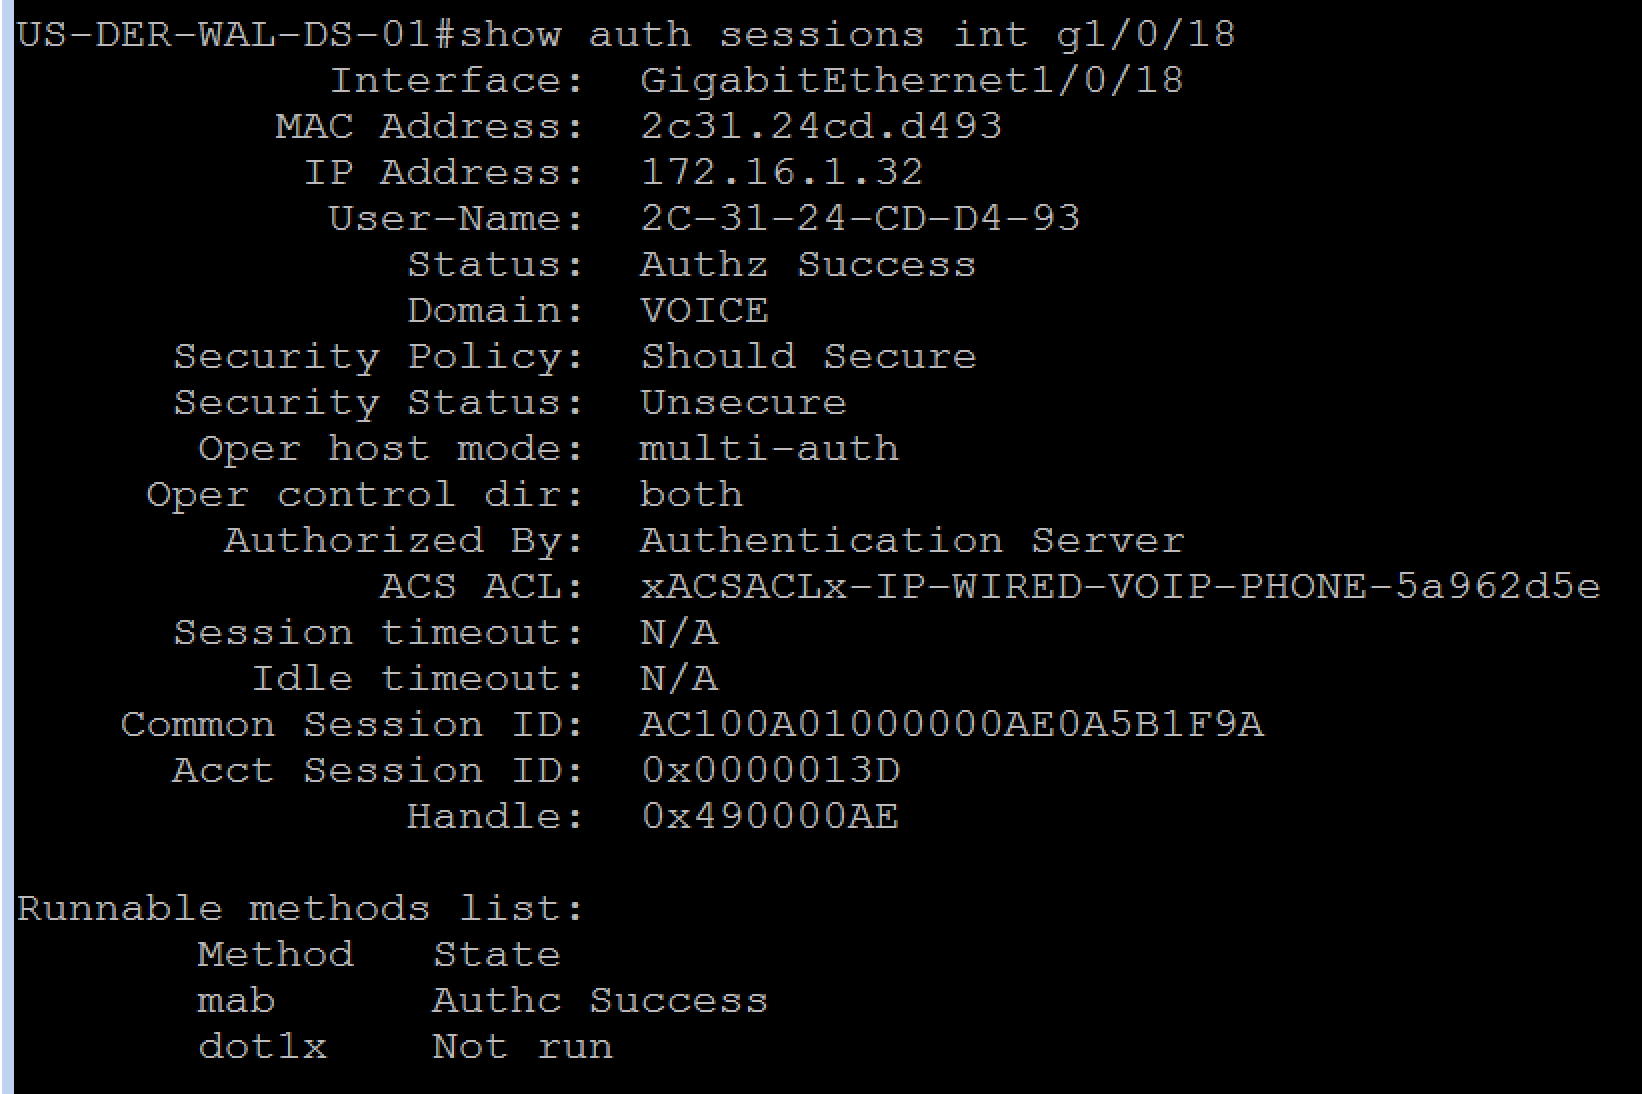
On our Lab switch, lets pull out our favorite CLI command, show auth sessions, to see what is taking place with our port.
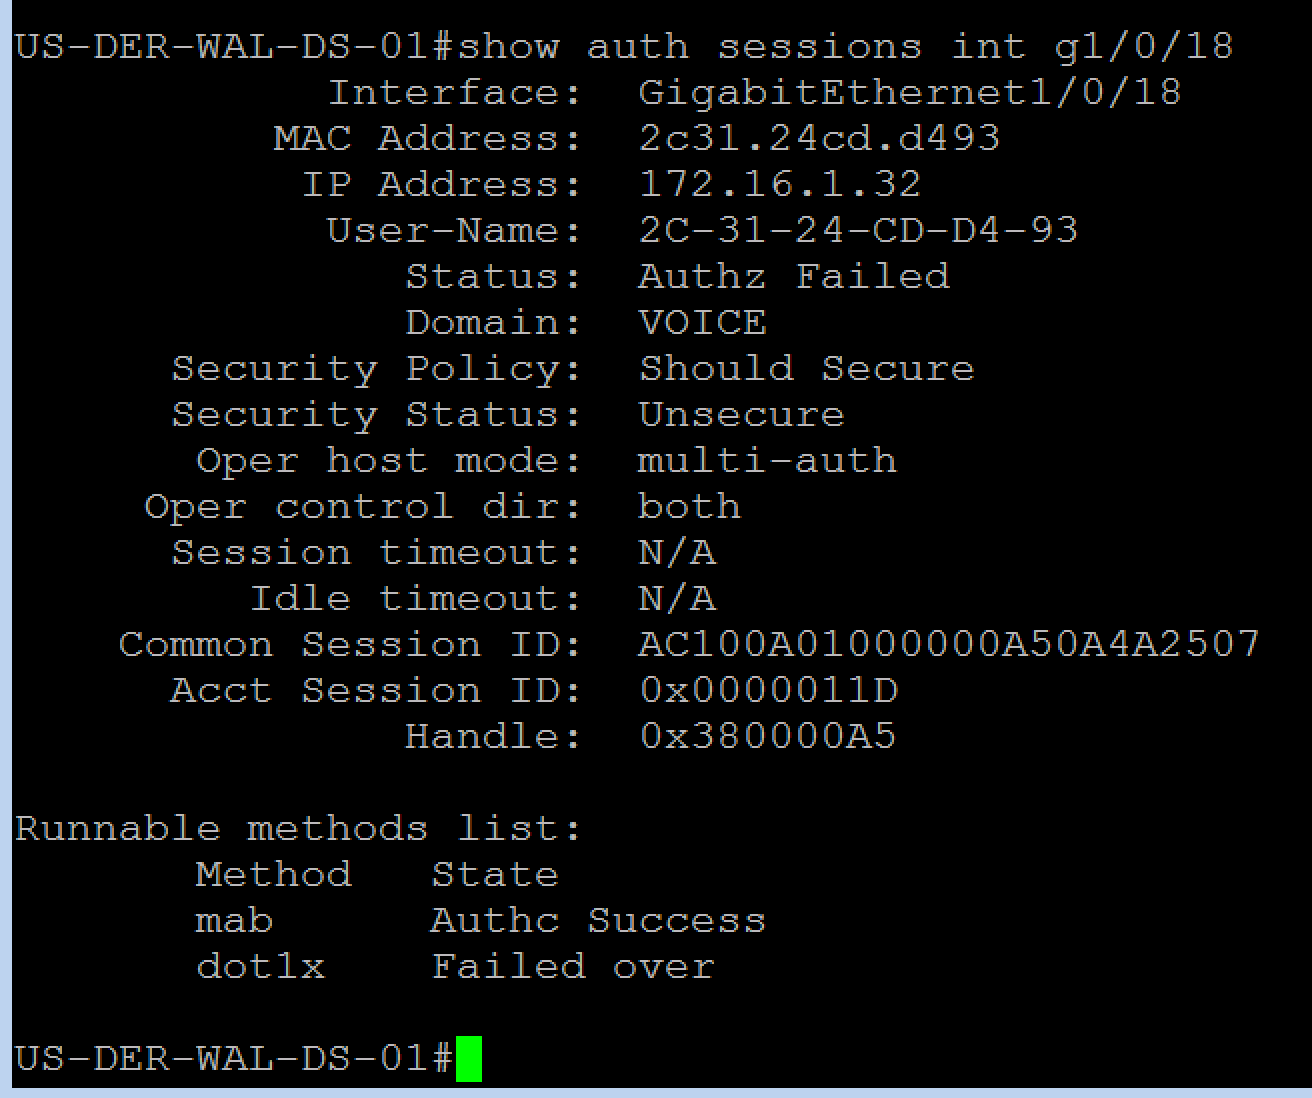
If we take a close look at the output we can see that our Cisco VoIP Phone properly authenticated (AuthC) via MAB and it looks like the Authorization (AuthZ) policy is properly setting the Voice domain permissions, so all seems good doesn’t it?!?!?!
Well this is a common issue that if not noticed could come and bit you later. Even though we see the Voice Domain Permission being applied to this session, we actually have a Authorization (AuthZ) Failed status, this is a key item to look at. Your session might have authenticated fine, but if somethings is wrong with your Authorization Policy as its being applied to the session this is the way you will find out. You might also notice that the dACL we included in our Authorization Policy is not being applied either. Sometimes this is a dACL syntax issue, but in this case its because we do not have a Voice VLAN configured on the switchport.
How can we give the session Voice Domain Permission if there is no Voice VLAN Configured??? Kind of makes sense doesn’t it?
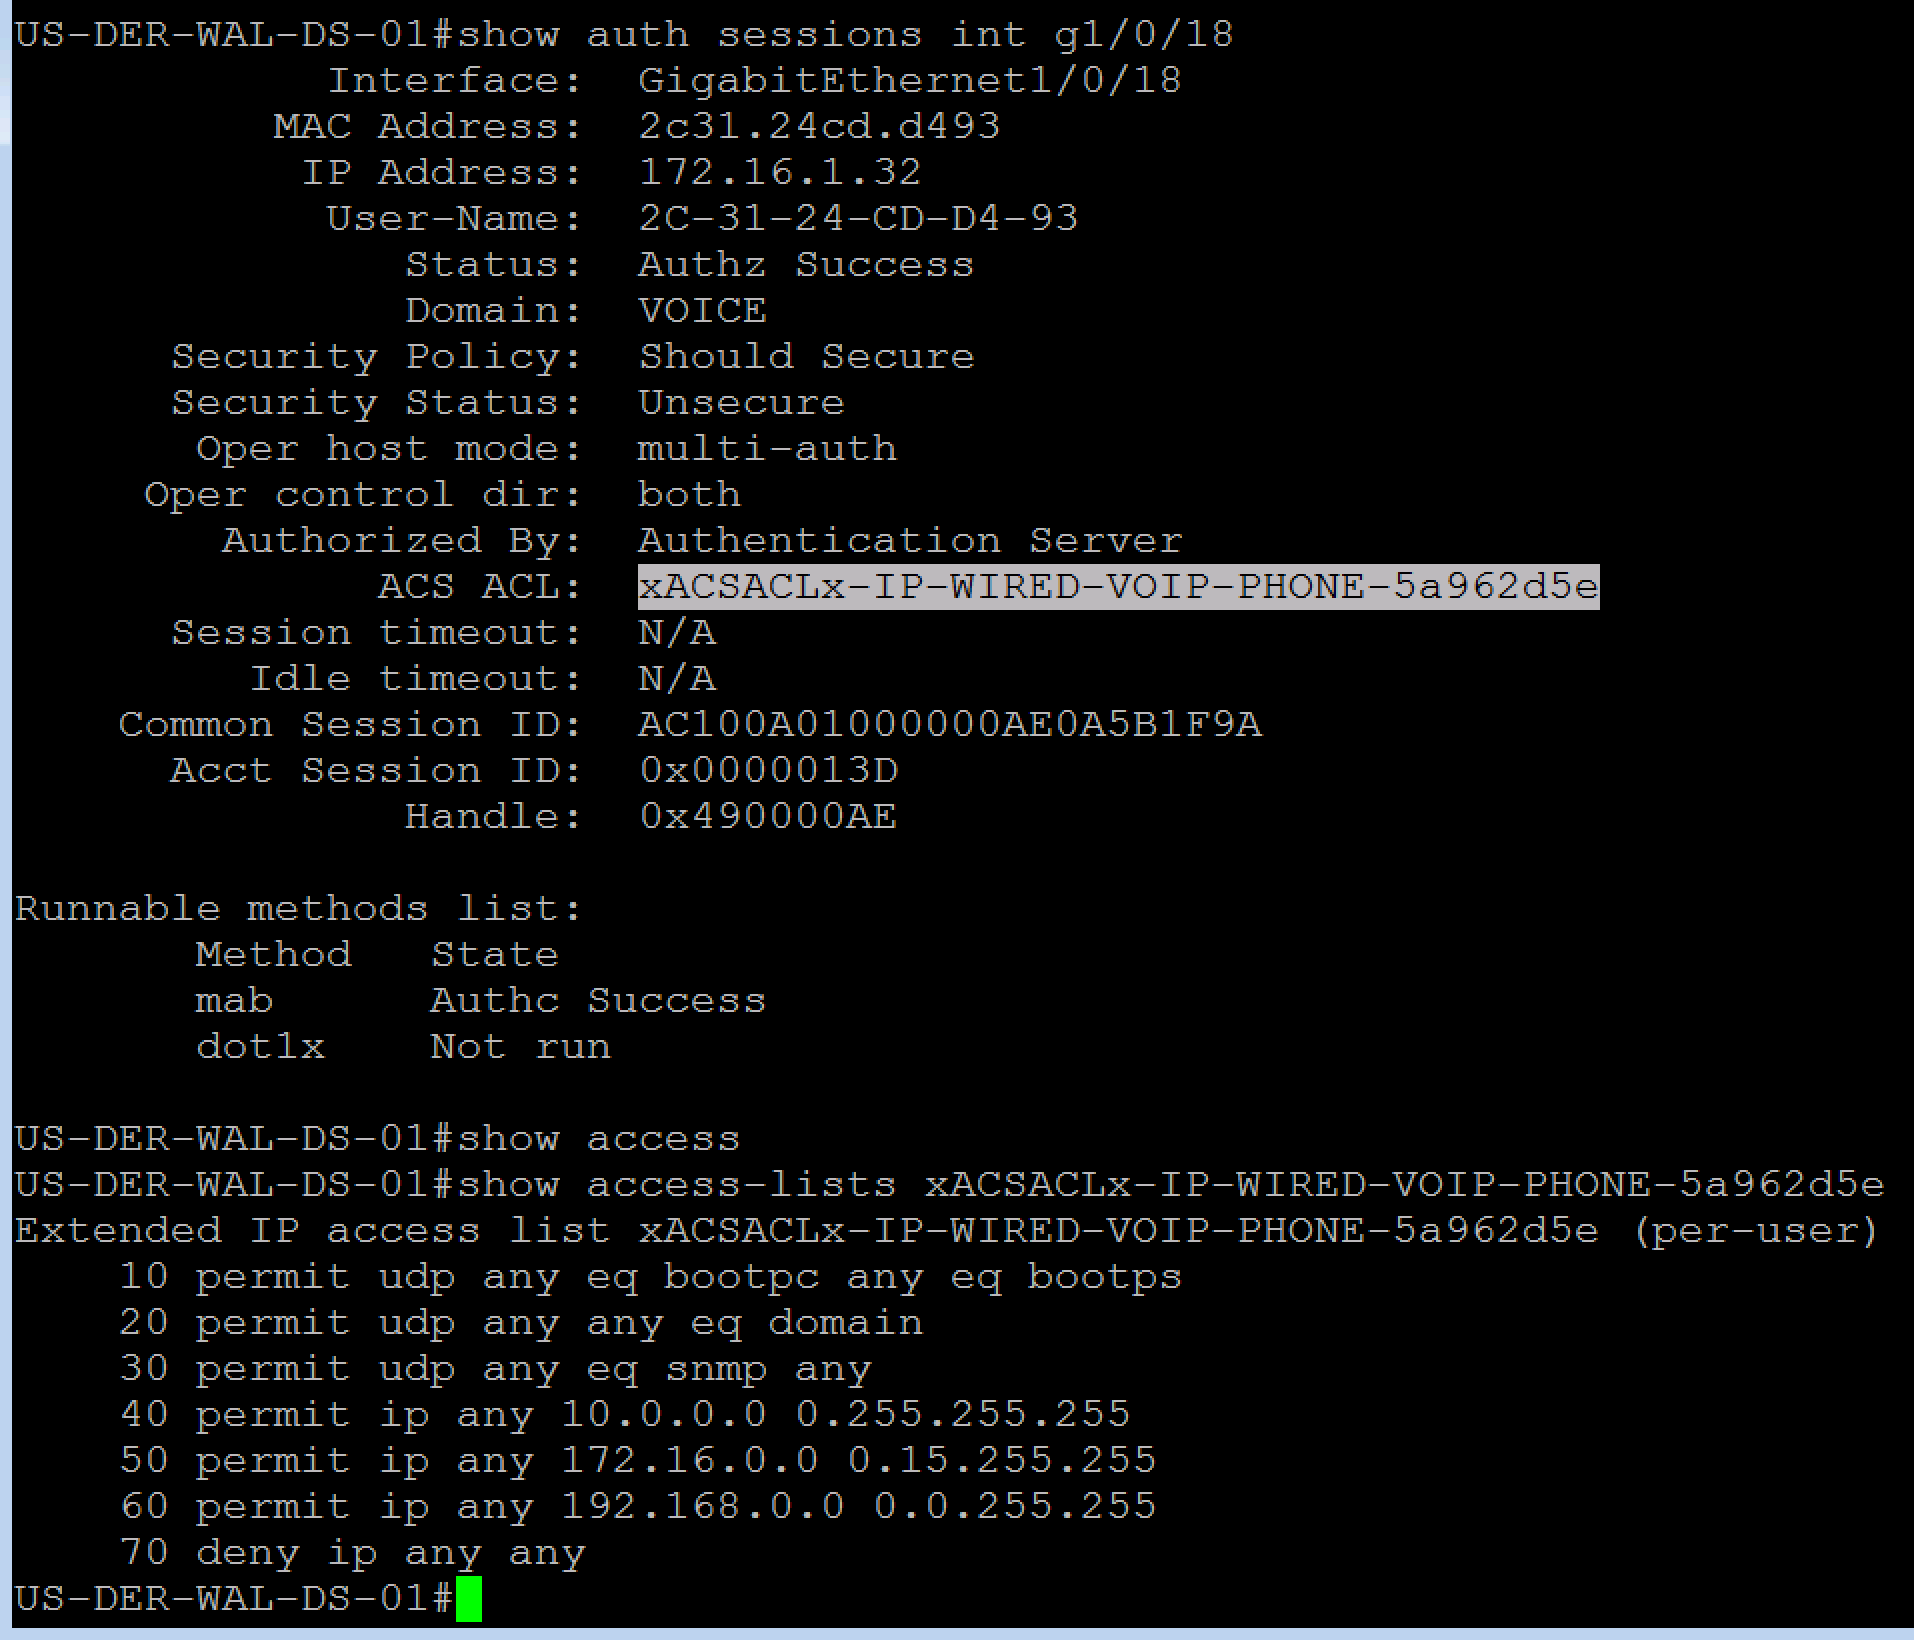
Once we add a Voice VLAN to our switchport and issue show auth sessions again we can see an Authorization (AuthZ) Success, we can see the Voice Domain Permission and the dACL. All of this is shown in the screenshot below.
Like we have been doing, lets make sure the dACL is what we expect it to be…and it is!!
Lets jump over to the ISE Radius Live log side, to view what ISE shows for the authentication session.
![]()
Just like we should see, our Cisco VoIP Phone has been properly authenticated and is hitting the proper Authorization Policy as expected!!
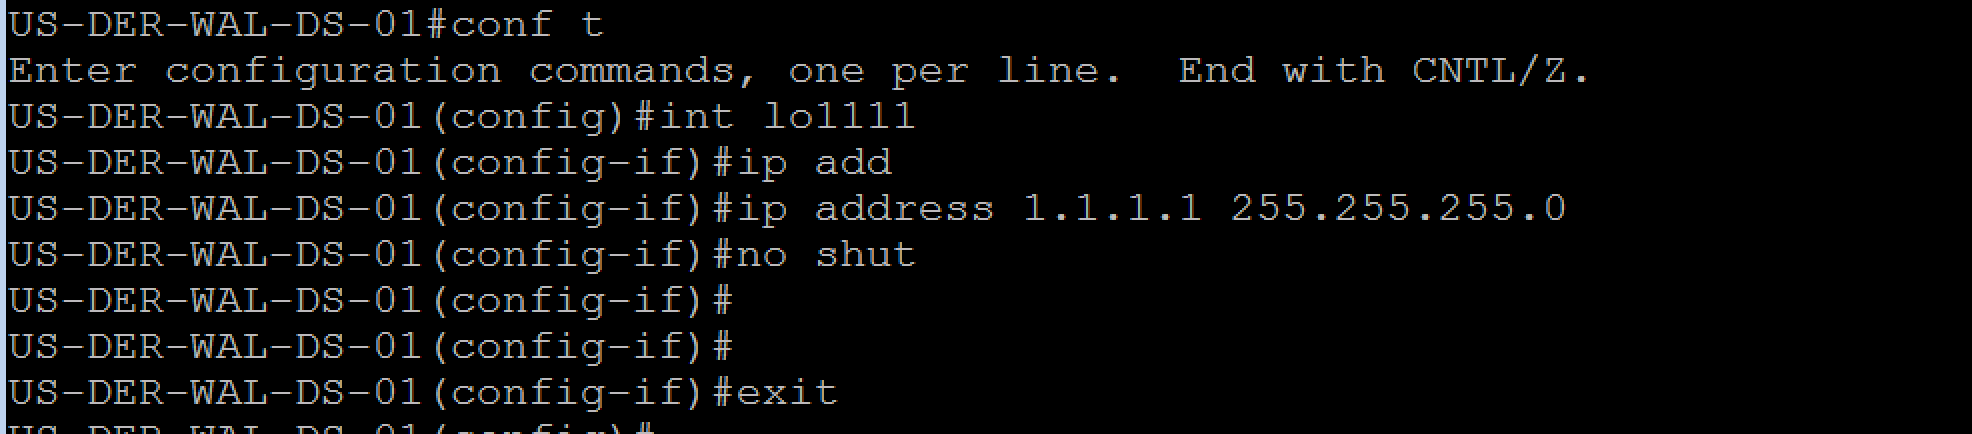
We need to do one more thing, test to make sure our dACL is functioning as expected and blocking external connectivity. To do this we are going to add a Loopback address on our Lab switch that will have an “external” address of 1.1.1.1. This will allow us to source traffic from this address to verify traffic is going to be blocked by our dACL that is applied to the session.
Below is the screenshot where we are adding the Loopback address, Loopback1111.
Now we need to identify what IP Address our Cisco VoIP Phone received on Vlan 200 so we can ping it.
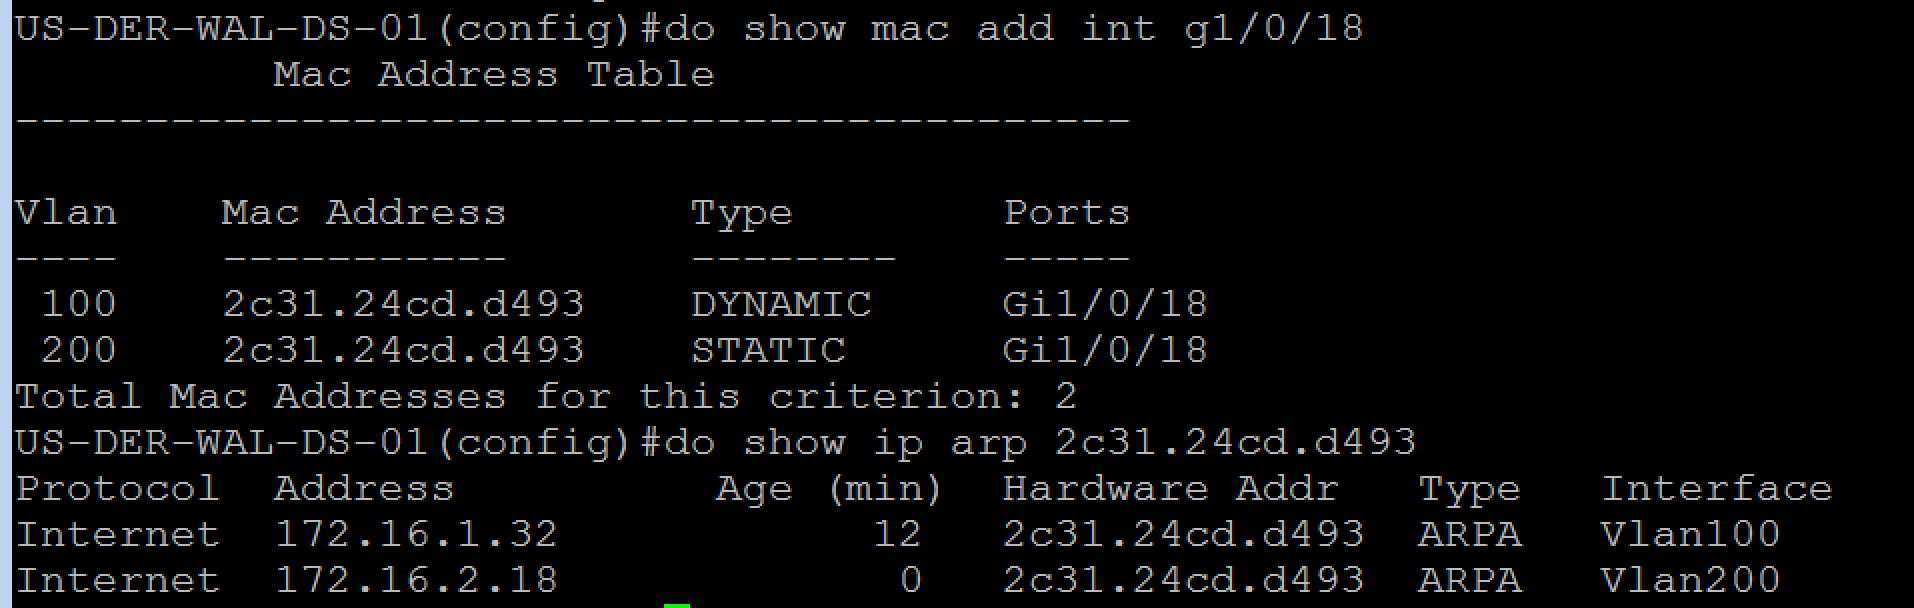
The final step is to ping something on Vlan 200 and source that ping from our Loopback1111. Here we ping the Vlan 200 default gateway which is 172.16.2.1. Then we ping the IP address of our Cisco VoIP Phone which is 172.16.2.18 sourcing the ping from Loopback1111.
In the below screenshot we see that the ping to the Vlan 200 Default Gateway works as expected and we see the ping to the Cisco VoIP Phone does not, as expected!

Thats it for today’s installment! Short, detailed, and sweet! 🙂
Related Resources:
Ask questions and give feedback
- You can leave a comment on the blog!
- You can leave a voicemail at (617) 913-4103
- You can email us at Feedback@zigbits.tech
Engage with Zigbits further:
- Subscribe to the podcast on an iPhone or on an Android
- Follow Zigbits on Twitter!
- Follow Zigbits on LinkedIn!
- Follow Zigbits on Facebook!
Engage with me further:
Transparency:
This post may contain affiliate links to products or services were I may receive a level of compensation from your actions by following those links. This is seamless to you and does not add any additional cost to the products or services in question. In addition, I do not let any affiliate relationship cloud my judgement or my recommendation of a product or service. My recommendations will always be above reproach. This is my commitment to you Ziglets!
Hello Mr ZIG, I am Frederic a young network technician. I am very interested in your tutorial on ISE 2.3. My company has an ISE and I spend some time on it to understand how it works. I admit that thanks to your tutorial I understood a lot of things. My question is how to make an authentication based on the mac address of a device: telephone, cameras, PC, access control. Thank you in advance for your answer.
Hey Frederic,
Thanks for the comment and the question. I’m glad you are finding the content useful and valuable. So this specific post is actually authenticating my Cisco VoIP phone utilizing MAB, or MAC Authentication Bypass, which is what you are looking for. The Cisco MAC Authentication Bypass Deployment Guide has some good information on MAB and how it works, which I would recommend reading through, specifically the introduction section. MAB Auth is useful, but it isn’t the most secure and this needs to be kept in mind when you are designing your specific Use Cases.
Hope this helps. Let us know how things go and if you have any other questions.
R/S
Zig